2017 FORD TAURUS display
[x] Cancel search: displayPage 109 of 504

Remote Start
ActionMessage
A reminder to apply the brake and push the gearshift buttonto drive your vehicle after a remote start.To Drive: Press Brakeand Gear Shift Button
Seats
ActionMessage
A reminder that memory seats are not available while driving.Memory Recall NotPermitted While Driving
Shows where you have saved your memory setting.Memory {0} Saved
Starting System
ActionMessage
A reminder to apply the brake when starting your vehicle.To START Press Brake
The starter has exceeded its cranking time in attempting tostart your vehicle.Cranking Time Exceeded
The starter is attempting to start your vehicle.Engine Start PendingPlease Wait
The system has cancelled the pending start.Pending Start Cancelled
Tire Pressure Monitoring System
ActionMessage
One or more tires on your vehicle have low tire pressure. SeeTire Pressure Monitoring System (page 287).Tire Pressure Low
The tire pressure monitoring system is malfunctioning. If thewarning stays on or continues to come on, contact anauthorized dealer. See Tire Pressure Monitoring System(page 287).
Tire Pressure MonitorFault
A tire pressure sensor is malfunctioning, or your spare tire isin use. If the warning stays on or continues to come on, contactan authorized dealer as soon as possible. See Tire PressureMonitoring System (page 287).
Tire Pressure SensorFault
106
Taurus (CPH) Canada/United States of America, enUSA, First Printing
Information Displays
Page 110 of 504
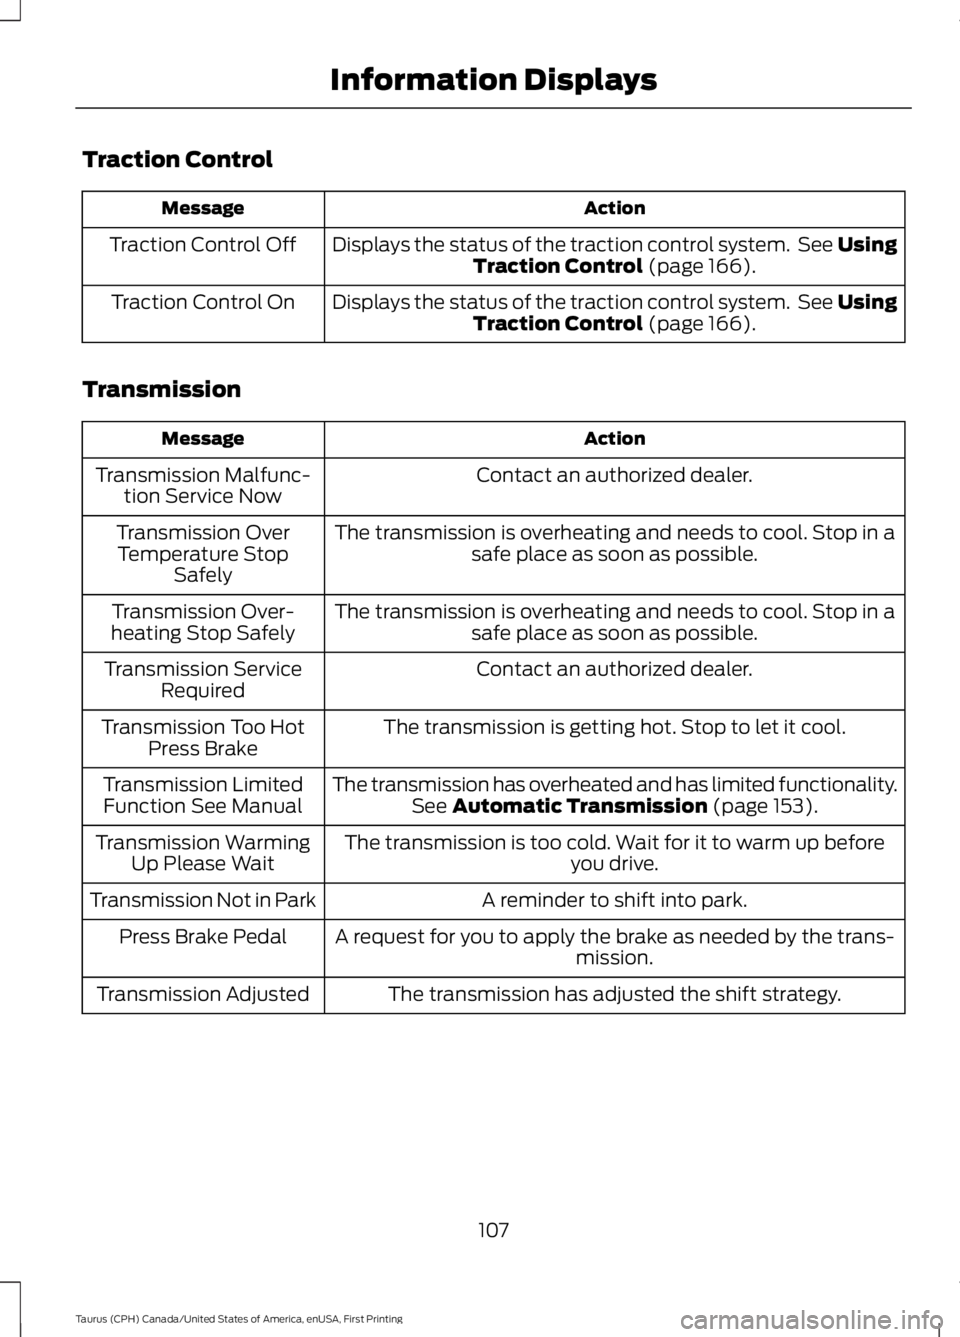
Traction Control
ActionMessage
Displays the status of the traction control system. See UsingTraction Control (page 166).Traction Control Off
Displays the status of the traction control system. See UsingTraction Control (page 166).Traction Control On
Transmission
ActionMessage
Contact an authorized dealer.Transmission Malfunc-tion Service Now
The transmission is overheating and needs to cool. Stop in asafe place as soon as possible.Transmission OverTemperature StopSafely
The transmission is overheating and needs to cool. Stop in asafe place as soon as possible.Transmission Over-heating Stop Safely
Contact an authorized dealer.Transmission ServiceRequired
The transmission is getting hot. Stop to let it cool.Transmission Too HotPress Brake
The transmission has overheated and has limited functionality.See Automatic Transmission (page 153).Transmission LimitedFunction See Manual
The transmission is too cold. Wait for it to warm up beforeyou drive.Transmission WarmingUp Please Wait
A reminder to shift into park.Transmission Not in Park
A request for you to apply the brake as needed by the trans-mission.Press Brake Pedal
The transmission has adjusted the shift strategy.Transmission Adjusted
107
Taurus (CPH) Canada/United States of America, enUSA, First Printing
Information Displays
Page 111 of 504
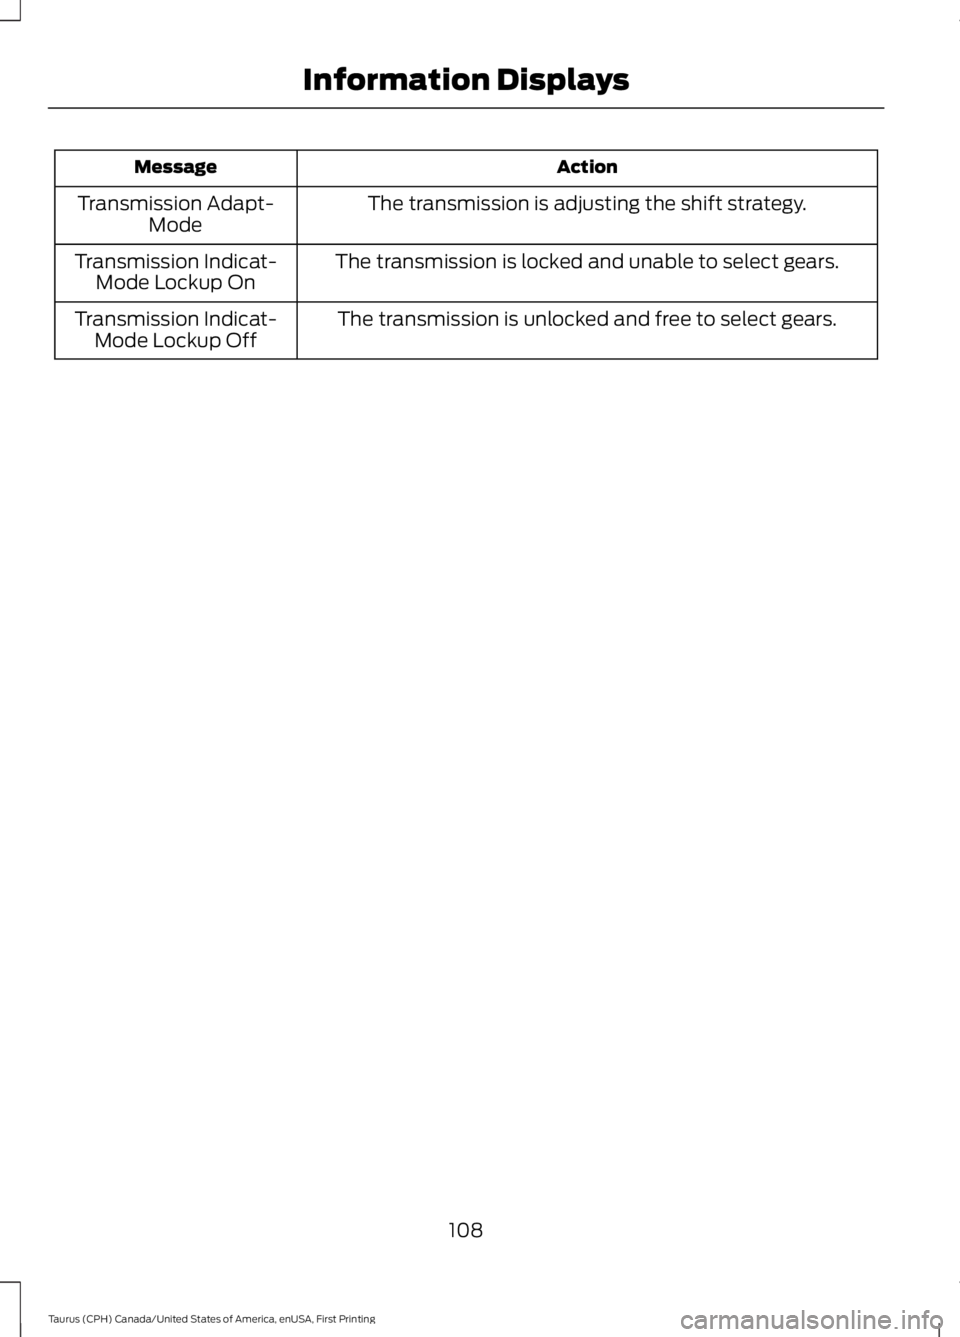
ActionMessage
The transmission is adjusting the shift strategy.Transmission Adapt-Mode
The transmission is locked and unable to select gears.Transmission Indicat-Mode Lockup On
The transmission is unlocked and free to select gears.Transmission Indicat-Mode Lockup Off
108
Taurus (CPH) Canada/United States of America, enUSA, First Printing
Information Displays
Page 113 of 504
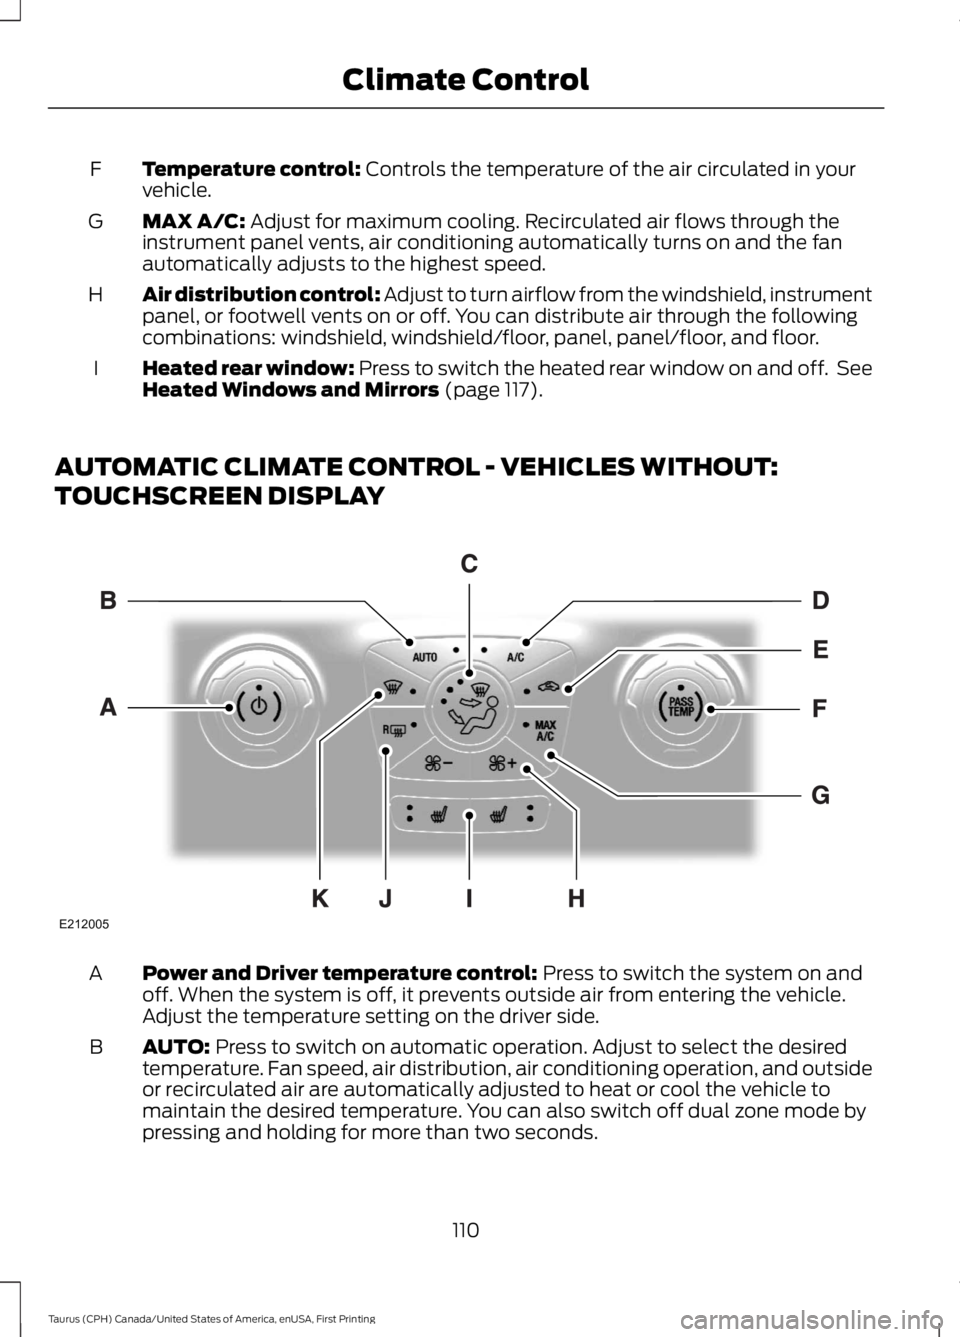
Temperature control: Controls the temperature of the air circulated in yourvehicle.F
MAX A/C: Adjust for maximum cooling. Recirculated air flows through theinstrument panel vents, air conditioning automatically turns on and the fanautomatically adjusts to the highest speed.
G
Air distribution control: Adjust to turn airflow from the windshield, instrumentpanel, or footwell vents on or off. You can distribute air through the followingcombinations: windshield, windshield/floor, panel, panel/floor, and floor.
H
Heated rear window: Press to switch the heated rear window on and off. SeeHeated Windows and Mirrors (page 117).I
AUTOMATIC CLIMATE CONTROL - VEHICLES WITHOUT:
TOUCHSCREEN DISPLAY
Power and Driver temperature control: Press to switch the system on andoff. When the system is off, it prevents outside air from entering the vehicle.Adjust the temperature setting on the driver side.
A
AUTO: Press to switch on automatic operation. Adjust to select the desiredtemperature. Fan speed, air distribution, air conditioning operation, and outsideor recirculated air are automatically adjusted to heat or cool the vehicle tomaintain the desired temperature. You can also switch off dual zone mode bypressing and holding for more than two seconds.
B
110
Taurus (CPH) Canada/United States of America, enUSA, First Printing
Climate ControlE212005
Page 121 of 504
For additional cabin air filter information,or to replace the filter, see an authorizeddealer.
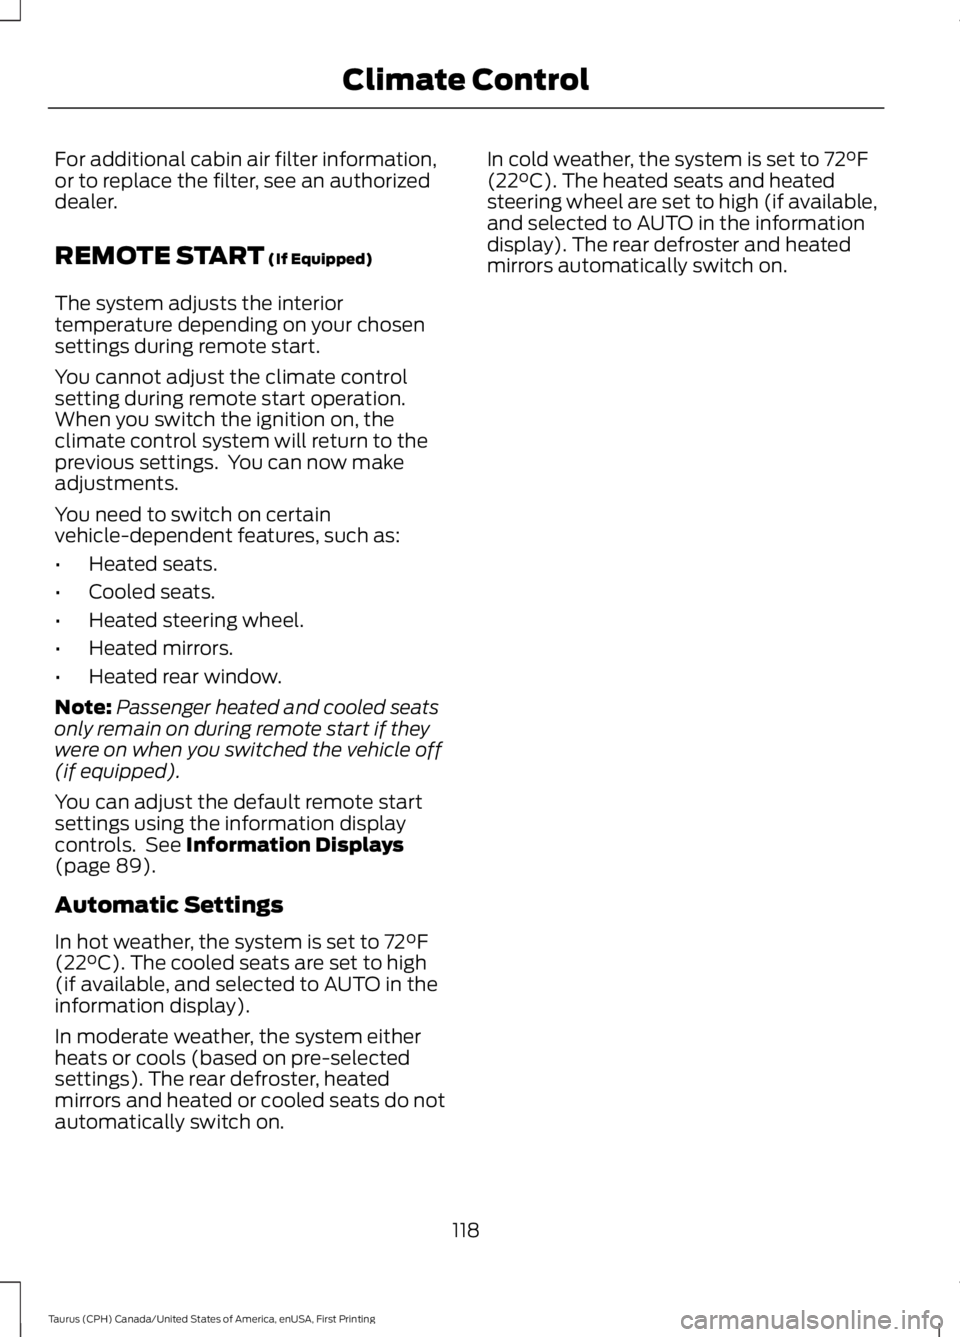
REMOTE START (If Equipped)
The system adjusts the interiortemperature depending on your chosensettings during remote start.
You cannot adjust the climate controlsetting during remote start operation.When you switch the ignition on, theclimate control system will return to theprevious settings. You can now makeadjustments.
You need to switch on certainvehicle-dependent features, such as:
•Heated seats.
•Cooled seats.
•Heated steering wheel.
•Heated mirrors.
•Heated rear window.
Note:Passenger heated and cooled seatsonly remain on during remote start if theywere on when you switched the vehicle off(if equipped).
You can adjust the default remote startsettings using the information displaycontrols. See Information Displays(page 89).
Automatic Settings
In hot weather, the system is set to 72°F(22°C). The cooled seats are set to high(if available, and selected to AUTO in theinformation display).
In moderate weather, the system eitherheats or cools (based on pre-selectedsettings). The rear defroster, heatedmirrors and heated or cooled seats do notautomatically switch on.
In cold weather, the system is set to 72°F(22°C). The heated seats and heatedsteering wheel are set to high (if available,and selected to AUTO in the informationdisplay). The rear defroster and heatedmirrors automatically switch on.
118
Taurus (CPH) Canada/United States of America, enUSA, First Printing
Climate Control
Page 128 of 504
MEMORY FUNCTION (If Equipped)
WARNINGS
Before activating the memory seat,make sure that the area immediatelysurrounding the seat is clear ofobstructions and that all occupants areclear of moving parts.
Do not use the memory functionwhen your vehicle is moving.
This function automatically recalls theposition of these features.
•Driver seat.
•Power mirrors.
•Optional power adjustable pedals.
•Optional power steering column.
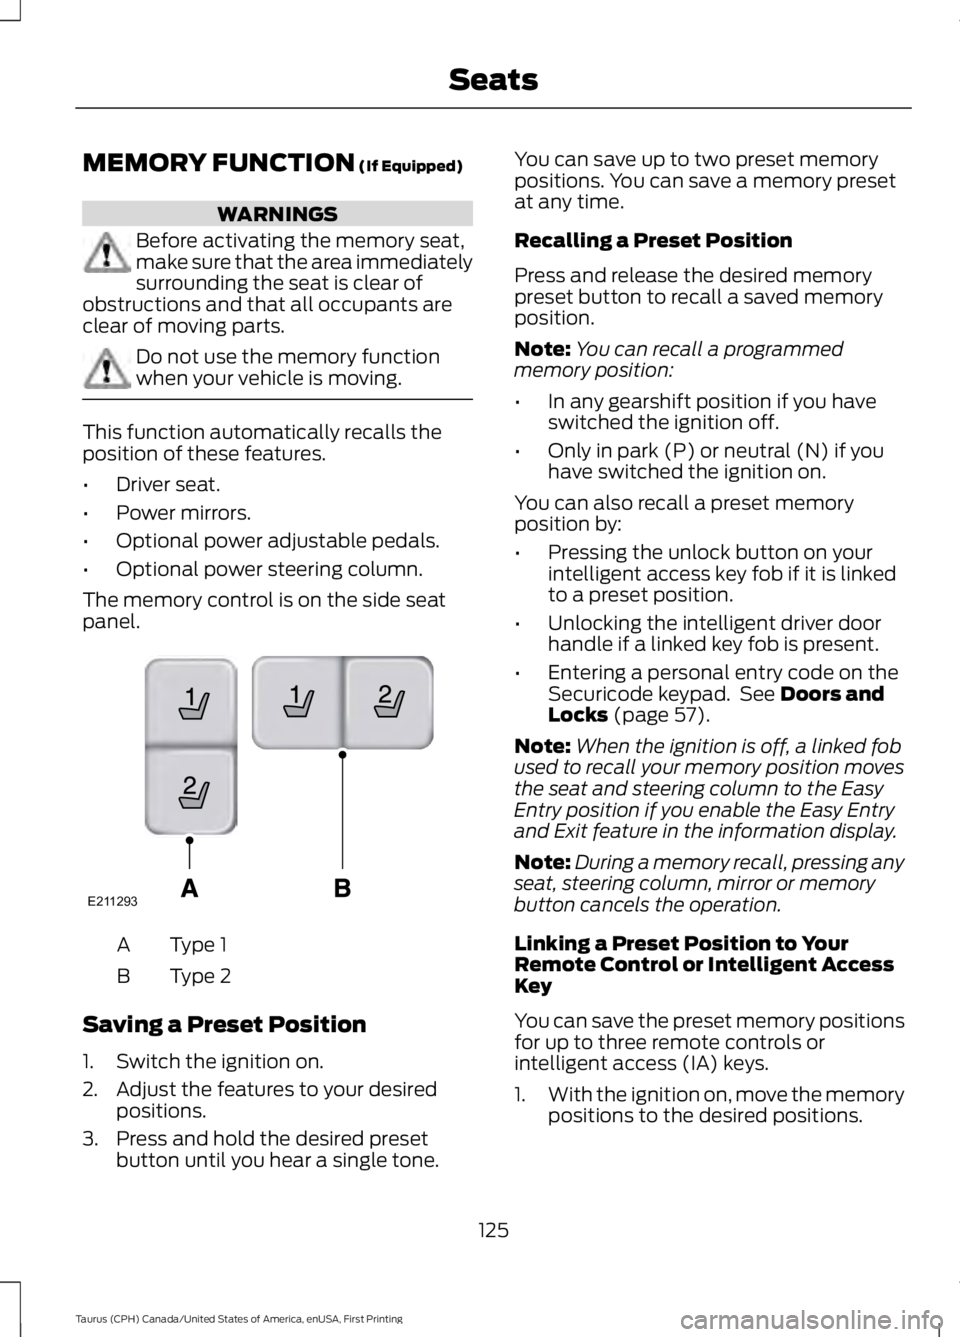
The memory control is on the side seatpanel.
Type 1A
Type 2B
Saving a Preset Position
1. Switch the ignition on.
2. Adjust the features to your desiredpositions.
3. Press and hold the desired presetbutton until you hear a single tone.
You can save up to two preset memorypositions. You can save a memory presetat any time.
Recalling a Preset Position
Press and release the desired memorypreset button to recall a saved memoryposition.
Note:You can recall a programmedmemory position:
•In any gearshift position if you haveswitched the ignition off.
•Only in park (P) or neutral (N) if youhave switched the ignition on.
You can also recall a preset memoryposition by:
•Pressing the unlock button on yourintelligent access key fob if it is linkedto a preset position.
•Unlocking the intelligent driver doorhandle if a linked key fob is present.
•Entering a personal entry code on theSecuricode keypad. See Doors andLocks (page 57).
Note:When the ignition is off, a linked fobused to recall your memory position movesthe seat and steering column to the EasyEntry position if you enable the Easy Entryand Exit feature in the information display.
Note:During a memory recall, pressing anyseat, steering column, mirror or memorybutton cancels the operation.
Linking a Preset Position to YourRemote Control or Intelligent AccessKey
You can save the preset memory positionsfor up to three remote controls orintelligent access (IA) keys.
1.With the ignition on, move the memorypositions to the desired positions.
125
Taurus (CPH) Canada/United States of America, enUSA, First Printing
SeatsE211293
Page 129 of 504
2. Press and hold the desired presetbutton for five seconds. A tone soundsafter about two seconds. Continueholding until you hear a second tone.
3. Within three seconds, press the lockbutton on the remote control you arelinking.
To unlink a remote control, follow thesame procedure – except in Step 3, pressthe unlock button on the remote control.
Easy Entry and Exit Feature (If
Equipped)
If you enable the easy entry and exitfeature, it automatically moves the driverseat position rearward up to 2 in (5 cm)and the steering column up and forwardwhen you switch the ignition off.
When you switch the ignition on, the driverseat and steering column return to theprevious position.
You can enable or disable this feature inthe information display. See InformationDisplays (page 89).
REAR SEATS
Split-folding Rear Seat
WARNING
Before returning the seatback to itsoriginal position, make sure thatcargo or any objects are not trappedbehind the seatback. After returning theseatback to its original position, pull on theseatback to make sure that it has fullylatched. An unlatched seat may becomedangerous in the event of a sudden stopor crash.
You can fold one or both rear seatbacks.
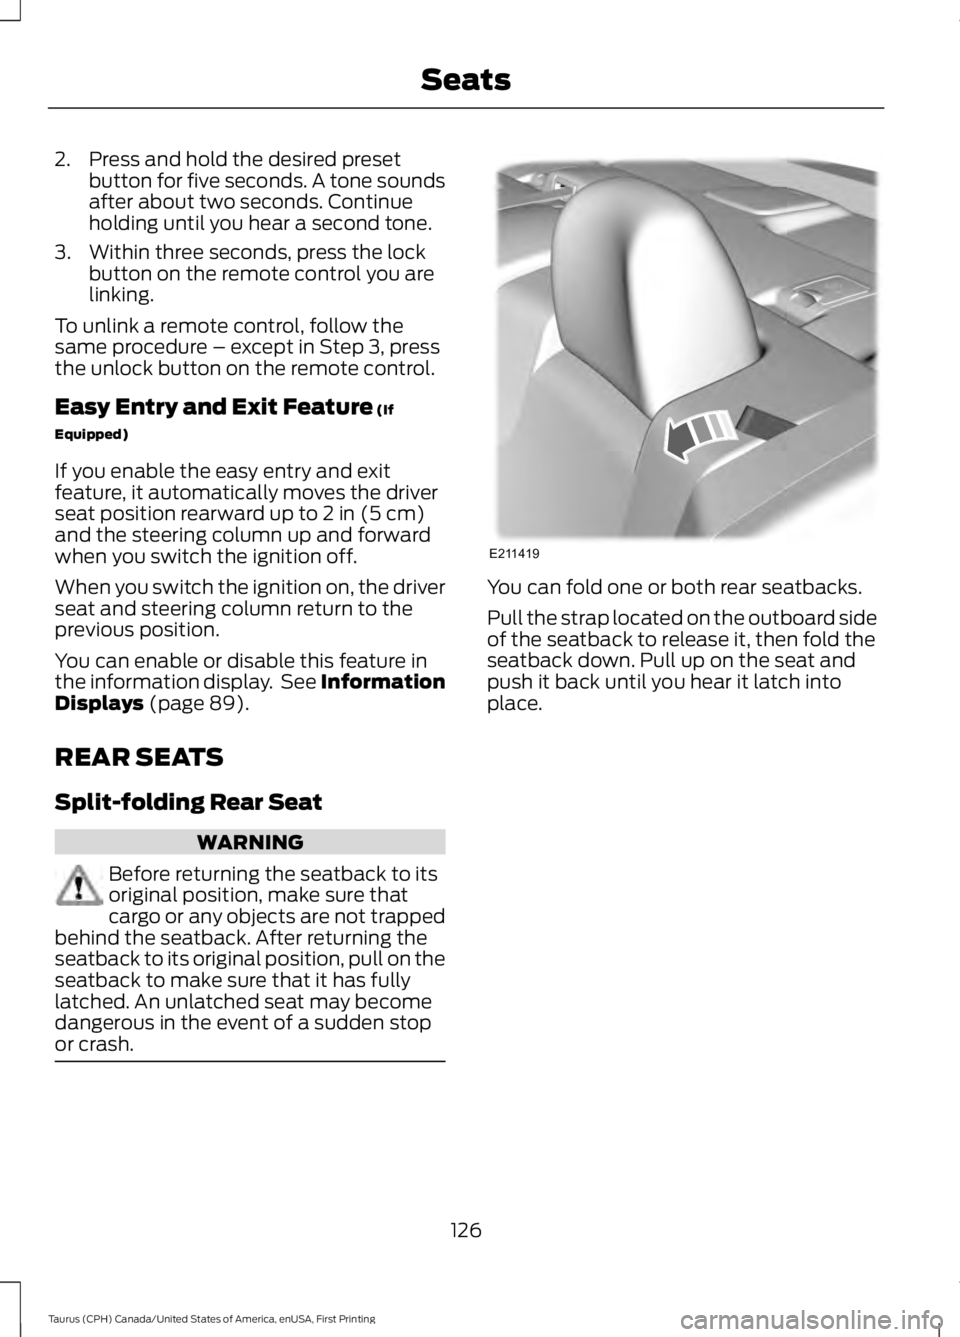
Pull the strap located on the outboard sideof the seatback to release it, then fold theseatback down. Pull up on the seat andpush it back until you hear it latch intoplace.
126
Taurus (CPH) Canada/United States of America, enUSA, First Printing
SeatsE211419
Page 136 of 504
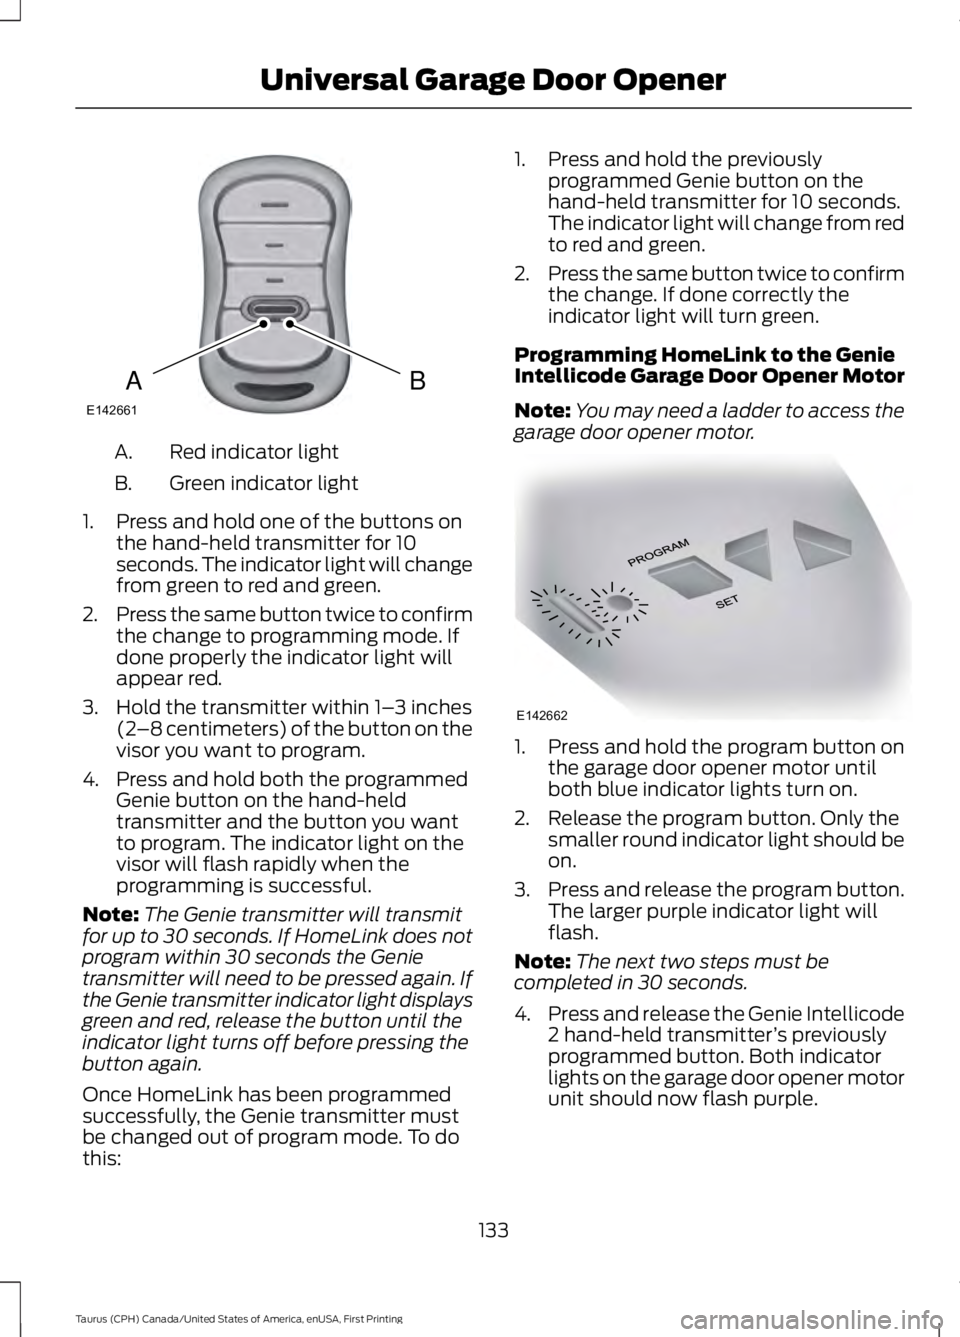
Red indicator lightA.
Green indicator lightB.
1. Press and hold one of the buttons onthe hand-held transmitter for 10seconds. The indicator light will changefrom green to red and green.
2.Press the same button twice to confirmthe change to programming mode. Ifdone properly the indicator light willappear red.
3. Hold the transmitter within 1–3 inches(2–8 centimeters) of the button on thevisor you want to program.
4. Press and hold both the programmedGenie button on the hand-heldtransmitter and the button you wantto program. The indicator light on thevisor will flash rapidly when theprogramming is successful.
Note:The Genie transmitter will transmitfor up to 30 seconds. If HomeLink does notprogram within 30 seconds the Genietransmitter will need to be pressed again. Ifthe Genie transmitter indicator light displaysgreen and red, release the button until theindicator light turns off before pressing thebutton again.
Once HomeLink has been programmedsuccessfully, the Genie transmitter mustbe changed out of program mode. To dothis:
1. Press and hold the previouslyprogrammed Genie button on thehand-held transmitter for 10 seconds.The indicator light will change from redto red and green.
2.Press the same button twice to confirmthe change. If done correctly theindicator light will turn green.
Programming HomeLink to the GenieIntellicode Garage Door Opener Motor
Note:You may need a ladder to access thegarage door opener motor.
1. Press and hold the program button onthe garage door opener motor untilboth blue indicator lights turn on.
2. Release the program button. Only thesmaller round indicator light should beon.
3.Press and release the program button.The larger purple indicator light willflash.
Note:The next two steps must becompleted in 30 seconds.
4.Press and release the Genie Intellicode2 hand-held transmitter’s previouslyprogrammed button. Both indicatorlights on the garage door opener motorunit should now flash purple.
133
Taurus (CPH) Canada/United States of America, enUSA, First Printing
Universal Garage Door OpenerBAE142661 E142662