2017 FORD TAURUS maintenance
[x] Cancel search: maintenancePage 253 of 504

Check the transmission fluid at the normaloperating temperatures between 180°F(82°C) and 200°F (93°C) on a levelsurface. Drive your vehicle until you warmit up to the normal operating temperatureafter approximately 20 mi (30 km).
Target the transmission fluid level withinthe cross-hatch area if at the normaloperating temperature between 180°F(82°C) and 200°F (93°C).
High fluid level
If the fluid level is above the MAX range ofthe dipstick, remove fluid to reach thehashmark level.
Note:Fluid level above the MAX level maycause shift or engagement concerns orpossible damage. An overheating conditioncan cause high fluid levels. If you operateyour vehicle for an extended period at highspeeds, in city traffic during hot weather orpulling a trailer, you should switch yourvehicle off until your vehicle reaches normaloperating temperatures. Depending onvehicle use, cooling times could take up to30 minutes or longer.
Adjusting Automatic Transmission FluidLevels
Before adding any fluid, make sure thecorrect type is used. The type of fluid usedis normally indicated on the dipstick andin the Technical Specifications section inthis chapter.
Note:An overfill condition of transmissionfluid may cause shift or engagementconcerns or possible damage.
Do not use supplemental transmissionfluid additives, treatments or cleaningagents. The use of these materials mayaffect transmission operation and resultin damage to internal transmissioncomponents. Reinstall the air filterassembly. After you check the fluid leveland adjust as necessary, do the following:
1. Switch the engine off.
2. Loosen the clamp holding the air filterassembly to the rubber hose.
3. Seat the air filter assembly back intothe grommets by pushing down on theair filter assembly.
4. Tighten the clamp.
250
Taurus (CPH) Canada/United States of America, enUSA, First Printing
MaintenanceE158844 E158845 E158846
Page 255 of 504
Add fluid to fill the reservoir if the level islow. Only use a washer fluid that meetsFord specifications. See Capacities andSpecifications (page 297).
State or local regulations on volatileorganic compounds may restrict the useof methanol, a common windshield washerantifreeze additive. Washer fluidscontaining non-methanol antifreezeagents should be used only if they providecold weather protection without damagingthe vehicle’s paint finish, wiper blades orwasher system.
FUEL FILTER
Your vehicle is equipped with a lifetimefuel filter that is integrated with the fueltank. Regular maintenance or replacementis not needed.
CHANGING THE 12V BATTERY
WARNINGS
Batteries normally produce explosivegases which can cause personalinjury. Therefore, do not allowflames, sparks or lighted substances tocome near the battery. When working nearthe battery, always shield your face andprotect your eyes. Always provide correctventilation.
When lifting a plastic-cased battery,excessive pressure on the end wallscould cause acid to flow through thevent caps, resulting in personal injury anddamage to the vehicle or battery. Lift thebattery with a battery carrier or with yourhands on opposite corners.
WARNINGS
Keep batteries out of reach ofchildren. Batteries contain sulfuricacid. Avoid contact with skin, eyes orclothing. Shield your eyes when workingnear the battery to protect against possiblesplashing of acid solution. In case of acidcontact with skin or eyes, flushimmediately with water for a minimum of15 minutes and get prompt medicalattention. If acid is swallowed, call aphysician immediately.
Battery posts, terminals and relatedaccessories contain lead and leadcompounds. Wash hands afterhandling.
This vehicle may be fitted with morethan one battery. Removing thebattery cables from only one batterydoes not disconnect your vehicle electricalsystem. Make sure you disconnect thebattery cables from all batteries whendisconnecting power. Failure to do so maycause serious personal injury or propertydamage.
Your vehicle is fitted with a Motorcraftmaintenance-free battery which normallydoes not require additional water.
When a battery replacement is required,you must use a recommendedreplacement battery that matches theelectrical requirements of the vehicle.
Note:After cleaning or replacing thebattery, make sure you reinstall the batterycover or shield.
Note:If you add electrical accessories orcomponents to the vehicle, it may adverselyaffect the low voltage battery performanceand durability. This may also affect theperformance of other electrical systems inthe vehicle.
For longer, trouble-free operation, keep thetop of the battery clean and dry.
252
Taurus (CPH) Canada/United States of America, enUSA, First Printing
Maintenance
Page 256 of 504
If you see any corrosion on the battery orterminals, remove the cables from theterminals and clean with a wire brush. Youcan neutralize the acid with a solution ofbaking soda and water.
Because your vehicle’s engine iselectronically controlled by a computer,some control conditions are maintainedby power from the battery. When thebattery is disconnected or a new batteryis installed, the engine must relearn its idleand fuel trim strategy for optimumdriveability and performance. Flexible fuelvehicles (FFV) must also relearn theethanol content of the fuel for optimumdriveability and performance.
To restore the settings, do the following:
1. Apply the parking brake.
2. Shift into park (P) or neutral (N).
3. Switch off all accessories.
4. Press the brake pedal and start yourvehicle.
5. Run the engine until it reaches normaloperating temperature. While theengine is warming up, complete thefollowing: Reset the clock. See AudioSystem (page 315). Reset the powerwindows bounce-back feature. SeeWindows and Mirrors (page 78).Reset the radio station presets. SeeAudio System (page 315).
6.Allow the engine to idle for at least oneminute.
7.Drive the vehicle at least 10 mi (16 km)to completely relearn the idle trim andfuel trim strategy.
Note:If you do not allow the engine torelearn the idle and fuel trim strategy, theidle quality of your vehicle may be adverselyaffected until the engine computereventually relearns the idle trim and fueltrim strategy.
Note:For flexible fuel vehicles, if you areoperating on E85, you may experience poorstarts or an inability to start the engine anddriveability problems until the fuel trim andethanol content have been relearned.
Make sure that you dispose of old batteriesin an environmentally friendly way. Seekadvice from your local authority aboutrecycling old batteries.
If storing your vehicle for more than 30days without recharging the battery, werecommend that you disconnect thebattery cables to maintain battery chargefor quick starting.
Battery Management System (If
Equipped)
The battery management system monitorsbattery conditions and takes actions toextend battery life. If excessive batterydrain is detected, the system temporarilydisables some electrical systems toprotect the battery.
Systems included are:
•Heated rear window.
•Heated seats.
•Climate control.
•Heated steering wheel.
•Audio unit.
•Navigation system.
A message may appear in the informationdisplays to alert you that batteryprotection actions are active. Thesemessages are only for notification that anaction is taking place, and not intended toindicate an electrical problem or that thebattery requires replacement.
253
Taurus (CPH) Canada/United States of America, enUSA, First Printing
Maintenance
Page 257 of 504
After battery replacement, or in somecases after charging the battery with anexternal charger, the battery managementsystem requires eight hours of vehicle sleeptime to relearn the battery state of charge.During this time your vehicle must remainfully locked with the ignition switched off.
Note:Prior to relearning the battery stateof charge, the battery management systemmay temporarily disable some electricalsystems.
Electrical Accessory Installation
To make sure the battery managementsystem works correctly, do not connect anelectrical device ground connectiondirectly to the battery negative post. Thiscan cause inaccurate measurements ofthe battery condition and potentialincorrect system operation.
Note:If you add electrical accessories orcomponents to the vehicle, it may adverselyaffect battery performance and durability.This may also affect the performance ofother electrical systems in the vehicle.
CHECKING THE WIPER
BLADES
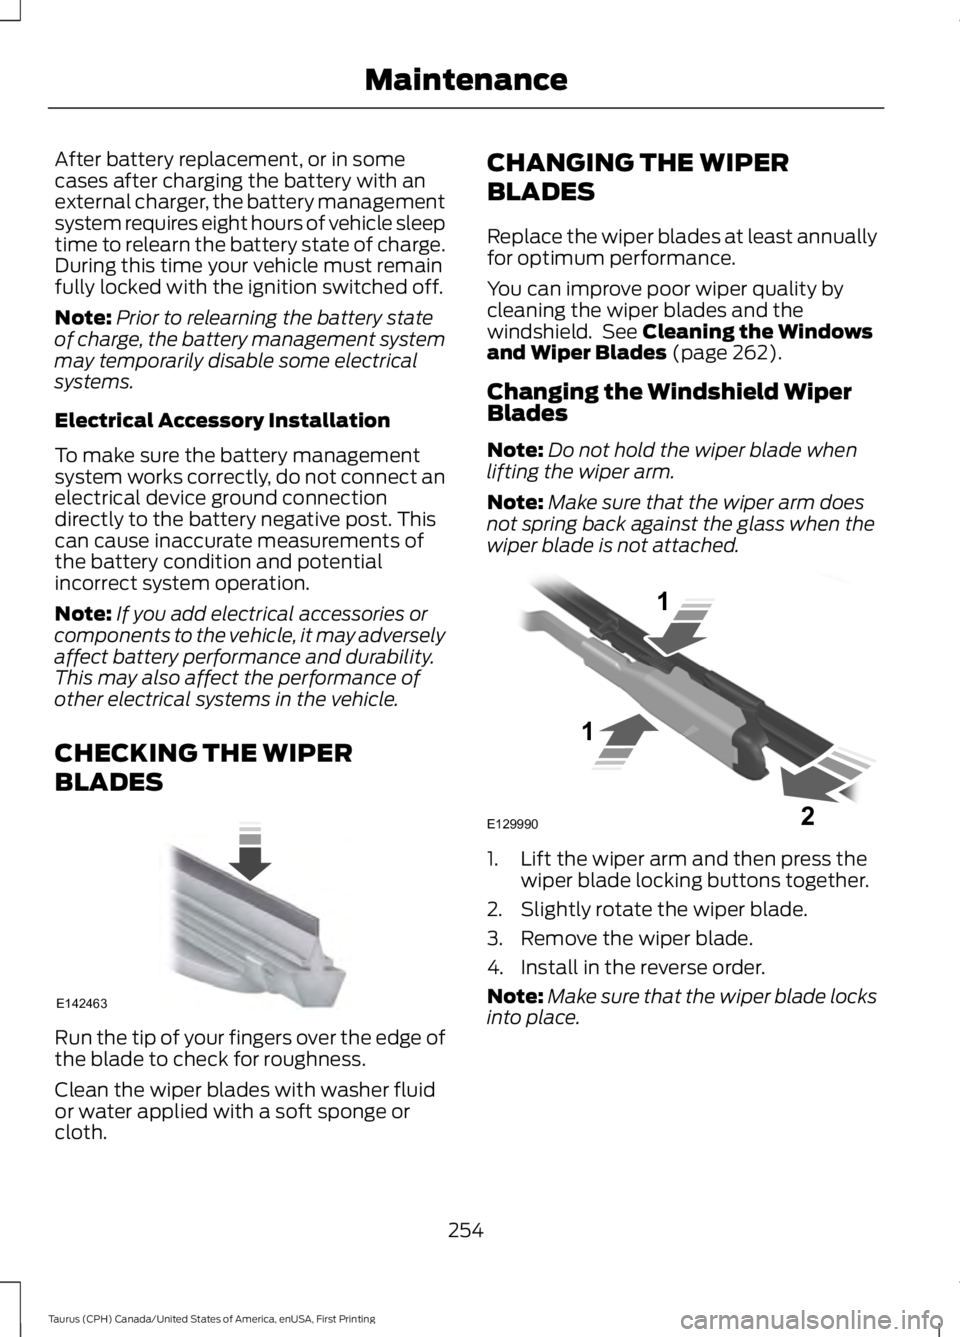
Run the tip of your fingers over the edge ofthe blade to check for roughness.
Clean the wiper blades with washer fluidor water applied with a soft sponge orcloth.
CHANGING THE WIPER
BLADES
Replace the wiper blades at least annuallyfor optimum performance.
You can improve poor wiper quality bycleaning the wiper blades and thewindshield. See Cleaning the Windowsand Wiper Blades (page 262).
Changing the Windshield WiperBlades
Note:Do not hold the wiper blade whenlifting the wiper arm.
Note:Make sure that the wiper arm doesnot spring back against the glass when thewiper blade is not attached.
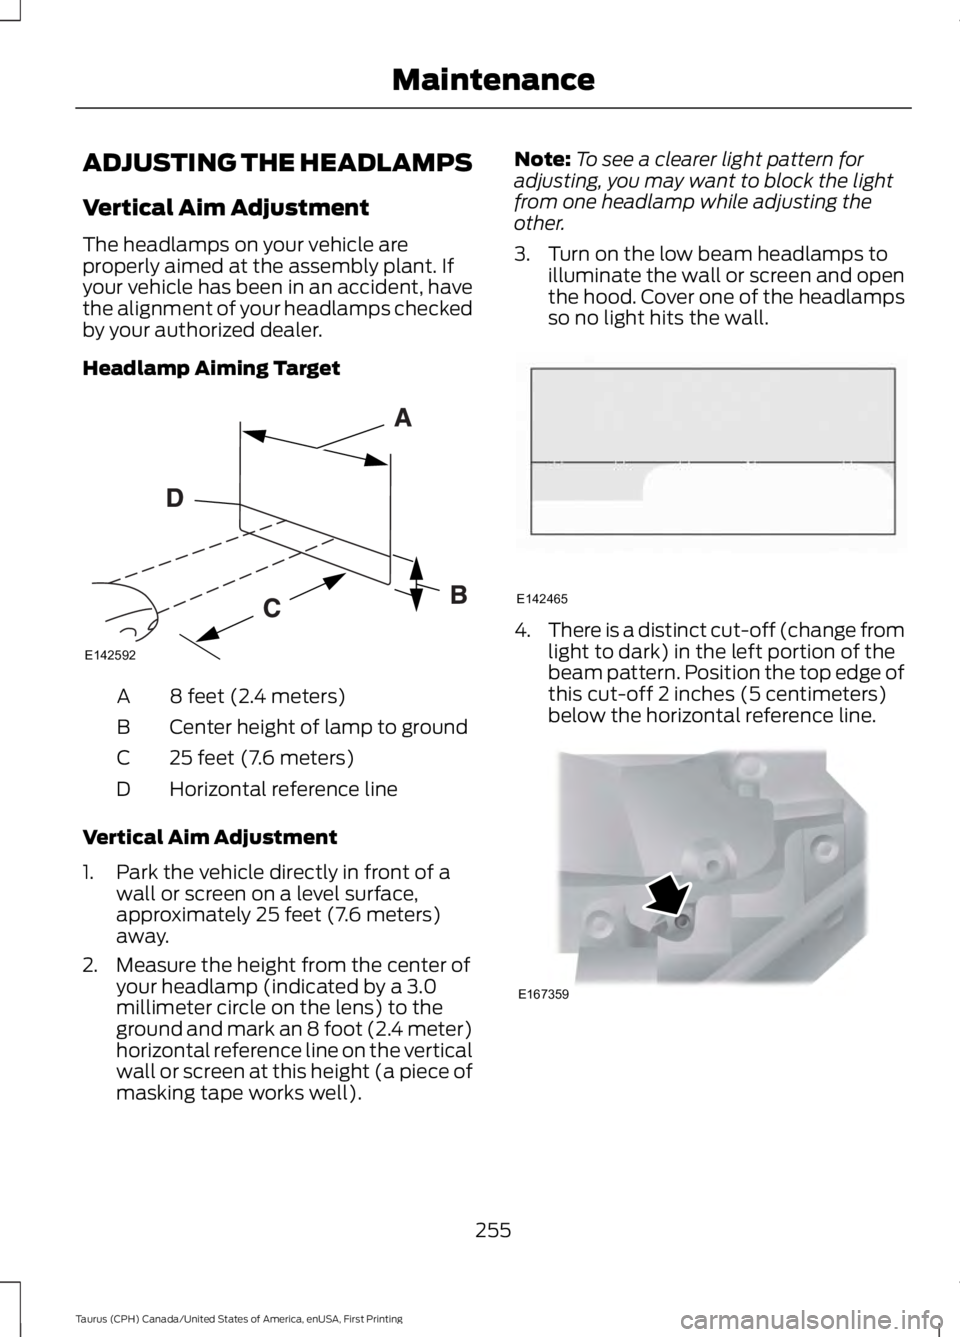
1. Lift the wiper arm and then press thewiper blade locking buttons together.
2. Slightly rotate the wiper blade.
3. Remove the wiper blade.
4. Install in the reverse order.
Note:Make sure that the wiper blade locksinto place.
254
Taurus (CPH) Canada/United States of America, enUSA, First Printing
MaintenanceE142463 E129990
1
1 2
Page 258 of 504
ADJUSTING THE HEADLAMPS
Vertical Aim Adjustment
The headlamps on your vehicle areproperly aimed at the assembly plant. Ifyour vehicle has been in an accident, havethe alignment of your headlamps checkedby your authorized dealer.
Headlamp Aiming Target
8 feet (2.4 meters)A
Center height of lamp to groundB
25 feet (7.6 meters)C
Horizontal reference lineD
Vertical Aim Adjustment
1. Park the vehicle directly in front of awall or screen on a level surface,approximately 25 feet (7.6 meters)away.
2. Measure the height from the center ofyour headlamp (indicated by a 3.0millimeter circle on the lens) to theground and mark an 8 foot (2.4 meter)horizontal reference line on the verticalwall or screen at this height (a piece ofmasking tape works well).
Note:To see a clearer light pattern foradjusting, you may want to block the lightfrom one headlamp while adjusting theother.
3. Turn on the low beam headlamps toilluminate the wall or screen and openthe hood. Cover one of the headlampsso no light hits the wall.
4.There is a distinct cut-off (change fromlight to dark) in the left portion of thebeam pattern. Position the top edge ofthis cut-off 2 inches (5 centimeters)below the horizontal reference line.
255
Taurus (CPH) Canada/United States of America, enUSA, First Printing
MaintenanceE142592 E142465 E167359
Page 259 of 504
5. Locate the vertical adjuster on eachheadlamp. Use a Phillips #2screwdriver to turn the adjuster eitherclockwise or counterclockwise toadjust the vertical aim of theheadlamp. The horizontal edge of thebrighter light should touch thehorizontal reference line.
6.Repeat Steps 3 through 7 to adjust theother headlamp.
7.Close the hood and turn off the lamps.
Horizontal Aim Adjustment
Horizontal aim is not required for thisvehicle and is not adjustable.
CHANGING A BULB
WARNINGS
Bulbs can become hot. Let the bulbcool down before removing it. Failureto do so could result in personalinjury.
Switch the lamps and the ignition off.Failure to follow this warning couldresult in serious personal injury.
Use the correct specification bulb. SeeBulb Specification Chart (page 257).
Install in the reverse order unless otherwisestated.
High-Intensity DischargeHeadlamps
These lamps operate at a high voltage. Seean authorized dealer if they fail.
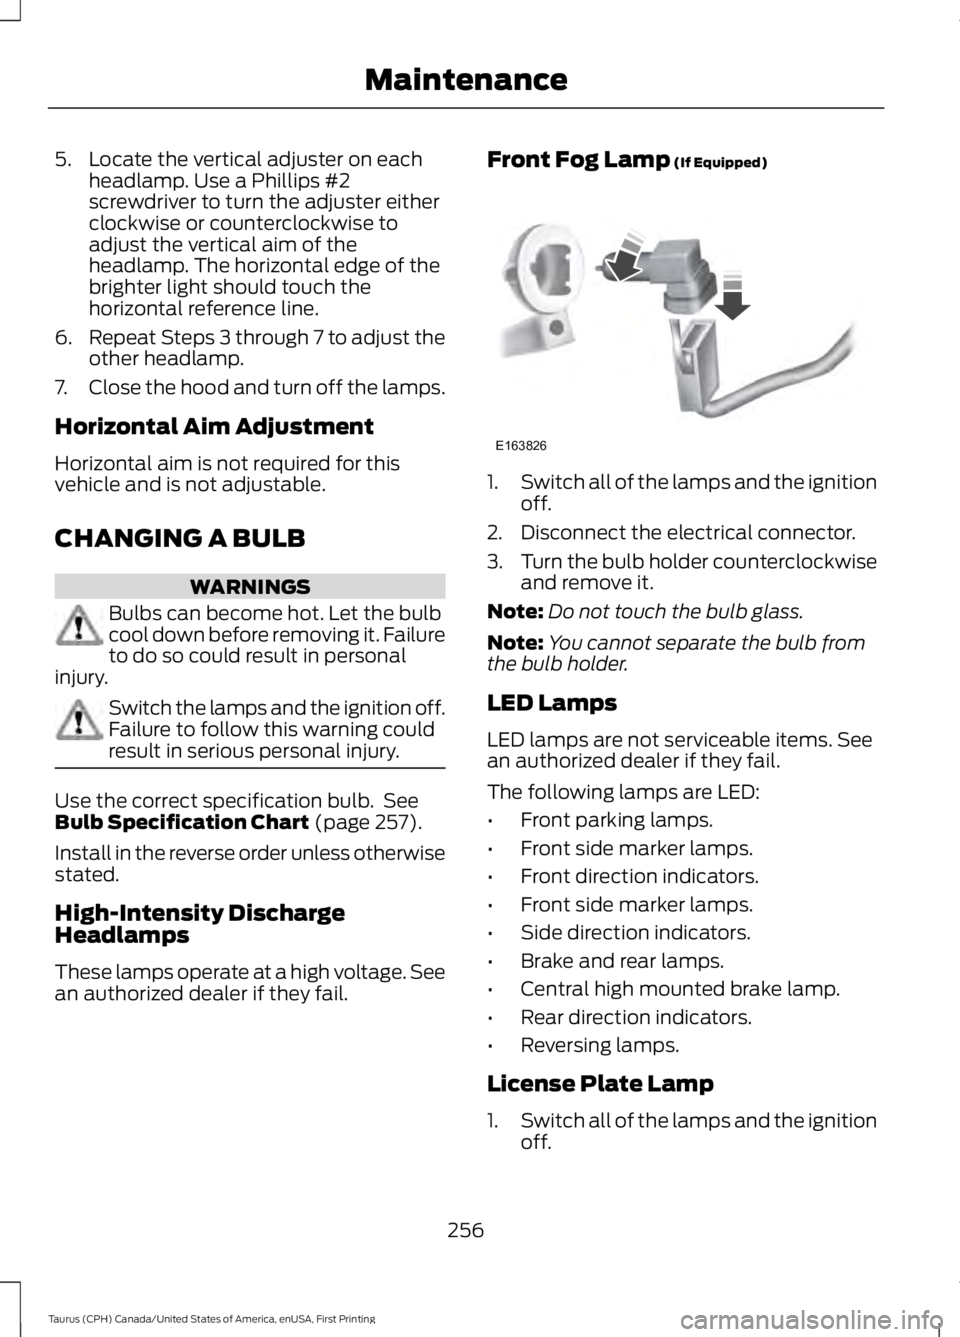
Front Fog Lamp (If Equipped)
1.Switch all of the lamps and the ignitionoff.
2. Disconnect the electrical connector.
3.Turn the bulb holder counterclockwiseand remove it.
Note:Do not touch the bulb glass.
Note:You cannot separate the bulb fromthe bulb holder.
LED Lamps
LED lamps are not serviceable items. Seean authorized dealer if they fail.
The following lamps are LED:
•Front parking lamps.
•Front side marker lamps.
•Front direction indicators.
•Front side marker lamps.
•Side direction indicators.
•Brake and rear lamps.
•Central high mounted brake lamp.
•Rear direction indicators.
•Reversing lamps.
License Plate Lamp
1.Switch all of the lamps and the ignitionoff.
256
Taurus (CPH) Canada/United States of America, enUSA, First Printing
MaintenanceE163826
Page 260 of 504

2. Remove the screws that secure thelamp assembly.3. Remove the bulb.
BULB SPECIFICATION CHART
The specified replacement bulbs are in thechart below. Headlamp bulbs must bemarked with an authorized D.O.T.(Department of Transportation) for NorthAmerica to affirm lamp performance, lightbrightness and pattern and safe visibility.The correct bulbs will not damage thelamp assembly or void the lamp assemblywarranty and will provide quality bulb burntime.
Trade numberFunction
D3S* Headlamp (high intensity discharge) Lowand High
LED* Sidemarker - front
LED* Park lamp - front
7444NA* Turn lamp - front
LEDSignal indicator mirror lamp
LEDApproach lamp
LED* Tail and brake lamp
LED* Turn lamp - rear
LED* Backup lamp
257
Taurus (CPH) Canada/United States of America, enUSA, First Printing
MaintenanceE178598 E178599
Page 261 of 504
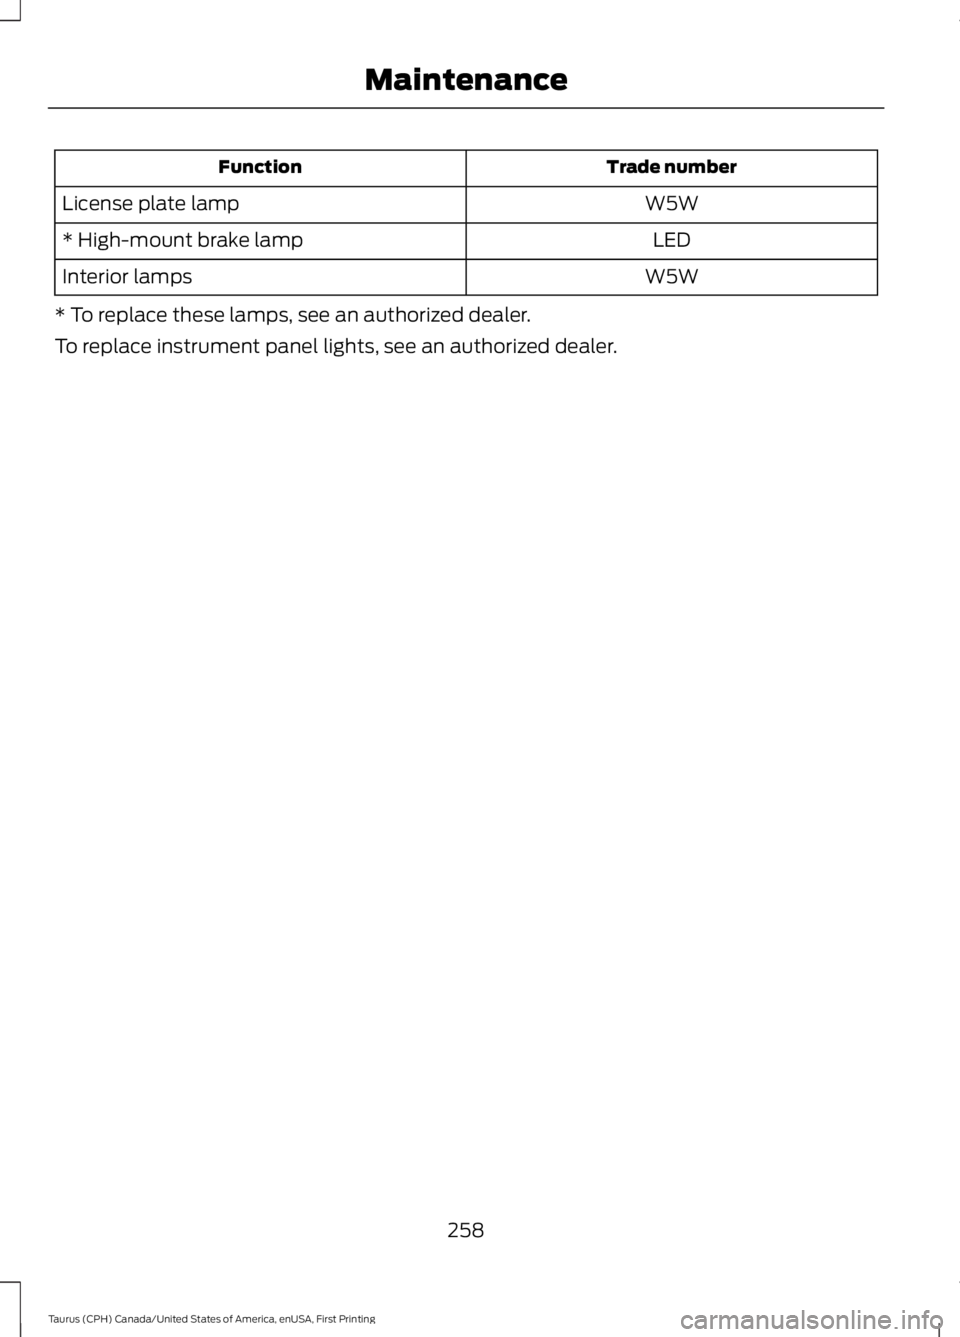
Trade numberFunction
W5WLicense plate lamp
LED* High-mount brake lamp
W5WInterior lamps
* To replace these lamps, see an authorized dealer.
To replace instrument panel lights, see an authorized dealer.
258
Taurus (CPH) Canada/United States of America, enUSA, First Printing
Maintenance