2017 FORD TAURUS check engine
[x] Cancel search: check enginePage 249 of 504
How Fail-Safe Cooling Works
If the engine begins to overheat,the coolant temperature gaugemoves toward the red zone:
A warning lamp illuminates anda message may appear in theinformation display.
If the engine reaches a presetover-temperature condition, the engineautomatically switches to alternatingcylinder operation. Each disabled cylinderacts as an air pump and cools the engine.
When this occurs, your vehicle stilloperates, however:
•Engine power is limited.
•The air conditioning system turns off.
Continued operation increases the enginetemperature, causing the engine tocompletely shut down. Your steering andbraking effort increases in this situation.
When the engine temperature cools, youcan re-start the engine. Have your vehiclechecked as soon as possible to minimizeengine damage.
When Fail-Safe Mode Is Activated
WARNINGS
Fail-safe mode is for use duringemergencies only. Operate yourvehicle in fail-safe mode only as longas necessary to bring your vehicle to restin a safe location and seek immediaterepairs. When in fail-safe mode, yourvehicle will have limited power, will not beable to maintain high-speed operation, andmay completely shut down withoutwarning, potentially losing engine power,power steering assist, and power brakeassist, which may increase the possibilityof a crash resulting in serious injury.
WARNINGS
Never remove the coolant reservoircap when the engine is running orhot.
Your vehicle has limited engine powerwhen in the fail-safe mode, drive yourvehicle with caution. Your vehicle does notmaintain high-speed operation and theengine may operate poorly.
Remember that the engine is capable ofautomatically shutting down to preventengine damage. In this situation:
1. Pull off the road as soon as safelypossible and switch the engine off.
2. If you are a member of a roadsideassistance program, we recommendthat you contact your roadsideassistance service provider.
3. If this is not possible, wait a shortperiod for the engine to cool.
4. Check the coolant level. If the coolantlevel is at or below the minimum mark,add prediluted coolant immediately.
5. When the engine temperature cools,you can re-start the engine. Have yourvehicle checked as soon as possible tominimize engine damage.
Note:Driving your vehicle without repairincreases the chance of engine damage.
Engine Coolant TemperatureManagement (If Equipped)
WARNING
To reduce the risk of crash and injury,be prepared that the vehicle speedmay reduce and the vehicle may notbe able to accelerate with full power untilthe coolant temperature reduces.
246
Taurus (CPH) Canada/United States of America, enUSA, First Printing
Maintenance
Page 250 of 504
If you tow a trailer with your vehicle, theengine may temporarily reach a highertemperature during severe operatingconditions, for example ascending a longor steep grade in high ambienttemperatures.
At this time, you may notice the coolanttemperature gauge moves toward the redzone and a message may appear in theinformation display.
You may notice a reduction in vehiclespeed caused by reduced engine power inorder to manage the engine coolanttemperature. Your vehicle may enter thismode if certain high-temperature andhigh-load conditions take place. Theamount of speed reduction depends onvehicle loading, grade and ambienttemperature. If this occurs, there is no needto pull off the road. You can continue todrive your vehicle.
The air conditioning may automaticallyturn on and off during severe operatingconditions to protect the engine fromoverheating. When the coolanttemperature decreases to the normaloperating temperature, the air conditioningturns on.
If the coolant temperature gauge movesfully into the red zone, or if the coolanttemperature warning or service enginesoon messages appear in your informationdisplay, do the following:
1. Pull off the road as soon as safelypossible and shift the transmission intopark (P).
2. Leave the engine running until thecoolant temperature gauge needlereturns to the normal position. Afterseveral minutes, if the temperaturedoes not drop, follow the remainingsteps.
3.Switch the engine off and wait for it tocool. Check the coolant level.
4. If the coolant level is at or below theminimum mark, add prediluted coolantimmediately.
5. If the coolant level is normal, restartthe engine and continue.
AUTOMATIC TRANSMISSION
FLUID CHECK - 2.0L
ECOBOOST™
6F35 Transmission
The automatic transmission does not havea transmission fluid dipstick.
The automatic transmission does notconsume fluid. If the transmission is notworking correctly, for example, thetransmission slips, shifts slowly or thereare signs of fluid leakage, have the systemchecked by an authorized dealer.
Change the automatic transmission fluidand filter at the correct service interval.
Do not use supplemental automatictransmission fluid additives because theyare unnecessary and could lead totransmission damage that may not becovered by the vehicle Warranty.
AUTOMATIC TRANSMISSION
FLUID CHECK - 3.5L DURATEC/
3.5L ECOBOOST™
6F50/6F55 Transmission (If Equipped)
WARNINGS
The dipstick cap and surroundingcomponents may be hot, use gloves.
Use gloves when moving the air filterassembly. Components will be hot.
247
Taurus (CPH) Canada/United States of America, enUSA, First Printing
Maintenance
Page 251 of 504
Note:Automatic transmission fluidexpands when warmed. To obtain anaccurate fluid check, drive your vehicle untilyou warm it up, approximately 20 mi(30 km). If you operate your vehicle for anextended period at high speeds, in city trafficduring hot weather or pulling a trailer, switchyour vehicle off until it reaches normaloperating temperatures to allow the fluidto cool before checking. Depending onvehicle use, cooling times could take up to30 minutes or longer.
Refer to your scheduled maintenanceinformation for scheduled intervals for fluidchecks and changes. Your transmissiondoes not consume fluid. However, youshould check the fluid level if thetransmission is not working properly. Forexample, if the transmission slips or shiftsslowly or if you notice some sign of a fluidleak.
1. Drive your vehicle 20 mi (30 km) oruntil it reaches normal operatingtemperature.
2.Park your vehicle on a level surface andengage the parking brake.
3. With the parking brake engaged andyour foot on the brake pedal, start theengine and move the gearshift leverthrough all of the gear ranges. Allow aminimum of 10 seconds for each gearto engage.
4. Put the gearshift lever in park (P) andleave the engine running.
Note:For vehicles with the EcoBoostengine, move the air filter assembly asideto access the transmission dipstick. SeeMoving the Air Filter Assembly for moreinformation.
5. Remove the dipstick and wipe it cleanwith a dry, lint free clean rag. Ifnecessary, refer to the Under hoodoverview in this chapter for the locationof the dipstick.
6. Install the dipstick making sure youfully seat it in the filler tube by turningit to the locked position.
7. Remove the dipstick and inspect thefluid level. The fluid should be in thedesignated areas for normal operatingtemperature.
Moving the Air Filter Assembly(Accessing the Dipstick)
WARNING
Do not run engine with the air filterdisconnected.
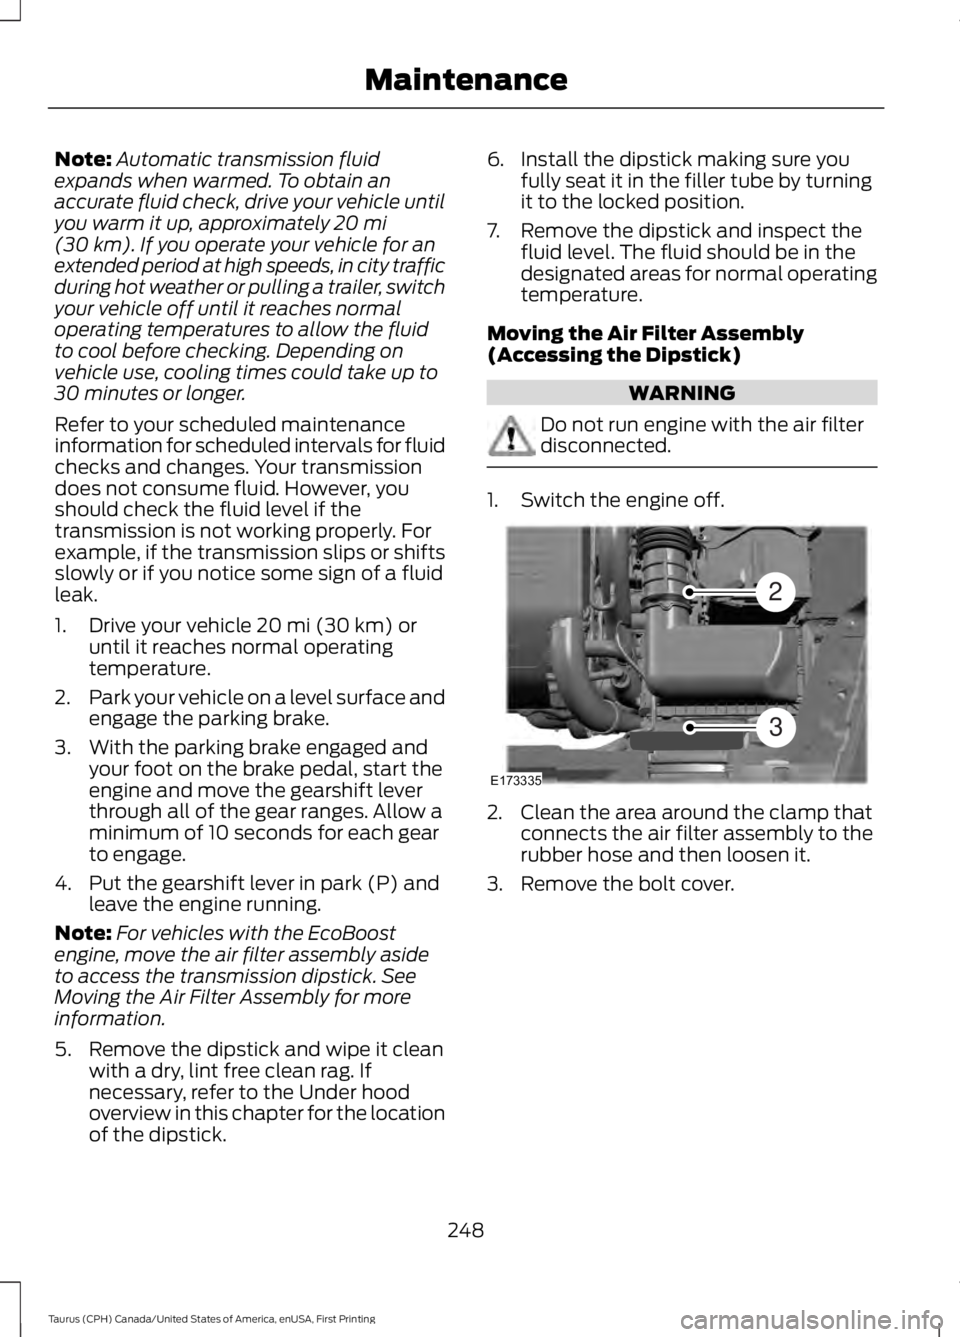
1. Switch the engine off.
2. Clean the area around the clamp thatconnects the air filter assembly to therubber hose and then loosen it.
3. Remove the bolt cover.
248
Taurus (CPH) Canada/United States of America, enUSA, First Printing
MaintenanceE173335
2
3
Page 253 of 504

Check the transmission fluid at the normaloperating temperatures between 180°F(82°C) and 200°F (93°C) on a levelsurface. Drive your vehicle until you warmit up to the normal operating temperatureafter approximately 20 mi (30 km).
Target the transmission fluid level withinthe cross-hatch area if at the normaloperating temperature between 180°F(82°C) and 200°F (93°C).
High fluid level
If the fluid level is above the MAX range ofthe dipstick, remove fluid to reach thehashmark level.
Note:Fluid level above the MAX level maycause shift or engagement concerns orpossible damage. An overheating conditioncan cause high fluid levels. If you operateyour vehicle for an extended period at highspeeds, in city traffic during hot weather orpulling a trailer, you should switch yourvehicle off until your vehicle reaches normaloperating temperatures. Depending onvehicle use, cooling times could take up to30 minutes or longer.
Adjusting Automatic Transmission FluidLevels
Before adding any fluid, make sure thecorrect type is used. The type of fluid usedis normally indicated on the dipstick andin the Technical Specifications section inthis chapter.
Note:An overfill condition of transmissionfluid may cause shift or engagementconcerns or possible damage.
Do not use supplemental transmissionfluid additives, treatments or cleaningagents. The use of these materials mayaffect transmission operation and resultin damage to internal transmissioncomponents. Reinstall the air filterassembly. After you check the fluid leveland adjust as necessary, do the following:
1. Switch the engine off.
2. Loosen the clamp holding the air filterassembly to the rubber hose.
3. Seat the air filter assembly back intothe grommets by pushing down on theair filter assembly.
4. Tighten the clamp.
250
Taurus (CPH) Canada/United States of America, enUSA, First Printing
MaintenanceE158844 E158845 E158846
Page 269 of 504
•With your foot on the brake, shiftthrough all the gears while the engineis running.
•We recommend that you change theengine oil before you use your vehicleagain.
Fuel system
•Fill the fuel tank with high-quality fueluntil the first automatic shutoff of thefuel pump nozzle.
Cooling system
•Protect against freezing temperatures.
•When removing your vehicle fromstorage, check coolant fluid level.Confirm that there are no coolingsystem leaks and that fluid is at therecommended level.
Battery
•Check and recharge as necessary. Keepconnections clean.
•If storing your vehicle for more than 30days without recharging the battery,we recommend that you disconnectthe battery cables to maintain batterycharge for quick starting.
Note:It is necessary to reset memoryfeatures if battery cables are disconnected.
Brakes
•Make sure the brakes and parking brakerelease fully.
Tires
•Maintain recommended air pressure.
Miscellaneous
•Make sure all linkages, cables, leversand pins under your vehicle are coveredwith grease to prevent rust.
•Move vehicles at least 25 ft (7.5 m)every 15 days to lubricate working partsand prevent corrosion.
Removing Vehicle From Storage
When your vehicle is ready to come out ofstorage, do the following:
•Wash your vehicle to remove any dirtor grease film build-up on windowsurfaces.
•Check windshield wipers for anydeterioration.
•Check under the hood for any foreignmaterial that may have collectedduring storage such as mice or squirrelnests.
•Check the exhaust for any foreignmaterial that may have collectedduring storage.
•Check tire pressures and set tireinflation per the Tire Label.
•Check brake pedal operation. Driveyour vehicle 15 ft (4.5 m) back andforth to remove rust build-up.
•Check fluid levels (including coolant,oil and gas) to make sure there are noleaks, and fluids are at recommendedlevels.
•If you remove the battery, clean thebattery cable ends and check fordamage.
Contact an authorized dealer if you haveany concerns or issues.
266
Taurus (CPH) Canada/United States of America, enUSA, First Printing
Vehicle Care
Page 270 of 504
GENERAL INFORMATION
A decal with tire pressure data is locatedin the driver’s door opening.
Check and set the tire pressure at theambient temperature in which you areintending to drive your vehicle and whenthe tires are cold.
Note:Check your tire pressures regularly tooptimize fuel economy.
Note:Use only approved wheel and tiresizes. Using other sizes could damage yourvehicle and will make the National TypeApproval invalid.
Note:If you change the diameter of the tiresfrom that fitted at the factory, thespeedometer may not display the correctspeed. Take your vehicle to an authorizeddealer to have the engine managementsystem reprogrammed.
TIRE SEALANT AND INFLATOR
KIT (If Equipped)
Note:The temporary mobility kit canistercontains enough sealant compound for onetire repair only. See your authorized Forddealer for additional replacement sealantcanisters.
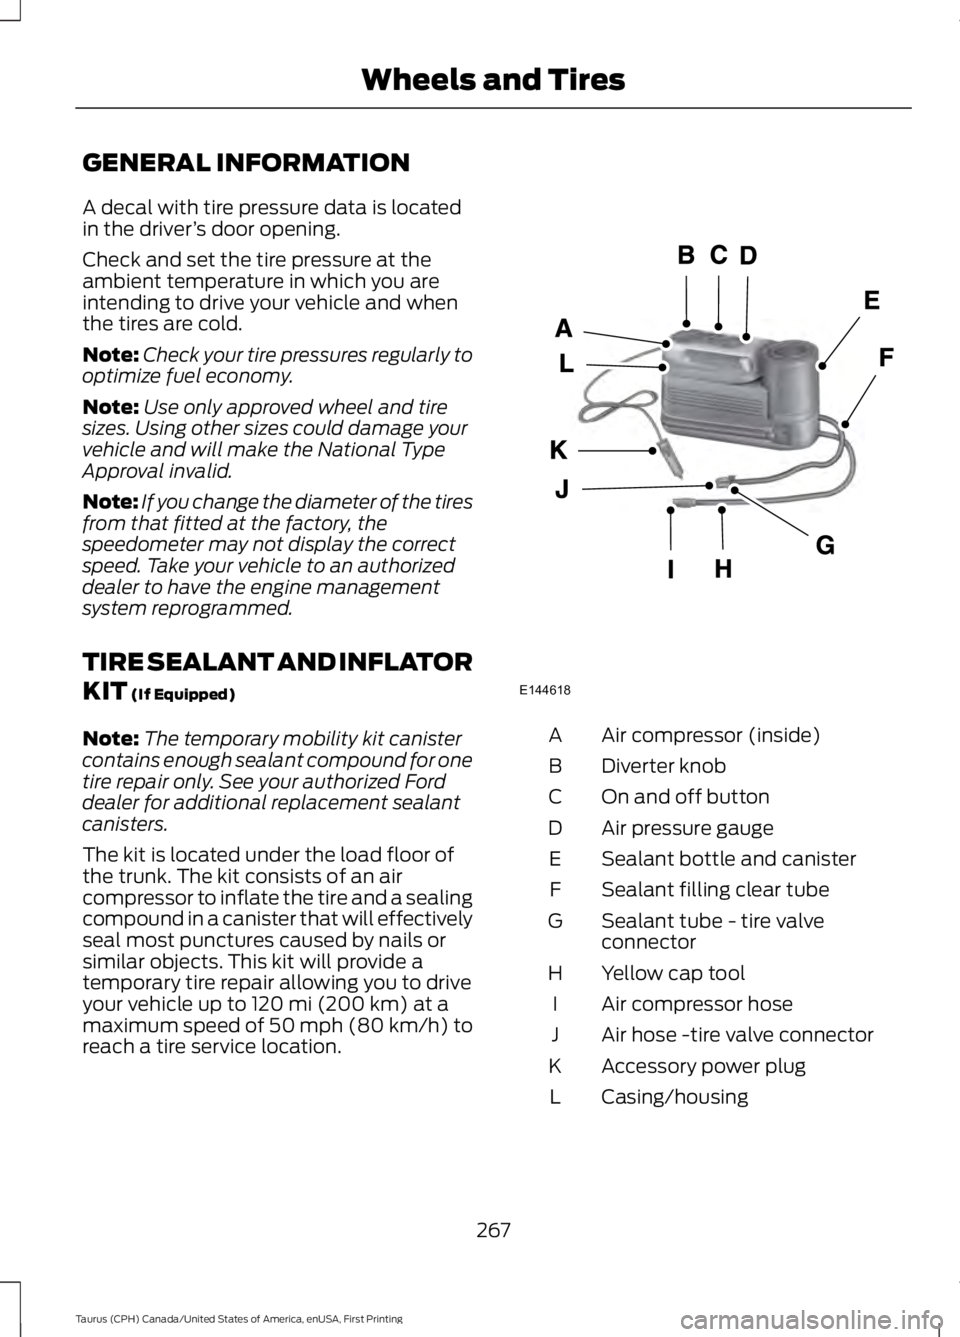
The kit is located under the load floor ofthe trunk. The kit consists of an aircompressor to inflate the tire and a sealingcompound in a canister that will effectivelyseal most punctures caused by nails orsimilar objects. This kit will provide atemporary tire repair allowing you to driveyour vehicle up to 120 mi (200 km) at amaximum speed of 50 mph (80 km/h) toreach a tire service location.
Air compressor (inside)A
Diverter knobB
On and off buttonC
Air pressure gaugeD
Sealant bottle and canisterE
Sealant filling clear tubeF
Sealant tube - tire valveconnectorG
Yellow cap toolH
Air compressor hoseI
Air hose -tire valve connectorJ
Accessory power plugK
Casing/housingL
267
Taurus (CPH) Canada/United States of America, enUSA, First Printing
Wheels and TiresE144618
Page 271 of 504

General Information
WARNING
Failure to follow these guidelinescould result in an increased risk ofloss of vehicle control, injury or death.
Note:Do not use the kit if a tire has becomeseverely damaged by driving the vehicle witha tire that has insufficient air pressure. Onlypunctured areas located within the tire treadcan be sealed with the kit.
Do not attempt to repair punctures largerthan ¼ inch (6 millimeters) or damage tothe tire's sidewall. The tire may notcompletely seal.
Loss of air pressure may adversely affecttire performance. For this reason:
Note:Do not drive the vehicle above50 mph (80 km/h).
Note:Do not drive further than 120 mi(200 km). Drive only to the closestauthorized Ford dealer or tire repair shop tohave your tire inspected.
•Drive carefully and avoid abruptsteering maneuvers.
•Periodically monitor tire inflationpressure in the affected tire. If the tireis losing pressure, have the vehicletowed.
•Read the information in the Tips forUse of the Kit section to make sure safeoperation of the kit and your vehicle.
Tips for Use of the Kit
Read the following list of tips to ensuresafe operation of the kit:
•Before operating the kit, make sureyour vehicle is safely off the road andaway from moving traffic. Turn on thehazard lights.
•Always set the parking brake to ensurethe vehicle does not moveunexpectedly.
•Do not remove any foreign objects,such as nails or screws, from the tire.
•When using the kit, leave the enginerunning (only if the vehicle is outdoorsor in a well-ventilated area) so thecompressor does not drain the vehiclebattery.
•Do not allow the compressor tooperate continuously for more than 15minutes. This will help prevent thecompressor from overheating.
•Never leave the kit unattended whenit is operating.
•Sealant compound contains latex.Make sure that you use the non-latexgloves provided to avoid an allergicreaction.
•Keep the kit away from children.
•Only use the kit when the ambienttemperature is between -22°F (-30°C)and 158°F (70°C).
•Only use the sealing compound beforethe use by date. The use by date is onthe lower right hand corner of the labellocated on the sealant canister(bottle). Check the use by dateregularly and replace the canister afterfour years.
•Do not store the kit unsecured insidethe passenger compartment of thevehicle as it may cause injury during asudden stop or crash. Always store thekit in its original location.
•After sealant use, the tire pressuremonitoring system sensor and valvestem on the wheel must be replacedby an authorized Ford dealer.
268
Taurus (CPH) Canada/United States of America, enUSA, First Printing
Wheels and Tires
Page 272 of 504

•When inflating a tire or other objects,use the black air hose only. Do not usethe transparent hose which is designedfor sealant application only.
•Operating the kit could cause anelectrical disturbance in radio, CD, andDVD player operation.
What to do when a Tire IsPunctured
A tire puncture within the tire tread areacan be repaired in two stages with the kit.
•In the first stage, the tire will bereinflated with a sealing compoundand air. After the tire has beenreinflated, you will need to drive thevehicle a short distance 4 mi (6 km) todistribute the sealant in the tire.
•In the second stage, you will need tocheck the tire pressure and adjust, ifnecessary, to the vehicle tire inflationpressure.
First Stage: Reinflating the Tirewith Sealing Compound and Air
WARNINGS
Do not stand directly over the kitwhile inflating the tire. If you noticeany unusual bulges or deformationsin the tire sidewall during inflation, stopand call roadside assistance.
If the tire does not inflate to therecommended tire pressure within15 minutes, stop and call roadsideassistance.
Preparation: Park the vehicle in a safe, leveland secure area, away from moving traffic.Turn the hazard lights on. Apply the parkingbrake and turn the engine off. Inspect theflat tire for visible damage.
Sealant compound contains latex. Toavoid any allergic reactions, use thenon-latex gloves located in the accessorybox on the underside of the kit housing.
Do not remove any foreign object that haspierced the tire. If a puncture is located inthe tire sidewall, stop and call roadsideassistance.
1. Remove the valve cap from the tirevalve.
2. Unwrap the clear tube from thecompressor housing.
3. Remove the tube cap and fasten themetal connector of the tube to the tirevalve, turning clockwise. Make sure theconnection is tightly fastened.
4. Plug the power cable into the 12-voltpower point in the vehicle.
5. Remove the warning sticker found onthe canister and place it on the top ofthe instrument panel or the center ofthe dash.
6. Start the vehicle only if the vehicle isoutdoors or in a well-ventilated area.
269
Taurus (CPH) Canada/United States of America, enUSA, First Printing
Wheels and TiresE144619