2017 FORD SUPER DUTY remote control
[x] Cancel search: remote controlPage 4 of 636

Introduction
About This Manual...........................................7
Symbols Glossary.............................................8
Data Recording
................................................10
California Proposition 65
.............................12
Perchlorate.........................................................12
Ford Credit
.........................................................12
Replacement Parts Recommendation.......................................12
Special Notices
................................................13
Mobile Communications Equipment.....................................................14
Export Unique Options
.................................14
Environment
Protecting the Environment........................16
Child Safety
General Information.......................................17
Installing Child Restraints
............................18
Booster Seats..................................................30
Child Restraint Positioning.........................32
Child Safety Locks..........................................33
Seatbelts
Principle of Operation..................................35
Fastening the Seatbelts..............................36
Seatbelt Height Adjustment.....................40
Seatbelt Warning Lamp and Indicator Chime.............................................................40
Seatbelt Reminder.........................................41
Child Restraint and Seatbelt Maintenance................................................42
Seatbelt Extension
........................................43
Supplementary Restraints System
Principle of Operation..................................44
Driver and Passenger Airbags
...................45
Side Airbags
.....................................................50 Safety Canopy
™
..............................................51
Crash Sensors and Airbag Indicator
........52
Airbag Disposal
...............................................53
Keys and Remote Controls
General Information on Radio Frequencies..................................................54
Remote Control..............................................54
Replacing a Lost Key or Remote Control...........................................................60
MyKey ™
Principle of Operation...................................61
Creating a MyKey
............................................62
Clearing All MyKeys.......................................63
Checking MyKey System Status...............63
Using MyKey With Remote Start Systems.........................................................64
MyKey Troubleshooting...............................64
Doors and Locks
Locking and Unlocking
.................................65
Keyless Entry....................................................67
Tailgate
Tailgate Lock....................................................70
Removing the Tailgate
.................................70
Tailgate Step
.....................................................71
Bed Extender
....................................................72
Security
Passive Anti-Theft System.........................74
Anti-Theft Alarm
............................................76
Power Running Boards
Using Power Running Boards....................78
Steering Wheel
Adjusting the Steering Wheel...................80
Audio Control
...................................................81
1
Super Duty (TFE) Canada/United States of America, enUSA, First Printing Table of Contents
Page 5 of 636

Voice Control...................................................82
Cruise Control..................................................82
Information Display Control
.......................82
Heated Steering Wheel
................................82
Pedals
Adjusting the Pedals
.....................................83
Wipers and Washers
Windshield Wipers........................................84
Autowipers
.......................................................84
Windshield Washers
.....................................85
Lighting
General Information.....................................86
Lighting Control..............................................86
Autolamps........................................................87
Instrument Lighting Dimmer.....................88
Daytime Running Lamps............................88
Automatic High Beam Control.................89
Front Fog Lamps............................................90
Direction Indicators
.......................................90
Spot Lamps
.......................................................91
Interior Lamps..................................................91
Ambient Lighting
...........................................94
Windows and Mirrors
Power Windows
.............................................95
Global Opening
..............................................96
Exterior Mirrors
................................................96
Interior Mirror
...................................................98
Sliding Windows............................................99
Sun Visors
.........................................................99
Moonroof........................................................100
Instrument Cluster
Gauges ..............................................................
102
Warning Lamps and Indicators...............105
Audible Warnings and Indicators............110 Information Displays
General Information
......................................111
Information Messages
................................128
Climate Control
Manual Climate Control
.............................145
Automatic Climate Control
......................146
Hints on Controlling the Interior Climate.........................................................148
Heated Windows and Mirrors..................150
Cabin Air Filter
.................................................151
Remote Start...................................................151
Seats
Sitting in the Correct Position
..................152
Head Restraints
.............................................152
Manual Seats
.................................................154
Power Seats
....................................................155
Memory Function
..........................................157
Rear Seats.......................................................159
Heated Seats.................................................160
Climate Controlled Seats...........................161
Front Seat Armrest......................................162
Rear Seat Armrest........................................163
Universal Garage Door Opener
Universal Garage Door Opener...............164
Auxiliary Power Points
Auxiliary Power Points...............................168
Storage Compartments
Center Console..............................................170
Overhead Console
........................................170
Under Seat Storage.....................................170
2
Super Duty (TFE) Canada/United States of America, enUSA, First Printing Table of Contents
Page 15 of 636

CALIFORNIA PROPOSITION 65
WARNINGS
Some constituents of engine
exhaust, certain vehicle components,
certain fluids contained in vehicles
and certain products of component wear
contain or emit chemicals known to the
State of California to cause cancer and
birth defects or other reproductive harm. Battery posts, terminals and related
accessories contain lead and lead
compounds, chemicals known to the
State of California to cause cancer and
reproductive harm. Batteries also contain
other chemicals known to the State of
California to cause cancer. Wash your
hands after handling. PERCHLORATE
Certain components in your vehicle such
as airbag modules, seatbelt pretensioners
and remote control batteries may contain
perchlorate material. Special handling
may apply for service or vehicle end of life
disposal.
For more information visit:
Web Address
www.dtsc.ca.gov/hazard- ouswaste/perchlorate
FORD CREDIT
US Only
Ford Credit offers a full range of financing
and lease plans to help you acquire your
vehicle. If you have financed or leased your
vehicle through Ford Credit, thank you for
your business. We offer a number of convenient ways for
you to contact us and help to manage your
account.
Call 1-800-727-7000.
For more information about Ford Credit
and access to the Account Manager, go to
www.fordcredit.com.
REPLACEMENT PARTS
RECOMMENDATION
We have built your vehicle to the highest
standards using quality parts. We
recommend that you demand the use of
genuine Ford and Motorcraft parts
whenever your vehicle requires scheduled
maintenance or repair. You can clearly
identify genuine Ford and Motorcraft parts
by looking for the Ford, FoMoCo or
Motorcraft branding on the parts or their
packaging.
Scheduled Maintenance and
Mechanical Repairs
One of the best ways for you to make sure
that your vehicle provides years of service
is to have it maintained in line with our
recommendations using parts that
conform to the specifications detailed in
this Owner
’s Manual. Genuine Ford and
Motorcraft parts meet or exceed these
specifications.
Collision Repairs
We hope that you never experience a
collision, but accidents do happen.
Genuine Ford replacement collision parts
meet our stringent requirements for fit,
finish, structural integrity, corrosion
protection and dent resistance. During
12
Super Duty (TFE) Canada/United States of America, enUSA, First Printing Introduction
Page 16 of 636

vehicle development we validate that
these parts deliver the intended level of
protection as a whole system. A great way
to know for sure you are getting this level
of protection is to use genuine Ford
replacement collision parts.
Warranty on Replacement Parts
Genuine Ford and Motorcraft replacement
parts are the only replacement parts that
benefit from a Ford Warranty. The Ford
Warranty may not cover damage caused
to your vehicle as a result of failed
non-Ford parts. For additional information,
refer to the terms and conditions of the
Ford Warranty.
SPECIAL NOTICES
New Vehicle Limited Warranty
For a detailed description of what is
covered and what is not covered by your
vehicle
’s New Vehicle Limited Warranty,
see the Warranty Guide that is provided to
you along with your Owner ’s Manual.
Special Instructions
For your added safety, your vehicle has
sophisticated electronic controls. WARNINGS
You risk death or serious injury to
yourself and others if you do not
follow the instruction highlighted by
the warning symbol. Failure to follow the
specific warnings and instructions could
result in personal injury. Never place front seat mounted
rear-facing child or infant seats in
front of an active passenger airbag. On Board Diagnostics Data Link
Connector
WARNING
Do not connect wireless plug-in
devices to the data link connector.
Unauthorized third parties could gain
access to vehicle data and impair the
performance of safety related systems.
Only allow repair facilities that follow our
service and repair instructions to connect
their equipment to the data link connector. Your vehicle has an OBD Data Link
Connector (DLC) that is used in
conjunction with a diagnostic scan tool for
vehicle diagnostics, repairs and
reprogramming services. Installing an
aftermarket device that uses the DLC
during normal driving for purposes such as
remote insurance company monitoring,
transmission of vehicle data to other
devices or entities, or altering the
performance of the vehicle, may cause
interference with or even damage to
vehicle systems. We do not recommend
or endorse the use of aftermarket plug-in
devices unless approved by Ford. The
vehicle Warranty will not cover damage
caused by an aftermarket plug-in device.
Using your Vehicle With a
Snowplow
More information and guidelines for using
your vehicle with a snowplow are in this
Owner's Manual. See Snowplowing (page
292
).
Using your Vehicle as an
Ambulance
If your light truck has the Ford Ambulance
Preparation Package, it may be utilized as
an ambulance. We urge ambulance
manufacturers to follow the
recommendations of the Ford Incomplete
Vehicle Manual, Ford Truck Body Builder ’s
13
Super Duty (TFE) Canada/United States of America, enUSA, First Printing Introduction
Page 57 of 636

GENERAL INFORMATION ON
RADIO FREQUENCIES
This device complies with Part 15 of the
FCC Rules and with Industry Canada
license-exempt RSS standard(s).
Operation is subject to the following two
conditions: (1) This device may not cause
harmful interference, and (2) This device
must accept any interference received,
including interference that may cause
undesired operation.
Note:
Changes or modifications not
expressively approved by the party
responsible for compliance could void the
user's authority to operate the equipment.
The term IC before the radio certification
number only signifies that Industry Canada
technical specifications were met.
The typical operating range for your
transmitter is approximately 33 feet (10
meters). Vehicles with the remote start
feature will have a greater range. One of
the following could cause a decrease in
operating range:
• weather conditions
• nearby radio towers
• structures around the vehicle
• other vehicles parked next to your
vehicle
Other short-distance radio transmitters,
such as amateur radios, medical
equipment, wireless headphones, remote
controls and alarm systems may operate
on the same frequency as your remote
control. If other transmitters are operating
on those frequencies, you may not be able
to use your remote control. Using your
remote control near some types of
electronic equipment, such as USB devices, computers or cell phones can interfere with
remote operation. Operating your remote
control near metal or metallic-finished
purses, bags or clothing can interfere with
remote operation. You can lock and unlock
the doors with the key.
Note:
Make sure to lock your vehicle before
leaving it unattended.
Note: If you are in range, the remote control
will operate if you press any button
unintentionally.
Intelligent Access
The system uses a radio frequency signal
to communicate with your vehicle and
authorize your vehicle to unlock when one
of the following conditions are met:
• You touch the inside of the front
exterior door handle within
3 ft (1 m)
proximity of an intelligent access key.
• You press the tailgate release button.
• You press a button on the transmitter.
If excessive radio frequency interference
is present in the area or if the transmitter
battery is low, you may need to
mechanically unlock your door. You can
use the mechanical key blade in your
intelligent access key to open the driver
door in this situation. See
Remote
Control (page 54).
REMOTE CONTROL
Integrated Keyhead Transmitter (If
Equipped)
Use the key blade to start your vehicle and
unlock or lock the driver door from outside
your vehicle. The transmitter portion
functions as the remote control.
54
Super Duty (TFE) Canada/United States of America, enUSA, First Printing Keys and Remote Controls
Page 58 of 636

Press the button to release the key blade.
Press and hold the button to fold the key
blade back in when not in use.
Note:
Your vehicle keys came with a
security label that provides important key
cut information. Keep the label in a safe
place for future reference. Intelligent Access Key (If Equipped) The intelligent access keys operate the
power locks and the remote start system.
The key must be in your vehicle to use the
push button start.
Removable Key Blade
The intelligent access key also contains a
removable key blade that you can use to
unlock your vehicle.
55
Super Duty (TFE) Canada/United States of America, enUSA, First Printing Keys and Remote ControlsE191532 E151795 E226461
Page 59 of 636

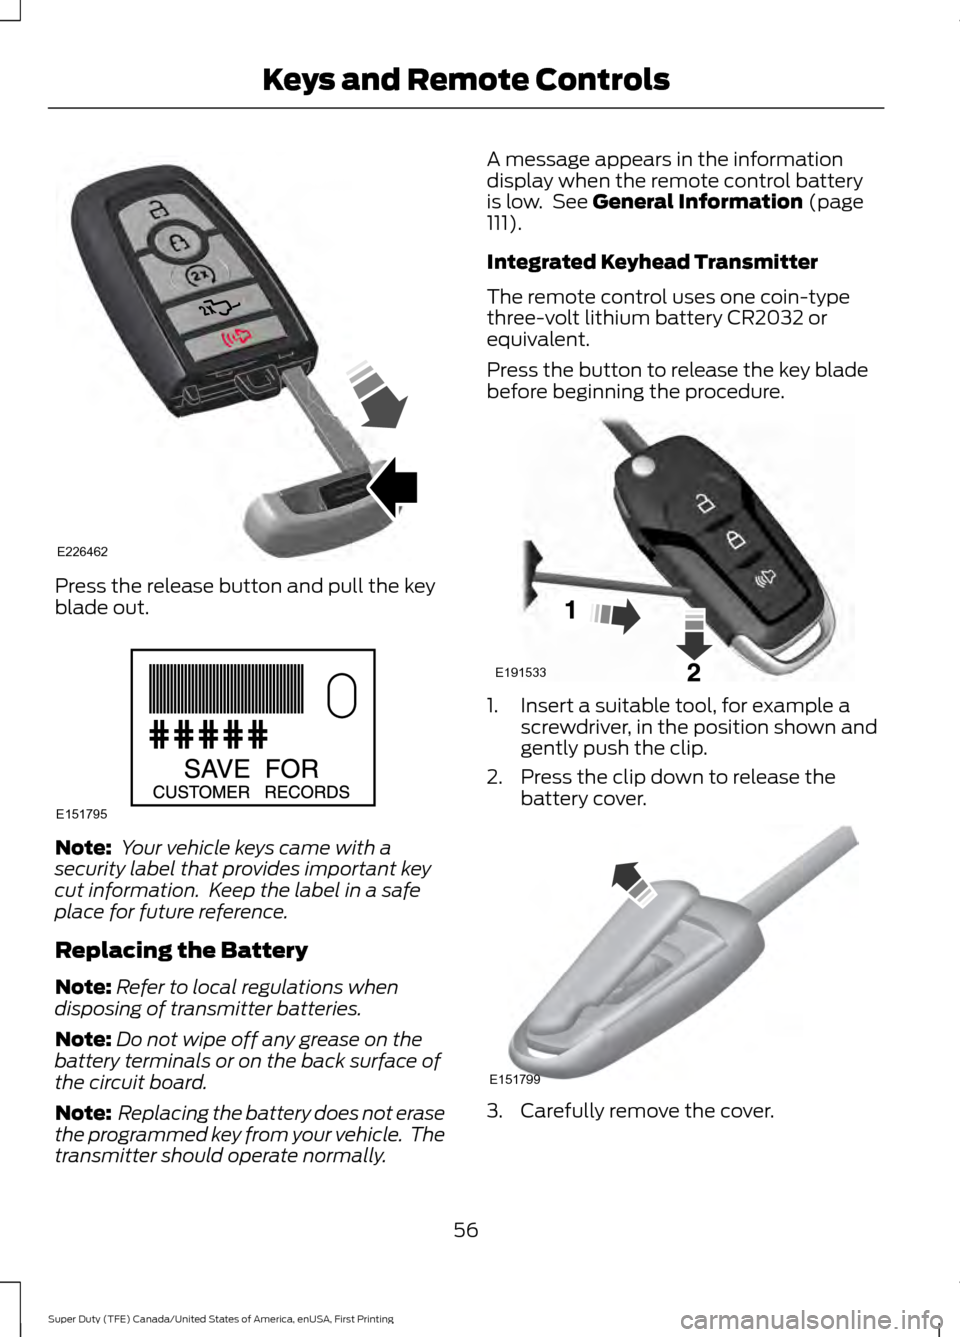
Press the release button and pull the key
blade out.
Note:
Your vehicle keys came with a
security label that provides important key
cut information. Keep the label in a safe
place for future reference.
Replacing the Battery
Note: Refer to local regulations when
disposing of transmitter batteries.
Note: Do not wipe off any grease on the
battery terminals or on the back surface of
the circuit board.
Note: Replacing the battery does not erase
the programmed key from your vehicle. The
transmitter should operate normally. A message appears in the information
display when the remote control battery
is low. See General Information (page
111).
Integrated Keyhead Transmitter
The remote control uses one coin-type
three-volt lithium battery CR2032 or
equivalent.
Press the button to release the key blade
before beginning the procedure. 1. Insert a suitable tool, for example a
screwdriver, in the position shown and
gently push the clip.
2. Press the clip down to release the battery cover. 3. Carefully remove the cover.
56
Super Duty (TFE) Canada/United States of America, enUSA, First Printing Keys and Remote ControlsE226462 E151795 E191533 E151799
Page 60 of 636

Note:
Do not touch the battery contacts or
the printed circuit board with the
screwdriver.
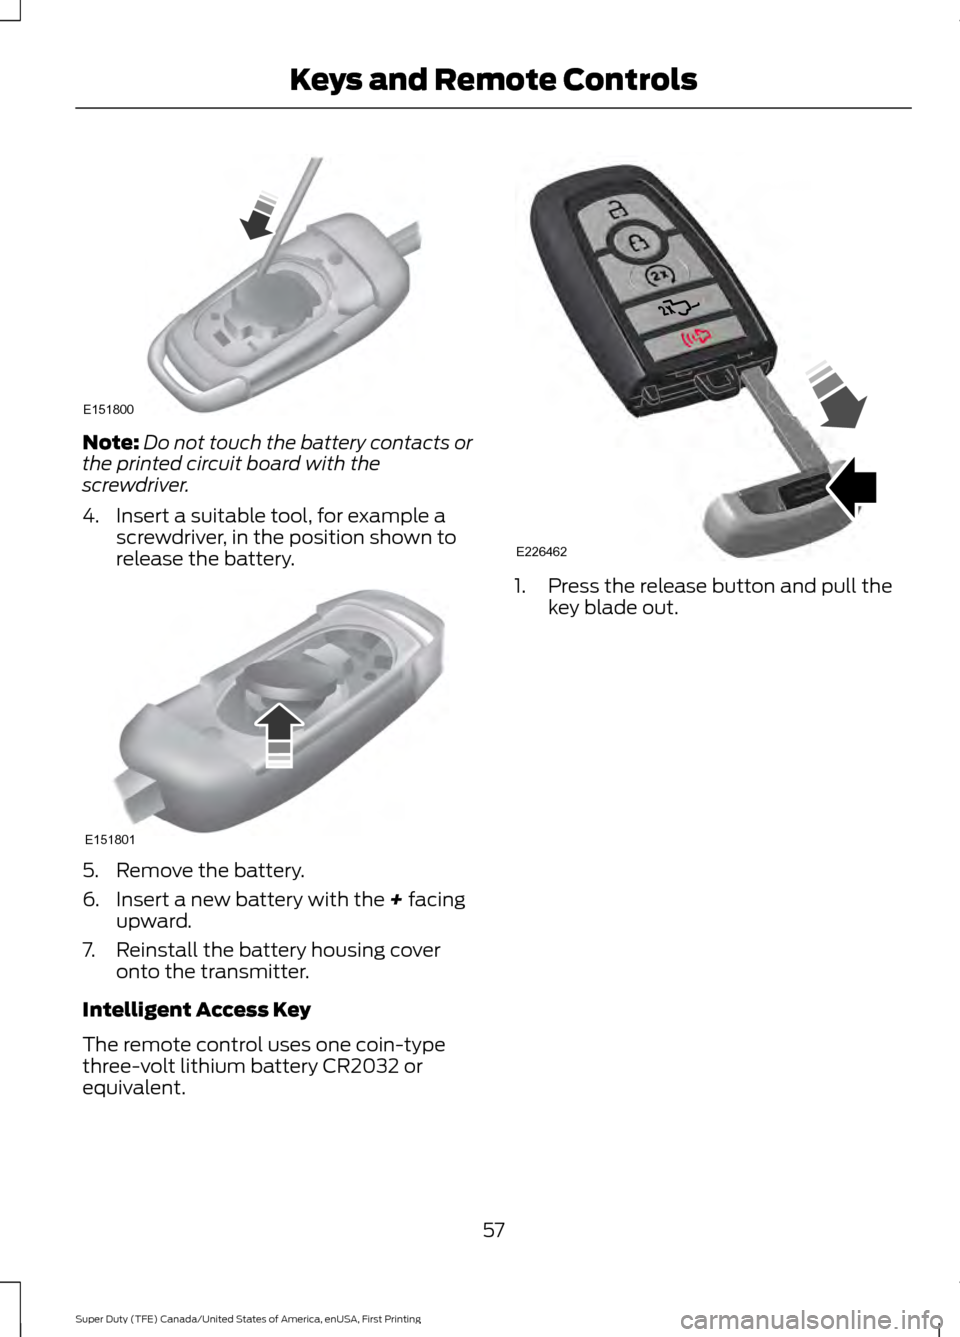
4. Insert a suitable tool, for example a screwdriver, in the position shown to
release the battery. 5. Remove the battery.
6. Insert a new battery with the + facing
upward.
7. Reinstall the battery housing cover onto the transmitter.
Intelligent Access Key
The remote control uses one coin-type
three-volt lithium battery CR2032 or
equivalent. 1. Press the release button and pull the
key blade out.
57
Super Duty (TFE) Canada/United States of America, enUSA, First Printing Keys and Remote ControlsE151800 E151801 E226462