2017 FORD SUPER DUTY clock
[x] Cancel search: clockPage 408 of 636
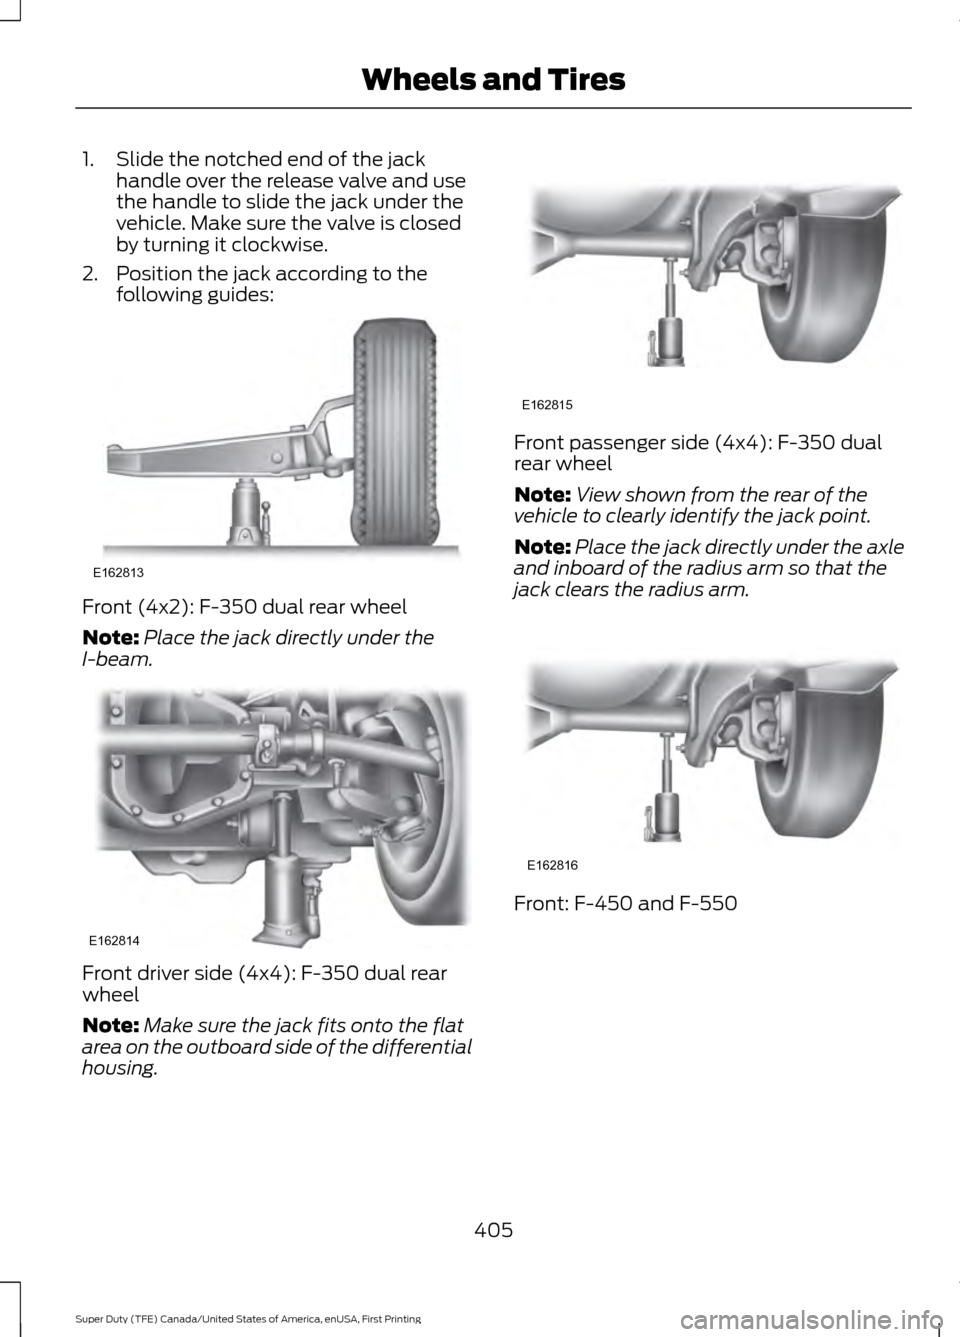
1. Slide the notched end of the jack
handle over the release valve and use
the handle to slide the jack under the
vehicle. Make sure the valve is closed
by turning it clockwise.
2. Position the jack according to the following guides: Front (4x2): F-350 dual rear wheel
Note:
Place the jack directly under the
I-beam. Front driver side (4x4): F-350 dual rear
wheel
Note:
Make sure the jack fits onto the flat
area on the outboard side of the differential
housing. Front passenger side (4x4): F-350 dual
rear wheel
Note:
View shown from the rear of the
vehicle to clearly identify the jack point.
Note: Place the jack directly under the axle
and inboard of the radius arm so that the
jack clears the radius arm. Front: F-450 and F-550
405
Super Duty (TFE) Canada/United States of America, enUSA, First Printing Wheels and TiresE162813 E162814 E162815 E162816
Page 409 of 636
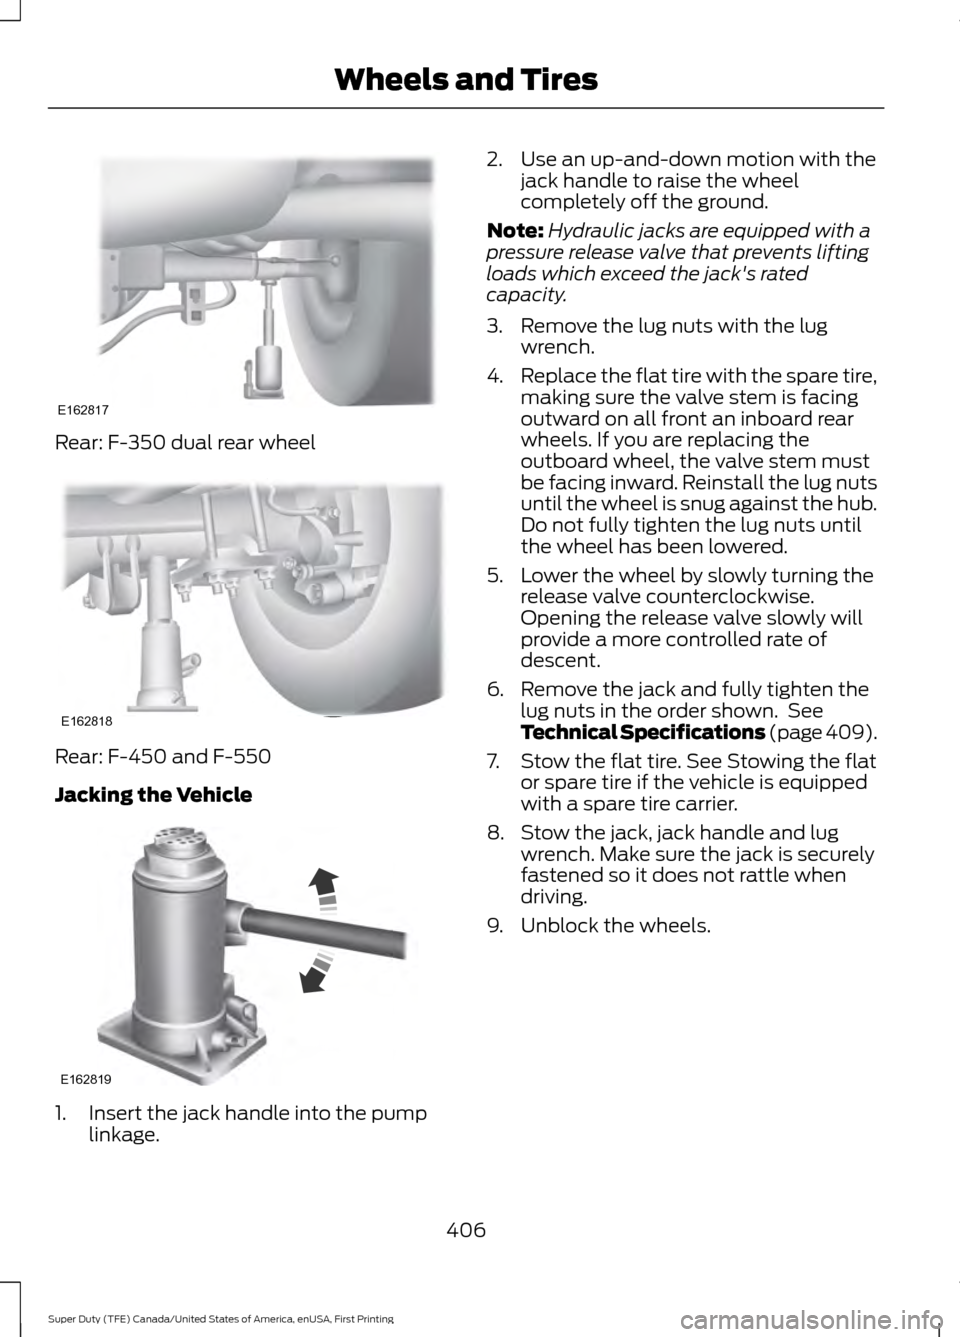
Rear: F-350 dual rear wheel
Rear: F-450 and F-550
Jacking the Vehicle
1. Insert the jack handle into the pump
linkage. 2. Use an up-and-down motion with the
jack handle to raise the wheel
completely off the ground.
Note: Hydraulic jacks are equipped with a
pressure release valve that prevents lifting
loads which exceed the jack's rated
capacity.
3. Remove the lug nuts with the lug wrench.
4. Replace the flat tire with the spare tire,
making sure the valve stem is facing
outward on all front an inboard rear
wheels. If you are replacing the
outboard wheel, the valve stem must
be facing inward. Reinstall the lug nuts
until the wheel is snug against the hub.
Do not fully tighten the lug nuts until
the wheel has been lowered.
5. Lower the wheel by slowly turning the release valve counterclockwise.
Opening the release valve slowly will
provide a more controlled rate of
descent.
6. Remove the jack and fully tighten the lug nuts in the order shown. See
Technical Specifications (page 409).
7. Stow the flat tire. See Stowing the flat or spare tire if the vehicle is equipped
with a spare tire carrier.
8. Stow the jack, jack handle and lug wrench. Make sure the jack is securely
fastened so it does not rattle when
driving.
9. Unblock the wheels.
406
Super Duty (TFE) Canada/United States of America, enUSA, First Printing Wheels and TiresE162817 E162818 E162819
Page 411 of 636
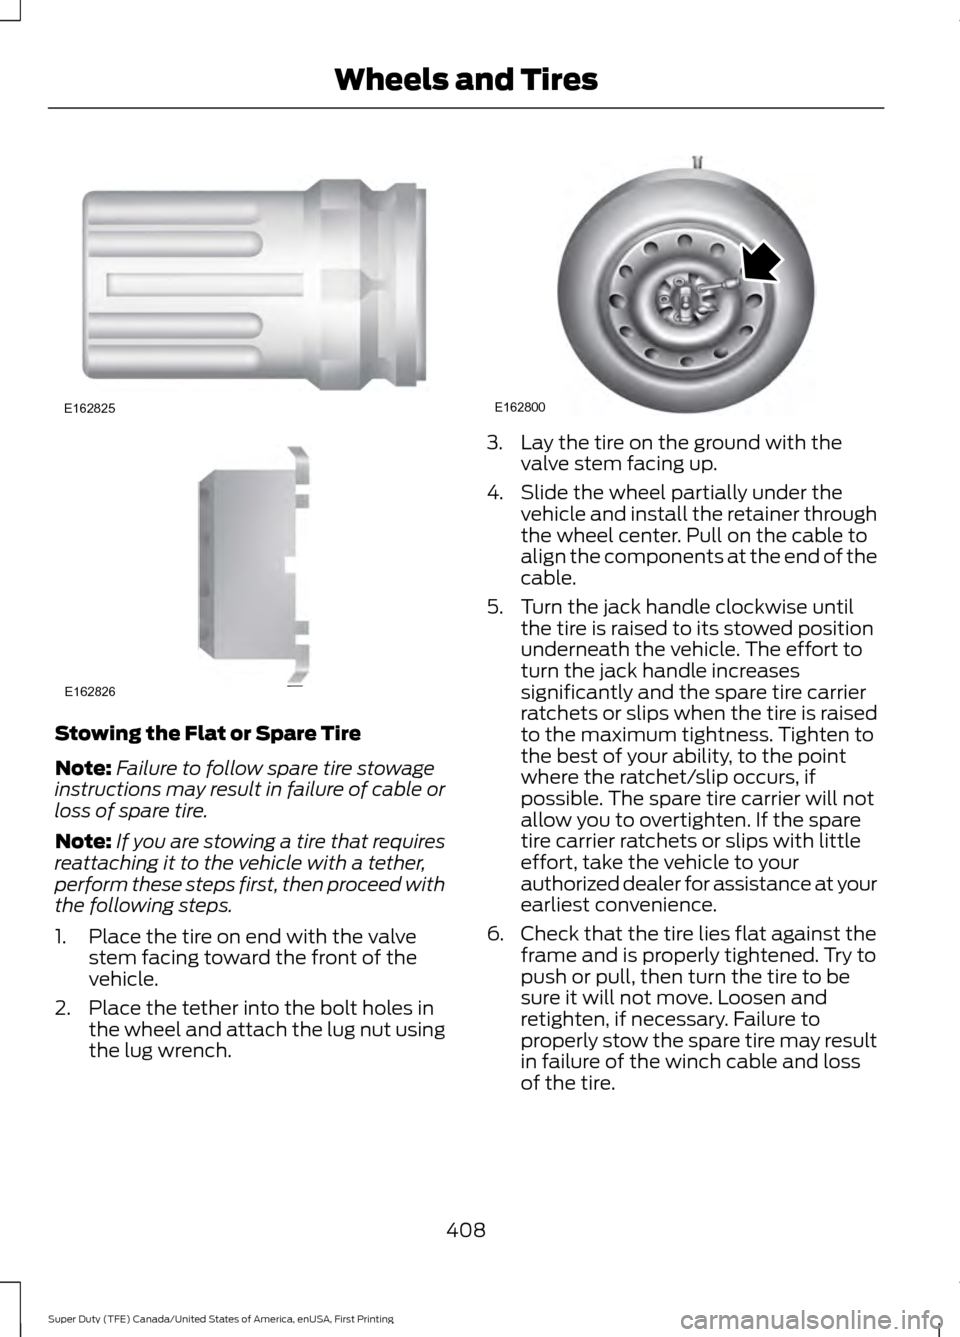
Stowing the Flat or Spare Tire
Note:
Failure to follow spare tire stowage
instructions may result in failure of cable or
loss of spare tire.
Note: If you are stowing a tire that requires
reattaching it to the vehicle with a tether,
perform these steps first, then proceed with
the following steps.
1. Place the tire on end with the valve stem facing toward the front of the
vehicle.
2. Place the tether into the bolt holes in the wheel and attach the lug nut using
the lug wrench. 3. Lay the tire on the ground with the
valve stem facing up.
4. Slide the wheel partially under the vehicle and install the retainer through
the wheel center. Pull on the cable to
align the components at the end of the
cable.
5. Turn the jack handle clockwise until the tire is raised to its stowed position
underneath the vehicle. The effort to
turn the jack handle increases
significantly and the spare tire carrier
ratchets or slips when the tire is raised
to the maximum tightness. Tighten to
the best of your ability, to the point
where the ratchet/slip occurs, if
possible. The spare tire carrier will not
allow you to overtighten. If the spare
tire carrier ratchets or slips with little
effort, take the vehicle to your
authorized dealer for assistance at your
earliest convenience.
6. Check that the tire lies flat against the frame and is properly tightened. Try to
push or pull, then turn the tire to be
sure it will not move. Loosen and
retighten, if necessary. Failure to
properly stow the spare tire may result
in failure of the winch cable and loss
of the tire.
408
Super Duty (TFE) Canada/United States of America, enUSA, First Printing Wheels and TiresE162825 E162826 E162800
Page 440 of 636
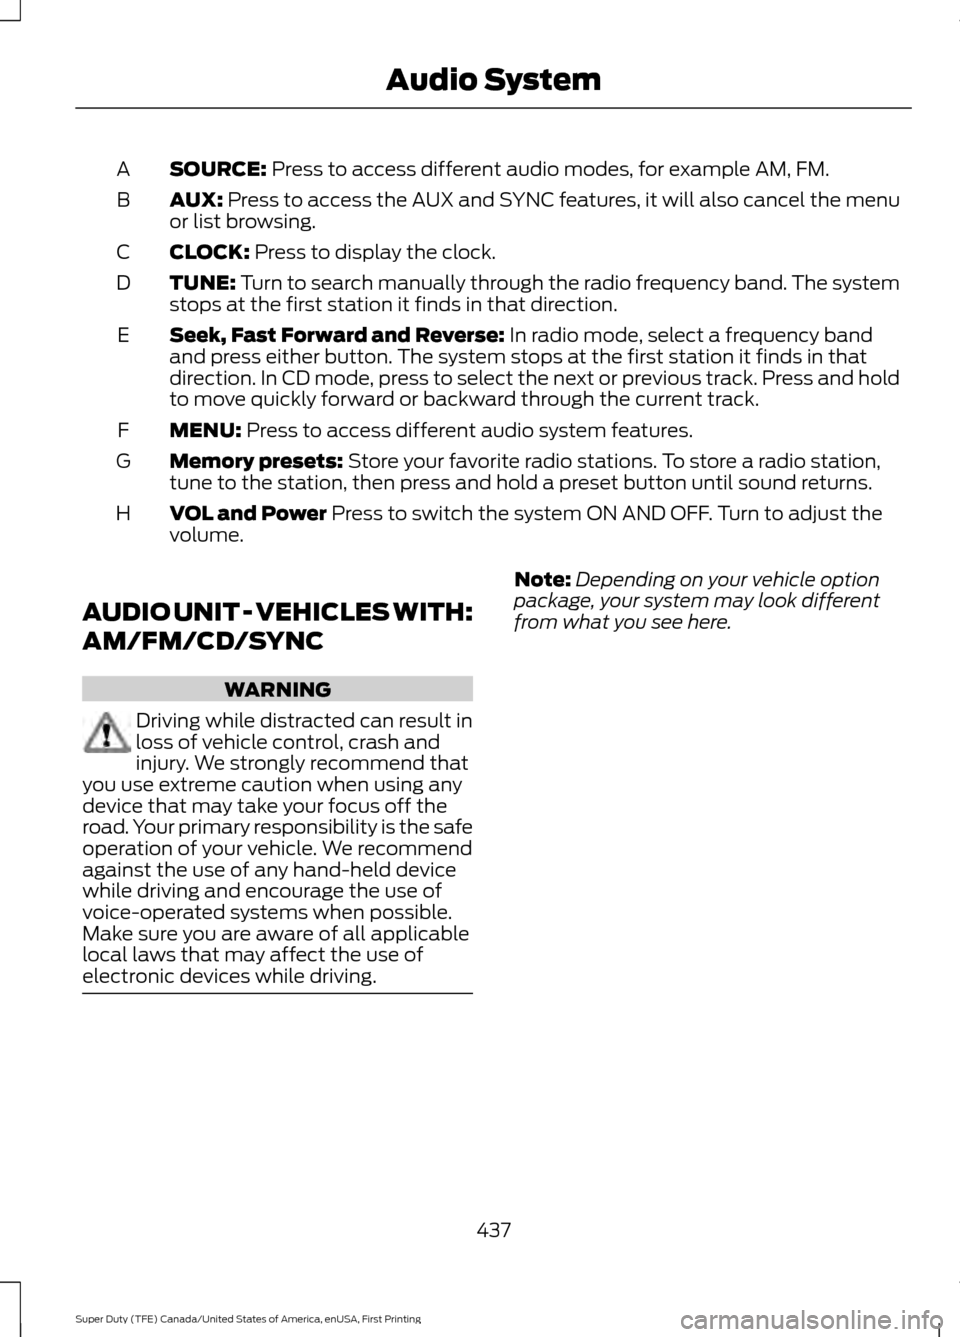
SOURCE: Press to access different audio modes, for example AM, FM.
A
AUX:
Press to access the AUX and SYNC features, it will also cancel the menu
or list browsing.
B
CLOCK:
Press to display the clock.
C
TUNE:
Turn to search manually through the radio frequency band. The system
stops at the first station it finds in that direction.
D
Seek, Fast Forward and Reverse:
In radio mode, select a frequency band
and press either button. The system stops at the first station it finds in that
direction. In CD mode, press to select the next or previous track. Press and hold
to move quickly forward or backward through the current track.
E
MENU:
Press to access different audio system features.
F
Memory presets:
Store your favorite radio stations. To store a radio station,
tune to the station, then press and hold a preset button until sound returns.
G
VOL and Power
Press to switch the system ON AND OFF. Turn to adjust the
volume.
H
AUDIO UNIT - VEHICLES WITH:
AM/FM/CD/SYNC WARNING
Driving while distracted can result in
loss of vehicle control, crash and
injury. We strongly recommend that
you use extreme caution when using any
device that may take your focus off the
road. Your primary responsibility is the safe
operation of your vehicle. We recommend
against the use of any hand-held device
while driving and encourage the use of
voice-operated systems when possible.
Make sure you are aware of all applicable
local laws that may affect the use of
electronic devices while driving. Note:
Depending on your vehicle option
package, your system may look different
from what you see here.
437
Super Duty (TFE) Canada/United States of America, enUSA, First Printing Audio System
Page 442 of 636
CD slot: Insert a CD.
G
Eject:
Press to eject a CD.
H
VOL and Power:
Press to switch the system on and off. Turn to adjust the
volume.
I
PHONE:
Press to access the phone features of the SYNC system. See your
SYNC information.
J
MENU:
Press to access different audio system features. See Menu Structure
later in this section.
K
MEDIA:
Press to open the media source menu. You can press this multiple
times to change to CD or to a SYNC-Media device or scroll through the media
sources using the arrow buttons. Press OK to select a source.
L
CLOCK:
If not in phone mode, press to display the clock.
M
RADIO:
Press this multiple times to select a radio band. Press and hold to
select the autostore function. Press to return to the main screen of the active
radio band.
N
SIRIUS:
Press to listen to SIRIUS satellite radio.
O
CD:
Press to listen to a CD. Press the function buttons to scroll through the
menu choices.
P
SOUND:
Press to access settings for Treble, Midrange, Bass, Fade or Balance.
Use the up and down arrow buttons to select the various settings. When you
make your selection, press the left and right arrow buttons to change the
settings. Press
OK to set or press MENU to exit. Sound settings can be set for
each audio source independently.
Q
Menu Structure
Note: Depending on your system, some
options may appear slightly different.
Press
MENU. Press the up and down arrow buttons to
scroll through the options.
Press the right arrow to enter a menu.
Press the left arrow to exit a menu.
Press OK to confirm a selection.
439
Super Duty (TFE) Canada/United States of America, enUSA, First Printing Audio System
Page 443 of 636
Radio
Use the left and right arrows to go up or down the
frequency band.
Manual tune
Select for a brief sampling of all available channels.
Scan
Select to store the six strongest local stations on the AM-
AST and FM-AST frequency bands.
AST
Select to view additional broadcast data (radio text), if
available. This feature defaults to off. RBDS must be on
for you to set a category, or display radio text and station
names.
RBDS/RDS Audio Settings
Automatically adjusts the volume to compensate for
speed and wind noise. You can set the system between
0 and +7.
Speed Compensated
Volume
Select to adjust settings for Treble, Midrange, Bass, Fade
or Balance.
Sound
Select to optimize sound quality for the chosen seating
position.
Occupancy Mode
Choose between the stereo modes.
DSP CD Settings
Select to scan all disc selections.
Scan All
Select to scan all music in the current MP3 folder.
Scan Folder
Select to bring soft and loud passages together for a more
consistent listening level.
CD Compression Clock Settings
Select to set the time.
Set Time
Select to set the calendar date.
Set Date
Select to view clock time in a 12-hour mode or 24-hour
mode.
24h Mode
440
Super Duty (TFE) Canada/United States of America, enUSA, First Printing Audio System
Page 491 of 636
Action and Description
Menu Item
Item
This bar displays icons and messages pertaining to current
system activities including climate settings, voice
commands and phone functions such as text messages.
Status Bar
A
This button is available on the main screens. Pressing it
takes you to the home screen view.
Home
B
This shows the current time. You can set the clock manually
or have it controlled by the vehicle's GPS location. See
Settings (page 535).
Clock
C
This displays the current outside temperature.
Outside
Temperature
D
You can touch any of the buttons on this bar to select a
feature.
Feature Bar
E
The touchscreen allows you quick access
to all of your comfort, navigation,
communication and entertainment
options. Using the status and feature bar
you can quickly select the feature you want
to use.
Note: Your system is equipped with a
feature that allows you to access and
control audio features for 10 minutes after
you switch the ignition off (and no doors
open). The Status Bar
Additional icons also display in the status
bar depending on market, vehicle options
and current operation. If a feature is not
active, the icon does not display. Certain
icons may move to the left or right
depending on what options are active.
488
Super Duty (TFE) Canada/United States of America, enUSA, First Printing SYNC™ 3
(If Equipped)
Page 520 of 636
Note: The heated steering wheel may remain on after remote starting the
vehicle, based on your remote start settings. The heated steering wheel may
also turn on when you start your vehicle, if it was on when you switched your
vehicle off.
Note:
For steering wheels with wood trim, the heating feature will not heat the
wheel between the 10 and 2 o'clock positions.
Defrost:
A pop up appears on the screen to display the defrost options.
C
MAX Defrost: Touch the button to maximize defrosting. Air flows through the
windshield vents, the fan automatically adjusts to the highest speed and the
driver and passenger temperatures are set to HI. You can use this setting to
defog or clear a thin covering of ice from the windshield. The heated rear window
also automatically turns on when you select MAX Defrost.
Defrost:
Distributes air through the windshield defroster vents and demister
vents.
AUTO:
Touch the button to switch on automatic operation. Select the desired
temperature using the temperature control. The system adjusts fan speed, air
distribution, air conditioning operation, and selects outside air or recirculated
air to heat or cool the vehicle in order to maintain the desired temperature.
D
Power:
Touch the button to switch the system on and off. Switching off the
climate control system prevents outside air from entering the vehicle.
E
DUAL:
This button lights up when the passenger controls are active. To switch
it off and link the passenger temperature to the driver temperature, touch the
DUAL button.
F
Note:
the passenger side temperature and the DUAL indication automatically
turn on when you or your passenger adjust the passenger temperature.
Passenger temperature:
Touch up or down to adjust the temperature.
G
Fan speed:
Touch up or down to increase or decrease the volume of air that
circulates in your vehicle.
H
Note:
You cannot adjust the fan speed when the system is set to AUTO or MAX
A/C.
A/C:
A pop-up appears on the screen to display the air conditioning options.
I
MAX A/C: Touch the button to activate and maximize cooling. The driver and
passenger temperatures are set to LO, recirculated air flows through the
instrument panel vents, air conditioning automatically turns on and the fan
automatically adjusts to the highest speed.
A/C:
Touch to switch the air conditioning on or off. Use A/C with recirculated
air to improve cooling performance and efficiency.
Note:
In certain conditions (for example, Max Defrost), the air conditioning
compressor may continue to operate even when you switch the air conditioning
A/C button off.
517
Super Duty (TFE) Canada/United States of America, enUSA, First Printing SYNC™ 3
(If Equipped)