2017 FORD SUPER DUTY parking brake
[x] Cancel search: parking brakePage 143 of 636
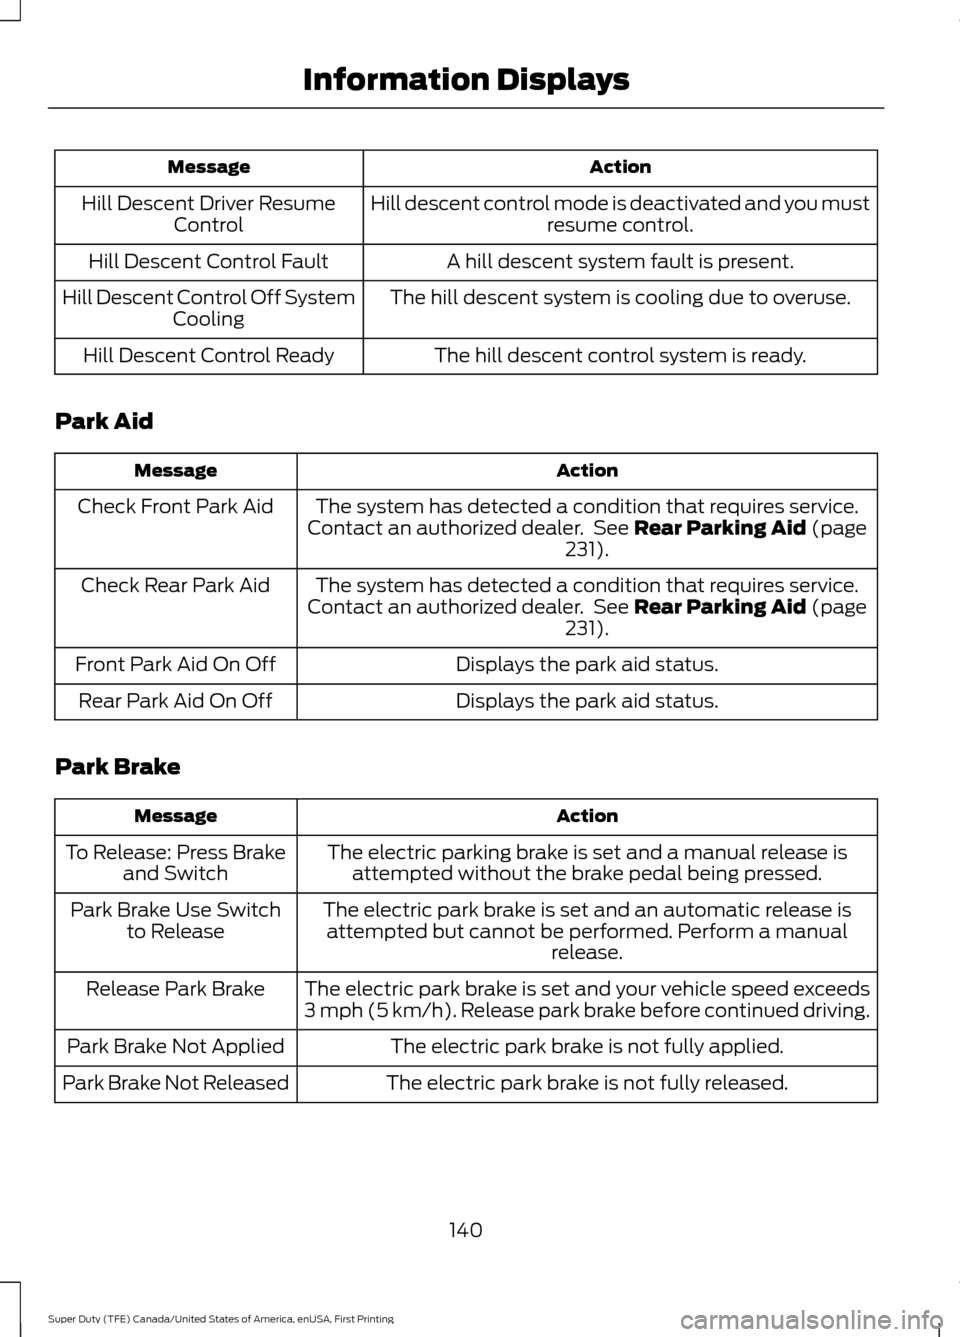
Action
Message
Hill descent control mode is deactivated and you mustresume control.
Hill Descent Driver Resume
Control
A hill descent system fault is present.
Hill Descent Control Fault
The hill descent system is cooling due to overuse.
Hill Descent Control Off System
Cooling
The hill descent control system is ready.
Hill Descent Control Ready
Park Aid Action
Message
The system has detected a condition that requires service.
Contact an authorized dealer. See Rear Parking Aid (page
231).
Check Front Park Aid
The system has detected a condition that requires service.
Contact an authorized dealer. See
Rear Parking Aid (page
231).
Check Rear Park Aid
Displays the park aid status.
Front Park Aid On Off
Displays the park aid status.
Rear Park Aid On Off
Park Brake Action
Message
The electric parking brake is set and a manual release isattempted without the brake pedal being pressed.
To Release: Press Brake
and Switch
The electric park brake is set and an automatic release isattempted but cannot be performed. Perform a manual release.
Park Brake Use Switch
to Release
The electric park brake is set and your vehicle speed exceeds
3 mph (5 km/h). Release park brake before continued driving.
Release Park Brake
The electric park brake is not fully applied.
Park Brake Not Applied
The electric park brake is not fully released.
Park Brake Not Released
140
Super Duty (TFE) Canada/United States of America, enUSA, First Printing Information Displays
Page 178 of 636
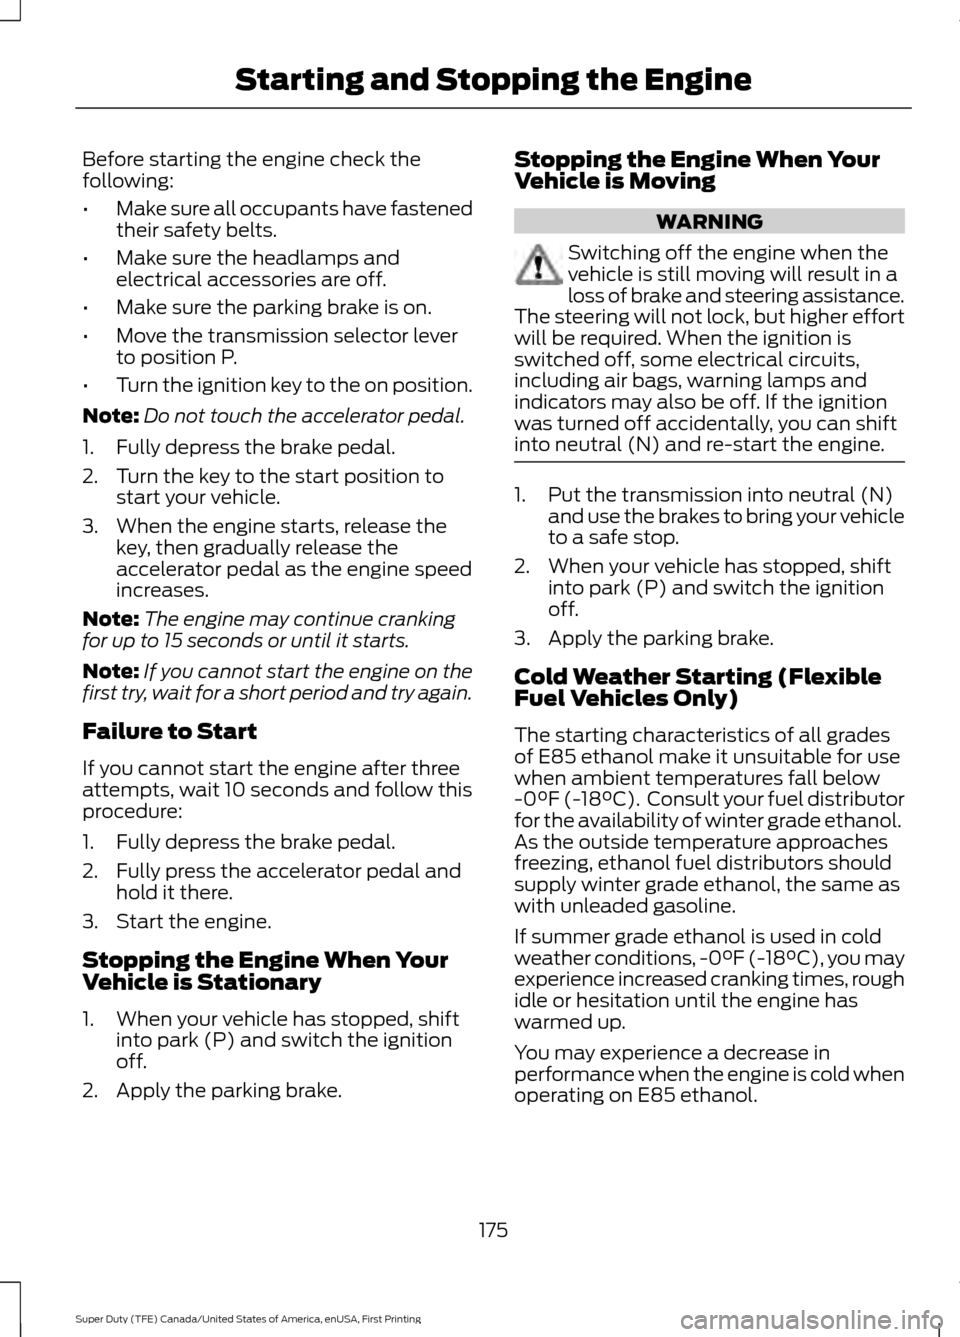
Before starting the engine check the
following:
•
Make sure all occupants have fastened
their safety belts.
• Make sure the headlamps and
electrical accessories are off.
• Make sure the parking brake is on.
• Move the transmission selector lever
to position P.
• Turn the ignition key to the on position.
Note: Do not touch the accelerator pedal.
1. Fully depress the brake pedal.
2. Turn the key to the start position to start your vehicle.
3. When the engine starts, release the key, then gradually release the
accelerator pedal as the engine speed
increases.
Note: The engine may continue cranking
for up to 15 seconds or until it starts.
Note: If you cannot start the engine on the
first try, wait for a short period and try again.
Failure to Start
If you cannot start the engine after three
attempts, wait 10 seconds and follow this
procedure:
1. Fully depress the brake pedal.
2. Fully press the accelerator pedal and hold it there.
3. Start the engine.
Stopping the Engine When Your
Vehicle is Stationary
1. When your vehicle has stopped, shift into park (P) and switch the ignition
off.
2. Apply the parking brake. Stopping the Engine When Your
Vehicle is Moving WARNING
Switching off the engine when the
vehicle is still moving will result in a
loss of brake and steering assistance.
The steering will not lock, but higher effort
will be required. When the ignition is
switched off, some electrical circuits,
including air bags, warning lamps and
indicators may also be off. If the ignition
was turned off accidentally, you can shift
into neutral (N) and re-start the engine. 1. Put the transmission into neutral (N)
and use the brakes to bring your vehicle
to a safe stop.
2. When your vehicle has stopped, shift into park (P) and switch the ignition
off.
3. Apply the parking brake.
Cold Weather Starting (Flexible
Fuel Vehicles Only)
The starting characteristics of all grades
of E85 ethanol make it unsuitable for use
when ambient temperatures fall below
-0°F (-18°C). Consult your fuel distributor
for the availability of winter grade ethanol.
As the outside temperature approaches
freezing, ethanol fuel distributors should
supply winter grade ethanol, the same as
with unleaded gasoline.
If summer grade ethanol is used in cold
weather conditions, -0°F (-18°C), you may
experience increased cranking times, rough
idle or hesitation until the engine has
warmed up.
You may experience a decrease in
performance when the engine is cold when
operating on E85 ethanol.
175
Super Duty (TFE) Canada/United States of America, enUSA, First Printing Starting and Stopping the Engine
Page 179 of 636
Do not use starting fluid such as ether in
the air intake system. Such fluid could
cause immediate explosive damage to the
engine and possible personal injury.
If you should experience cold weather
starting problems on E85 ethanol, and
neither an alternative brand of E85 ethanol
nor an engine block heater is available, the
addition of unleaded gasoline to your tank
improves cold starting performance. Your
vehicle is designed to operate on E85
ethanol alone, unleaded gasoline alone, or
any mixture of the two.
If the Engine Fails to Start Using the
Preceding Instructions (Flexible Fuel
Vehicles Only)
1. Press the accelerator pedal down
one-third to one-half of its travel, and
then crank the engine.
2. When the engine starts, release the key, then gradually release the
accelerator pedal as the engine speed
increases. If the engine still does not
start, repeat Step 1.
Guarding Against Exhaust Fumes WARNING
Exhaust leaks may result in entry of
harmful and potentially lethal fumes
into the passenger compartment. If
you smell exhaust fumes inside your
vehicle, have your vehicle inspected
immediately. Do not drive if you smell
exhaust fumes. Important Ventilating Information
If you stop your vehicle and then leave the
engine idling for long periods of time, we
recommend that you do one of the
following:
•
Open the windows at least 1 inch (2.5
centimeters).
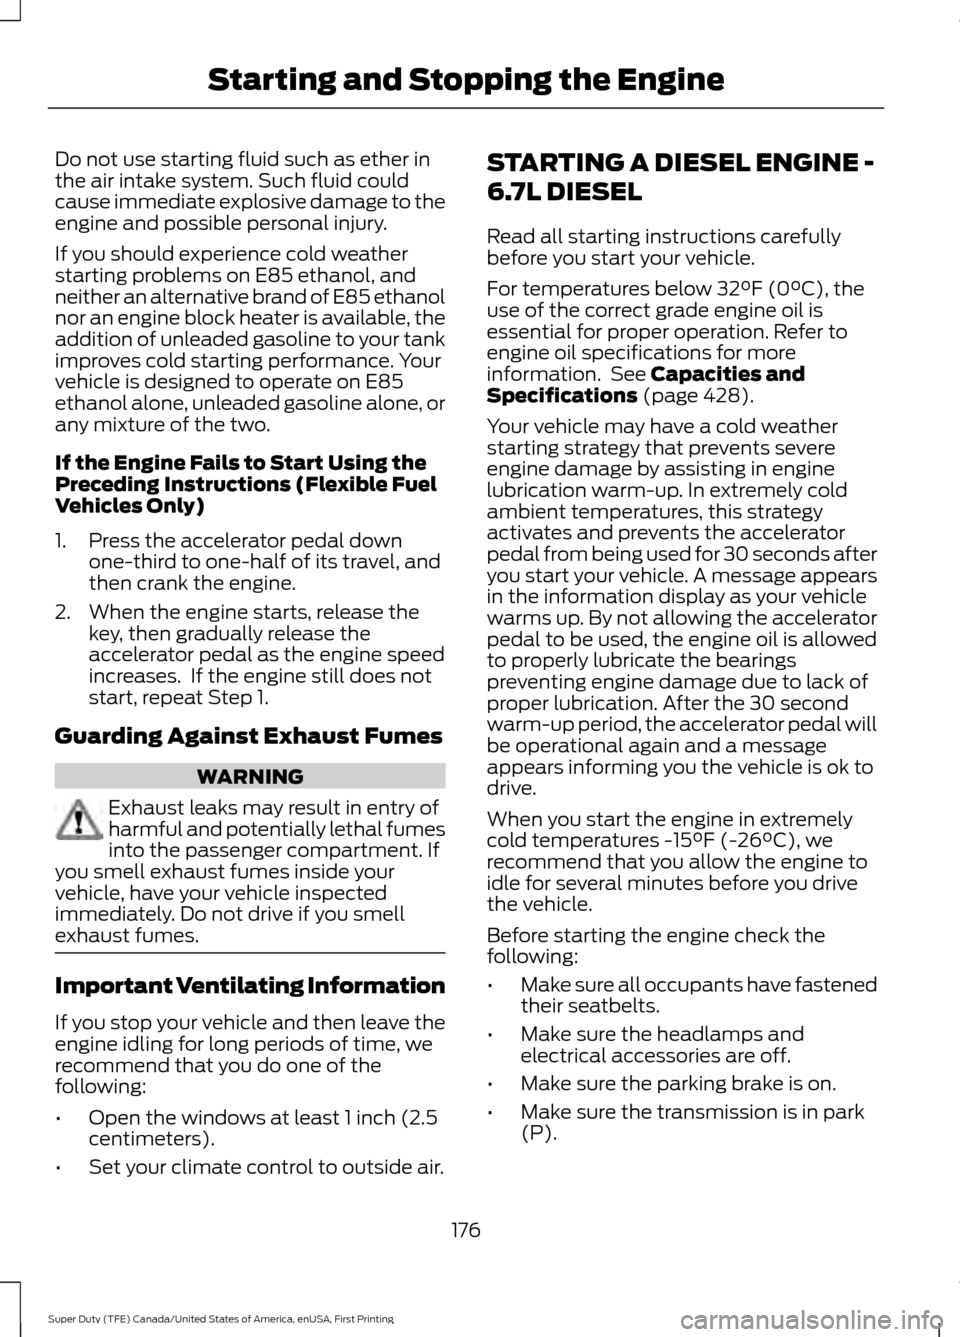
• Set your climate control to outside air. STARTING A DIESEL ENGINE -
6.7L DIESEL
Read all starting instructions carefully
before you start your vehicle.
For temperatures below 32°F (0°C), the
use of the correct grade engine oil is
essential for proper operation. Refer to
engine oil specifications for more
information. See
Capacities and
Specifications (page 428).
Your vehicle may have a cold weather
starting strategy that prevents severe
engine damage by assisting in engine
lubrication warm-up. In extremely cold
ambient temperatures, this strategy
activates and prevents the accelerator
pedal from being used for 30 seconds after
you start your vehicle. A message appears
in the information display as your vehicle
warms up. By not allowing the accelerator
pedal to be used, the engine oil is allowed
to properly lubricate the bearings
preventing engine damage due to lack of
proper lubrication. After the 30 second
warm-up period, the accelerator pedal will
be operational again and a message
appears informing you the vehicle is ok to
drive.
When you start the engine in extremely
cold temperatures
-15°F (-26°C), we
recommend that you allow the engine to
idle for several minutes before you drive
the vehicle.
Before starting the engine check the
following:
• Make sure all occupants have fastened
their seatbelts.
• Make sure the headlamps and
electrical accessories are off.
• Make sure the parking brake is on.
• Make sure the transmission is in park
(P).
176
Super Duty (TFE) Canada/United States of America, enUSA, First Printing Starting and Stopping the Engine
Page 184 of 636
To help prolong engine life, we
recommended you allow the engine to idle
for three to five minutes, especially after
any of the following:
•
Continuous engine speed.
• High ambient temperature.
• High GVW or GCW operation, for
example heavy loads or trailers.
This allows the turbo charged engine to
cool down.
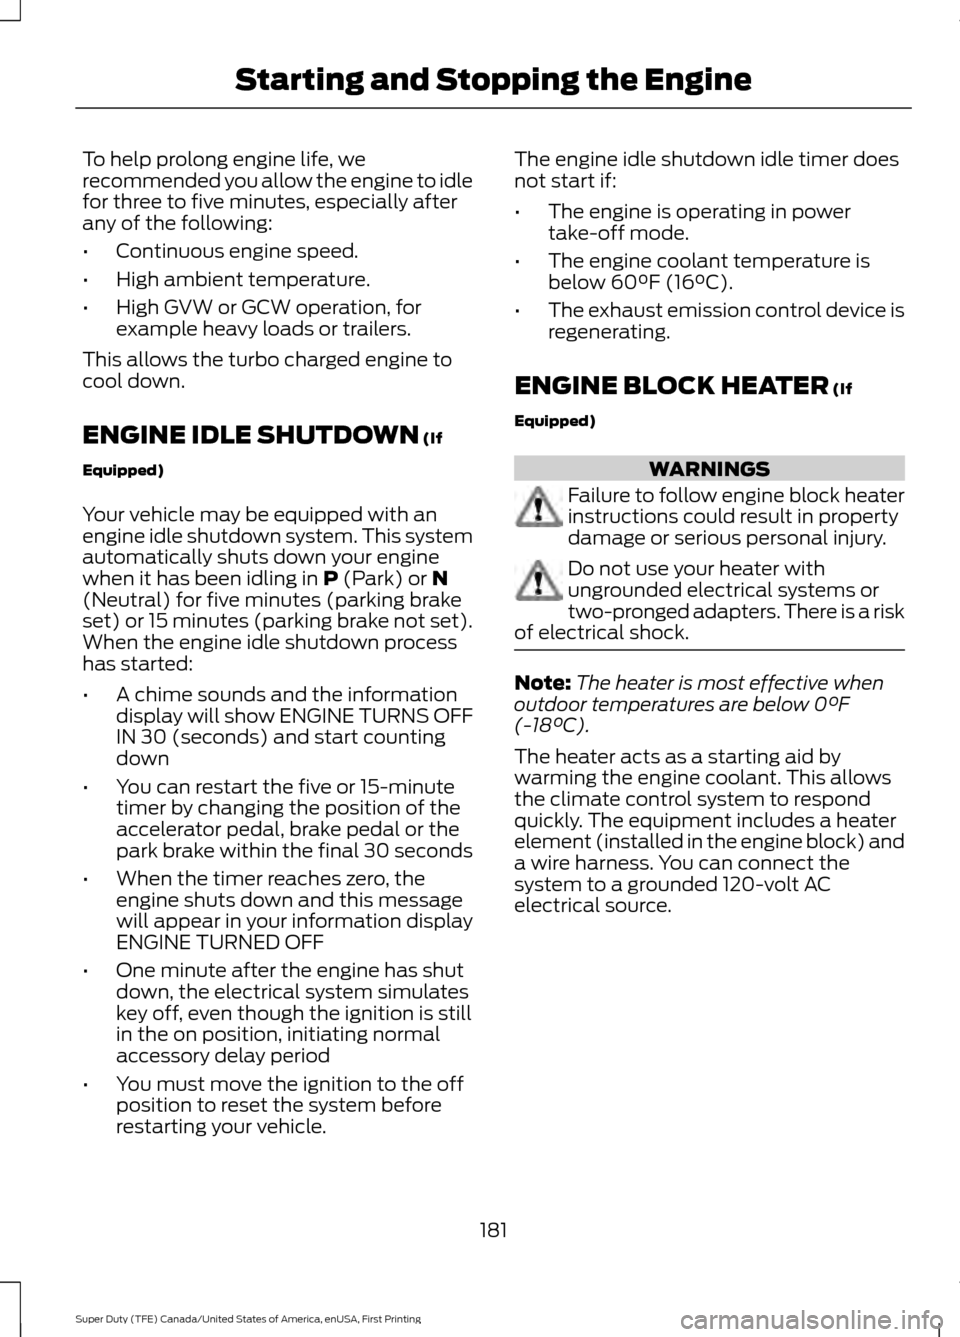
ENGINE IDLE SHUTDOWN (If
Equipped)
Your vehicle may be equipped with an
engine idle shutdown system. This system
automatically shuts down your engine
when it has been idling in
P (Park) or N
(Neutral) for five minutes (parking brake
set) or 15 minutes (parking brake not set).
When the engine idle shutdown process
has started:
• A chime sounds and the information
display will show ENGINE TURNS OFF
IN 30 (seconds) and start counting
down
• You can restart the five or 15-minute
timer by changing the position of the
accelerator pedal, brake pedal or the
park brake within the final 30 seconds
• When the timer reaches zero, the
engine shuts down and this message
will appear in your information display
ENGINE TURNED OFF
• One minute after the engine has shut
down, the electrical system simulates
key off, even though the ignition is still
in the on position, initiating normal
accessory delay period
• You must move the ignition to the off
position to reset the system before
restarting your vehicle. The engine idle shutdown idle timer does
not start if:
•
The engine is operating in power
take-off mode.
• The engine coolant temperature is
below 60°F (16°C).
• The exhaust emission control device is
regenerating.
ENGINE BLOCK HEATER
(If
Equipped) WARNINGS
Failure to follow engine block heater
instructions could result in property
damage or serious personal injury.
Do not use your heater with
ungrounded electrical systems or
two-pronged adapters. There is a risk
of electrical shock. Note:
The heater is most effective when
outdoor temperatures are below 0°F
(-18°C).
The heater acts as a starting aid by
warming the engine coolant. This allows
the climate control system to respond
quickly. The equipment includes a heater
element (installed in the engine block) and
a wire harness. You can connect the
system to a grounded 120-volt AC
electrical source.
181
Super Duty (TFE) Canada/United States of America, enUSA, First Printing Starting and Stopping the Engine
Page 203 of 636
The regeneration process operates more
efficiently when you drive your vehicle at
a constant speed above 30 mph
(48 km/h) and at a steady engine speed
for approximately 20 minutes. The
frequency and duration of regeneration
fluctuates by how you drive your vehicle,
outside air temperature and altitude. For
most driving, regeneration frequency varies
from 100–500 mi (160–805 km) between
occurrences and each occurrence lasts
9– 35 minutes. You can usually reduce the
duration of regeneration if you maintain a
constant speed above 30 mph (48 km/h).
When the engine control module detects
that the diesel particulate filter is nearly
full of particulates and you are not
operating your vehicle in a manner to allow
effective automatic regeneration,
messages appear in the information
display as a reminder for you to drive your
vehicle in order to clean the diesel
particulate filter. If you drive your vehicle
in a manner to allow effective automatic
regeneration, the information display
shows a cleaning exhaust filter message,
which is the normal regeneration process.
You can also choose operator commanded
regeneration to clean the exhaust system
at this point. See Information Messages
(page
128).
If you are not able to drive in a manner that
allows effective automatic active
regeneration or you choose to perform
regeneration of the diesel particulate filter
while at idle, then operator commanded
regeneration would need to be performed.
Operator Commanded Regeneration
(If Equipped)
If your vehicle is operated with significant
stationary operation, low speed drive
cycles less than
25 mph (40 km/h), short
drive cycles, a drive time is less than 10 -
15 minutes or the vehicle does not fully
warm up, passive and active regeneration
may not sufficiently clean the diesel particulate filter system. Operator
commanded regeneration allows you to
manually start regeneration of the diesel
particulate filter at idle to clean the filter.
If you are not sure whether your vehicle has
this feature, contact an authorized dealer.
When to Carry Out Operator Commanded
Regeneration
You can use the operator commanded
regeneration feature when a message
appears in the information display and you
are not able to drive in a manner that
allows effective automatic active
regeneration or if you choose to manually
start the regeneration of the diesel
particulate filter manually while the vehicle
is idle. See
Information Messages (page
128).
Operator Commanded Regeneration
Precautions and Safe Exhaust Position WARNING
Failure to comply with the following
instructions for Operator
Commanded Regeneration may
result in fire, serious injury, death or
property damage. Make sure that the louvers located at the
tip of the exhaust are clear of any
obstructions as they are used to introduce
fresh air into the tailpipe to cool the
exhaust gases as they leave the exhaust
system.
Before you start operator commanded
regeneration, do the following:
•
Shift into park (P) and apply the
parking brake on stable, level ground.
• Park your vehicle outside of any
structure.
200
Super Duty (TFE) Canada/United States of America, enUSA, First Printing Fuel and Refueling
Page 208 of 636
AUTOMATIC TRANSMISSION
WARNING
Always apply the parking brake fully
and make sure you shift into park (P).
Switch the ignition off and remove
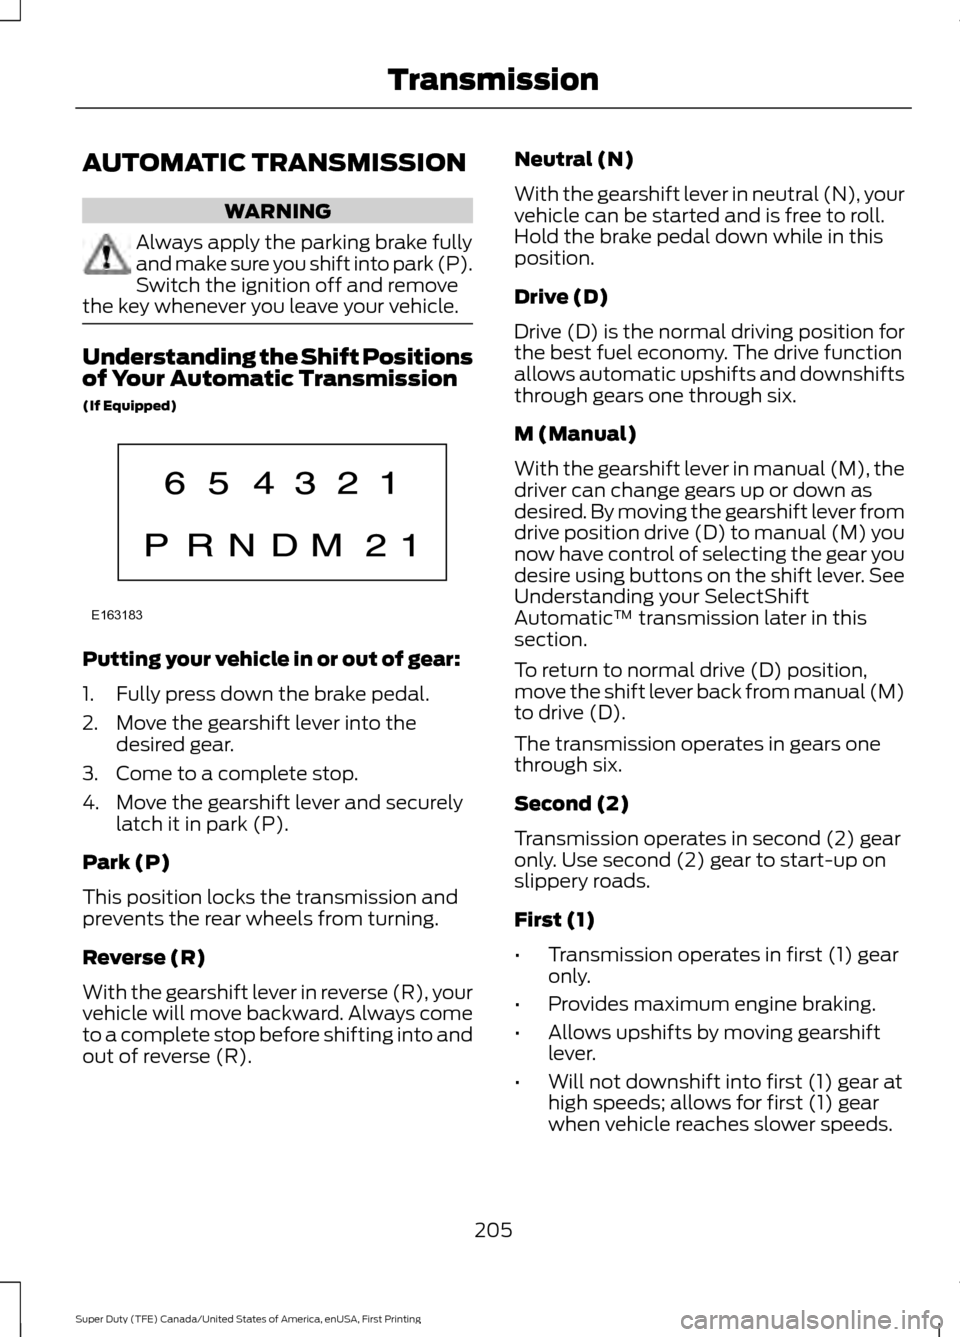
the key whenever you leave your vehicle. Understanding the Shift Positions
of Your Automatic Transmission
(If Equipped)
Putting your vehicle in or out of gear:
1. Fully press down the brake pedal.
2. Move the gearshift lever into the
desired gear.
3. Come to a complete stop.
4. Move the gearshift lever and securely latch it in park (P).
Park (P)
This position locks the transmission and
prevents the rear wheels from turning.
Reverse (R)
With the gearshift lever in reverse (R), your
vehicle will move backward. Always come
to a complete stop before shifting into and
out of reverse (R). Neutral (N)
With the gearshift lever in neutral (N), your
vehicle can be started and is free to roll.
Hold the brake pedal down while in this
position.
Drive (D)
Drive (D) is the normal driving position for
the best fuel economy. The drive function
allows automatic upshifts and downshifts
through gears one through six.
M (Manual)
With the gearshift lever in manual (M), the
driver can change gears up or down as
desired. By moving the gearshift lever from
drive position drive (D) to manual (M) you
now have control of selecting the gear you
desire using buttons on the shift lever. See
Understanding your SelectShift
Automatic
™ transmission later in this
section.
To return to normal drive (D) position,
move the shift lever back from manual (M)
to drive (D).
The transmission operates in gears one
through six.
Second (2)
Transmission operates in second (2) gear
only. Use second (2) gear to start-up on
slippery roads.
First (1)
• Transmission operates in first (1) gear
only.
• Provides maximum engine braking.
• Allows upshifts by moving gearshift
lever.
• Will not downshift into first (1) gear at
high speeds; allows for first (1) gear
when vehicle reaches slower speeds.
205
Super Duty (TFE) Canada/United States of America, enUSA, First Printing TransmissionE163183
Page 209 of 636
Forced downshifts
•
Allowed in drive (D) with the tow/haul
feature on or off.
• Press the accelerator to the floor.
• Allows transmission to select an
appropriate gear.
Tow/Haul Mode WARNING
Do not use the tow/haul feature
when driving in icy or slippery
conditions as the increased engine
braking can cause the rear wheels to slide
and your vehicle to swing around with the
possible loss of vehicle control. To activate tow/haul, press the
button on the gearshift lever
once. The TOW HAUL indicator
light illuminates in the instrument cluster.
The tow/haul feature:
• Delays upshifts to reduce the frequency
of transmission shifting.
• Provides engine braking in all forward
gears, which slows your vehicle and
assists you in controlling your vehicle
when descending a grade.
• Depending on driving conditions and
load conditions, may downshift the
transmission, slow your vehicle and
control your vehicle speed when
descending a hill, without pressing the
accelerator pedal. The amount of
downshift braking provided will vary
based upon the amount you press the
brake pedal.
The tow/haul feature improves
transmission operation when towing a
trailer or a heavy load. All transmission
gear ranges are available when using
tow/haul. Note:
If your vehicle is equipped with the
Adaptive Steering System, enabling the
tow/haul feature will adjust the steering
response. In tow/haul mode the Adaptive
Steering system reduces vehicle sensitivity
to steering inputs at higher vehicle speeds
while maintaining the ease of parking and
maneuverability at low speeds. See
Steering (page 256).
To deactivate the tow/haul feature and
return to normal driving mode, press the
button on the gearshift lever when
tow/haul is active. The TOW HAUL light
deactivates. Tow/haul also deactivates
when you power down your vehicle.
Understanding your SelectShift
Automatic ™ transmission (If Equipped) Your vehicle is equipped with a SelectShift
Automatic
™ transmission gearshift lever.
The SelectShift Automatic transmission
gives you the ability to change gears up or
down (without a clutch) as desired.
206
Super Duty (TFE) Canada/United States of America, enUSA, First Printing TransmissionE161509 E163184
Page 211 of 636
Automatic Transmission Adaptive
Learning
This feature's design is to increase
durability and provide consistent shift feel
over the life of your vehicle. A new vehicle
or transmission may have firm shifts, soft
shifts or both. This operation is normal and
does not affect function or durability of the
transmission. Over time, the adaptive
learning process fully updates transmission
operation. Additionally, whenever you
disconnect the battery or install a new
battery, the system must relearn the
strategy.
Brake-Shift Interlock
WARNINGS
Do not drive your vehicle until you
verify that the brake lamps are
working.
When doing this procedure, you need
to take the transmission out of park
(P) which means your vehicle can
roll freely. To avoid unwanted vehicle
movement, always fully apply the parking
brake prior to doing this procedure. Use
wheels chocks if appropriate. If the parking brake is fully released,
but the brake warning lamp remains
illuminated, the brakes may not be
working properly. Have your vehicle
checked as soon as possible. Your vehicle is equipped with a brake-shift
interlock feature that prevents the
gearshift lever from moving from park (P)
when the ignition is on and the brake pedal
is not pressed.
If you cannot move the gearshift lever out
of park (P) position with the ignition is on
and the brake pedal pressed, a malfunction
may have occurred. It is possible that a
fuse has blown or your vehicle
’s brake
lamps are not operating properly. See
Fuse Specification Chart (page 310). If the fuse is not blown and the brake
lamps are working properly, the following
procedure allows you to move the gearshift
lever from park (P):
1. Apply the parking brake. Switch the
ignition key to 1 (off), then remove the
key.
2. Move the steering column to the full down and full rearward position
(toward the driver ’s seat).
3. Remove the gearshift lever boot.
4. Place fingers into hole where you removed the gearshift lever boot and
pull top half of shroud up and forward
to separate it from the lower half of the
shroud. There is a hinge at the forward
edge of the top shroud. Roll the top
half of the shroud upward on the hinge
point to clear the hazard flasher button,
then pull straight rearward toward the
driver ’s seat to remove.
5. Remove the top half of the shroud.
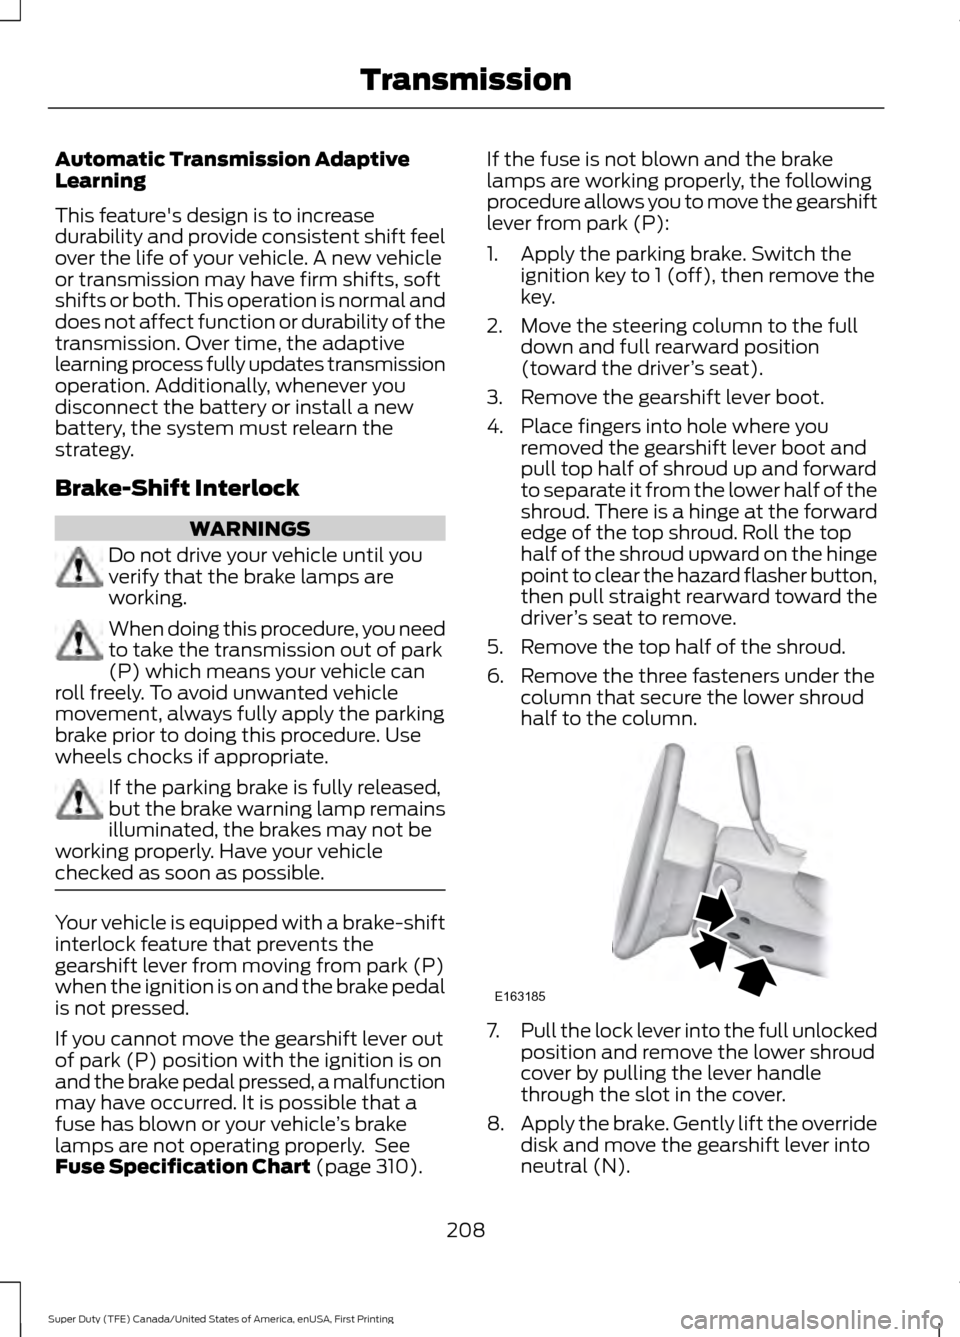
6. Remove the three fasteners under the column that secure the lower shroud
half to the column. 7.
Pull the lock lever into the full unlocked
position and remove the lower shroud
cover by pulling the lever handle
through the slot in the cover.
8. Apply the brake. Gently lift the override
disk and move the gearshift lever into
neutral (N).
208
Super Duty (TFE) Canada/United States of America, enUSA, First Printing TransmissionE163185