2017 FORD POLICE INTERCEPTOR SEDAN check engine
[x] Cancel search: check enginePage 184 of 358
Note:
Automatic transmission fluid
expands when warmed. To obtain an
accurate fluid check, drive your vehicle until
you warm it up, approximately 20 mi
(30 km). If you operate your vehicle for an
extended period at high speeds, in city traffic
during hot weather or pulling a trailer, switch
your vehicle off until it reaches normal
operating temperatures to allow the fluid
to cool before checking. Depending on
vehicle use, cooling times could take up to
30 minutes or longer.
Refer to your scheduled maintenance
information for scheduled intervals for fluid
checks and changes. Your transmission
does not consume fluid. However, you
should check the fluid level if the
transmission is not working properly. For
example, if the transmission slips or shifts
slowly or if you notice some sign of a fluid
leak.
1. Drive your vehicle
20 mi (30 km) or
until it reaches normal operating
temperature.
2. Park your vehicle on a level surface and
engage the parking brake.
3. With the parking brake engaged and your foot on the brake pedal, start the
engine and move the gearshift lever
through all of the gear ranges. Allow a
minimum of 10 seconds for each gear
to engage.
4. Put the gearshift lever in park (P) and leave the engine running.
Note: For vehicles with the EcoBoost
engine, move the air filter assembly aside
to access the transmission dipstick. See
Moving the Air Filter Assembly for more
information.
5. Remove the dipstick and wipe it clean with a dry, lint free clean rag. If
necessary, refer to the Under hood
overview in this chapter for the location
of the dipstick. 6. Install the dipstick making sure you
fully seat it in the filler tube by turning
it to the locked position.
7. Remove the dipstick and inspect the fluid level. The fluid should be in the
designated areas for normal operating
temperature.
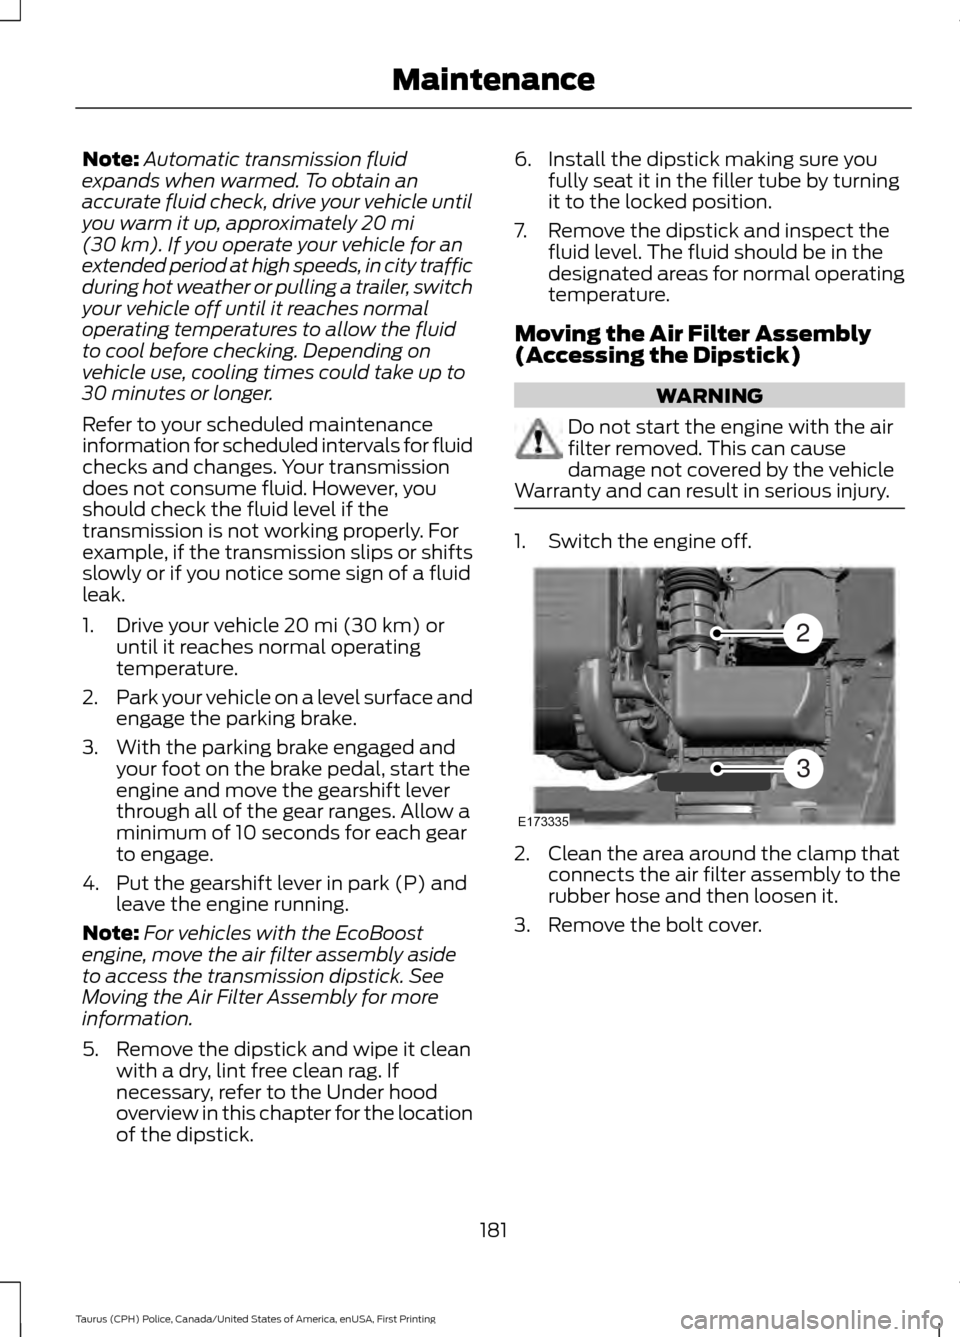
Moving the Air Filter Assembly
(Accessing the Dipstick) WARNING
Do not start the engine with the air
filter removed. This can cause
damage not covered by the vehicle
Warranty and can result in serious injury. 1. Switch the engine off.
2. Clean the area around the clamp that
connects the air filter assembly to the
rubber hose and then loosen it.
3. Remove the bolt cover.
181
Taurus (CPH) Police, Canada/United States of America, enUSA, First Printing MaintenanceE173335
2
3
Page 186 of 358

High fluid level
If the fluid level is above the MIN range of
the dipstick, remove fluid to reach the MIN
level.
Note:
Fluid level above the MIN level may
cause shift or engagement concerns or
possible damage. An overheating condition
can cause high fluid levels. If you operate
your vehicle for an extended period at high
speeds, in city traffic during hot weather or
pulling a trailer, you should switch your
vehicle off until your vehicle reaches normal
operating temperatures. Depending on
vehicle use, cooling times could take up to
30 minutes or longer.
Adjusting Automatic Transmission
Fluid Levels
Low fluid level Overfilled fluid level
Note:
An overfill condition of transmission
fluid may cause shift or engagement
concerns or possible damage.
Before adding any fluid, make sure the
correct type is used. The type of fluid used
is normally indicated on the dipstick and
in the Technical Specifications section in
this chapter.
Do not use supplemental transmission
fluid additives, treatments or cleaning
agents. The use of these materials may
affect transmission operation and result
in damage to internal transmission
components. Reinstall the air filter
assembly. After you check the fluid level
and adjust as necessary, do the following:
Reinstalling The Air Filter
Assembly
1. Switch the engine off.
2. Replace the air filter assembly back into the grommets by pushing down
on the air filter assembly.
3. Tighten the clamp holding the air filter
assembly to the rubber hose.
4. Install and tighten the two bolts that attach the air filter assembly to the
front of the vehicle.
5. Install the bolt cover.
6. Reinstall the harness retaining clip into
the front of the air filter assembly.
183
Taurus (CPH) Police, Canada/United States of America, enUSA, First Printing MaintenanceE240047 E240048 E240049
Page 202 of 358
•
With your foot on the brake, shift
through all the gears while the engine
is running.
• We recommend that you change the
engine oil before you use your vehicle
again.
Fuel system
• Fill the fuel tank with high-quality fuel
until the first automatic shutoff of the
fuel pump nozzle.
Cooling system
• Protect against freezing temperatures.
• When removing your vehicle from
storage, check coolant fluid level.
Confirm that there are no cooling
system leaks and that fluid is at the
recommended level.
Battery
• Check and recharge as necessary. Keep
connections clean.
• If storing your vehicle for more than 30
days without recharging the battery,
we recommend that you disconnect
the battery cables to maintain battery
charge for quick starting.
Note: It is necessary to reset memory
features if battery cables are disconnected.
Brakes
• Make sure the brakes and parking brake
release fully.
Tires
• Maintain recommended air pressure. Miscellaneous
•
Make sure all linkages, cables, levers
and pins under your vehicle are covered
with grease to prevent rust.
• Move vehicles at least 25 ft (7.5 m)
every 15 days to lubricate working parts
and prevent corrosion.
Removing Vehicle From Storage
When your vehicle is ready to come out of
storage, do the following:
• Wash your vehicle to remove any dirt
or grease film build-up on window
surfaces.
• Check windshield wipers for any
deterioration.
• Check under the hood for any foreign
material that may have collected
during storage such as mice or squirrel
nests.
• Check the exhaust for any foreign
material that may have collected
during storage.
• Check tire pressures and set tire
inflation per the Tire Label.
• Check brake pedal operation. Drive
your vehicle
15 ft (4.5 m) back and
forth to remove rust build-up.
• Check fluid levels (including coolant,
oil and gas) to make sure there are no
leaks, and fluids are at recommended
levels.
• If you remove the battery, clean the
battery cable ends and check for
damage.
Contact an authorized dealer if you have
any concerns or issues.
199
Taurus (CPH) Police, Canada/United States of America, enUSA, First Printing Vehicle Care
Page 203 of 358
GENERAL INFORMATION
A decal with tire pressure data is located
in the driver
’s door opening.
Check and set the tire pressure at the
ambient temperature in which you are
intending to drive your vehicle and when
the tires are cold.
Note: Check your tire pressures regularly to
optimize fuel economy.
Note: Use only approved wheel and tire
sizes. Using other sizes could damage your
vehicle and will make the National Type
Approval invalid.
Note: If you change the diameter of the tires
from that fitted at the factory, the
speedometer may not display the correct
speed. Take your vehicle to an authorized
dealer to have the engine management
system reprogrammed.
TIRE CARE
Information About Uniform
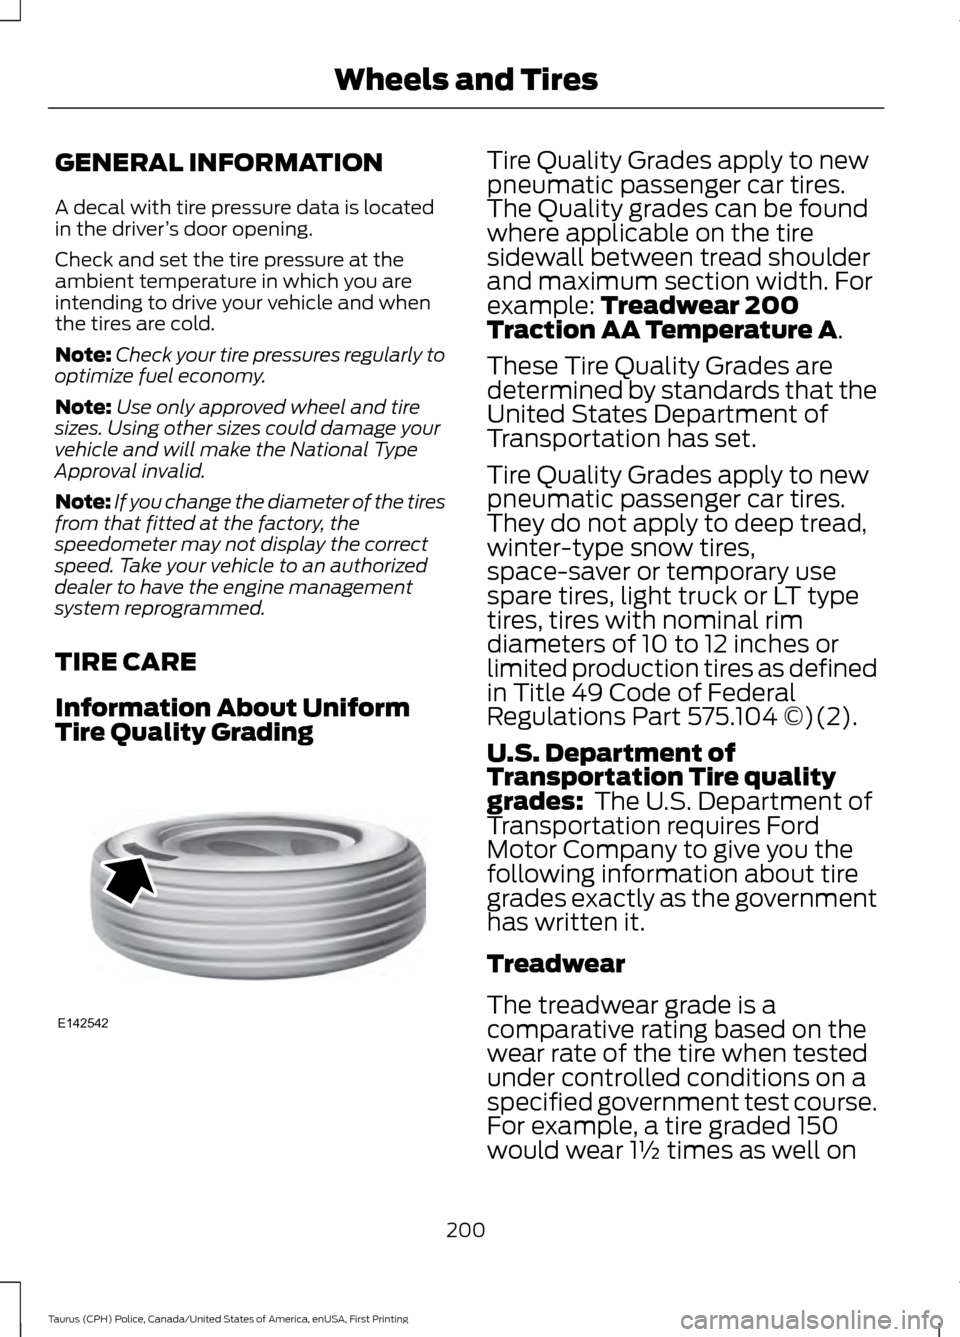
Tire Quality Grading Tire Quality Grades apply to new
pneumatic passenger car tires.
The Quality grades can be found
where applicable on the tire
sidewall between tread shoulder
and maximum section width. For
example: Treadwear 200
Traction AA Temperature A.
These Tire Quality Grades are
determined by standards that the
United States Department of
Transportation has set.
Tire Quality Grades apply to new
pneumatic passenger car tires.
They do not apply to deep tread,
winter-type snow tires,
space-saver or temporary use
spare tires, light truck or LT type
tires, tires with nominal rim
diameters of 10 to 12 inches or
limited production tires as defined
in Title 49 Code of Federal
Regulations Part 575.104 ©)(2).
U.S. Department of
Transportation Tire quality
grades:
The U.S. Department of
Transportation requires Ford
Motor Company to give you the
following information about tire
grades exactly as the government
has written it.
Treadwear
The treadwear grade is a
comparative rating based on the
wear rate of the tire when tested
under controlled conditions on a
specified government test course.
For example, a tire graded 150
would wear 1½ times as well on
200
Taurus (CPH) Police, Canada/United States of America, enUSA, First Printing Wheels and TiresE142542
Page 234 of 358
VEHICLE IDENTIFICATION
NUMBER
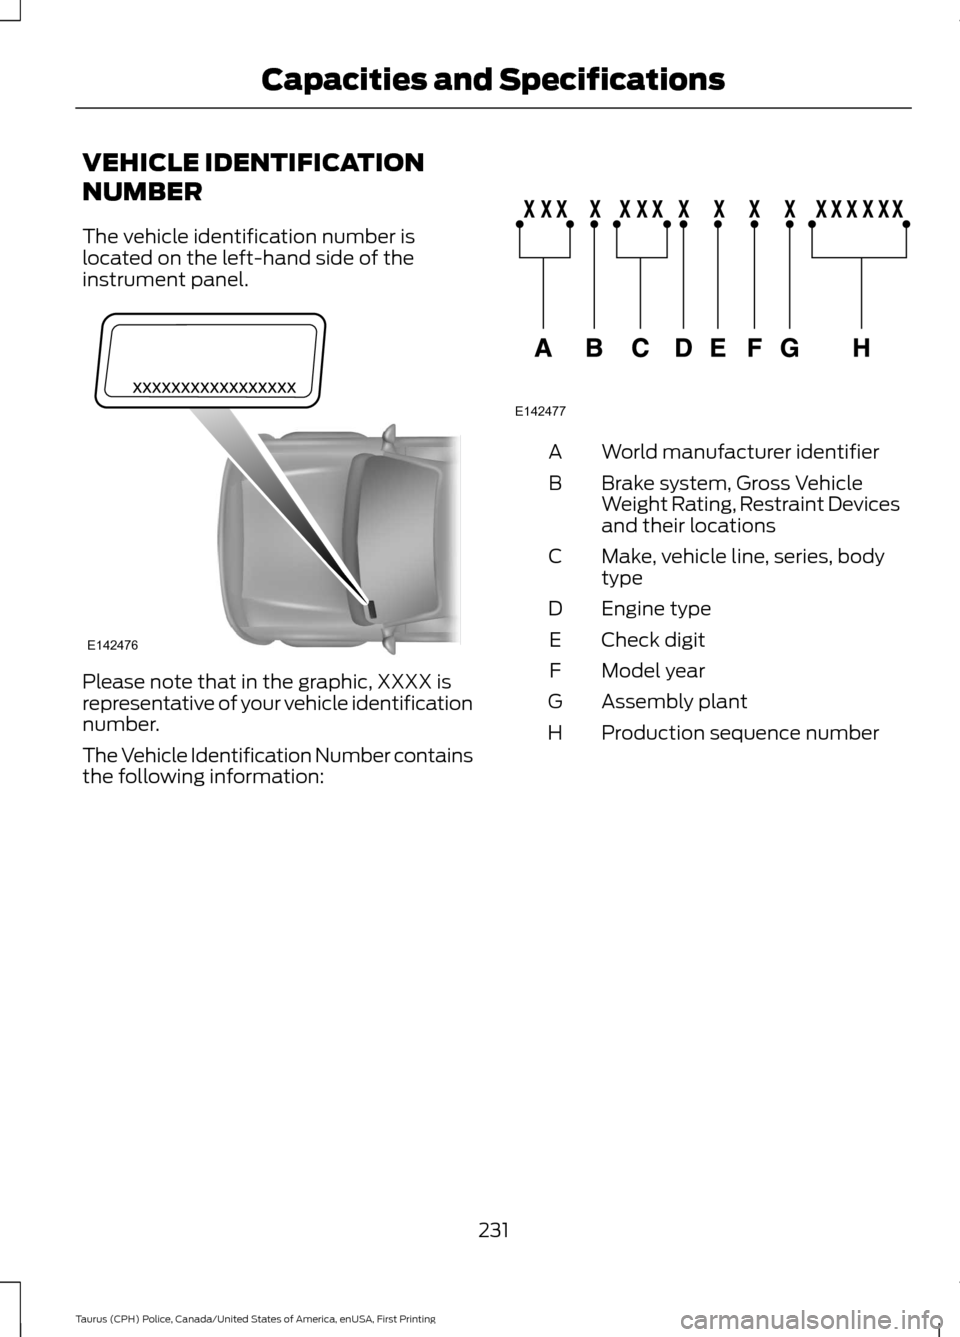
The vehicle identification number is
located on the left-hand side of the
instrument panel.
Please note that in the graphic, XXXX is
representative of your vehicle identification
number.
The Vehicle Identification Number contains
the following information: World manufacturer identifier
A
Brake system, Gross Vehicle
Weight Rating, Restraint Devices
and their locations
B
Make, vehicle line, series, body
type
C
Engine type
D
Check digit
E
Model year
F
Assembly plant
G
Production sequence number
H
231
Taurus (CPH) Police, Canada/United States of America, enUSA, First Printing Capacities and SpecificationsE142476 E142477
Page 303 of 358

Less Cost to Properly Maintain Your
Vehicle
Ford Protect Extended Service Plan also
offers a Premium Maintenance Plan that
covers all scheduled maintenance, and
selected wear items. The coverage is
prepaid, so you never have to worry about
the cost of your vehicle
’s maintenance.
Covered maintenance includes:
• Windshield wiper blades.
• Spark plugs.
• The clutch disc.
• Brake pads and linings.
• Shock absorbers.
• Struts.
• Engine Belts.
• Engine coolant hoses, clamps and
o-rings.
• Diesel exhaust fluid replenishment.
• Cabin air filter replacement every
20,000 mi (32,000 km) (electric
vehicles only).
Interest Free Finance Options
Just a 10% down payment will provide you
with an affordable, no interest, no fee
payment program allowing you all the
security and benefits Ford Protect
Extended Service Plan has to offer while
paying over time. You are pre-approved
with no credit check or hassles. To learn
more, call our Ford Protect Extended
Service Plan specialists at 800-367-3377.
Ford Protect Extended Service Plan
P.O. Box 321067
Detroit, MI 48232 Ford Protect Extended Service
Plan (CANADA ONLY)
You can get more protection for your
vehicle by purchasing a Ford Protect
Extended Service Plan. Ford Protect
Extended Service Plan is the only service
contract backed by Ford Motor Company
of Canada, Limited. Depending on the plan
you purchase, Ford Protect Extended
Service Plan provides benefits such as:
•
Rental reimbursement.
• Coverage for certain maintenance and
wear items.
• Protection against repair costs after
your New Vehicle Limited Warranty
Coverage expires.
• Roadside Assistance benefits.
There are several Ford Protect Extended
Service Plans available in various time,
distance and deductible combinations.
Each plan is tailored to fit your own driving
needs, including reimbursement for towing
and rental. When you purchase Ford
Protect Extended Service Plan, you receive
added peace-of-mind protection
throughout Canada, the United States and
Mexico, provided by a network of
participating authorized Ford Motor
Company dealers.
Note: Repairs performed outside of
Canada, the United States and Mexico are
not eligible for Ford Protect Extended
Service Plan coverage.
This information is subject to change. For
more information; visit your local Ford of
Canada dealer or www.ford.ca to find the
Ford Protect Extended Service Plan that
is right for you.
300
Taurus (CPH) Police, Canada/United States of America, enUSA, First Printing Ford Protect
Page 305 of 358
When the oil change message appears in
the information display, it is time for an oil
change. Make sure you perform the oil
change within two weeks or 500 miles
(800 kilometers) of the message
appearing. Make sure you reset the
Intelligent Oil-Life Monitor after each oil
change. See Oil Change Indicator Reset
(page 176).
If your information display resets
prematurely or becomes inoperative, you
should perform the oil change interval at
six months or 5000 miles (8000
kilometers) from your last oil change.
Never exceed one year or 10000 miles
(16000 kilometers) between oil change
intervals.
Your vehicle is very sophisticated and built
with multiple, complex, performance
systems. Every manufacturer develops
these systems using different
specifications and performance features.
That is why it is important to rely upon your
dealership to properly diagnose and repair
your vehicle.
Ford Motor Company has recommended
maintenance intervals for various parts
and component systems based upon
engineering testing. Ford Motor Company
relies upon this testing to determine the
most appropriate mileage for replacement
of oils and fluids to protect your vehicle at
the lowest overall cost to you and
recommends against maintenance
schedules that deviate from the scheduled
maintenance information.
We strongly recommend the use of only
genuine Ford, Motorcraft or
Ford-authorized re-manufactured
replacement parts engineered for your
vehicle. Additives and Chemicals
This owner's manual and the Ford
Workshop Manual list the recommended
additives and chemicals for your vehicle.
We do not recommend using chemicals or
additives not approved by us as part of
your vehicle
’s normal maintenance. Please
consult your warranty information.
Oils, Fluids and Flushing
In many cases, fluid discoloration is a
normal operating characteristic and, by
itself, does not necessarily indicate a
concern or that the fluid needs to be
changed. However, a qualified expert, such
as the factory-trained technicians at your
dealership, should inspect discolored fluids
that also show signs of overheating or
foreign material contamination
immediately.
Make sure to change your vehicle ’s oils and
fluids at the specified intervals or in
conjunction with a repair. Flushing is a
viable way to change fluid for many vehicle
sub-systems during scheduled
maintenance. It is critical that systems are
flushed only with new fluid that is the same
as that required to fill and operate the
system or using a Ford-approved flushing
chemical.
Owner Checks and Services
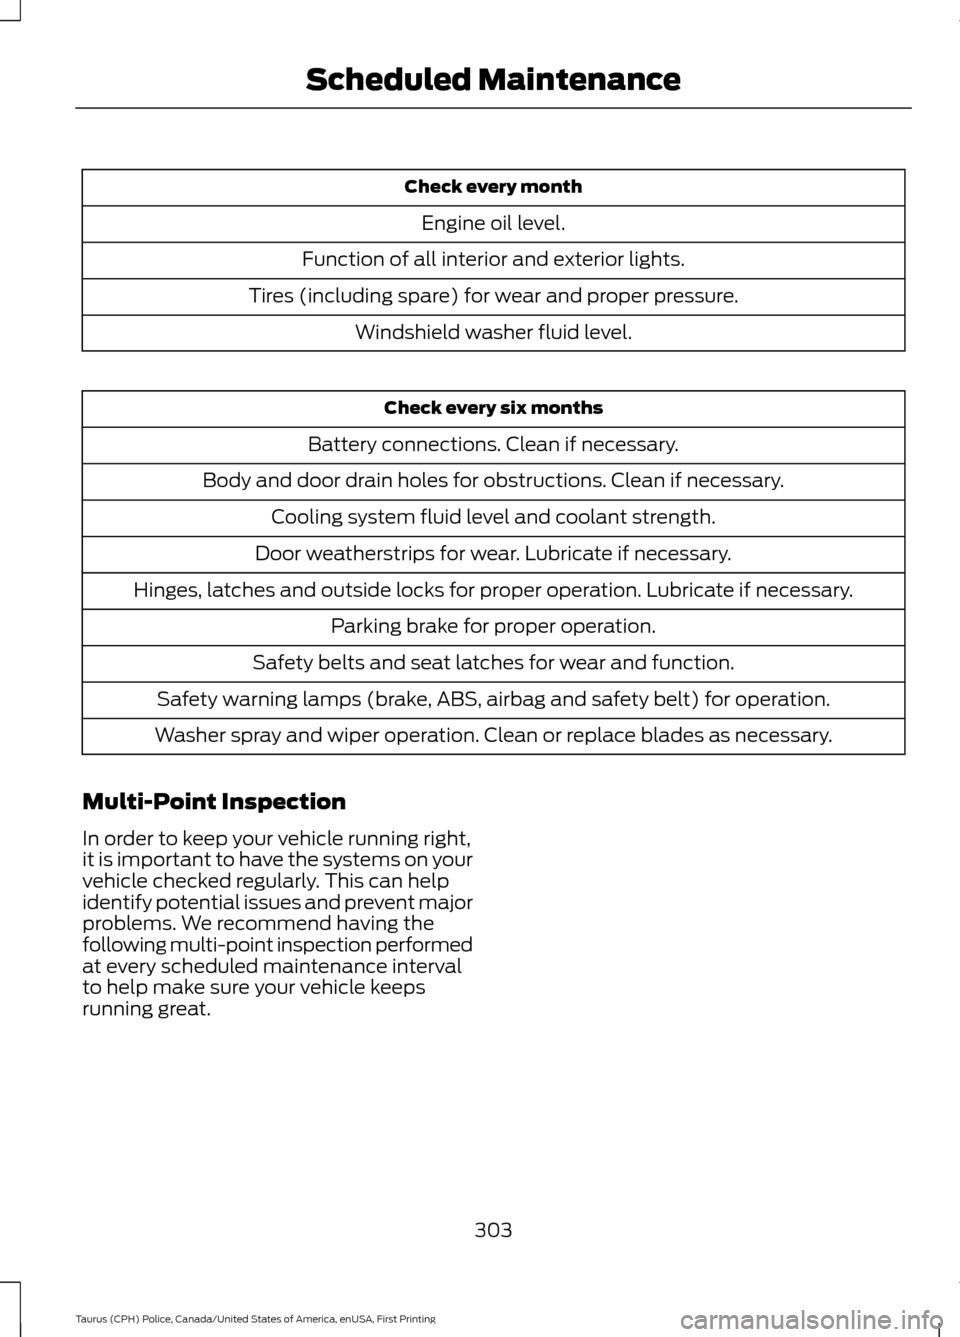
Make sure you perform the following basic
maintenance checks and inspections every
month or at six-month intervals.
302
Taurus (CPH) Police, Canada/United States of America, enUSA, First Printing Scheduled Maintenance
Page 306 of 358
Check every month
Engine oil level.
Function of all interior and exterior lights.
Tires (including spare) for wear and proper pressure. Windshield washer fluid level. Check every six months
Battery connections. Clean if necessary.
Body and door drain holes for obstructions. Clean if necessary. Cooling system fluid level and coolant strength.
Door weatherstrips for wear. Lubricate if necessary.
Hinges, latches and outside locks for proper operation. Lubricate if necessary. Parking brake for proper operation.
Safety belts and seat latches for wear and function.
Safety warning lamps (brake, ABS, airbag and safety belt) for operation.
Washer spray and wiper operation. Clean or replace blades as necessary.
Multi-Point Inspection
In order to keep your vehicle running right,
it is important to have the systems on your
vehicle checked regularly. This can help
identify potential issues and prevent major
problems. We recommend having the
following multi-point inspection performed
at every scheduled maintenance interval
to help make sure your vehicle keeps
running great.
303
Taurus (CPH) Police, Canada/United States of America, enUSA, First Printing Scheduled Maintenance