2017 FORD FUSION (AMERICAS) ignition
[x] Cancel search: ignitionPage 95 of 528

Stability Control Off
It will illuminate when you switch
the system off. It will go out
when you switch the system
back on or when you switch the ignition
off. See Using Stability Control (page
180).
Trunk Ajar Displays when the ignition is on
and the trunk is not completely
closed.
AUDIBLE WARNINGS AND
INDICATORS
Keyless Warning Alert
The horn will sound twice when you exit
your vehicle with the intelligent access key
and your vehicle is in RUN, indicating your
vehicle is still on.
Headlamps On Warning Chime
Sounds when you remove the key from the
ignition and open the driver's door and you
have left the headlamps or parking lamps
on.
Parking Brake On Warning Chime
Sounds when you have left the parking
brake on and drive your vehicle. If the
warning chime remains on after you have
released the parking brake, have the
system checked by your authorized dealer
immediately.
92
Fusion (CC7) Canada/United States of America, enUSA, First Printing Instrument ClusterE130458 E159323
Page 110 of 528

Battery and Charging System
Action
Message
The charging system needs servicing. If the warning stays on
or continues to come on, contact an authorized dealer as soon as possible.
Check Charging System
The battery management system detects an extended low-voltage condition. Your vehicle will disable various features
to help preserve the battery. Turn off as many of the electrical loads as soon as possible to improve system voltage. If the system voltage has recovered, the disabled features will operate again as normal.
Low Battery Features
Temporarily Turned Off
The battery management system determines that the batteryis at a low state of charge. Turn your ignition off as soon as
possible to protect the battery. This message will clear once you restart your vehicle and the battery state of charge has
recovered. Turning off unnecessary electrical loads will allow faster battery state-of-charge recovery.
Turn Power Off To Save
Battery
Blind Spot Information and Cross Traffic Alert System Action
Message
A fault with the system has occurred. Contact an authorizeddealer as soon as possible.
Blindspot System Fault
The system sensors are blocked. See Blind Spot Informa-
tion System (page 207).
Blindspot Not Available
Sensor Blocked See Manual
The system detects a vehicle. See
Blind Spot Information
System (page 207).
Cross Traffic Vehicle
Coming From X
The blind spot information system and cross traffic alert
system sensors are blocked. See
Blind Spot Information
System (page 207).
Cross Traffic Not Avail-
able Sensor Blocked See Manual
A fault with the system has occurred. Contact an authorizeddealer as soon as possible.
Cross Traffic System
Fault
107
Fusion (CC7) Canada/United States of America, enUSA, First Printing Information Displays
Page 112 of 528

Keys and Intelligent Access
Action
Message
A reminder to press the brake while starting your vehicle.
To START Press Brake
The system does not detect a key in your vehicle. See KeylessStarting (page 146).
No Key Detected
You pressed the start/stop button to switch off the engine
and your vehicle does not detect your intelligent access key inside your vehicle.
Restart Now or Key is
Needed
Your vehicle is in the run ignition state.
Accessory Power is
Active
There is a problem with your vehicle ’s starting system. Contact
an authorized dealer for service.
Starting System Fault
You have successfully programmed an intelligent access keyto the system.
Key Program Successful
You have failed to program an intelligent access key to thesystem.
Key Program Failure
You have programmed the maximum number of keys to the system.
Max Number of Keys
Learned
You have not programmed enough keys to the system.
Not Enough Keys
Learned
The key battery is low. Change the battery as soon as possible.
Key Battery Low Replace
Soon
An attempt is made to program a spare key using two existing keys.
Could Not Program
Integrated Key
A reminder that you are exiting your vehicle and the engine is on.
Vehicle is ON
109
Fusion (CC7) Canada/United States of America, enUSA, First Printing Information Displays
Page 128 of 528

HEATED WINDOWS AND
MIRRORS
Heated Rear Window
Note:
Make sure the engine is running
before operating the heated windows. Press the button to clear the
heated rear window of thin ice
and fog. The heated rear window
will automatically turn off after a short
period of time. Start the engine before you
switch the heated rear window on.
Note: Do not use razor blades or other
sharp objects to clean or remove decals
from the inside of the heated rear window.
The vehicle warranty does not cover
damage caused to the heated rear window
grid lines.
Heated Exterior Mirror (If Equipped)
When you switch the heated rear window
on, the heated exterior mirrors will
automatically turn on.
Note: Do not remove ice from the mirrors
with a scraper or adjust the mirror glass
when it is frozen in place.
Note: Do not clean the mirror housing or
glass with harsh abrasives, fuel or other
petroleum-based cleaning products.
CABIN AIR FILTER
Your vehicle is equipped with a cabin air
filter, which gives you and your passengers
the following benefits:
• It improves your driving comfort by
reducing particle concentration.
• It improves the interior compartment
cleanliness.
• It protects the climate control
components from particle deposits. You can locate the cabin air filter behind
the glove box.
Note:
Make sure you have a cabin air filter
installed at all times. This prevents foreign
objects from entering the system. Running
the system without a filter in place could
result in degradation or damage to the
system.
Replace the filter at regular intervals. See
Scheduled Maintenance
(page 477).
For additional cabin air filter information,
or to replace the filter, see an authorized
dealer.
REMOTE START
(If Equipped)
The remote start feature allows you to
pre-condition the interior of your vehicle.
The climate control system works to
achieve comfort according to your previous
settings.
Note: You cannot adjust the system during
remote start operation.
Turn the ignition on to return the system
to its previous settings. You can now make
adjustments normally, but you need to turn
certain vehicle-dependent features back
on, such as:
• Heated seats.
• Cooled seats.
• Heated steering wheel.
• Heated mirrors.
• Heated rear window.
You can adjust the default remote start
settings using the information display
controls. See
Information Displays
(page 93).
125
Fusion (CC7) Canada/United States of America, enUSA, First Printing Climate ControlE184884
Page 135 of 528

•
Driver seat.
• Power mirrors.
• Power steering column.
The memory control is on the driver door. Saving a PreSet Position
1. Adjust the memory features to your
desired position.
2. Press and hold the SET button until you hear a single tone.
3. Press the desired preset button until you hear a single tone.
You can save up to two preset memory
positions. You can save a memory preset
at any time.
Recalling a PreSet Position
Press and release the preset button
associated with your desired driving
position. The memory features move to
the position stored for that preset.
Note: A preset memory position can only
be recalled when the ignition is off, or when
the transmission is in park (P) or neutral (N)
if the ignition is on and the vehicle is not
moving. You can also recall a preset memory
position by:
•
Pressing the unlock button on your
intelligent access key fob if it is linked
to a preset position.
• Unlocking the intelligent driver door
handle if a linked key fob is present.
• Entering a personal entry code on the
Securicode keypad. See Locks (page
58).
Note: Using a linked key fob to recall your
memory position when the ignition is off
moves the seat to the Easy Entry position.
Note: Pressing any active memory feature
control - power seat, mirror, or steering
column (or any memory button) during a
memory recall cancels the operation.
Linking a PreSet Position to your
Remote Control or Intelligent
Access Key Fob
Your vehicle can save the preset memory
positions for up to two remote controls or
intelligent access (IA) keys.
After you have saved your desired memory
preset positions:
1. Press and hold the desired preset button for about three seconds until
you hear a single tone.
2. Within three seconds, press the lock button on the remote control you are
linking.
To unlink a remote control, follow the
same procedure – except in step 2, press
the unlock button on the remote control.
Note: If more than one linked remote
control or intelligent access key is in range,
the memory function moves to the settings
of the first key to initiate a memory recall.
132
Fusion (CC7) Canada/United States of America, enUSA, First Printing SeatsE223340
Page 136 of 528

Easy Entry and Exit Feature
If you enable the easy entry and exit
feature, it automatically moves the driver
seat position rearward up to two inches
(five centimeters) when you switch the
ignition off.
The driver seat will return to the previous
position when you switch the ignition on.
You can enable or disable this feature in
the information display. See Information
Displays (page 93).
REAR SEATS
Note: Your vehicle may have split
seatbacks that you must fold individually.
Note: Make sure the center safety belt is
unbuckled before folding the seatback.
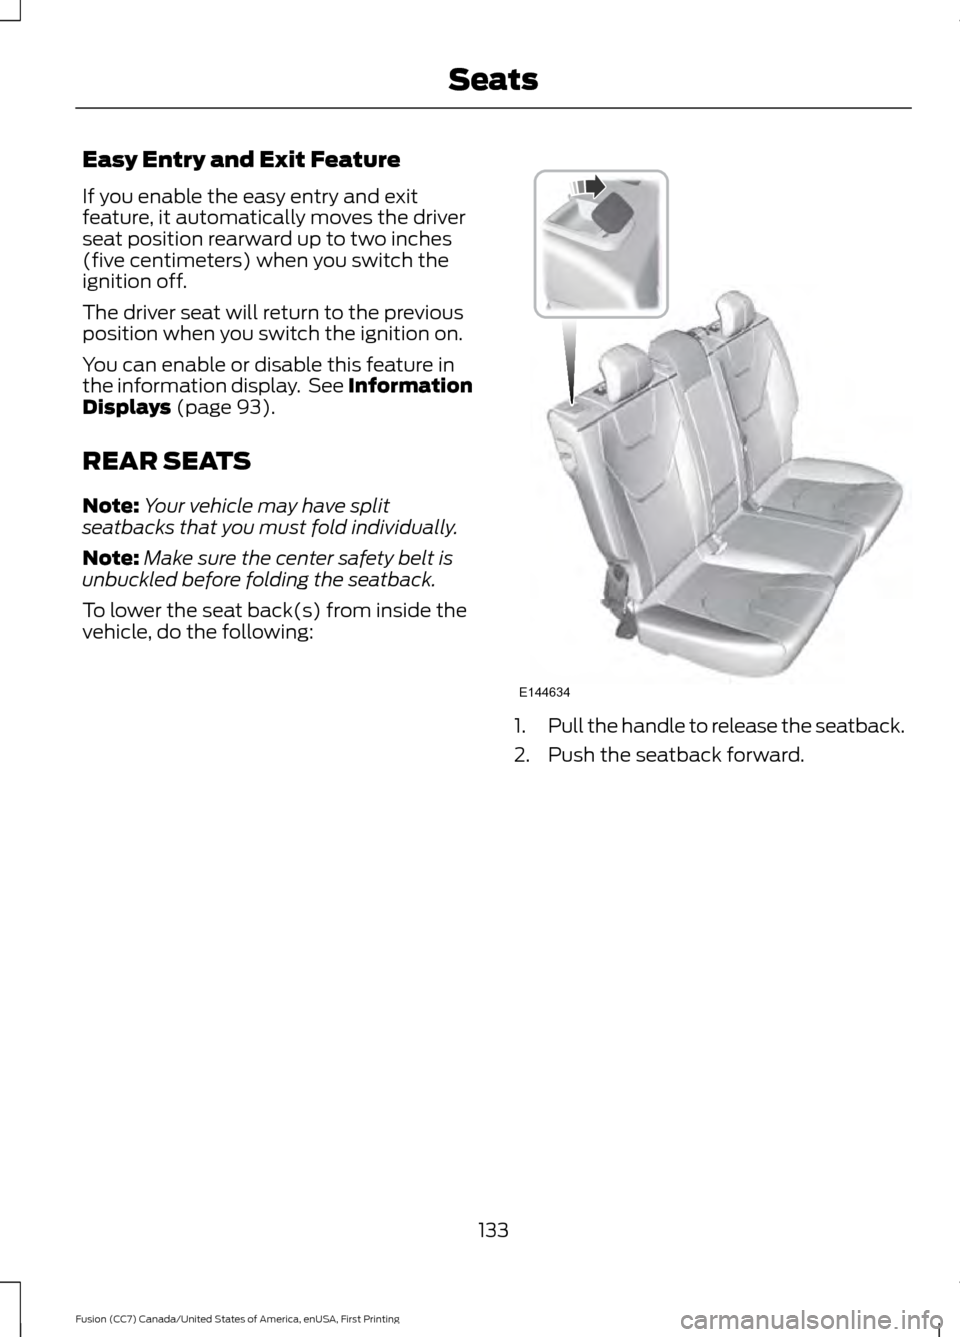
To lower the seat back(s) from inside the
vehicle, do the following: 1.
Pull the handle to release the seatback.
2. Push the seatback forward.
133
Fusion (CC7) Canada/United States of America, enUSA, First Printing SeatsE144634
Page 141 of 528

1.
With your vehicle parked outside of the
garage, turn your ignition to the on
position, but do not start your vehicle.
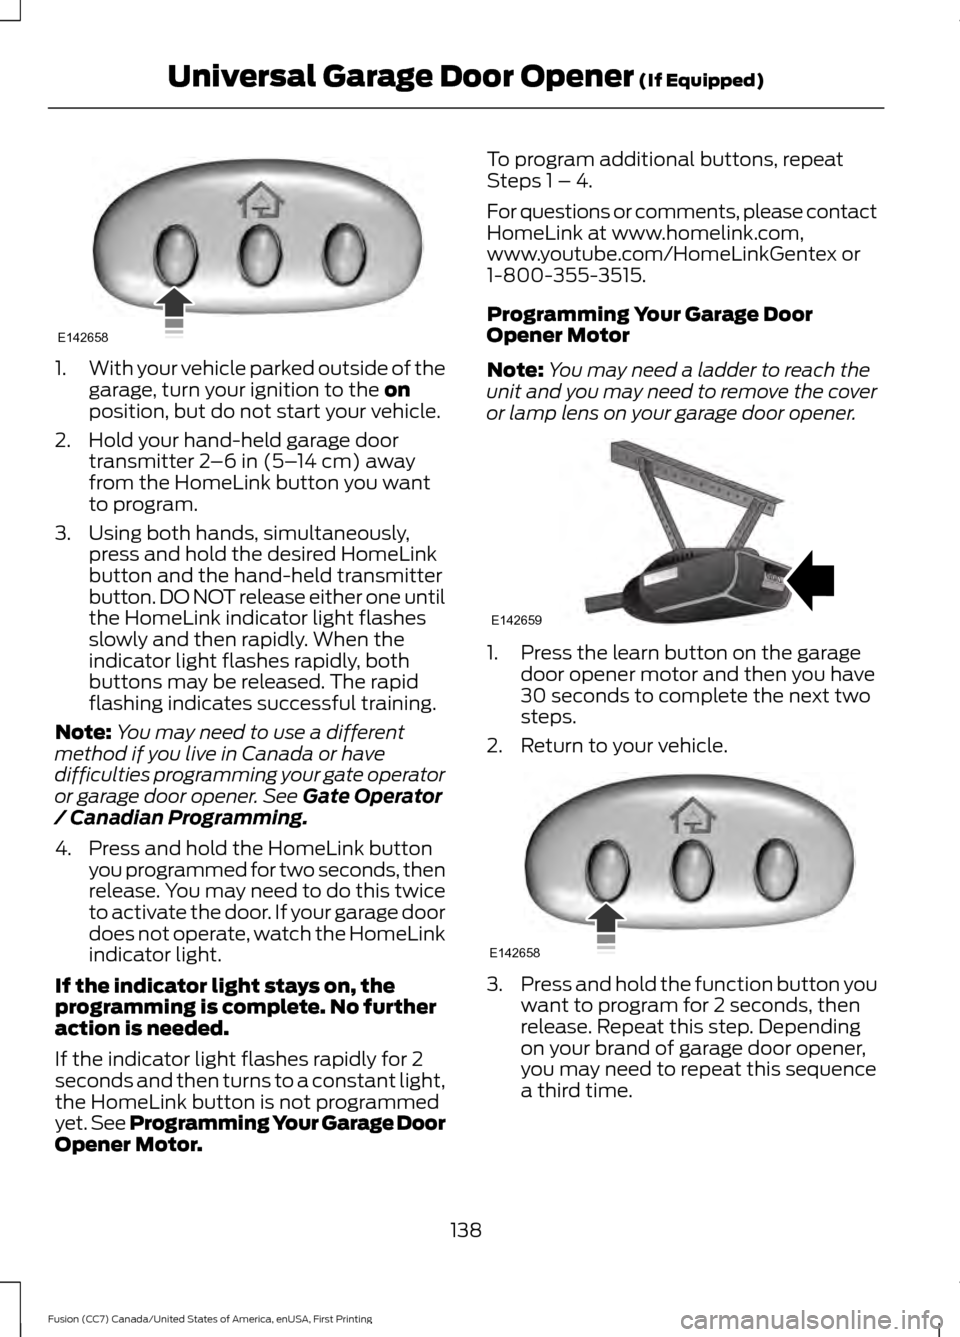
2. Hold your hand-held garage door transmitter
2–6 in (5– 14 cm) away
from the HomeLink button you want
to program.
3. Using both hands, simultaneously, press and hold the desired HomeLink
button and the hand-held transmitter
button. DO NOT release either one until
the HomeLink indicator light flashes
slowly and then rapidly. When the
indicator light flashes rapidly, both
buttons may be released. The rapid
flashing indicates successful training.
Note: You may need to use a different
method if you live in Canada or have
difficulties programming your gate operator
or garage door opener. See
Gate Operator
/ Canadian Programming.
4. Press and hold the HomeLink button you programmed for two seconds, then
release. You may need to do this twice
to activate the door. If your garage door
does not operate, watch the HomeLink
indicator light.
If the indicator light stays on, the
programming is complete. No further
action is needed.
If the indicator light flashes rapidly for 2
seconds and then turns to a constant light,
the HomeLink button is not programmed
yet. See Programming Your Garage Door
Opener Motor. To program additional buttons, repeat
Steps 1 – 4.
For questions or comments, please contact
HomeLink at www.homelink.com,
www.youtube.com/HomeLinkGentex or
1-800-355-3515.
Programming Your Garage Door
Opener Motor
Note:
You may need a ladder to reach the
unit and you may need to remove the cover
or lamp lens on your garage door opener. 1. Press the learn button on the garage
door opener motor and then you have
30 seconds to complete the next two
steps.
2. Return to your vehicle. 3.
Press and hold the function button you
want to program for 2 seconds, then
release. Repeat this step. Depending
on your brand of garage door opener,
you may need to repeat this sequence
a third time.
138
Fusion (CC7) Canada/United States of America, enUSA, First Printing Universal Garage Door Opener
(If Equipped)E142658 E142659 E142658
Page 145 of 528

12 Volt DC Power Point
WARNINGS
Do not plug optional electrical
accessories into the cigar lighter
socket. Incorrect use of the cigar
lighter can cause damage not covered by
the vehicle warranty, and can result in fire
or serious injury. Do not use a power point for
operating a cigar lighter. Incorrect
use of the power points can cause
damage not covered by the vehicle
warranty, and can result in fire or serious
injury. Note:
When you switch the ignition on, you
can use the socket to power 12 volt
appliances with a maximum current rating
of 15 amps.
If the power supply does not work after you
switch the ignition off, switch the ignition
on.
Note: Do not hang any accessory from the
accessory plug.
Note: Do not use the power point over the
vehicle capacity of 12 volt DC 180 watts or
a fuse may blow.
Note: Always keep the power point caps
closed when not in use.
Do not insert objects other than an
accessory plug into the power point. This
will damage the power point and blow the
fuse.
Run the vehicle for full capacity use of the
power point.
To prevent the battery from running out of
charge:
• Do not use the power point longer than
necessary when the vehicle is not
running.
• Do not leave devices plugged in
overnight or when you park your vehicle
for extended periods. Locations
Power points may be in the following
locations:
•
On the front of the center console.
• Inside the center console.
• On the rear of the center console.
110 Volt AC Power Point (If Equipped) WARNING
Do not keep electrical devices
plugged in the power point whenever
the device is not in use. Do not use
any extension cord with the 110 volt AC
power point, since it will defeat the safety
protection design. Doing so may cause the
power point to overload due to powering
multiple devices that can reach beyond
the 150 watt load limit and could result in
fire or serious injury. Note:
The power point will turn off when
the ignition is switched off or the battery
voltage drops below 11 volts.
Use the power point for powering electric
devices that require up to 150 watts. It is
on the rear of the center console. Note:
Depending on your vehicle, the power
point may open to the right or upward.
142
Fusion (CC7) Canada/United States of America, enUSA, First Printing Auxiliary Power PointsE193395