2017 FORD FOCUS ELECTRIC buttons
[x] Cancel search: buttonsPage 56 of 367
LOCKING AND UNLOCKING
You can use the power door lock control
or the remote control to lock and unlock
your vehicle.
Note:
Always take your keys and lock all
doors when leaving your vehicle.
Power Door Locks
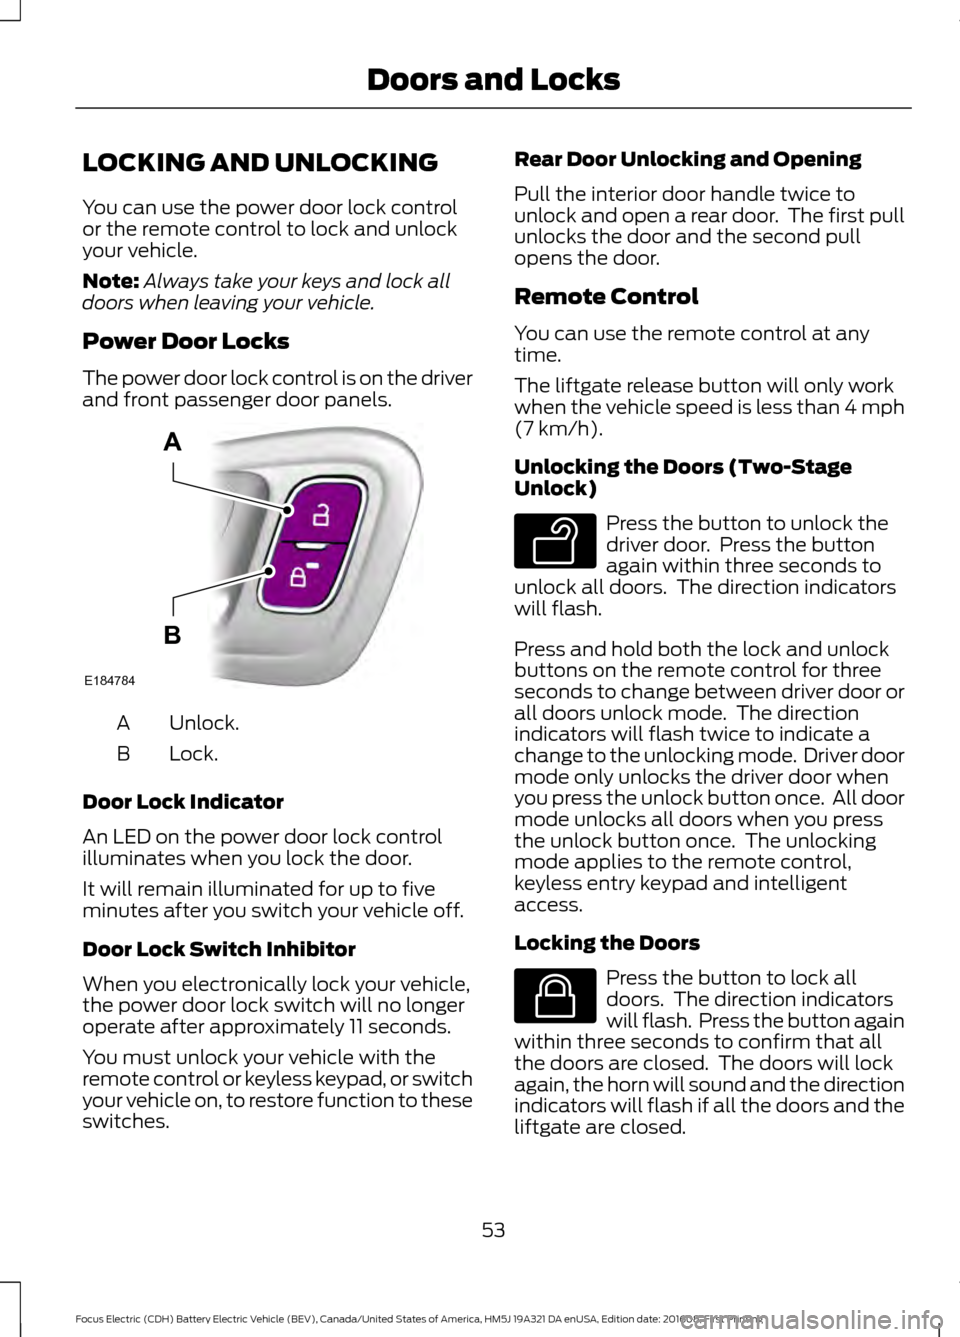
The power door lock control is on the driver
and front passenger door panels. Unlock.
A
Lock.
B
Door Lock Indicator
An LED on the power door lock control
illuminates when you lock the door.
It will remain illuminated for up to five
minutes after you switch your vehicle off.
Door Lock Switch Inhibitor
When you electronically lock your vehicle,
the power door lock switch will no longer
operate after approximately 11 seconds.
You must unlock your vehicle with the
remote control or keyless keypad, or switch
your vehicle on, to restore function to these
switches. Rear Door Unlocking and Opening
Pull the interior door handle twice to
unlock and open a rear door. The first pull
unlocks the door and the second pull
opens the door.
Remote Control
You can use the remote control at any
time.
The liftgate release button will only work
when the vehicle speed is less than 4 mph
(7 km/h).
Unlocking the Doors (Two-Stage
Unlock) Press the button to unlock the
driver door. Press the button
again within three seconds to
unlock all doors. The direction indicators
will flash.
Press and hold both the lock and unlock
buttons on the remote control for three
seconds to change between driver door or
all doors unlock mode. The direction
indicators will flash twice to indicate a
change to the unlocking mode. Driver door
mode only unlocks the driver door when
you press the unlock button once. All door
mode unlocks all doors when you press
the unlock button once. The unlocking
mode applies to the remote control,
keyless entry keypad and intelligent
access.
Locking the Doors Press the button to lock all
doors. The direction indicators
will flash. Press the button again
within three seconds to confirm that all
the doors are closed. The doors will lock
again, the horn will sound and the direction
indicators will flash if all the doors and the
liftgate are closed.
53
Focus Electric (CDH) Battery Electric Vehicle (BEV), Canada/United States of America, HM5J 19A321 DA enUSA, Edition date: 201608, First Printing Doors and LocksE184784
A
B E138629 E138623
Page 72 of 367
4.
The lighting control is in the autolamps
position.
5. The headlamps are off.
The other lighting control switch positions
do not activate the daytime running lamps,
and you can use them to temporarily
override autolamp control.
When switched off in the information
display, the daytime running lamps are off
in all lighting control switch positions.
DIRECTION INDICATORS Push the lever up or down to use the
direction indicators.
Note:
Tap the lever up or down to make the
direction indicators flash three times to
indicate a lane change.
INTERIOR LAMPS
The lamps turn on when:
• You open any door.
• You press a remote control button.
• You press the buttons on the map
lamps. Front Interior Lamps (If Equipped)
Note:
Press the door function switch to
switch off interior lights when you open any
door. The indicator lamp illuminates amber
when the door function is off. When the door
function is off and you open a door, the
courtesy and door lamps stay off. Press the
switch again to switch the door function
back on. The indicator lamp illuminates
white when the door function is on. When
the door function is on and you open a door,
the courtesy and door lamps switch on.
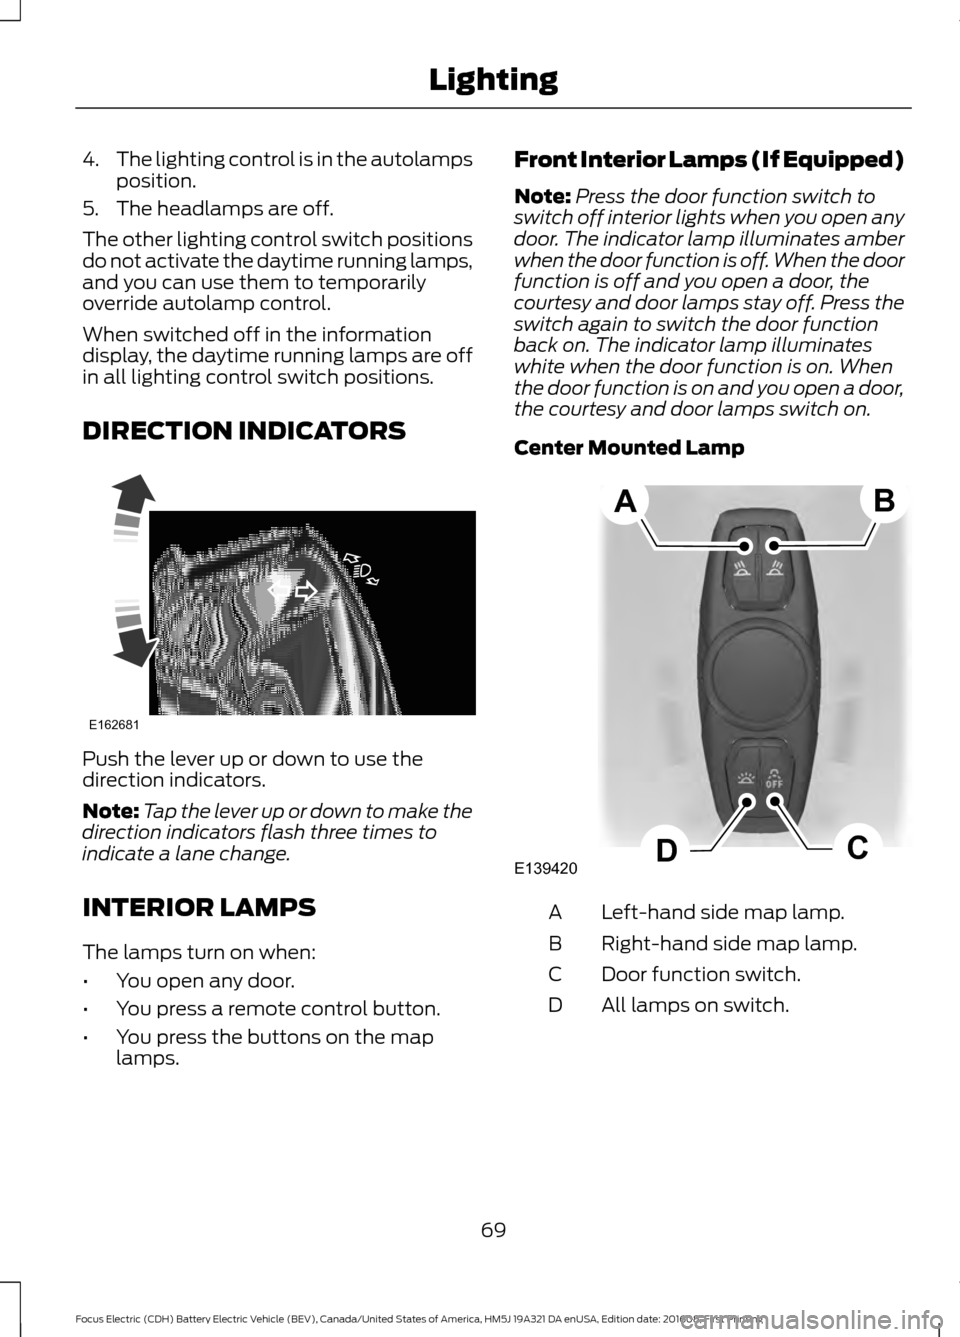
Center Mounted Lamp Left-hand side map lamp.
A
Right-hand side map lamp.
B
Door function switch.
C
All lamps on switch.
D
69
Focus Electric (CDH) Battery Electric Vehicle (BEV), Canada/United States of America, HM5J 19A321 DA enUSA, Edition date: 201608, First Printing LightingE162681 E139420C
D
AB
Page 83 of 367
GENERAL INFORMATION
WARNING
Driving while distracted can result in
loss of vehicle control, crash and
injury. We strongly recommend that
you use extreme caution when using any
device that may take your focus off the
road. Your primary responsibility is the safe
operation of your vehicle. We recommend
against the use of any hand-held device
while driving and encourage the use of
voice-operated systems when possible.
Make sure you are aware of all applicable
local laws that may affect the use of
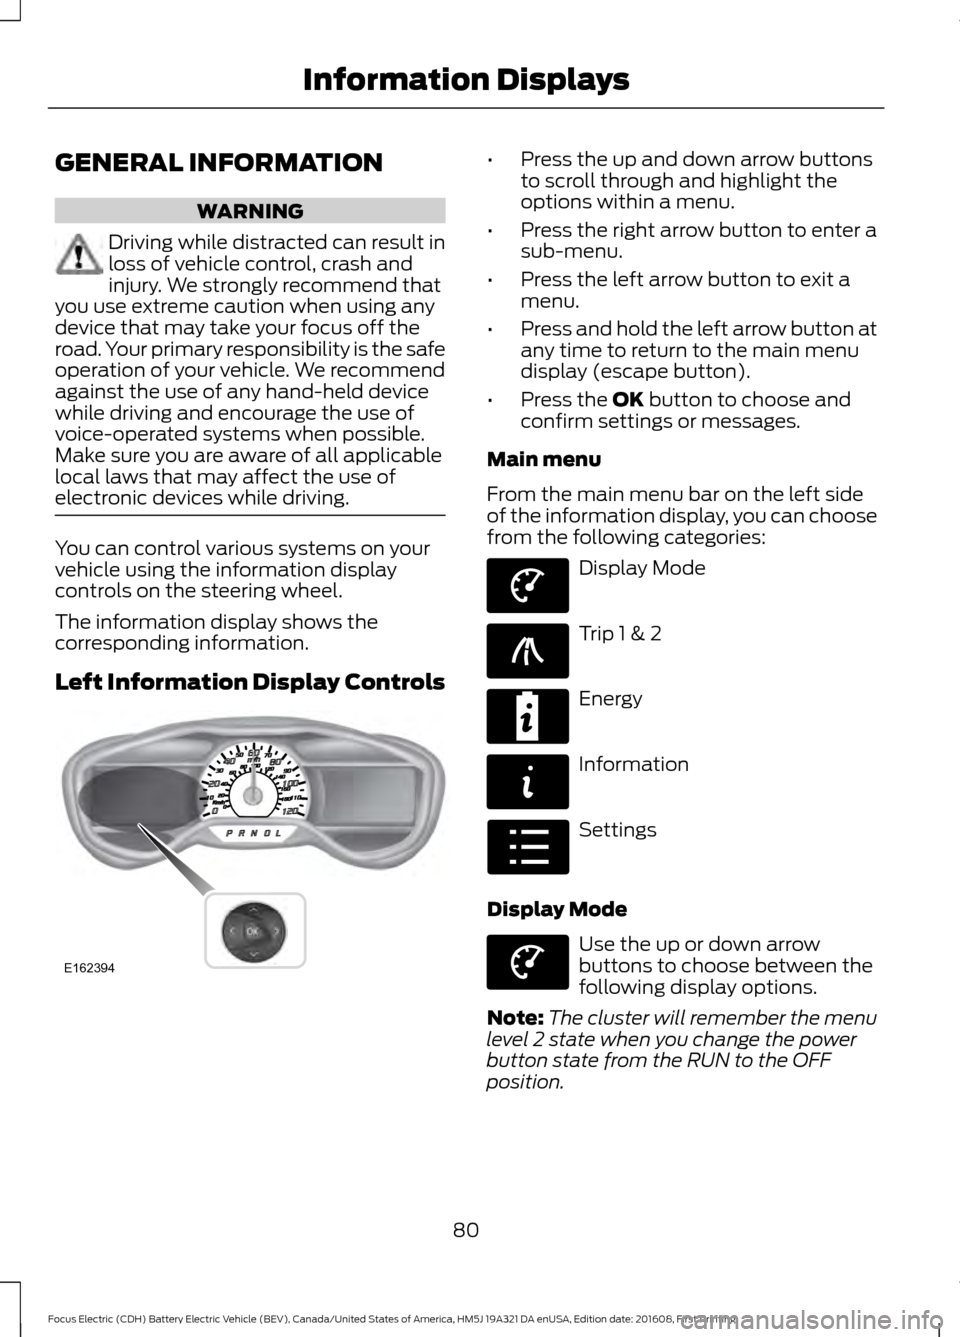
electronic devices while driving. You can control various systems on your
vehicle using the information display
controls on the steering wheel.
The information display shows the
corresponding information.
Left Information Display Controls •
Press the up and down arrow buttons
to scroll through and highlight the
options within a menu.
• Press the right arrow button to enter a
sub-menu.
• Press the left arrow button to exit a
menu.
• Press and hold the left arrow button at
any time to return to the main menu
display (escape button).
• Press the OK button to choose and
confirm settings or messages.
Main menu
From the main menu bar on the left side
of the information display, you can choose
from the following categories: Display Mode
Trip 1 & 2
Energy
Information
Settings
Display Mode Use the up or down arrow
buttons to choose between the
following display options.
Note: The cluster will remember the menu
level 2 state when you change the power
button state from the RUN to the OFF
position.
80
Focus Electric (CDH) Battery Electric Vehicle (BEV), Canada/United States of America, HM5J 19A321 DA enUSA, Edition date: 201608, First Printing Information DisplaysE162394 E144639 E138660 E220615 E144642 E100023 E144639
Page 85 of 367
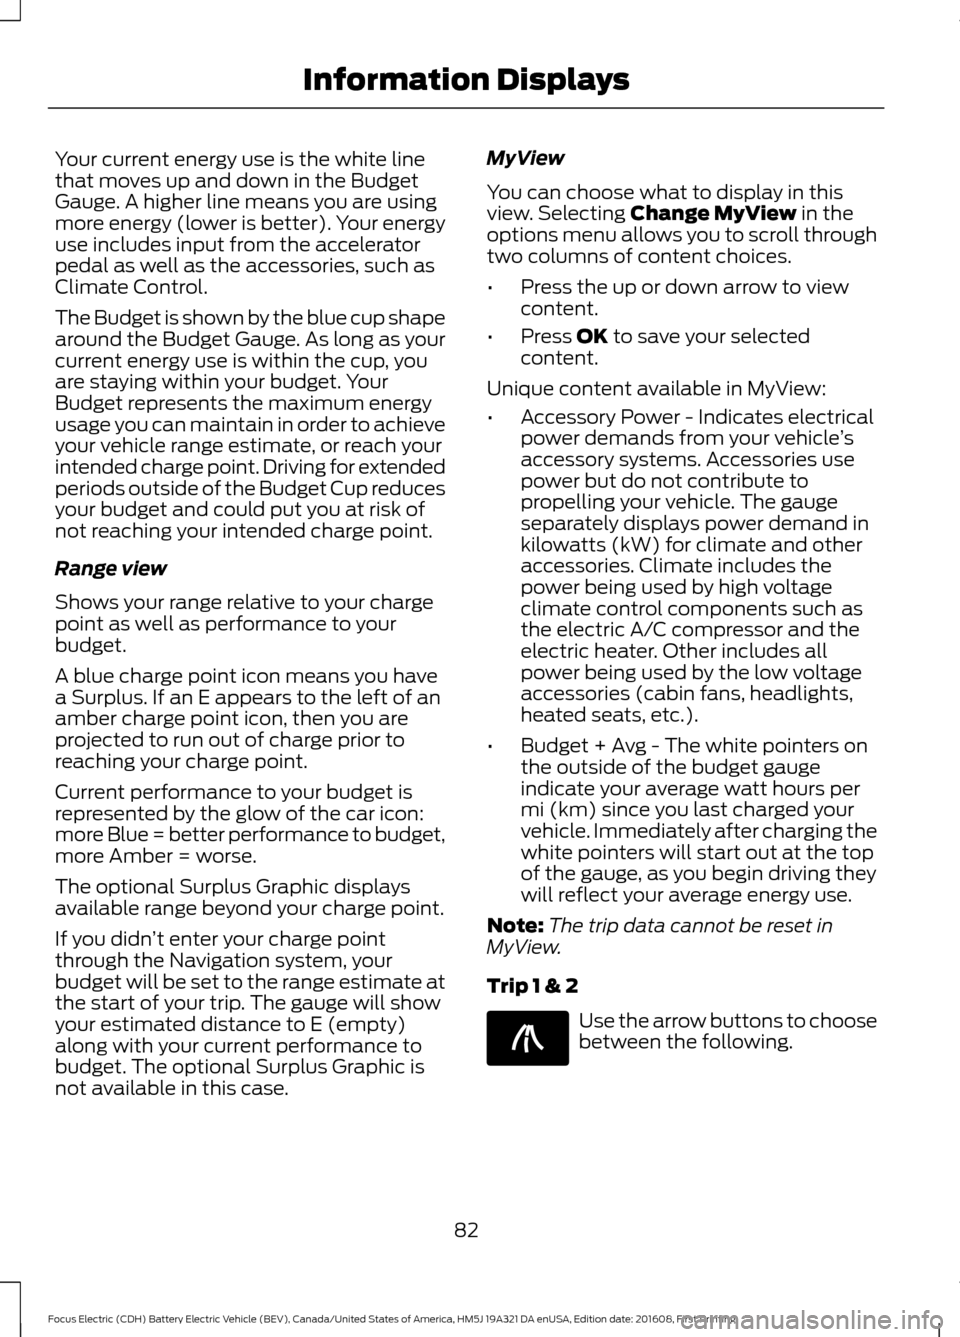
Your current energy use is the white line
that moves up and down in the Budget
Gauge. A higher line means you are using
more energy (lower is better). Your energy
use includes input from the accelerator
pedal as well as the accessories, such as
Climate Control.
The Budget is shown by the blue cup shape
around the Budget Gauge. As long as your
current energy use is within the cup, you
are staying within your budget. Your
Budget represents the maximum energy
usage you can maintain in order to achieve
your vehicle range estimate, or reach your
intended charge point. Driving for extended
periods outside of the Budget Cup reduces
your budget and could put you at risk of
not reaching your intended charge point.
Range view
Shows your range relative to your charge
point as well as performance to your
budget.
A blue charge point icon means you have
a Surplus. If an E appears to the left of an
amber charge point icon, then you are
projected to run out of charge prior to
reaching your charge point.
Current performance to your budget is
represented by the glow of the car icon:
more Blue = better performance to budget,
more Amber = worse.
The optional Surplus Graphic displays
available range beyond your charge point.
If you didn
’t enter your charge point
through the Navigation system, your
budget will be set to the range estimate at
the start of your trip. The gauge will show
your estimated distance to E (empty)
along with your current performance to
budget. The optional Surplus Graphic is
not available in this case. MyView
You can choose what to display in this
view. Selecting Change MyView in the
options menu allows you to scroll through
two columns of content choices.
• Press the up or down arrow to view
content.
• Press
OK to save your selected
content.
Unique content available in MyView:
• Accessory Power - Indicates electrical
power demands from your vehicle ’s
accessory systems. Accessories use
power but do not contribute to
propelling your vehicle. The gauge
separately displays power demand in
kilowatts (kW) for climate and other
accessories. Climate includes the
power being used by high voltage
climate control components such as
the electric A/C compressor and the
electric heater. Other includes all
power being used by the low voltage
accessories (cabin fans, headlights,
heated seats, etc.).
• Budget + Avg - The white pointers on
the outside of the budget gauge
indicate your average watt hours per
mi (km) since you last charged your
vehicle. Immediately after charging the
white pointers will start out at the top
of the gauge, as you begin driving they
will reflect your average energy use.
Note: The trip data cannot be reset in
MyView.
Trip 1 & 2 Use the arrow buttons to choose
between the following.
82
Focus Electric (CDH) Battery Electric Vehicle (BEV), Canada/United States of America, HM5J 19A321 DA enUSA, Edition date: 201608, First Printing Information DisplaysE138660
Page 86 of 367
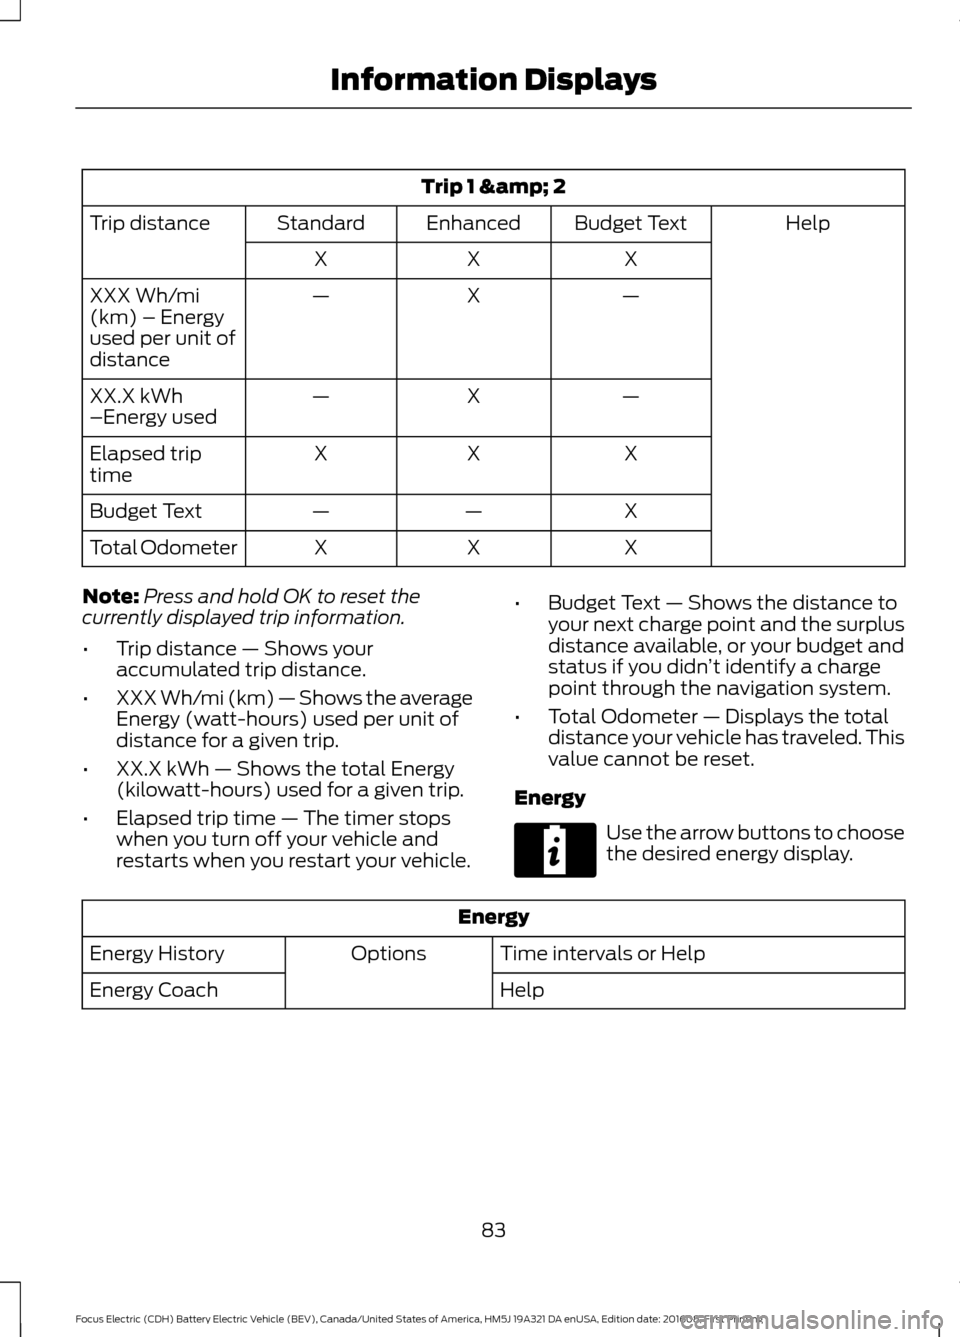
Trip 1 & 2
Help
Budget Text
Enhanced
Standard
Trip distance
X
X
X
—
X
—
XXX Wh/mi
(km) – Energy
used per unit of
distance
—
X
—
XX.X kWh
–Energy used
X
X
X
Elapsed trip
time
X
—
—
Budget Text
X
X
X
Total Odometer
Note: Press and hold OK to reset the
currently displayed trip information.
• Trip distance — Shows your
accumulated trip distance.
• XXX Wh/mi (km) — Shows the average
Energy (watt-hours) used per unit of
distance for a given trip.
• XX.X kWh — Shows the total Energy
(kilowatt-hours) used for a given trip.
• Elapsed trip time — The timer stops
when you turn off your vehicle and
restarts when you restart your vehicle. •
Budget Text — Shows the distance to
your next charge point and the surplus
distance available, or your budget and
status if you didn ’t identify a charge
point through the navigation system.
• Total Odometer — Displays the total
distance your vehicle has traveled. This
value cannot be reset.
Energy Use the arrow buttons to choose
the desired energy display.
Energy
Time intervals or Help
Options
Energy History
Help
Energy Coach
83
Focus Electric (CDH) Battery Electric Vehicle (BEV), Canada/United States of America, HM5J 19A321 DA enUSA, Edition date: 201608, First Printing Information DisplaysE220615
Page 88 of 367
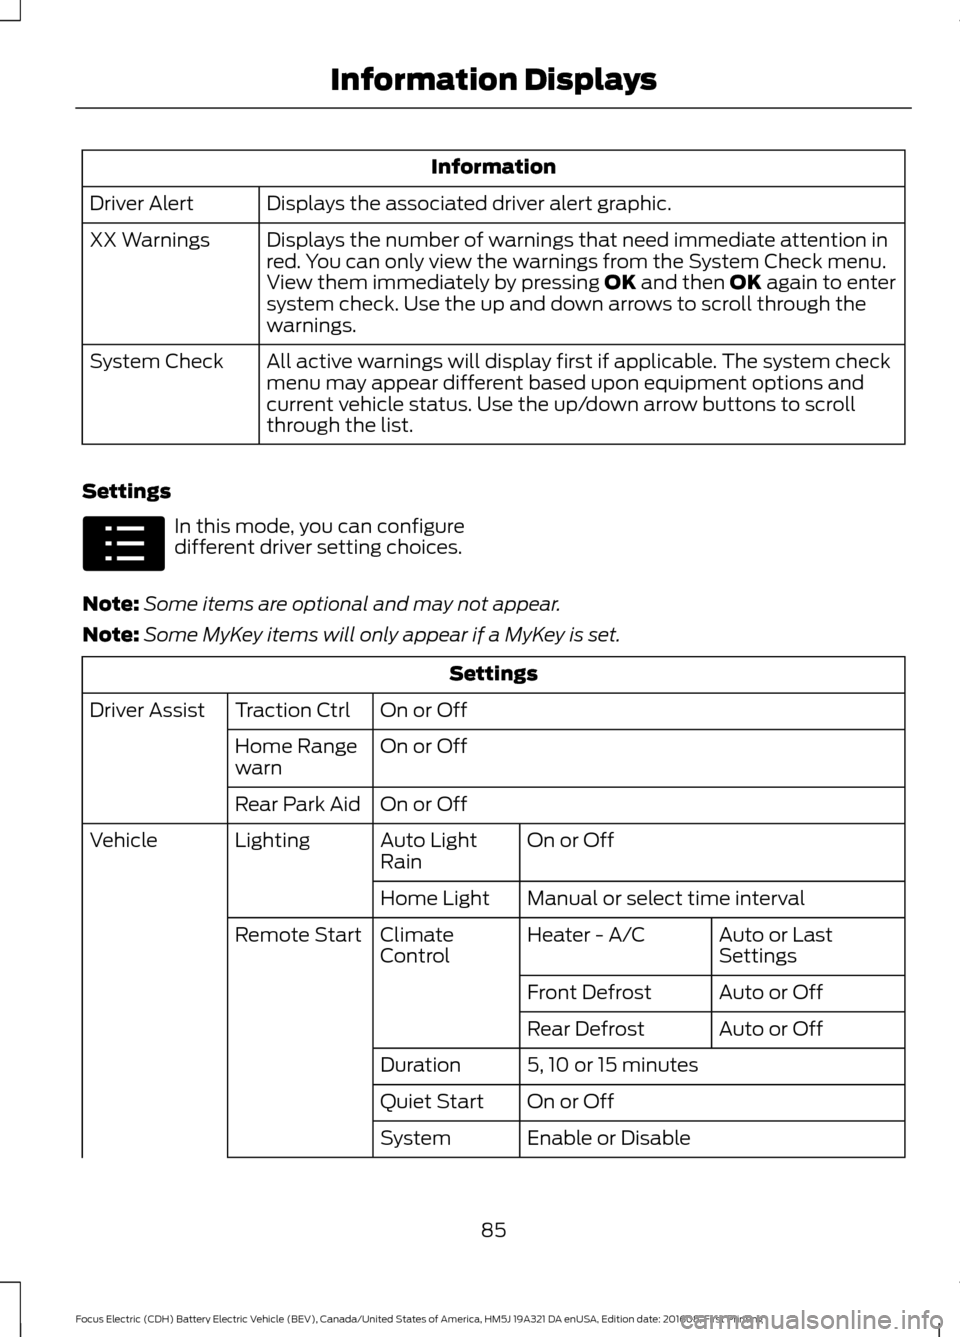
Information
Displays the associated driver alert graphic.
Driver Alert
Displays the number of warnings that need immediate attention in
red. You can only view the warnings from the System Check menu.
View them immediately by pressing OK and then OK again to enter
system check. Use the up and down arrows to scroll through the
warnings.
XX Warnings
All active warnings will display first if applicable. The system check
menu may appear different based upon equipment options and
current vehicle status. Use the up/down arrow buttons to scroll
through the list.
System Check
Settings In this mode, you can configure
different driver setting choices.
Note: Some items are optional and may not appear.
Note: Some MyKey items will only appear if a MyKey is set. Settings
On or Off
Traction Ctrl
Driver Assist
On or Off
Home Range
warn
On or Off
Rear Park Aid
On or Off
Auto Light
Rain
Lighting
Vehicle
Manual or select time interval
Home Light
Auto or Last
Settings
Heater - A/C
Climate
Control
Remote Start
Auto or Off
Front Defrost
Auto or Off
Rear Defrost
5, 10 or 15 minutes
Duration
On or Off
Quiet Start
Enable or Disable
System
85
Focus Electric (CDH) Battery Electric Vehicle (BEV), Canada/United States of America, HM5J 19A321 DA enUSA, Edition date: 201608, First Printing Information DisplaysE100023
Page 89 of 367
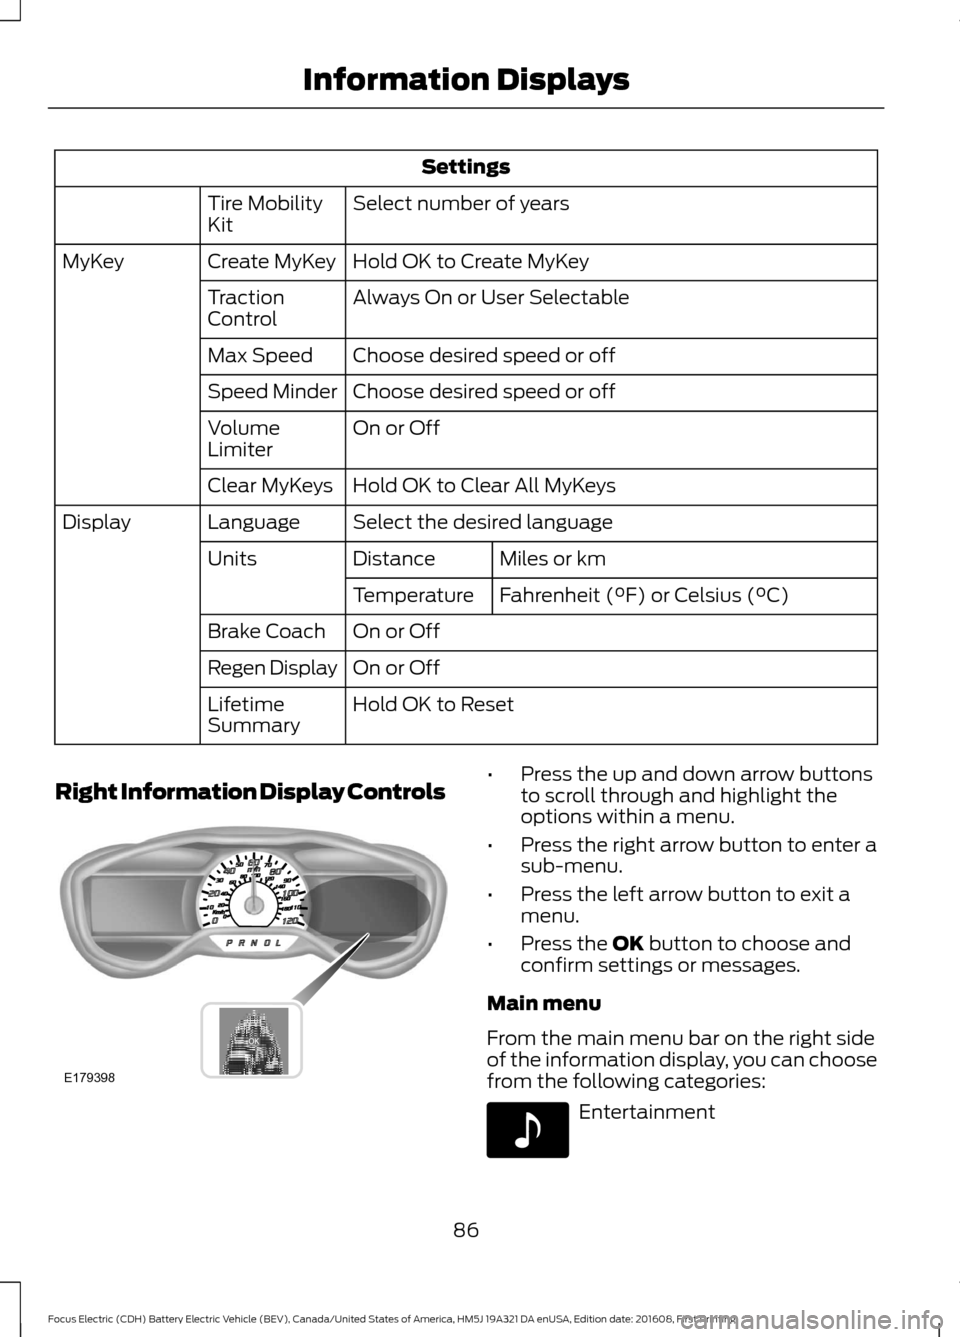
Settings
Select number of years
Tire Mobility
Kit
Hold OK to Create MyKey
Create MyKey
MyKey
Always On or User Selectable
Traction
Control
Choose desired speed or off
Max Speed
Choose desired speed or off
Speed Minder
On or Off
Volume
Limiter
Hold OK to Clear All MyKeys
Clear MyKeys
Select the desired language
Language
Display
Miles or km
Distance
Units
Fahrenheit (°F) or Celsius (°C)
Temperature
On or Off
Brake Coach
On or Off
Regen Display
Hold OK to Reset
Lifetime
Summary
Right Information Display Controls •
Press the up and down arrow buttons
to scroll through and highlight the
options within a menu.
• Press the right arrow button to enter a
sub-menu.
• Press the left arrow button to exit a
menu.
• Press the OK button to choose and
confirm settings or messages.
Main menu
From the main menu bar on the right side
of the information display, you can choose
from the following categories: Entertainment
86
Focus Electric (CDH) Battery Electric Vehicle (BEV), Canada/United States of America, HM5J 19A321 DA enUSA, Edition date: 201608, First Printing Information DisplaysE179398 E142611
Page 102 of 367
WARNINGS
The adjustable head restraint is a
safety device. Whenever possible, it
should be installed and properly
adjusted when the seat is occupied. Failure
to adjust the head restraint properly could
reduce its effectiveness during certain
impacts. Install the head restraint properly to
help minimize the risk of neck injury
in the event of a crash.
Note:
Adjust the seatback to an upright
driving position before adjusting the head
restraint. Adjust the head restraint so that
the top of it is level with the top of your head
and as far forward as possible. Make sure
that you remain comfortable. If you are
extremely tall, adjust the head restraint to
its highest position.
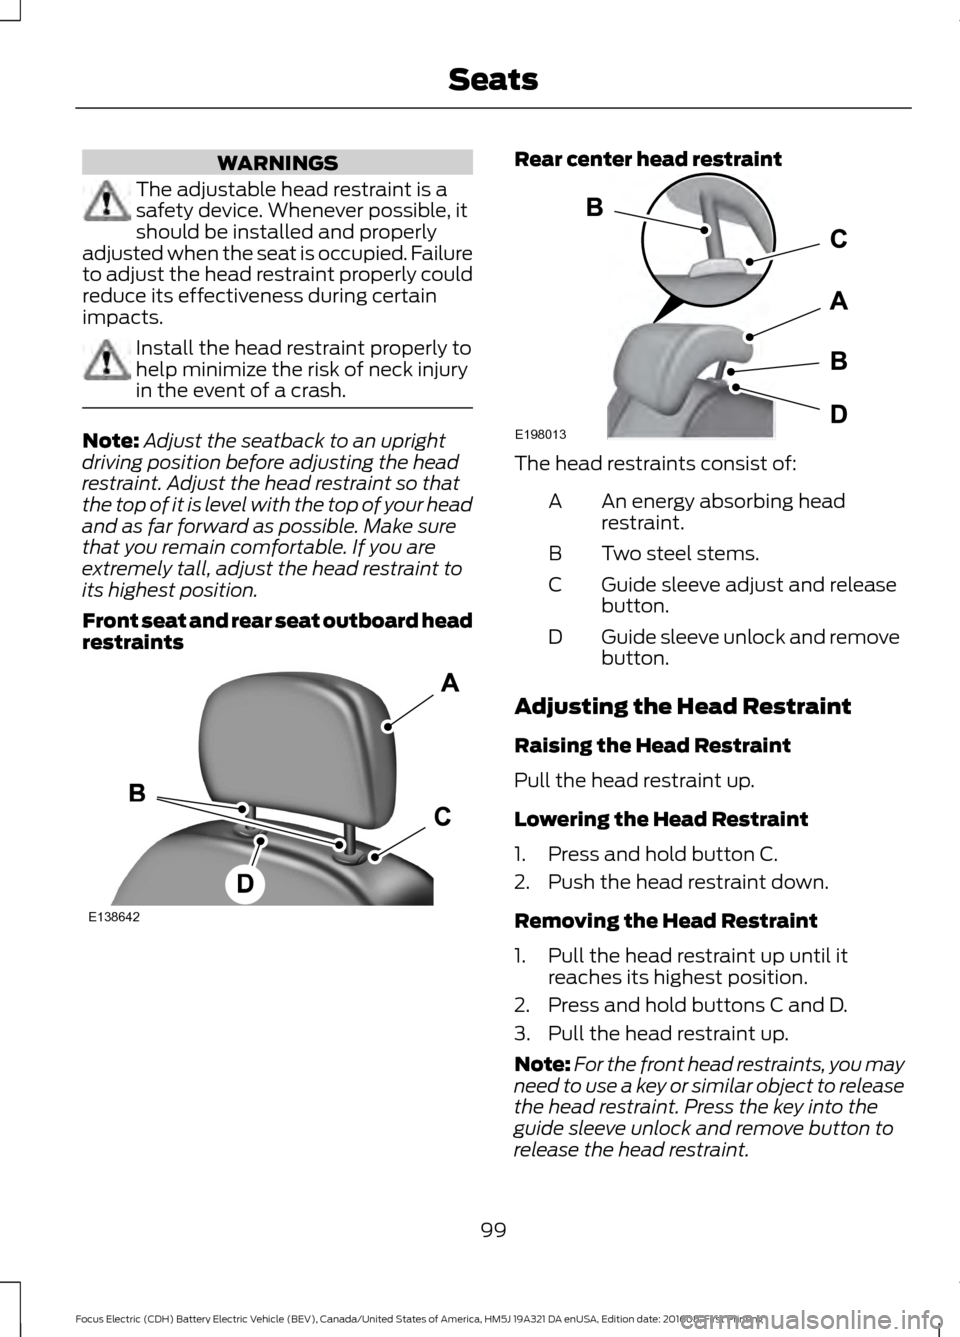
Front seat and rear seat outboard head
restraints Rear center head restraint
The head restraints consist of:
An energy absorbing head
restraint.
A
Two steel stems.
B
Guide sleeve adjust and release
button.
C
Guide sleeve unlock and remove
button.
D
Adjusting the Head Restraint
Raising the Head Restraint
Pull the head restraint up.
Lowering the Head Restraint
1. Press and hold button C.
2. Push the head restraint down.
Removing the Head Restraint
1. Pull the head restraint up until it reaches its highest position.
2. Press and hold buttons C and D.
3. Pull the head restraint up.
Note: For the front head restraints, you may
need to use a key or similar object to release
the head restraint. Press the key into the
guide sleeve unlock and remove button to
release the head restraint.
99
Focus Electric (CDH) Battery Electric Vehicle (BEV), Canada/United States of America, HM5J 19A321 DA enUSA, Edition date: 201608, First Printing SeatsE138642 E198013