Page 318 of 496
RADIO: Press this multiple times to select a radio band. Press and hold to
select the autostore function. Press to return to the main screen of the active
radio band.
A
CD:
Press to listen to a CD. Press the function buttons to scroll through the
menu choices.
B
Number block:
In radio mode, store and recall your favorite radio stations. To
store a radio station, tune to the station, then press and hold a preset button
until sound returns. In CD mode, select a track. In phone mode, enter a phone
number.
C
Function buttons:
Select different functions of the audio system depending
on which mode you are in (for example Radio mode or CD mode).
D
TUNE:
Press to manually search through the radio frequency band.
E
315
Flex (), enUSA, First Printing Audio SystemE210707
AB
O
NMLKJ
EI
H
C
FG
D
Page 323 of 496

SOURCE: Press to access different audio modes, such as AM, FM, Satellite
Radio and Line in.
A
Seek, Fast Forward and Reverse:
In radio mode, select a frequency band
and press this button. The system stops at the first station it finds in that
direction. In CD mode, press to select the previous or next track. Press and hold
to move quickly forward through the current track.
B
SOUND:
Press to access settings for Treble, Midrange, Bass, Fade or Balance.
Use the up and down arrow buttons to select the various settings. When you
make your selection, press the left and right arrow buttons to change the
settings. Press
OK to set or press MENU to exit. Sound settings can be set for
each audio source independently.
C
TUNE:
In radio mode, press to manually search through the radio frequency
band.
D
VOL and Power:
Press to switch the system on and off. Turn to adjust the
volume.
E
USB PORT
(If Equipped) The USB port allows you to plug in media
playing devices, memory sticks and charge
devices (if supported). See your SYNC
information.
MEDIA HUB
(If Equipped)
You can locate the media hub inside the
center console or on the instrument panel. See your SYNC information.
320
Flex (), enUSA, First Printing Audio SystemE176344 E211463
Page 330 of 496

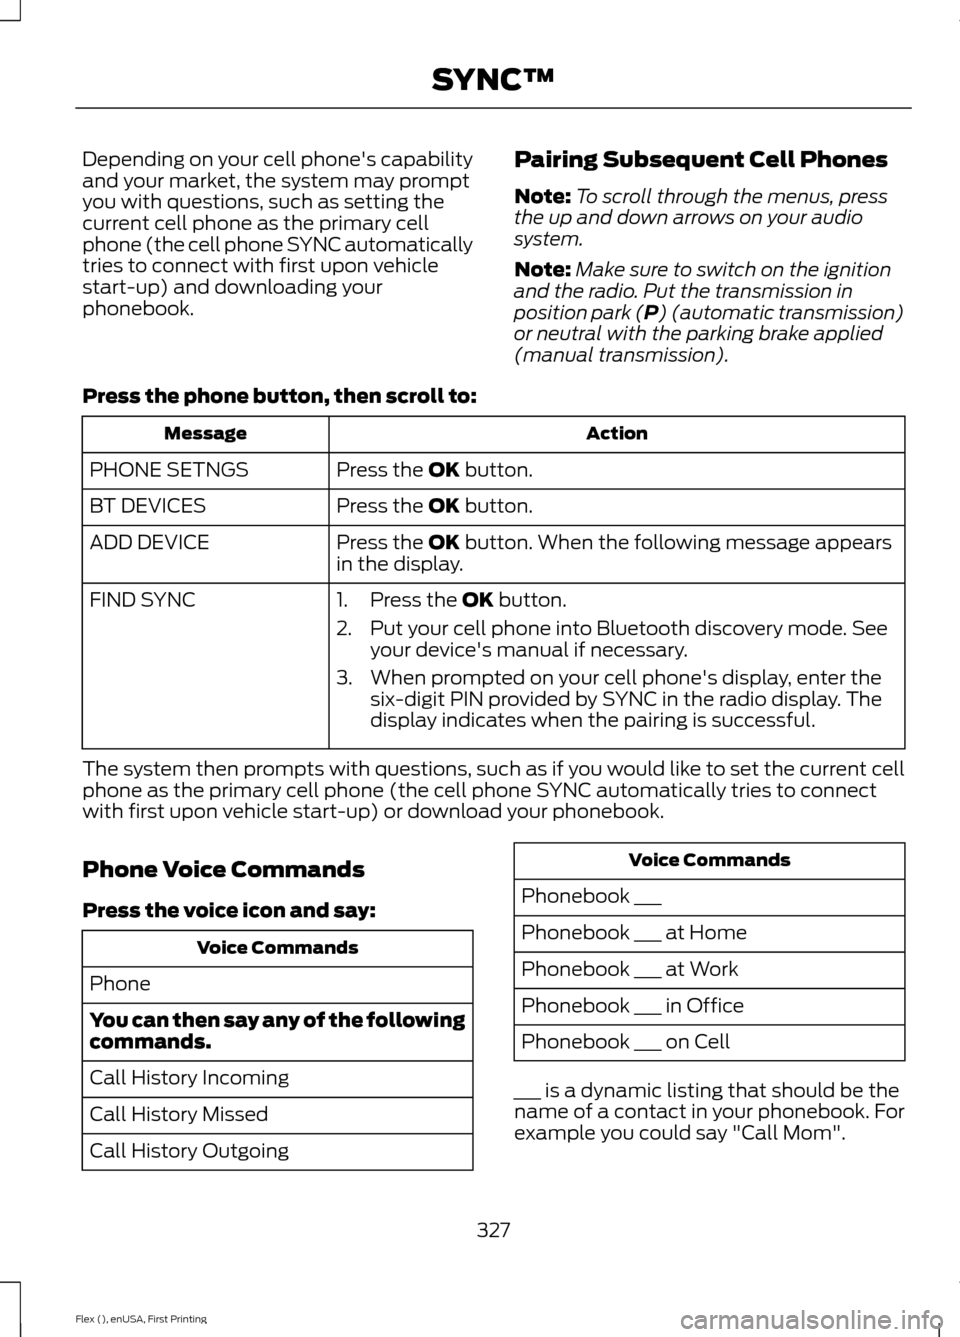
Depending on your cell phone's capability
and your market, the system may prompt
you with questions, such as setting the
current cell phone as the primary cell
phone (the cell phone SYNC automatically
tries to connect with first upon vehicle
start-up) and downloading your
phonebook.
Pairing Subsequent Cell Phones
Note:
To scroll through the menus, press
the up and down arrows on your audio
system.
Note: Make sure to switch on the ignition
and the radio. Put the transmission in
position park (P) (automatic transmission)
or neutral with the parking brake applied
(manual transmission).
Press the phone button, then scroll to: Action
Message
Press the
OK button.
PHONE SETNGS
Press the
OK button.
BT DEVICES
Press the
OK button. When the following message appears
in the display.
ADD DEVICE
FIND SYNC
1. Press the
OK button.
2. Put your cell phone into Bluetooth discovery mode. See your device's manual if necessary.
3. When prompted on your cell phone's display, enter the six-digit PIN provided by SYNC in the radio display. The
display indicates when the pairing is successful.
The system then prompts with questions, such as if you would like to set the current cell
phone as the primary cell phone (the cell phone SYNC automatically tries to connect
with first upon vehicle start-up) or download your phonebook.
Phone Voice Commands
Press the voice icon and say: Voice Commands
Phone
You can then say any of the following
commands.
Call History Incoming
Call History Missed
Call History Outgoing Voice Commands
Phonebook ___
Phonebook ___ at Home
Phonebook ___ at Work
Phonebook ___ in Office
Phonebook ___ on Cell
___ is a dynamic listing that should be the
name of a contact in your phonebook. For
example you could say "Call Mom".
327
Flex (), enUSA, First Printing SYNC™
Page 424 of 496

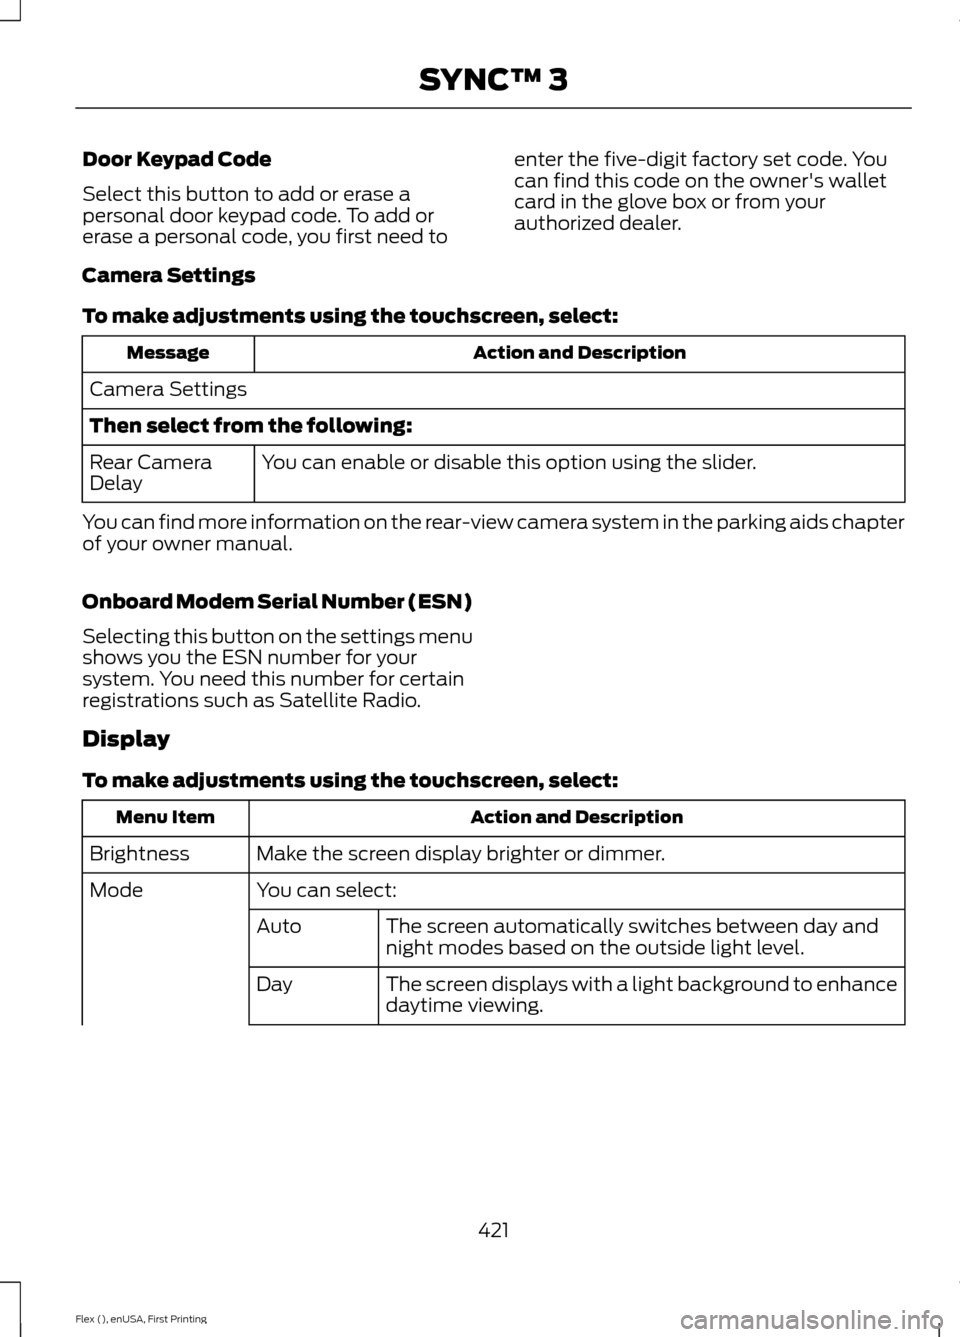
Door Keypad Code
Select this button to add or erase a
personal door keypad code. To add or
erase a personal code, you first need to
enter the five-digit factory set code. You
can find this code on the owner's wallet
card in the glove box or from your
authorized dealer.
Camera Settings
To make adjustments using the touchscreen, select: Action and Description
Message
Camera Settings
Then select from the following: You can enable or disable this option using the slider.
Rear Camera
Delay
You can find more information on the rear-view camera system in the parking aids chapter
of your owner manual.
Onboard Modem Serial Number (ESN)
Selecting this button on the settings menu
shows you the ESN number for your
system. You need this number for certain
registrations such as Satellite Radio.
Display
To make adjustments using the touchscreen, select: Action and Description
Menu Item
Make the screen display brighter or dimmer.
Brightness
You can select:
Mode
The screen automatically switches between day and
night modes based on the outside light level.
Auto
The screen displays with a light background to enhance
daytime viewing.
Day
421
Flex (), enUSA, First Printing SYNC™ 3