2017 FORD F450 SUPER DUTY air filter
[x] Cancel search: air filterPage 328 of 642
Brake fluid reservoir. See Brake Fluid Check (page 343).F.
Engine cooling system coolant reservoir (primary high-temperature coolingsystem). See Engine Coolant Check (page 336).G.
Battery. See Changing the 12V Battery (page 346).H.
Windshield washer fluid reservoir. See Washer Fluid Check (page 344).I.
Power steering fluid reservoir. See Power Steering Fluid Check (page 344).J.
Secondary cooling system coolant reservoir. See Engine Coolant Check (page336).K.
Battery. See Changing the 12V Battery (page 346).L.
Air filter assembly. See Changing the Engine Air Filter (page 357).M.
Scheduled Maintenance
The recommended scheduledmaintenance services are required becausethey are considered essential to the lifeand performance of your vehicle. SeeNormal Scheduled Maintenance (page576).
Use only recommended fuel, lubricants,fluids and service parts conforming to Fordspecifications. Motorcraft® parts aredesigned and built for best performancein your vehicle. See Capacities andSpecifications (page 427).
325
Super Duty (TFE) Canada/United States of America, enUSA, Edition date: 201710, Second Printing
Maintenance
Page 329 of 642

UNDER HOOD OVERVIEW - 6.8L
Air filter. See Changing the Engine Air Filter (page 356).A.
Engine compartment fuse box. See Fuse Specification Chart (page 312).B.
Automatic transmission fluid dipstick. See Automatic Transmission FluidCheck (page 340).C.
Engine oil dipstick. See Engine Oil Dipstick (page 327).D.
Brake fluid reservoir. See Brake Fluid Check (page 343).E.
Windshield washer fluid reservoir. See Washer Fluid Check (page 344).F.
Engine coolant reservoir. See Engine Coolant Check (page 332).G.
Power steering fluid reservoir. See Power Steering Fluid Check (page 344).H.
Engine oil filler cap. See Engine Oil Check (page 327).I.
Battery. See Changing the 12V Battery (page 346).J.
326
Super Duty (TFE) Canada/United States of America, enUSA, Edition date: 201710, Second Printing
MaintenanceABC
JFGI
ED
E222144
H
Page 333 of 642
If your vehicle is equipped with a dieselengine, an Intelligent Oil Life Monitor™calculates the proper oil change serviceinterval. When the information displayindicates: OIL CHANGE REQUIRED, changethe engine oil and oil filter. SeeInformation Displays (page 111).
The engine oil filter protects your engineby filtering harmful, abrasive or sludgeparticles and particles significantly smallerthan most available will-fit filters. SeeMotorcraft Parts (page 419).
1. Unscrew the oil filter and oil pan drainplug and wait for the oil to drain.
2. Replace the filter.
3. Reinstall the oil pan drain plug.
4. Refill the engine with new oil. SeeCapacities and Specifications (page427).
5. For diesel engines, you need to resetthe Intelligent Oil Life Monitor™. SeeInformation Displays (page 111).
Engine lubrication for severeservice operation
The following conditions define severeoperation for which engine operation withSAE 5W-40 API CJ-4 is recommended. Oiland oil filter change intervals will bedetermined by the Intelligent Oil LifeMonitor™ as noted previously.
•Frequent or extended idling (over 10minutes per hour of normal driving).
•Low-speed operation/stationary use.
•If vehicle is operated in sustainedambient temperatures below -9°F(-23°C) or above 100°F (38°C).
•Frequent low-speed operation,consistent heavy traffic less than25 mph (40 km/h).
•Operating in severe dust conditions.
•Operating the vehicle off road.
•Towing a trailer over 1,000 mi(1,600 km).
•Sustained, high-speed driving at GrossVehicle Weight Rating (maximumloaded weight for vehicle operation).
•Use of fuels with sulfur content otherthan ultra-low sulfur diesel (ULSD).
•Use of high-sulfur diesel fuel.
CHANGING THE COALESCER
FILTER ELEMENT
WARNING
Do not dispose of engine oil or oilfilters in the household refuse or thepublic sewage system. Use anauthorized waste disposal facility.
Do not clean or recondition the filterelement.
We recommend that you demand the useof genuine Ford and Motorcraft® partswhenever your vehicle requires scheduledmaintenance or repair. Use the correctspecification filter element. SeeMotorcraft Parts (page 418).
Note:Operating your vehicle without a filterelement or with an unapproved filterelement may result in damage to the turbocharger or exchanger and could lead toengine damage that may not be covered bythe vehicle Warranty.
330
Super Duty (TFE) Canada/United States of America, enUSA, Edition date: 201710, Second Printing
Maintenance
Page 343 of 642
Coolant Change
At specific mileage intervals, as listed inthe scheduled maintenance information,the coolant should be changed. Theinformation display may display a messageto change coolant at this time. Addprediluted coolant approved to the correctspecification. See Capacities andSpecifications (page 415).
Engine-driven Cooling Fan (FanClutch)
Your vehicle may have an engine drivencooling fan drive (also called a fan clutch).This fan drive changes the fan speed tomatch the vehicle’s changing cooling airflow requirements. Fan speed, fan noiselevel and fuel consumption all will increasebased on the driving conditions thatinclude trailer towing, hill climbing, heavyloads, high speed and high ambienttemperature, individually or in combination.
The fan drive is designed to provide theminimum fan speed (and resultingminimum fan noise and fuel consumption)required to meet the ever changing vehiclecooling air flow requirements. You will hearthe amount of fan noise increasing anddecreasing as the engine powerrequirements and vehicle driving conditionschange as you drive. This is to be expectedas being normal to the operation of yourvehicle. High levels of fan noise might alsobe heard when your engine is first started,and should normally decrease after drivingfor a short time.
AUTOMATIC TRANSMISSION
FLUID CHECK
Have an authorized dealer check andchange the transmission fluid and filter atthe correct service interval. SeeScheduled Maintenance (page 573).
Do not use supplemental transmissionfluid additives, treatments or cleaningagents. The use of these materials mayaffect transmission operation and resultin damage to internal transmissioncomponents.
Checking Automatic TransmissionFluid
For scheduled intervals of the fluid checksand changes, See ScheduledMaintenance (page 573). Yourtransmission does not consume fluid.However, the fluid level should be checkedif the transmission is not working properly,i.e., if the transmission slips or shifts slowlyor if you notice some sign of fluid leakage.
Automatic transmission fluid expandswhen warmed. To obtain an accurate fluidcheck, drive the vehicle until it is at normaloperating temperature (approximately19 mi (30 km)). Verify that thetransmission fluid temperature gauge,located on the instrument cluster, is withinnormal range.
1. Drive the vehicle 19 mi (30 km)until itreaches normal operating temperature.
2.Park the vehicle on a level surface andengage the parking brake.
3.With the engine running, parking brakeengaged and your foot on the brakepedal, move the gearshift lever throughall of the gear ranges. Allow sufficienttime for each gear to engage.
4.Latch the gearshift lever in P and leavethe engine running.
5. Remove the dipstick, wiping it cleanwith a clean, dry lint free rag. Ifnecessary, refer to the Under HoodOverview in this chapter for thelocation of the dipstick.
340
Super Duty (TFE) Canada/United States of America, enUSA, Edition date: 201710, Second Printing
Maintenance
Page 349 of 642
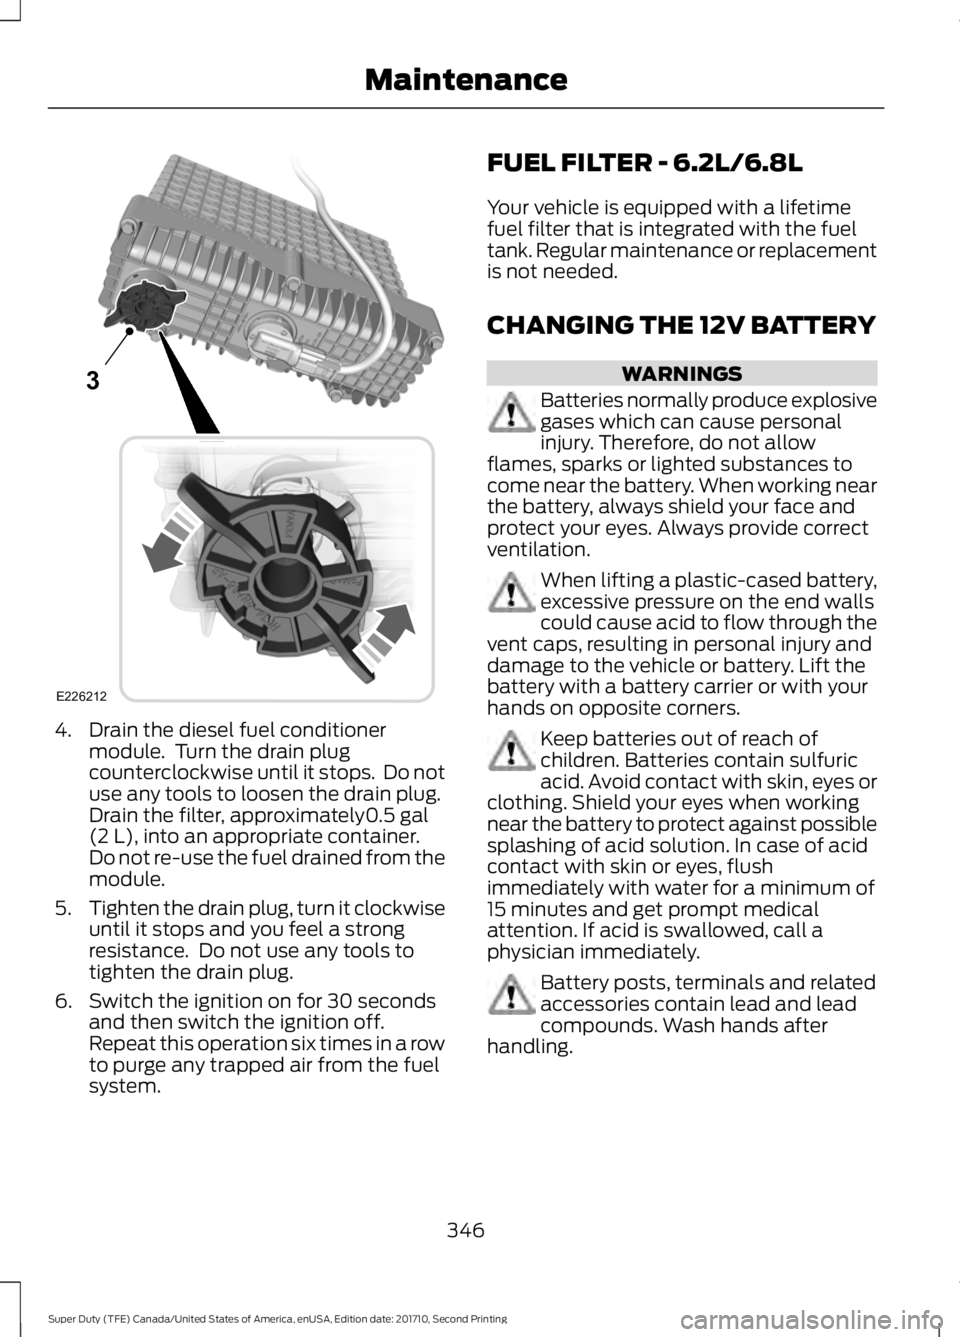
4. Drain the diesel fuel conditionermodule. Turn the drain plugcounterclockwise until it stops. Do notuse any tools to loosen the drain plug.Drain the filter, approximately0.5 gal(2 L), into an appropriate container.Do not re-use the fuel drained from themodule.
5.Tighten the drain plug, turn it clockwiseuntil it stops and you feel a strongresistance. Do not use any tools totighten the drain plug.
6. Switch the ignition on for 30 secondsand then switch the ignition off.Repeat this operation six times in a rowto purge any trapped air from the fuelsystem.
FUEL FILTER - 6.2L/6.8L
Your vehicle is equipped with a lifetimefuel filter that is integrated with the fueltank. Regular maintenance or replacementis not needed.
CHANGING THE 12V BATTERY
WARNINGS
Batteries normally produce explosivegases which can cause personalinjury. Therefore, do not allowflames, sparks or lighted substances tocome near the battery. When working nearthe battery, always shield your face andprotect your eyes. Always provide correctventilation.
When lifting a plastic-cased battery,excessive pressure on the end wallscould cause acid to flow through thevent caps, resulting in personal injury anddamage to the vehicle or battery. Lift thebattery with a battery carrier or with yourhands on opposite corners.
Keep batteries out of reach ofchildren. Batteries contain sulfuricacid. Avoid contact with skin, eyes orclothing. Shield your eyes when workingnear the battery to protect against possiblesplashing of acid solution. In case of acidcontact with skin or eyes, flushimmediately with water for a minimum of15 minutes and get prompt medicalattention. If acid is swallowed, call aphysician immediately.
Battery posts, terminals and relatedaccessories contain lead and leadcompounds. Wash hands afterhandling.
346
Super Duty (TFE) Canada/United States of America, enUSA, Edition date: 201710, Second Printing
Maintenance3
E226212
Page 353 of 642
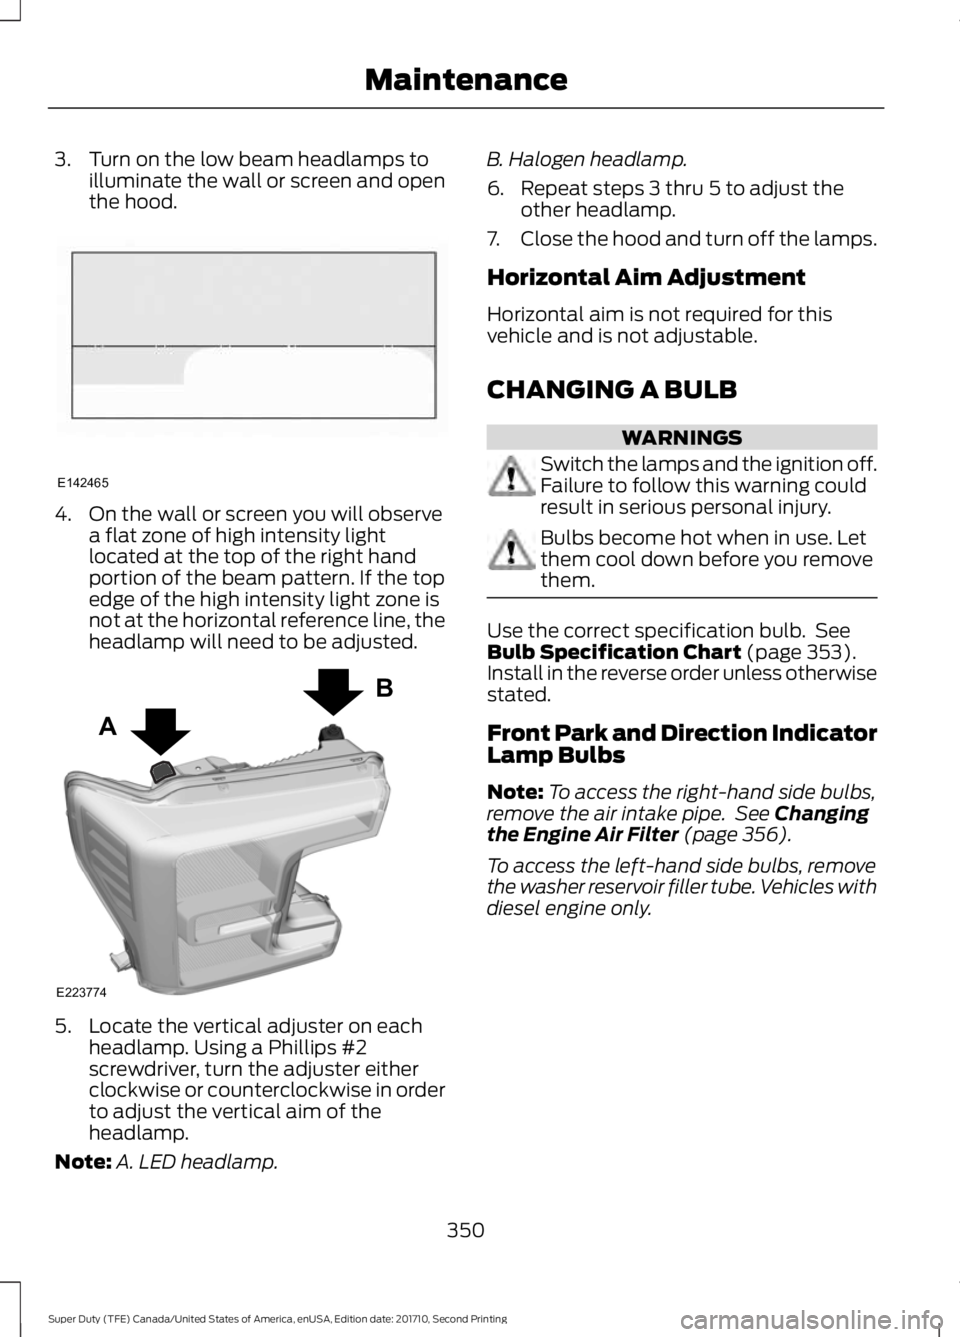
3. Turn on the low beam headlamps toilluminate the wall or screen and openthe hood.
4. On the wall or screen you will observea flat zone of high intensity lightlocated at the top of the right handportion of the beam pattern. If the topedge of the high intensity light zone isnot at the horizontal reference line, theheadlamp will need to be adjusted.
5. Locate the vertical adjuster on eachheadlamp. Using a Phillips #2screwdriver, turn the adjuster eitherclockwise or counterclockwise in orderto adjust the vertical aim of theheadlamp.
Note:A. LED headlamp.
B. Halogen headlamp.
6. Repeat steps 3 thru 5 to adjust theother headlamp.
7.Close the hood and turn off the lamps.
Horizontal Aim Adjustment
Horizontal aim is not required for thisvehicle and is not adjustable.
CHANGING A BULB
WARNINGS
Switch the lamps and the ignition off.Failure to follow this warning couldresult in serious personal injury.
Bulbs become hot when in use. Letthem cool down before you removethem.
Use the correct specification bulb. SeeBulb Specification Chart (page 353).Install in the reverse order unless otherwisestated.
Front Park and Direction IndicatorLamp Bulbs
Note:To access the right-hand side bulbs,remove the air intake pipe. See Changingthe Engine Air Filter (page 356).
To access the left-hand side bulbs, removethe washer reservoir filler tube. Vehicles withdiesel engine only.
350
Super Duty (TFE) Canada/United States of America, enUSA, Edition date: 201710, Second Printing
MaintenanceE142465 A
B
E223774
Page 354 of 642
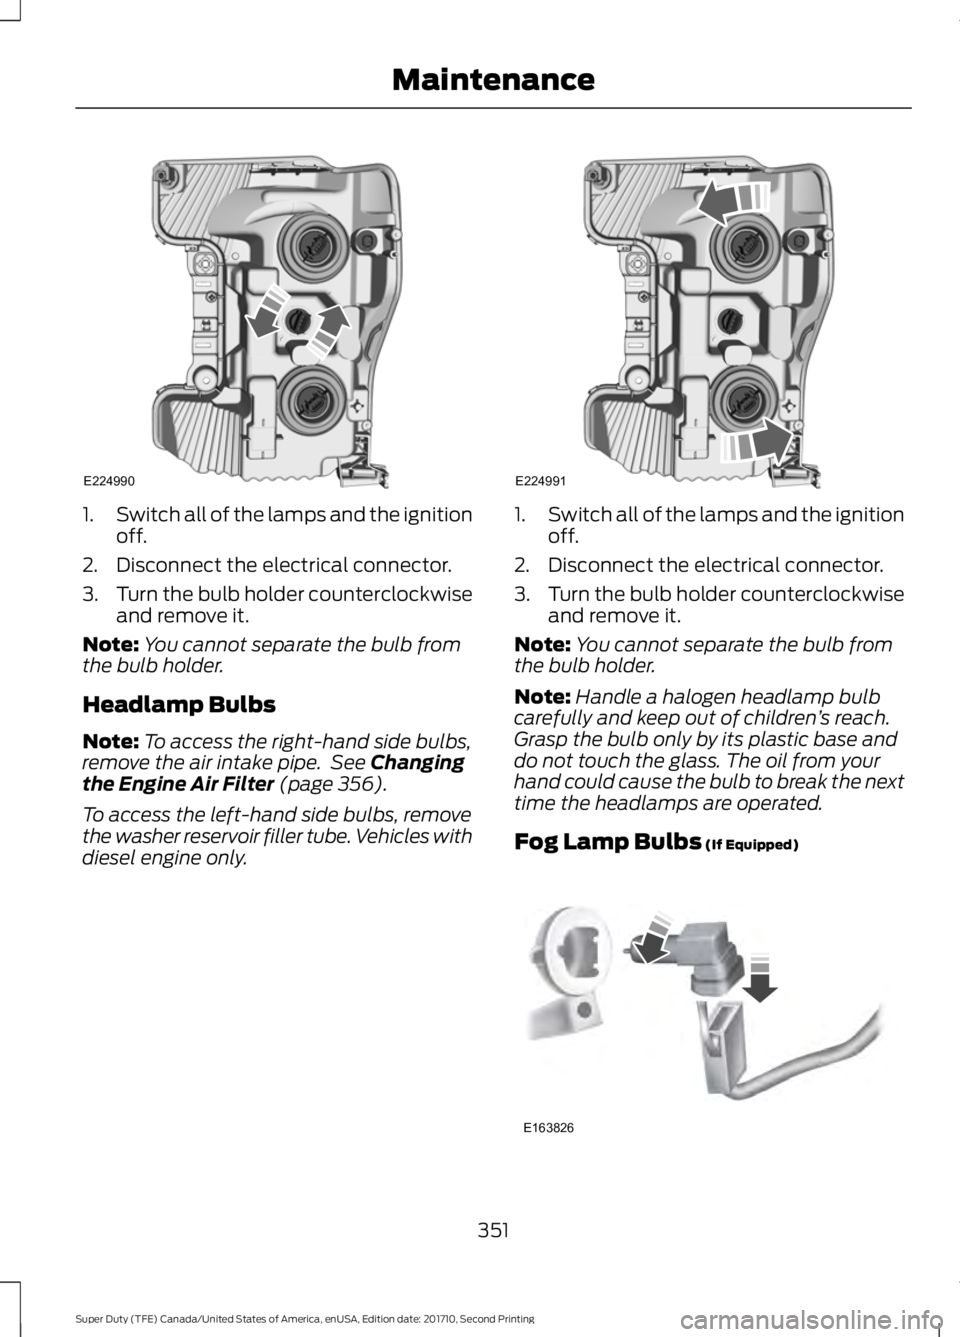
1.Switch all of the lamps and the ignitionoff.
2. Disconnect the electrical connector.
3.Turn the bulb holder counterclockwiseand remove it.
Note:You cannot separate the bulb fromthe bulb holder.
Headlamp Bulbs
Note:To access the right-hand side bulbs,remove the air intake pipe. See Changingthe Engine Air Filter (page 356).
To access the left-hand side bulbs, removethe washer reservoir filler tube. Vehicles withdiesel engine only.
1.Switch all of the lamps and the ignitionoff.
2. Disconnect the electrical connector.
3.Turn the bulb holder counterclockwiseand remove it.
Note:You cannot separate the bulb fromthe bulb holder.
Note:Handle a halogen headlamp bulbcarefully and keep out of children’s reach.Grasp the bulb only by its plastic base anddo not touch the glass. The oil from yourhand could cause the bulb to break the nexttime the headlamps are operated.
Fog Lamp Bulbs (If Equipped)
351
Super Duty (TFE) Canada/United States of America, enUSA, Edition date: 201710, Second Printing
MaintenanceE224990 E224991 E163826
Page 359 of 642

CHANGING THE ENGINE AIR
FILTER - 6.2L/6.8L
WARNING
To reduce the risk of vehicle damageand personal burn injuries, do notstart your engine with the air cleanerremoved and do not remove it while theengine is running.
Use the correct specification air filterelement. See Motorcraft Parts (page419).
Note: Failure to use the correct air filterelement may result in severe enginedamage. Resulting component damagemay not be covered by the vehicle Warranty.
Change the air filter element at the correctservice interval. See ScheduledMaintenance (page 573).
1. Disconnect the mass air flow sensorelectrical connector.
2. Remove the air intake tube securingclamp.
3. Pull the air intake tube away from theair filter housing.
4. Remove the clips that secure the airfilter housing cover. Remove the airfilter housing cover.
356
Super Duty (TFE) Canada/United States of America, enUSA, Edition date: 201710, Second Printing
MaintenanceE226426
x4
1
2
4
3