2017 FORD F150 tow
[x] Cancel search: towPage 101 of 599

To adjust your mirrors, make sure you
switch your vehicle on (with the ignition in
accessory mode or the engine running) and
then:
1. Press and release the control. It lights.
2. Press the adjustment control to
position the mirrors.
•Press the left arrow to extend the
mirrors out. Press the right arrow to
retract the mirrors in.
• Press the up or down arrow to fold
the mirrors toward the window
glass. Press the up or down arrow
again to fold the mirrors out.
Note: Moving the mirrors 10 or more times
within one minute, or repeated folding and
unfolding of the mirrors while holding the
control down during full travel, may disable
the system to protect the motors from
overheating. Wait approximately three
minutes with the vehicle running, and up to
10 minutes with the vehicle off, for the
system to reset and for function to return to
normal.
Heated Exterior Mirrors (If Equipped)
See Heated Windows and Mirrors (page
147
). Memory Mirrors
(If Equipped)
You can save and recall the mirror
positions through the memory function.
See
Memory Function (page 154).
Auto-dimming Feature
(If Equipped)
The driver exterior mirror automatically
dims when the interior auto-dimming
mirror turns on.
Direction Indicator Mirrors (If Equipped)
While the vehicle is running, the
forward-facing portion of the appropriate
mirror housing blinks when you switch on
the direction indicator.
Puddle Lamps
(If Equipped)
The lamps on the bottom part of the mirror
housing light when you use your
transmitter to unlock the doors or when
you open a door.
Clearance Lamps
(If Equipped)
The lower, outer part of the mirror housings
light when you switch the headlamps or
parking lamps on.
Spot Lamps
(If Equipped)
The area lights are on the forward-facing
portion of the mirror housing. You can
switch them on and off by using the
controls located on the instrument panel.
See
Lighting (page 87).
360-Degree Camera
(If Equipped)
Each mirror includes a camera.
Integrated Blind Spot Mirror
(If
Equipped) WARNING
Objects in the blind spot mirror are
closer than they appear.
98
F-150 (TFC) Canada/United States of America, enUSA, First Printing Windows and MirrorsE176218
Page 102 of 599

Blind spot mirrors have an integrated
convex mirror built into the upper outboard
corner of the exterior mirrors. They can
assist you by increasing visibility along the
side of your vehicle. The blind spot mirror
is only on the driver exterior mirror.
Check the main mirror first before a lane
change, then check the blind spot mirror.
If no vehicles are present in the blind spot
mirror and the traffic in the adjacent lane
is at a safe distance, signal that you are
going to change lanes. Glance over your
shoulder to verify traffic is clear, and
carefully change lanes. The image of the approaching vehicle is
small and near the inboard edge of the
main mirror when it is at a distance. The
image becomes larger and begins to move
outboard across the main mirror as the
vehicle approaches (A). The image
transitions from the main mirror and begins
to appear in the blind spot mirror as the
vehicle approaches (B). The vehicle
transitions to your peripheral field of view
as it leaves the blind spot mirror (C).
Blind Spot Information System (If
Equipped)
See
Blind Spot Information System
(page 236).
INTERIOR MIRROR WARNING
Do not adjust the mirror when your
vehicle is moving.
Note:
Do not clean the housing or glass of
any mirror with harsh abrasives, fuel or other
petroleum or ammonia-based cleaning
products.
You can adjust the interior mirror to your
preference. Some mirrors also have a
second pivot point. This lets you move the
mirror head up or down and from side to
side.
Pull the tab below the mirror toward you
to reduce glare at night.
Auto-Dimming Mirror
(If Equipped)
Note: Do not block the sensors on the front
and back of the mirror. Mirror performance
may be affected. A rear center passenger or
raised rear center head restraint may also
block light from reaching the sensor.
99
F-150 (TFC) Canada/United States of America, enUSA, First Printing Windows and MirrorsA
B
C
E138665
Page 103 of 599
The mirror will dim automatically to reduce
glare when bright lights are detected from
behind your vehicle. It will automatically
return to normal reflection when you select
reverse gear to make sure you have a clear
view when backing up.
SLIDING WINDOWS (If Equipped)
Power Sliding Back Window
(If
Equipped) WARNINGS
When operating the power sliding
back window, you must make sure
all rear seat occupants and cargo are
not in the proximity of the back window. Do not leave children unattended in
your vehicle and do not let them play
with the power sliding back window.
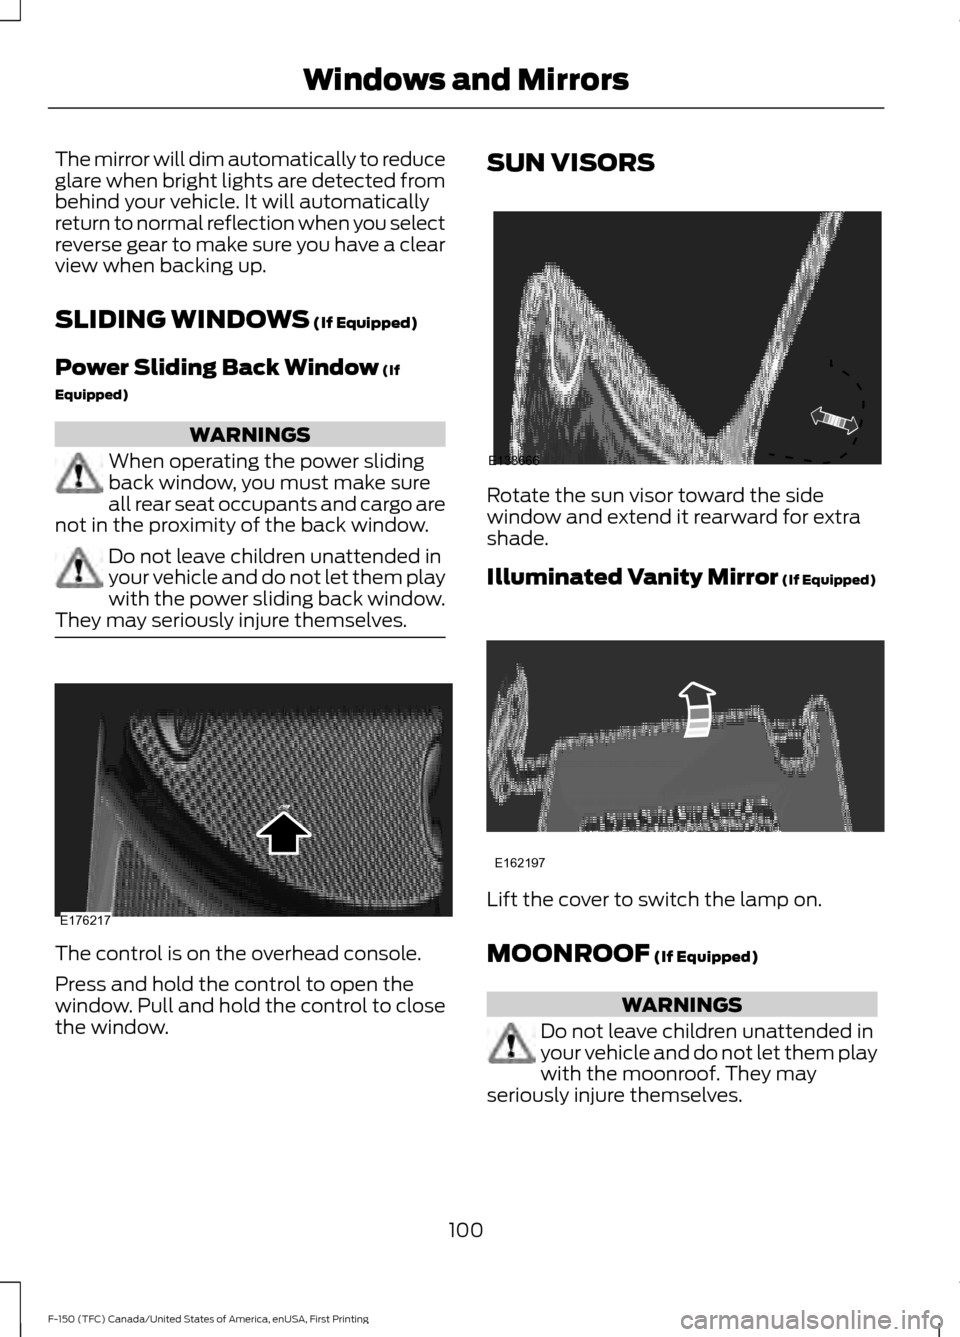
They may seriously injure themselves. The control is on the overhead console.
Press and hold the control to open the
window. Pull and hold the control to close
the window. SUN VISORS
Rotate the sun visor toward the side
window and extend it rearward for extra
shade.
Illuminated Vanity Mirror
(If Equipped)
Lift the cover to switch the lamp on.
MOONROOF
(If Equipped)
WARNINGS
Do not leave children unattended in
your vehicle and do not let them play
with the moonroof. They may
seriously injure themselves.
100
F-150 (TFC) Canada/United States of America, enUSA, First Printing Windows and MirrorsE176217 E138666 E162197
Page 107 of 599

Engine Oil Pressure Gauge
Indicates engine oil pressure. The needle
should stay in the normal operating range
(between L and H). If the needle falls
below the normal range, stop your vehicle,
turn off the engine and check the engine
oil level. Add oil if needed. If the oil level is
correct, have your vehicle checked by an
authorized dealer.
Engine Coolant Temperature
Gauge
WARNING
Never remove the coolant reservoir
cap while the engine is running or hot.
Indicates engine coolant temperature. At
normal operating temperature, the level
indicator will be in the normal range. If the
engine coolant temperature exceeds the
normal range, stop your vehicle as soon as
safely possible, switch off the engine and
let the engine cool.
Fuel Gauge
Note:
The fuel gauge may vary slightly
when your vehicle is moving or on a gradient.
Switch the ignition on. The fuel gauge will
indicate approximately how much fuel is
left in the fuel tank. The arrow adjacent to
the fuel pump symbol indicates on which
side of your vehicle the fuel filler door is
located.
The needle should move toward F when
you refuel your vehicle. If the needle points
to E after adding fuel, this indicates your
vehicle needs service soon.
After refueling some variability in needle
position is normal: •
It may take a short time for the needle
to reach F after leaving the gas station.
This is normal and depends upon the
slope of pavement at the gas station.
• The fuel amount dispensed into the
tank is a little less or more than the
gauge indicated. This is normal and
depends upon the slope of pavement
at the gas station.
• If the gas station nozzle shuts off
before the tank is full, try a different
gas pump nozzle.
Low Fuel Reminder
A low fuel reminder triggers at 50 mi
(80 km) to empty.
Transmission Fluid Temperature
Gauge
Indicates transmission fluid temperature.
At normal operating temperature, the level
indicator will be in the normal range. If the
transmission fluid temperature exceeds
the normal range, stop the vehicle as soon
as safely possible and verify the airflow is
not restricted such as snow or debris
blocking airflow through the grill. Also,
higher than normal operating temperature
can be caused by special operation
conditions (i.e. snowplowing, towing or
off-road use). Refer to Special operating
conditions in the scheduled maintenance
information for instructions. Operating the
transmission for extended periods with the
gauge in the higher than normal area may
cause internal transmission damage. You
need to alter the severity of your driving
conditions to lower the transmission
temperature into the normal range. If the
gauge continues to show high
temperatures, see an authorized dealer.
104
F-150 (TFC) Canada/United States of America, enUSA, First Printing Instrument Cluster
Page 111 of 599
Service Engine Soon
If the service engine soon
indicator light stays illuminated
after you start the engine, it
indicates that the On Board Diagnostics
system (OBD) has detected a malfunction
of your vehicle emissions control system.
Refer to On board diagnostics (OBD) in
the Fuel and Refueling chapter for more
information about having your vehicle
serviced. See Emission Control System
(page 183).
If the light is blinking, engine misfire is
occurring which could damage your
catalytic converter. Drive in a moderate
fashion (avoid heavy acceleration and
deceleration) and have your vehicle
serviced immediately. WARNING
Under engine misfire conditions,
excessive exhaust temperatures
could damage the catalytic
converter, the fuel system, interior floor
coverings or other vehicle components,
possibly causing a fire. Have an authorized
dealer service your vehicle immediately. When you first switch the ignition on,
before engine start, the service engine soon
indicator light illuminates to check the bulb
and to indicate whether your vehicle is
ready for inspection maintenance testing.
Normally, the service engine soon light will
stay on until you crank the engine, and then
turn itself off if no malfunctions are
present. However, if after 15 seconds the
service engine soon light blinks eight times,
it means that your vehicle is not ready for
inspection maintenance testing. See
Emission Control System
(page 183). Sport Mode Illuminates when you switch the
sport mode on.
Traction and Stability Control Illuminates when the system is
active. If it remains illuminated
or does not illuminate when you
switch the ignition on, this indicates a
malfunction. During a malfunction the
system will switch off. Have the system
checked by an authorized dealer
immediately. See
Using Stability
Control (page 210).
Traction and Stability Control Off Illuminates when you switch the
system off. It will go out when
you switch the system back on
or when you switch the ignition off. See
Using Stability Control
(page 210).
Transmission Tow/Haul
(If Equipped) Illuminates when the tow/haul
feature has been activated. If the
light flashes steadily, have the
system serviced immediately, damage to
the transmission could occur. See
Automatic Transmission
(page 186).
AUDIBLE WARNINGS AND
INDICATORS
Airbag Secondary Warning
Sounds if there is a malfunction with the
safety belt warning lamp and there is a
fault in the supplemental restraints
system.
108
F-150 (TFC) Canada/United States of America, enUSA, First Printing Instrument Cluster E176099 E138639 E130458 E161509
Page 116 of 599
Settings
MyKey Mileage
Hold OK to Create MyKey
Create MyKey
Select Your Setting
911 Assist
Do Not
Disturb
AdvanceTrac
Max Speed
Speed Minder
Vol. Limiter
Clear MyKeys - Press OK to clear MyKeys
Clear MyKeys
Select Your Setting
Units
Display Setup
Temperature
Tire Pressure
Language
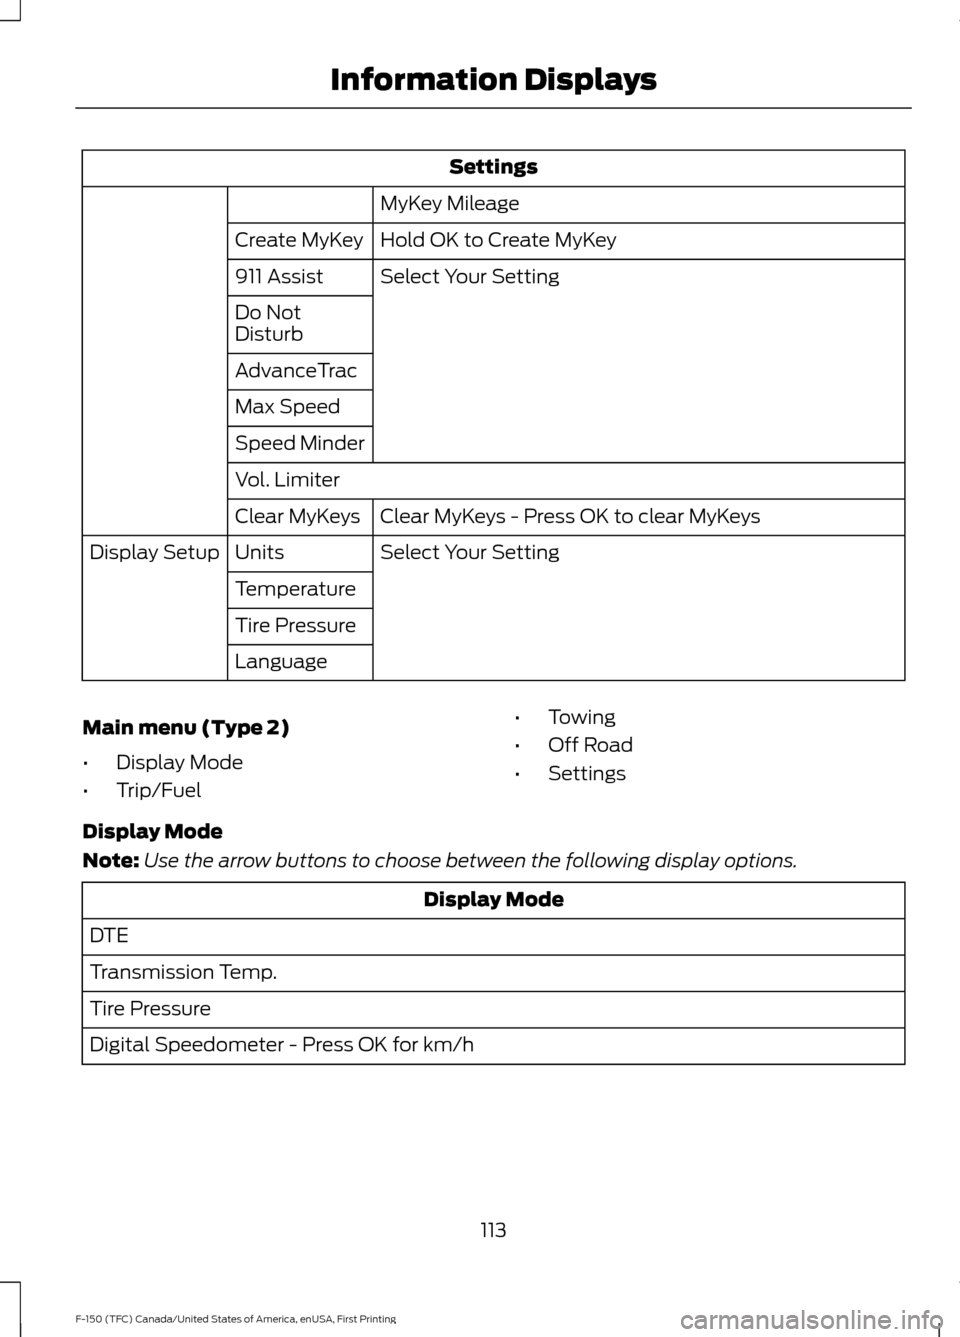
Main menu (Type 2)
• Display Mode
• Trip/Fuel •
Towing
• Off Road
• Settings
Display Mode
Note: Use the arrow buttons to choose between the following display options. Display Mode
DTE
Transmission Temp.
Tire Pressure
Digital Speedometer - Press OK for km/h
113
F-150 (TFC) Canada/United States of America, enUSA, First Printing Information Displays
Page 118 of 599
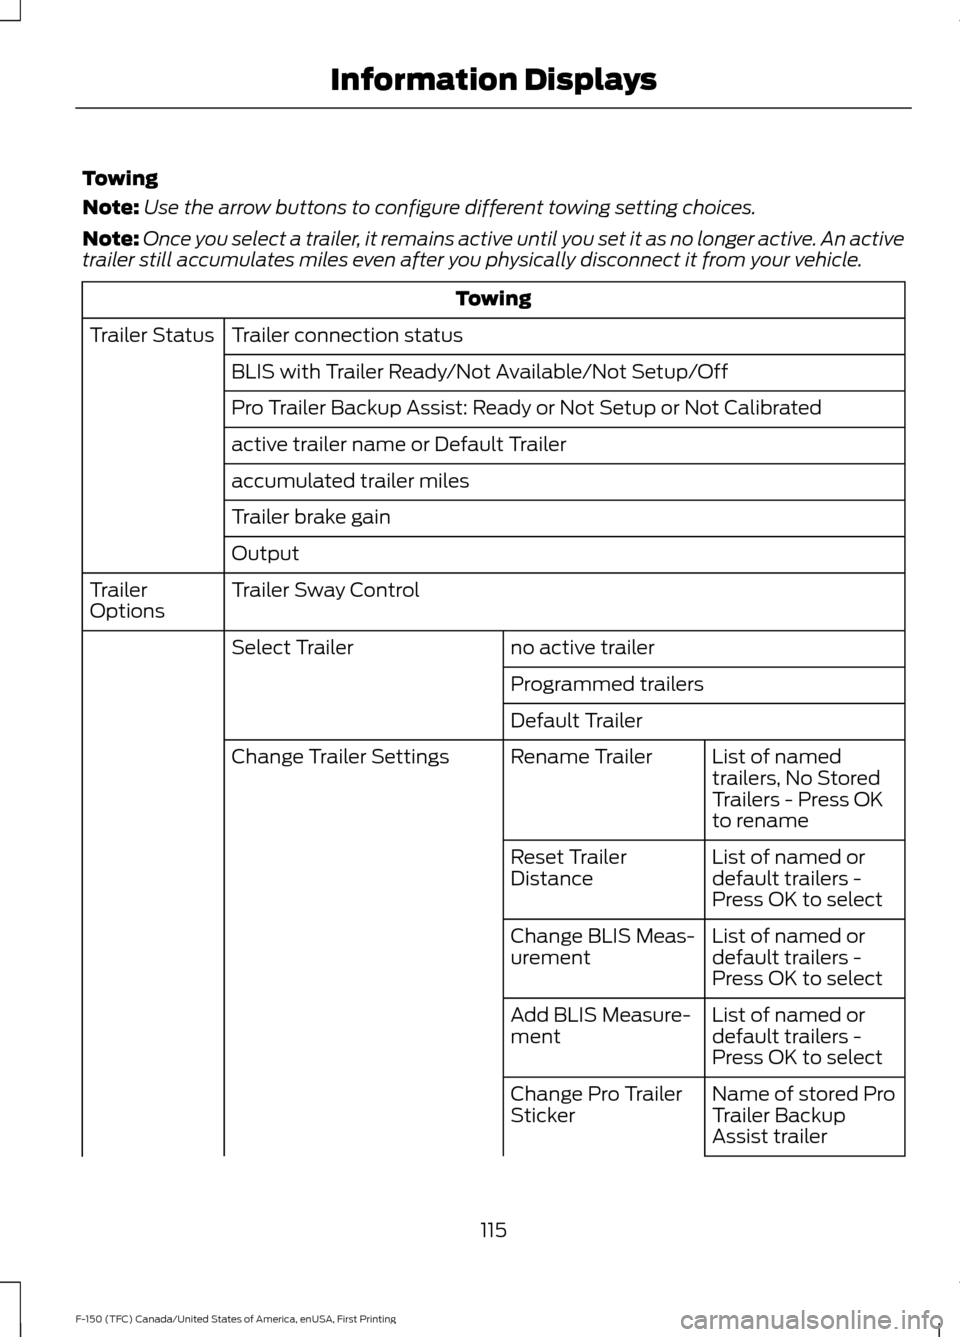
Towing
Note:
Use the arrow buttons to configure different towing setting choices.
Note: Once you select a trailer, it remains active until you set it as no longer active. An active
trailer still accumulates miles even after you physically disconnect it from your vehicle. Towing
Trailer connection status
Trailer Status
BLIS with Trailer Ready/Not Available/Not Setup/Off
Pro Trailer Backup Assist: Ready or Not Setup or Not Calibrated
active trailer name or Default Trailer
accumulated trailer miles
Trailer brake gain
Output
Trailer Sway Control
Trailer
Options
no active trailer
Select Trailer
Programmed trailers
Default TrailerList of named
trailers, No Stored
Trailers - Press OK
to rename
Rename Trailer
Change Trailer Settings
List of named or
default trailers -
Press OK to select
Reset Trailer
Distance
List of named or
default trailers -
Press OK to select
Change BLIS Meas-
urement
List of named or
default trailers -
Press OK to select
Add BLIS Measure-
ment
Name of stored Pro
Trailer Backup
Assist trailer
Change Pro Trailer
Sticker
115
F-150 (TFC) Canada/United States of America, enUSA, First Printing Information Displays
Page 119 of 599
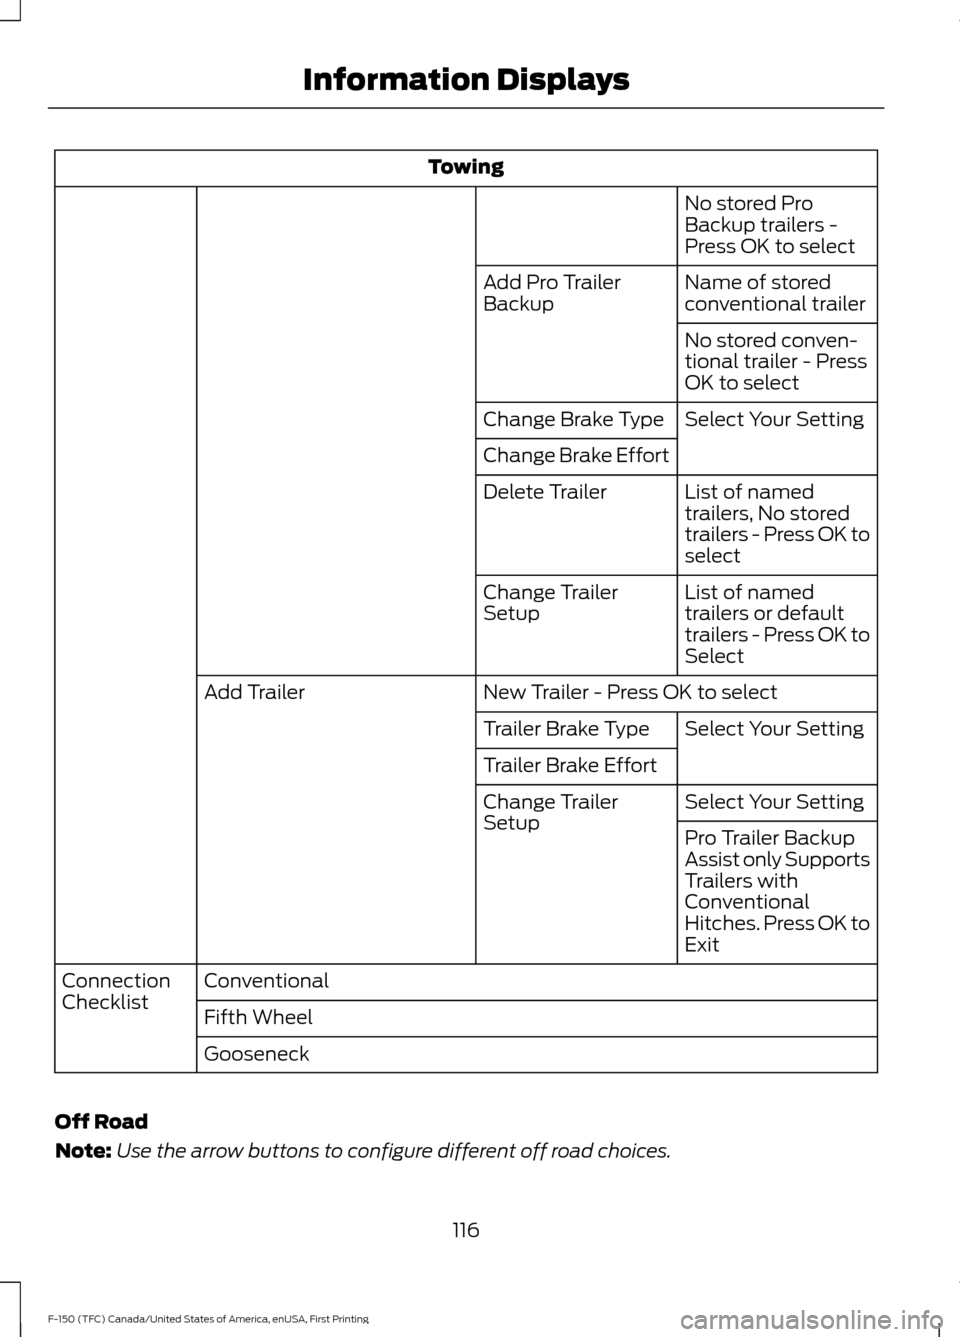
Towing
No stored Pro
Backup trailers -
Press OK to select
Name of stored
conventional trailer
Add Pro Trailer
Backup
No stored conven-
tional trailer - Press
OK to select
Select Your Setting
Change Brake Type
Change Brake Effort
List of named
trailers, No stored
trailers - Press OK to
select
Delete Trailer
List of named
trailers or default
trailers - Press OK to
Select
Change Trailer
Setup
New Trailer - Press OK to select
Add Trailer
Select Your Setting
Trailer Brake Type
Trailer Brake Effort
Select Your Setting
Change Trailer
Setup
Pro Trailer Backup
Assist only Supports
Trailers with
Conventional
Hitches. Press OK to
Exit
Conventional
Connection
Checklist
Fifth Wheel
Gooseneck
Off Road
Note: Use the arrow buttons to configure different off road choices.
116
F-150 (TFC) Canada/United States of America, enUSA, First Printing Information Displays