2017 FORD F150 maintenance schedule
[x] Cancel search: maintenance schedulePage 303 of 599
GETTING THE SERVICES YOU
NEED
Warranty repairs to your vehicle must be
performed by an authorized dealer. While
any authorized dealer handling your vehicle
line will provide warranty service, we
recommend you return to your selling
authorized dealer who wants to ensure
your continued satisfaction.
Please note that certain warranty repairs
require special training and equipment, so
not all authorized dealers are authorized
to perform all warranty repairs. This means
that, depending on the warranty repair
needed, you may have to take your vehicle
to another authorized dealer.
A reasonable time must be allowed to
perform a repair after taking your vehicle
to the authorized dealer. Repairs will be
made using Ford or Motorcraft® parts, or
remanufactured or other parts that are
authorized by Ford.
Away From Home
If you are away from home when your
vehicle needs service, contact the Ford
Customer Relationship Center or use the
online resources listed below to find the
nearest authorized dealer.
In the United States:
Mailing address
Ford Motor Company
Customer Relationship Center
P.O. Box 6248
Dearborn, MI 48126
Telephone
1-800-392-3673 (FORD)
(TDD for the hearing impaired:
1-800-232-5952)
Additional information and resources are
available online:
Website
www.owner.ford.com
These are some of the items that can be
found online:
• U.S. dealer locator by Dealer Name,
City/State or Zip Code.
• Owner Manuals.
• Maintenance Schedules.
• Recalls.
• Ford Extended Service Plans.
• Ford Genuine Accessories.
• Service specials and promotions.
In Canada:
Mailing address
Customer Relationship Centre
Ford Motor Company of Canada, Limited
P.O. Box 2000
Oakville, Ontario L6K 0C8
Telephone
1-800-565-3673 (FORD) Website
www.ford.ca
Twitter
@FordServiceCA (English Canada)
@FordServiceQC (Quebec)
Additional Assistance
If you have questions or concerns, or are
unsatisfied with the service you are
receiving, follow these steps:
1. Contact your Sales Representative or Service Advisor at your selling or
servicing authorized dealer.
300
F-150 (TFC) Canada/United States of America, enUSA, First Printing Customer Assistance
Page 327 of 599

WARNINGS
Do not put engine coolant in the
windshield washer fluid container. If
sprayed on the windshield, engine
coolant could make it difficult to see
through the windshield. To reduce the risk of personal injury,
make sure the engine is cool before
unscrewing the coolant pressure
relief cap. The cooling system is under
pressure. Steam and hot liquid can come
out forcefully when you loosen the cap
slightly. Do not add coolant further than the
MAX mark.
When the engine is cold, check the
concentration and level of the coolant at
the intervals listed in the scheduled
maintenance information. See Scheduled
Maintenance
(page 539).
Note: Make sure that the coolant level is
between the
MIN and MAX marks on the
coolant reservoir.
Note: Coolant expands when it is hot. The
level may extend beyond the
MAX mark.
Maintain coolant concentration within
48% to 50%, which equates to a freeze
point between -30°F (-34°C) and -34°F
(-37°C). Coolant concentration should be
checked using a refractometer. We do not
recommend the use of hydrometers or
coolant test strips for measuring coolant
concentration.
Adding Coolant WARNING
Never remove the coolant reservoir
cap when the engine is running or
hot. Note:
Automotive fluids are not
interchangeable. Take care not to put
engine coolant in the windshield washer
fluid reservoir or windshield washer fluid in
the engine coolant reservoir.
Note: Do not use stop leak pellets, cooling
system sealants, or non-specified additives
as they can cause damage to the engine
cooling or heating systems. Resulting
component damage may not be covered by
the vehicle Warranty.
It is very important to use prediluted
coolant approved to the correct
specification in order to avoid plugging the
small passageways in the engine cooling
system. See
Capacities and
Specifications (page 381). Do not mix
different colors or types of coolant in your
vehicle. Mixing of engine coolants or using
an incorrect coolant may harm the engine
or cooling system components and may
not be covered by the vehicle Warranty.
Note: If prediluted coolant is not available,
use the approved concentrated coolant
diluting it to 50/50 with distilled water. See
Capacities and Specifications (page 381).
Using water that has not been deionised
may contribute to deposit formation,
corrosion and plugging of the small cooling
system passageways.
Note: Coolants marketed for all makes and
models may not be approved to Ford
specifications and may cause damage to
the cooling system. Resulting component
damage may not be covered by the vehicle
Warranty.
If the coolant level is at or below the
minimum mark, add prediluted coolant
immediately.
To top up the coolant level do the
following:
1. Unscrew the cap slowly. Any pressure escapes as you unscrew the cap.
324
F-150 (TFC) Canada/United States of America, enUSA, First Printing Maintenance
Page 329 of 599
Coolant Change
At specific mileage intervals, as listed in
the scheduled maintenance information,
the coolant should be changed. Add
prediluted coolant approved to the correct
specification. See Capacities and
Specifications (page 381).
Fail-Safe Cooling
Fail-safe cooling allows you to temporarily
drive your vehicle before any incremental
component damage occurs. The fail-safe
distance depends on ambient
temperature, vehicle load and terrain.
How Fail-Safe Cooling Works
If the engine begins to overheat, the
coolant temperature gauge moves toward
the red zone: A warning lamp illuminates and
a message may appear in the
information display.
If the engine reaches a preset
over-temperature condition, the engine
automatically switches to alternating
cylinder operation. Each disabled cylinder
acts as an air pump and cools the engine.
When this occurs, your vehicle still
operates, however:
• Engine power is limited.
• The air conditioning system turns off.
Continued operation increases the engine
temperature, causing the engine to
completely shut down. Your steering and
braking effort increases in this situation.
When the engine temperature cools, you
can re-start the engine. Have your vehicle
checked as soon as possible to minimize
engine damage. When Fail-Safe Mode Is Activated WARNINGS
Fail-safe mode is for use during
emergencies only. Operate your
vehicle in fail-safe mode only as long
as necessary to bring your vehicle to rest
in a safe location and seek immediate
repairs. When in fail-safe mode, your
vehicle will have limited power, will not be
able to maintain high-speed operation, and
may completely shut down without
warning, potentially losing engine power,
power steering assist, and power brake
assist, which may increase the possibility
of a crash resulting in serious injury. Never remove the coolant reservoir
cap when the engine is running or
hot.
Your vehicle has limited engine power
when in the fail-safe mode, drive your
vehicle with caution. Your vehicle does not
maintain high-speed operation and the
engine may operate poorly.
Remember that the engine is capable of
automatically shutting down to prevent
engine damage. In this situation:
1. Pull off the road as soon as safely
possible and switch the engine off.
2. If you are a member of a roadside assistance program, we recommend
that you contact your roadside
assistance service provider.
3. If this is not possible, wait a short period for the engine to cool.
4. Check the coolant level. If the coolant level is at or below the minimum mark,
add prediluted coolant immediately.
5. When the engine temperature cools, you can re-start the engine. Have your
vehicle checked as soon as possible to
minimize engine damage.
326
F-150 (TFC) Canada/United States of America, enUSA, First Printing Maintenance
Page 330 of 599
Note:
Driving your vehicle without repair
increases the chance of engine damage.
Engine Coolant Temperature
Management (If Equipped) WARNING
To reduce the risk of crash and injury,
be prepared that the vehicle speed
may reduce and the vehicle may not
be able to accelerate with full power until
the coolant temperature reduces. If you tow a trailer with your vehicle, the
engine may temporarily reach a higher
temperature during severe operating
conditions, for example ascending a long
or steep grade in high ambient
temperatures.
At this time, you may notice the coolant
temperature gauge moves toward the red
zone and a message may appear in the
information display.
You may notice a reduction in vehicle
speed caused by reduced engine power.
In order to manage the engine coolant
temperature. Your vehicle may enter this
mode if certain high-temperature and
high-load conditions take place. The
amount of speed reduction depends on
vehicle loading, grade and ambient
temperature. If this occurs, there is no need
to pull off the road. You can continue to
drive your vehicle.
The air conditioning may automatically
turn on and off during severe operating
conditions to protect the engine from
overheating. When the coolant
temperature decreases to the normal
operating temperature, the air conditioning
turns on. If the coolant temperature gauge moves
fully into the red zone, or if the coolant
temperature warning or service engine
soon messages appear in your information
display, do the following:
1. Pull off the road as soon as safely
possible and shift the transmission into
park
(P).
2. Leave the engine running until the coolant temperature gauge needle
returns to the normal position. After
several minutes, if the temperature
does not drop, follow the remaining
steps.
3. Switch the engine off and wait for it to
cool. Check the coolant level.
4. If the coolant level is at or below the minimum mark, add prediluted coolant
immediately.
5. If the coolant level is normal, restart the engine and continue.
AUTOMATIC TRANSMISSION
FLUID CHECK
If required, have an authorized dealer check
and change the transmission fluid at the
correct service interval. See
Scheduled
Maintenance (page 539).
The automatic transmission does not have
a transmission fluid dipstick.
Refer to your scheduled maintenance
information for scheduled intervals for fluid
checks and changes. Your transmission
does not consume fluid. However, if the
transmission slips, shifts slowly or if you
notice a sign of leaking fluid, contact an
authorized dealer.
Do not use supplemental transmission
fluid additives, treatments or cleaning
agents. The use of these materials may
affect transmission operation and result
in damage to internal transmission
components.
327
F-150 (TFC) Canada/United States of America, enUSA, First Printing Maintenance
Page 342 of 599
CHANGING THE ENGINE AIR
FILTER
WARNING
To reduce the risk of vehicle damage
and personal burn injuries, do not
start your engine with the air cleaner
removed and do not remove it while the
engine is running. Note:
Failure to use the correct air filter
element may result in severe engine
damage. Resulting component damage
may not be covered by the vehicle Warranty.
Note: When servicing the air cleaner, do not
allow foreign material to enter the air
induction system. The engine is susceptible
to damage from even small particles.
When changing the air filter element, use
only the air filter element listed. See
Capacities and Specifications (page
381).
Change the air filter element at the proper
intervals. See
Scheduled Maintenance
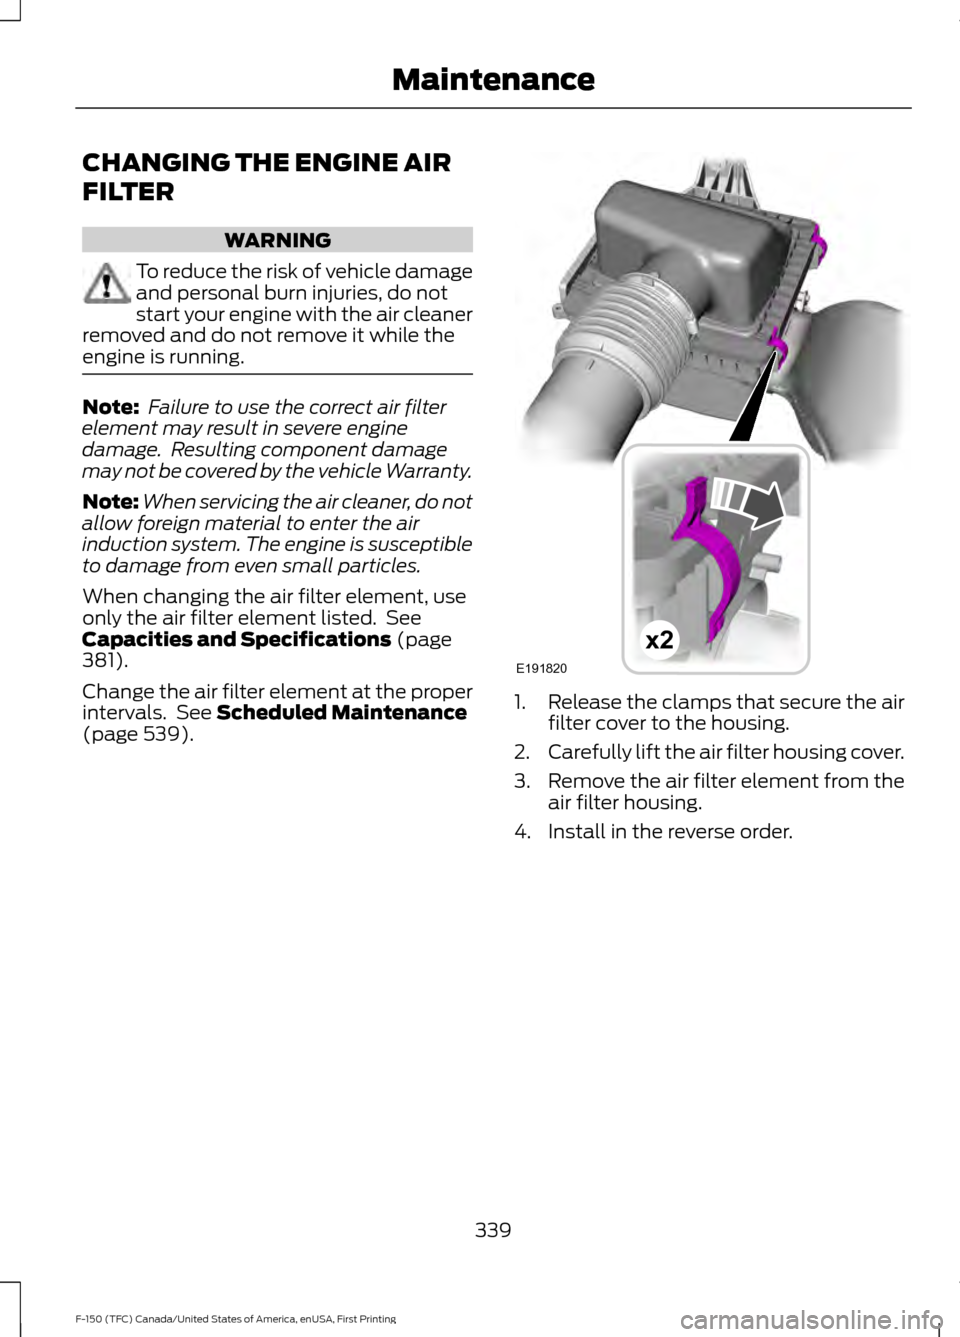
(page 539). 1.
Release the clamps that secure the air
filter cover to the housing.
2. Carefully lift the air filter housing cover.
3. Remove the air filter element from the
air filter housing.
4. Install in the reverse order.
339
F-150 (TFC) Canada/United States of America, enUSA, First Printing MaintenanceE191820x2
Page 368 of 599

Tire Rotation
WARNING
If the tire label shows
different tire pressures for the
front and rear tires and the vehicle
has a tire pressure monitoring
system, then you need to update
the settings for the system
sensors. Always perform the
system reset procedure after tire
rotation. If you do not reset the
system, it may not provide a low
tire pressure warning when
necessary. Note:
If your tires show uneven
wear ask an authorized dealer to
check for and correct any wheel
misalignment, tire imbalance or
mechanical problem involved
before tire rotation.
Note: Your vehicle may be
equipped with a dissimilar spare
wheel and tire assembly. A
dissimilar spare wheel and tire
assembly is defined as a spare
wheel and tire assembly that is
different in brand, size or
appearance from the road tires and
wheels. If you have a dissimilar
spare wheel and tire assembly it is
intended for temporary use only
and should not be used in a tire
rotation.
Note: After having your tires
rotated, inflation pressure must be
checked and adjusted to the
vehicle requirements. Rotating your tires at the
recommended interval (as
indicated in the Scheduled
Maintenance chapter) will help
your tires wear more evenly,
providing better tire performance
and longer tire life.
Rear-wheel drive vehicles and
four-wheel drive vehicles (front
tires at left of diagram)
Sometimes irregular tire wear can
be corrected by rotating the tires.
365
F-150 (TFC) Canada/United States of America, enUSA, First Printing Wheels and TiresE142548
Page 381 of 599
the best of your ability, to the point
where the ratchet or slip occurs, if
possible. The spare tire carrier will not
allow you to overtighten. If the spare
tire carrier ratchets or slips with little
effort, contact your authorized dealer.
4. Check that the tire lies flat against the frame and is properly tightened. Try to
push or pull, then turn the tire to be
sure it will not move. Loosen and
retighten, if necessary. Failure to
properly stow the spare tire may result
in failure of the winch cable and loss
of the tire.
5. Repeat this tightness check procedure
when servicing the spare tire pressure
(every six months, as per your
scheduled maintenance information),
or at any time that the spare tire is
disturbed through service of other
components.
6. If removed, install the spare tire lock into the bumper drive tube with the
spare tire lock key and jack handle.
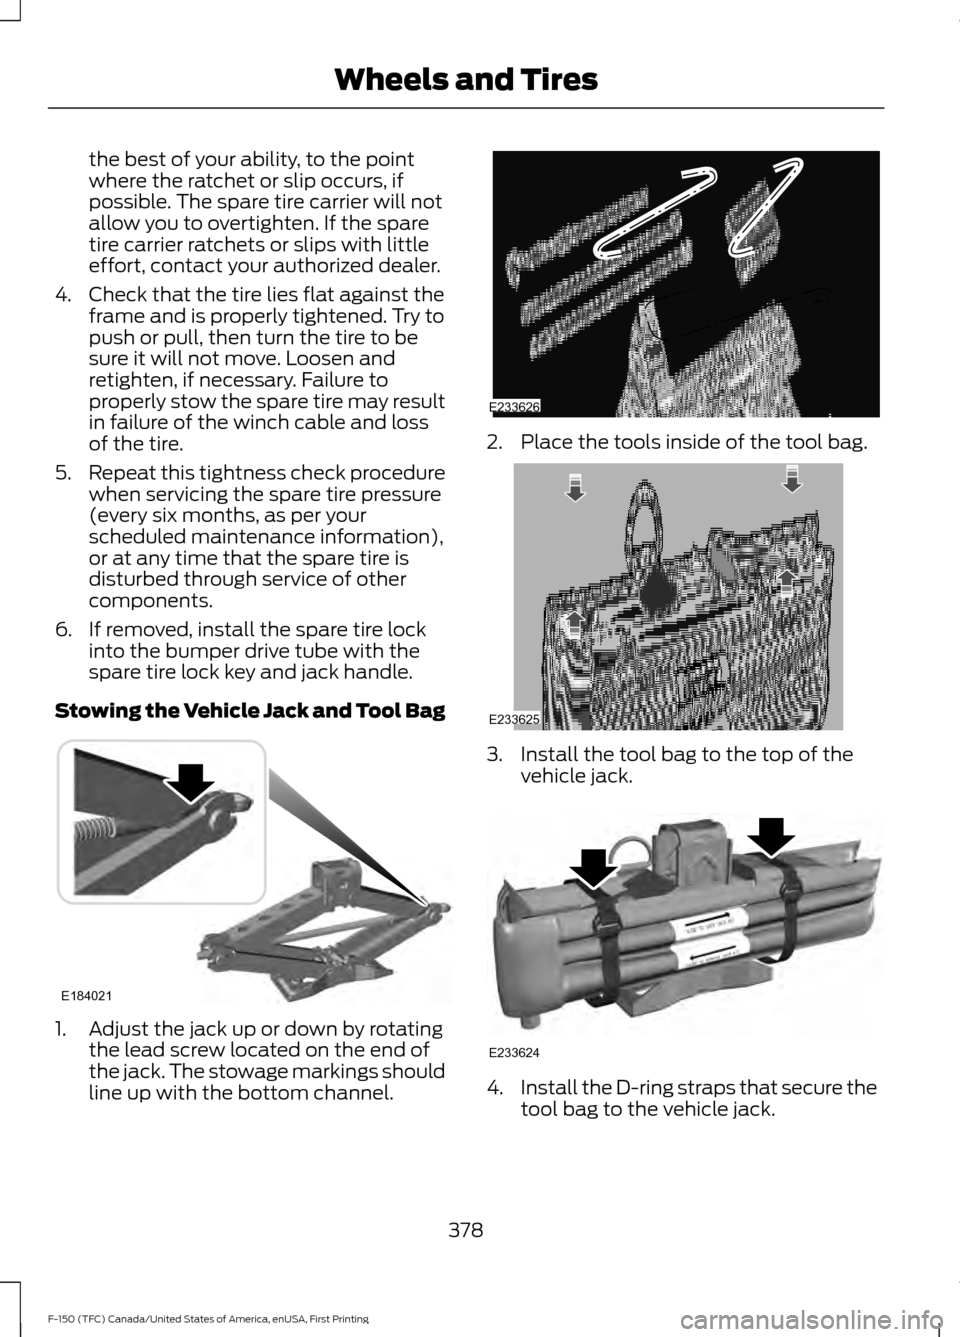
Stowing the Vehicle Jack and Tool Bag 1. Adjust the jack up or down by rotating
the lead screw located on the end of
the jack. The stowage markings should
line up with the bottom channel. 2. Place the tools inside of the tool bag.
3. Install the tool bag to the top of the
vehicle jack. 4.
Install the D-ring straps that secure the
tool bag to the vehicle jack.
378
F-150 (TFC) Canada/United States of America, enUSA, First Printing Wheels and TiresE184021 E233626 E233625 E233624
Page 387 of 599

For scheduled maintenance, we
recommend Motorcraft® replacement
parts available at your Ford dealer or at
fordparts.com. These parts meet or exceed
Ford Motor Company
’s specifications and
are engineered for your vehicle. Use of
other parts may impact vehicle
performance, emissions and durability.
Your warranty may be void for any damage related to use of other parts.
If a Motorcraft® oil filter is not available,
use an oil filter that meets industry
performance specification
SAE/USCAR-36.
For spark plug replacement, contact an
authorized dealer. Replace the spark plugs
at the appropriate intervals. See
Scheduled Maintenance (page 539).
MOTORCRAFT PARTS - 3.5L Motorcraft Part number
Component
FA-1883
Air filter element.
FL-500-S
Oil filter.
BXT-48H6-610
Battery.
SP-520
Spark plugs.
FT-138
Transmission filter.
WW-2242
Windshield wiper blade.
FP-79
Cabin air filter.
We recommend Motorcraft replacement
parts available at your Ford dealer or at
fordparts.com for scheduled maintenance.
These parts meet or exceed Ford Motor
Company ’s specifications and are
engineered for your vehicle. Use of other
parts may impact vehicle performance,
emissions and durability. Your warranty
may be void for any damage related to use
of other parts. If a Motorcraft oil filter is not available, use
an oil filter that meets industry
performance specification
SAE/USCAR-36.
For spark plug replacement, contact an
authorized dealer. Replace the spark plugs
at the appropriate intervals. See
Scheduled Maintenance
(page 539).
384
F-150 (TFC) Canada/United States of America, enUSA, First Printing Capacities and Specifications