2017 FORD F SERIES MOTORHOME AND COMMERCIAL CHASSIS brake fluid
[x] Cancel search: brake fluidPage 88 of 164
GENERAL INFORMATION
Have your vehicle serviced regularly to help
maintain its roadworthiness and resale
value. There is a large network of
authorized dealers that are there to help
you with their professional servicing
expertise. We believe that their specially
trained technicians are best qualified to
service your vehicle properly and expertly.
They are supported by a wide range of
highly specialized tools developed
specifically for servicing your vehicle.
If your vehicle requires professional service,
an authorized dealer can provide the
necessary parts and service. Check your
warranty information to find out which
parts and services are covered.
Use only recommended fuels, lubricants,
fluids and service parts conforming to
specifications. Motorcraft® parts are
designed and built to provide the best
performance in your vehicle.
Precautions
•
Do not work on a hot engine.
• Make sure that nothing gets caught in
moving parts. •
Do not work on a vehicle with the
engine running in an enclosed space,
unless you are sure you have enough
ventilation.
• Keep all open flames and other burning
material (such as cigarettes) away
from the battery and all fuel related
parts.
Working with the Engine Off
1. Set the parking brake and shift to park
(P).
2. Switch off the engine.
3. Block the wheels.
Working with the Engine On WARNING
To reduce the risk of vehicle damage
and/or personal burn injuries, do not
start your engine with the air cleaner
removed and do not remove it while the
engine is running. 1.
Set the parking brake and shift to park
(P).
2. Block the wheels.
85
Motorhome (TY3) Canada/United States of America, enUSA, First Printing Maintenance
Page 89 of 164
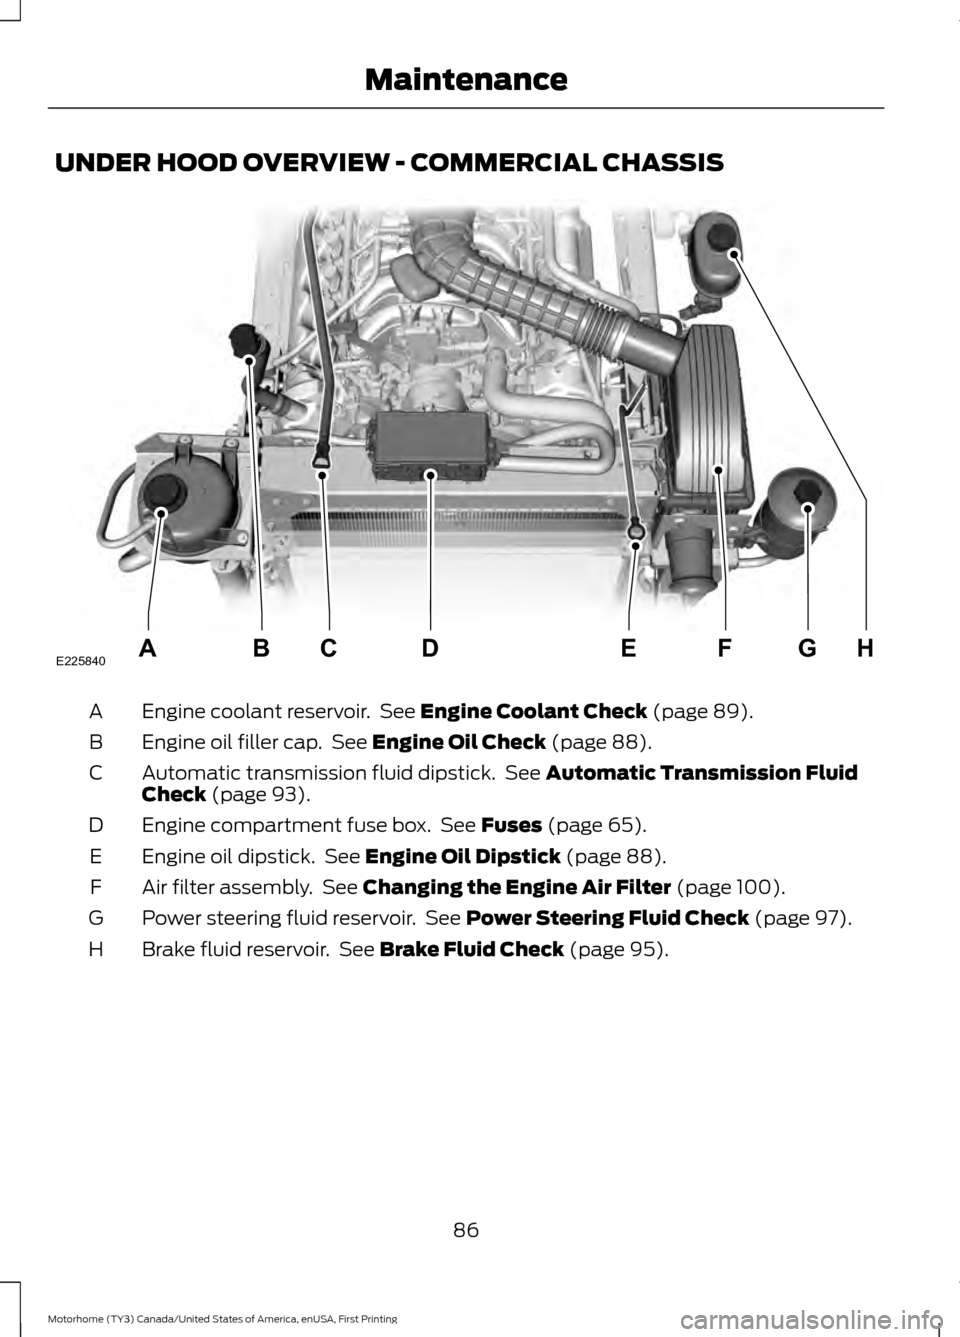
UNDER HOOD OVERVIEW - COMMERCIAL CHASSIS
Engine coolant reservoir. See Engine Coolant Check (page 89).
A
Engine oil filler cap. See
Engine Oil Check (page 88).
B
Automatic transmission fluid dipstick. See
Automatic Transmission Fluid
Check (page 93).
C
Engine compartment fuse box. See
Fuses (page 65).
D
Engine oil dipstick. See
Engine Oil Dipstick (page 88).
E
Air filter assembly. See
Changing the Engine Air Filter (page 100).
F
Power steering fluid reservoir. See
Power Steering Fluid Check (page 97).
G
Brake fluid reservoir. See
Brake Fluid Check (page 95).
H
86
Motorhome (TY3) Canada/United States of America, enUSA, First Printing MaintenanceE225840HGFEABCD
Page 90 of 164
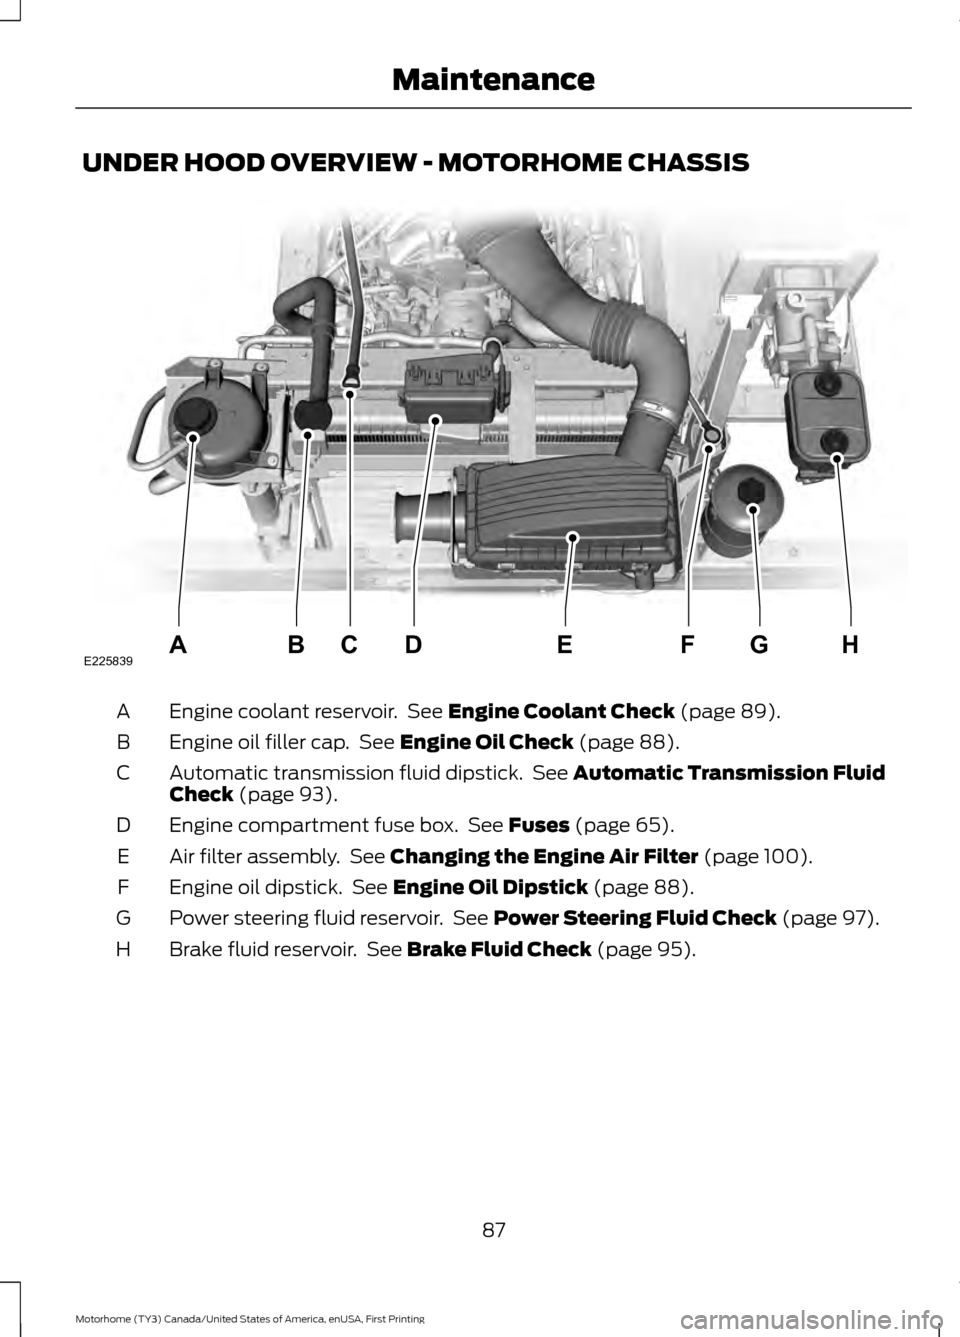
UNDER HOOD OVERVIEW - MOTORHOME CHASSIS
Engine coolant reservoir. See Engine Coolant Check (page 89).
A
Engine oil filler cap. See
Engine Oil Check (page 88).
B
Automatic transmission fluid dipstick. See
Automatic Transmission Fluid
Check (page 93).
C
Engine compartment fuse box. See
Fuses (page 65).
D
Air filter assembly. See
Changing the Engine Air Filter (page 100).
E
Engine oil dipstick. See
Engine Oil Dipstick (page 88).
F
Power steering fluid reservoir. See
Power Steering Fluid Check (page 97).
G
Brake fluid reservoir. See
Brake Fluid Check (page 95).
H
87
Motorhome (TY3) Canada/United States of America, enUSA, First Printing MaintenanceE225839HGFEABCD
Page 92 of 164
Only use oils certified for gasoline engines
by the American Petroleum Institute (API).
An oil with this trademark symbol
conforms to the current engine and
emission system protection standards and
fuel economy requirements of the
International Lubricants Specification
Advisory Committee (ILSAC), comprised
of U.S. and Japanese automobile
manufacturers.
To top up the engine oil level do the
following:
Clean the area surrounding the engine oil
filler cap before you remove it.
1. Remove the engine oil filler cap. See
Under Hood Overview (page 87).
Turn it counterclockwise and remove
it.
2. Add engine oil that meets the correct specification. See
Capacities and
Specifications (page 129). You may
have to use a funnel to pour the engine
oil into the opening.
3. Recheck the oil level.
4. If the oil level is correct, replace the dipstick and make sure it is fully seated.
5. Replace the engine oil filler cap. Turn it clockwise until you feel a strong
resistance.
Note: Do not add oil further than the
maximum mark. Oil levels above the
maximum mark may cause engine damage.
Note: Make sure you install the oil filler cap
correctly.
Note: Soak up any spillage with an
absorbent cloth immediately. OIL CHANGE INDICATOR
RESET
Resetting the Oil Life Monitoring
System
Only reset the oil life monitoring system
after changing the engine oil and oil filter.
To reset the oil life monitoring system do
the following:
1.
Switch the ignition on. Do not start the
engine.
2. Fully press the accelerator and brake pedals at the same time.
3. Keep the accelerator and brake pedals
fully pressed.
4. After three seconds, a message displays confirming the reset procedure
is in progress.
5. After 25 seconds, a message displays confirming the reset procedure is
complete.
6. Release the accelerator and brake pedals.
7. Switch the ignition off.
ENGINE COOLANT CHECK WARNINGS
Do not add engine coolant when the
engine is hot. Steam and scalding
liquids released from a hot cooling
system can burn you badly. Also, spilling
coolant on hot engine parts can burn you. Do not put engine coolant in the
windshield washer fluid container. If
sprayed on the windshield, engine
coolant could make it difficult to see
through the windshield.
89
Motorhome (TY3) Canada/United States of America, enUSA, First Printing Maintenance
Page 97 of 164
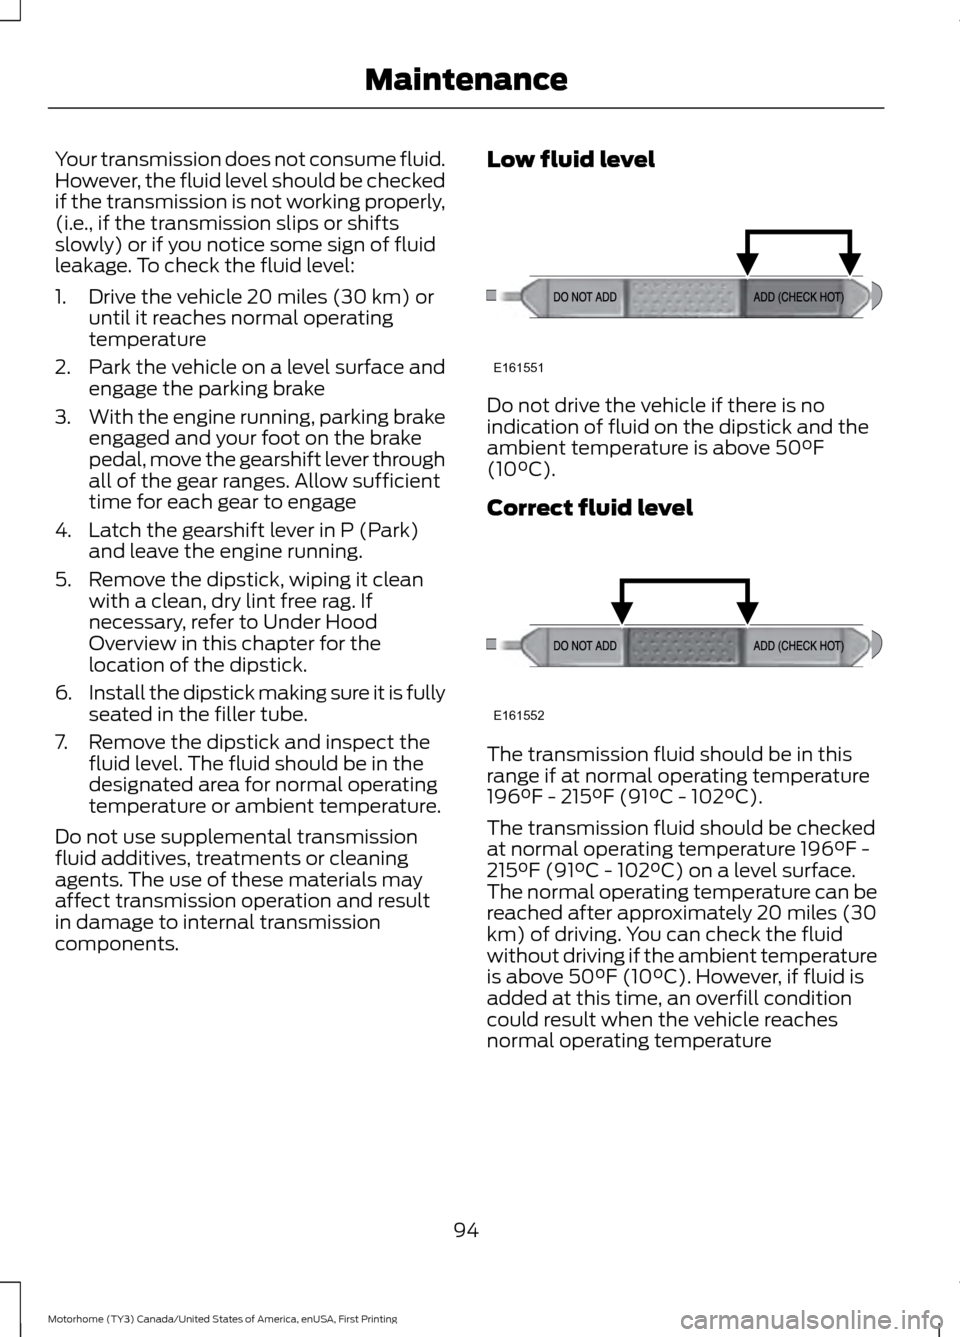
Your transmission does not consume fluid.
However, the fluid level should be checked
if the transmission is not working properly,
(i.e., if the transmission slips or shifts
slowly) or if you notice some sign of fluid
leakage. To check the fluid level:
1. Drive the vehicle 20 miles (30 km) or
until it reaches normal operating
temperature
2. Park the vehicle on a level surface and
engage the parking brake
3. With the engine running, parking brake
engaged and your foot on the brake
pedal, move the gearshift lever through
all of the gear ranges. Allow sufficient
time for each gear to engage
4. Latch the gearshift lever in P (Park) and leave the engine running.
5. Remove the dipstick, wiping it clean with a clean, dry lint free rag. If
necessary, refer to Under Hood
Overview in this chapter for the
location of the dipstick.
6. Install the dipstick making sure it is fully
seated in the filler tube.
7. Remove the dipstick and inspect the fluid level. The fluid should be in the
designated area for normal operating
temperature or ambient temperature.
Do not use supplemental transmission
fluid additives, treatments or cleaning
agents. The use of these materials may
affect transmission operation and result
in damage to internal transmission
components. Low fluid level Do not drive the vehicle if there is no
indication of fluid on the dipstick and the
ambient temperature is above 50°F
(10°C).
Correct fluid level
The transmission fluid should be in this
range if at normal operating temperature
196°F - 215°F (91°C - 102°C).
The transmission fluid should be checked
at normal operating temperature 196°F -
215°F (91°C - 102°C) on a level surface.
The normal operating temperature can be
reached after approximately 20 miles (30
km) of driving. You can check the fluid
without driving if the ambient temperature
is above 50°F (10°C). However, if fluid is
added at this time, an overfill condition
could result when the vehicle reaches
normal operating temperature
94
Motorhome (TY3) Canada/United States of America, enUSA, First Printing MaintenanceE161551 E161552
Page 98 of 164
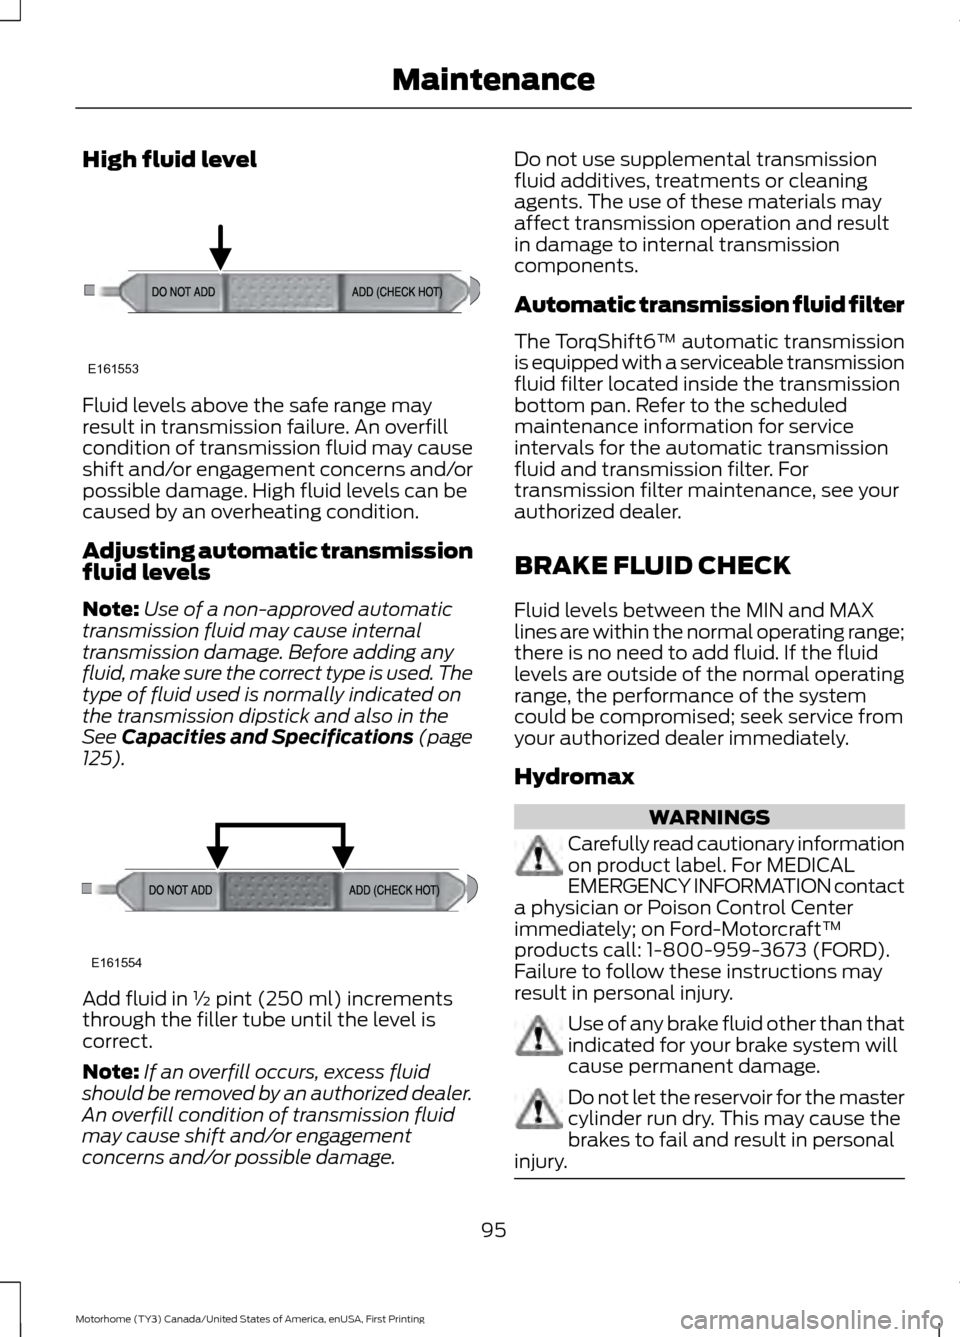
High fluid level
Fluid levels above the safe range may
result in transmission failure. An overfill
condition of transmission fluid may cause
shift and/or engagement concerns and/or
possible damage. High fluid levels can be
caused by an overheating condition.
Adjusting automatic transmission
fluid levels
Note:
Use of a non-approved automatic
transmission fluid may cause internal
transmission damage. Before adding any
fluid, make sure the correct type is used. The
type of fluid used is normally indicated on
the transmission dipstick and also in the
See Capacities and Specifications (page
125). Add fluid in ½ pint (250 ml) increments
through the filler tube until the level is
correct.
Note:
If an overfill occurs, excess fluid
should be removed by an authorized dealer.
An overfill condition of transmission fluid
may cause shift and/or engagement
concerns and/or possible damage. Do not use supplemental transmission
fluid additives, treatments or cleaning
agents. The use of these materials may
affect transmission operation and result
in damage to internal transmission
components.
Automatic transmission fluid filter
The TorqShift6™ automatic transmission
is equipped with a serviceable transmission
fluid filter located inside the transmission
bottom pan. Refer to the scheduled
maintenance information for service
intervals for the automatic transmission
fluid and transmission filter. For
transmission filter maintenance, see your
authorized dealer.
BRAKE FLUID CHECK
Fluid levels between the MIN and MAX
lines are within the normal operating range;
there is no need to add fluid. If the fluid
levels are outside of the normal operating
range, the performance of the system
could be compromised; seek service from
your authorized dealer immediately.
Hydromax
WARNINGS
Carefully read cautionary information
on product label. For MEDICAL
EMERGENCY INFORMATION contact
a physician or Poison Control Center
immediately; on Ford-Motorcraft™
products call: 1-800-959-3673 (FORD).
Failure to follow these instructions may
result in personal injury. Use of any brake fluid other than that
indicated for your brake system will
cause permanent damage.
Do not let the reservoir for the master
cylinder run dry. This may cause the
brakes to fail and result in personal
injury. 95
Motorhome (TY3) Canada/United States of America, enUSA, First Printing MaintenanceE161553 E161554
Page 99 of 164
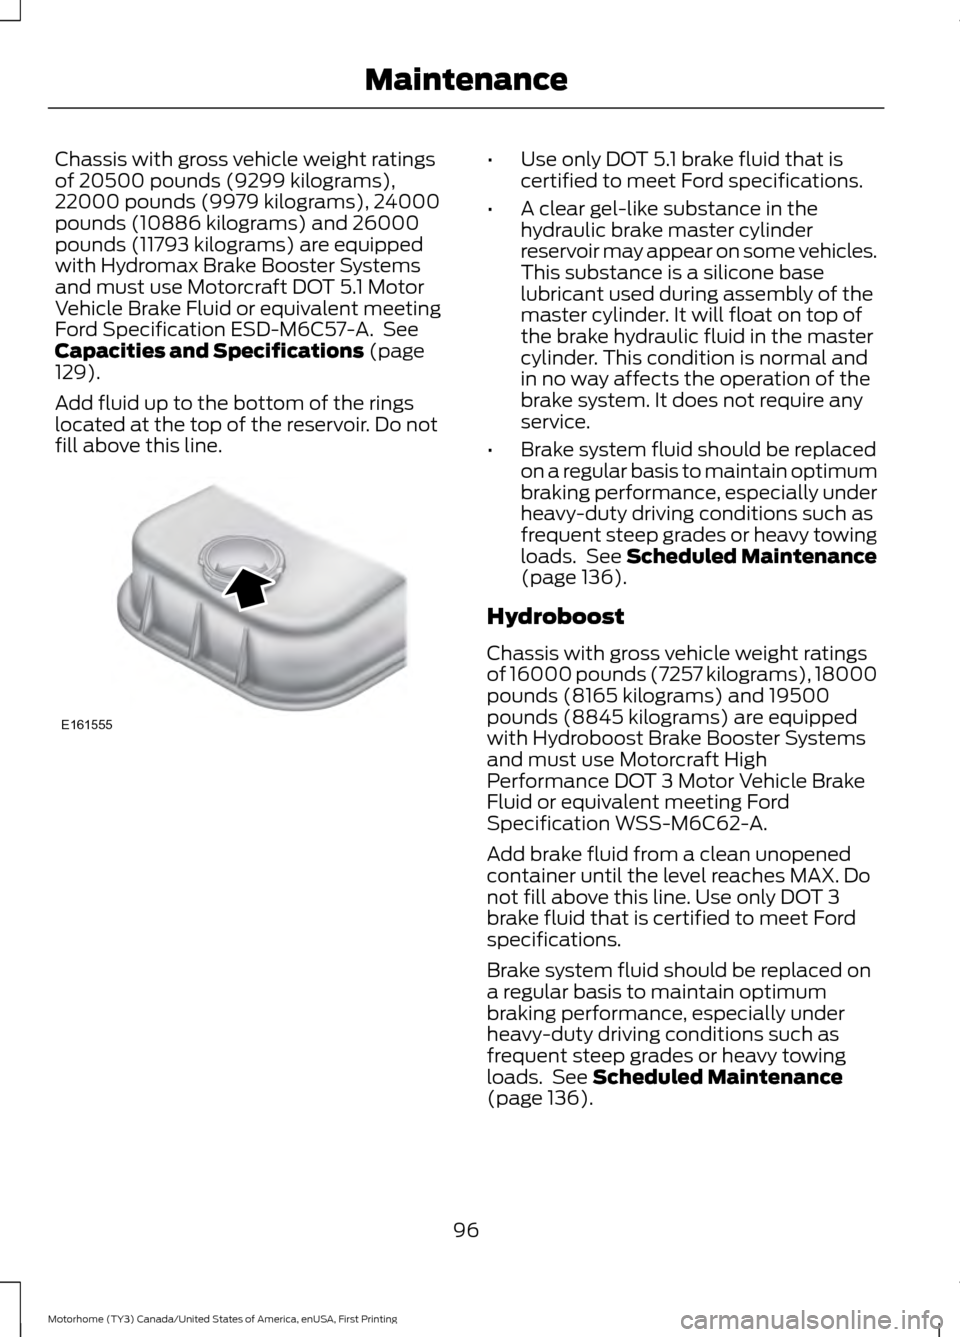
Chassis with gross vehicle weight ratings
of 20500 pounds (9299 kilograms),
22000 pounds (9979 kilograms), 24000
pounds (10886 kilograms) and 26000
pounds (11793 kilograms) are equipped
with Hydromax Brake Booster Systems
and must use Motorcraft DOT 5.1 Motor
Vehicle Brake Fluid or equivalent meeting
Ford Specification ESD-M6C57-A. See
Capacities and Specifications (page
129).
Add fluid up to the bottom of the rings
located at the top of the reservoir. Do not
fill above this line. •
Use only DOT 5.1 brake fluid that is
certified to meet Ford specifications.
• A clear gel-like substance in the
hydraulic brake master cylinder
reservoir may appear on some vehicles.
This substance is a silicone base
lubricant used during assembly of the
master cylinder. It will float on top of
the brake hydraulic fluid in the master
cylinder. This condition is normal and
in no way affects the operation of the
brake system. It does not require any
service.
• Brake system fluid should be replaced
on a regular basis to maintain optimum
braking performance, especially under
heavy-duty driving conditions such as
frequent steep grades or heavy towing
loads. See
Scheduled Maintenance
(page 136).
Hydroboost
Chassis with gross vehicle weight ratings
of 16000 pounds (7257 kilograms), 18000
pounds (8165 kilograms) and 19500
pounds (8845 kilograms) are equipped
with Hydroboost Brake Booster Systems
and must use Motorcraft High
Performance DOT 3 Motor Vehicle Brake
Fluid or equivalent meeting Ford
Specification WSS-M6C62-A.
Add brake fluid from a clean unopened
container until the level reaches MAX. Do
not fill above this line. Use only DOT 3
brake fluid that is certified to meet Ford
specifications.
Brake system fluid should be replaced on
a regular basis to maintain optimum
braking performance, especially under
heavy-duty driving conditions such as
frequent steep grades or heavy towing
loads. See
Scheduled Maintenance
(page 136).
96
Motorhome (TY3) Canada/United States of America, enUSA, First Printing MaintenanceE161555
Page 105 of 164
Underbody
Flush the complete underside of your
vehicle frequently. Keep body and door
drain holes free of debris or foreign
material.
Under Hood
For removing black rubber marks from
under the hood we recommend Motorcraft
Wheel and Tire Cleaner or Motorcraft Bug
and Tar Remover.
CLEANING THE ENGINE
Engines are more efficient when they are
clean because grease and dirt buildup keep
the engine warmer than normal.
When washing:
•
Take care when using a power washer
to clean the engine. The high-pressure
fluid could penetrate the sealed parts
and cause damage.
• Do not spray a hot engine with cold
water to avoid cracking the engine
block or other engine components.
• Spray Motorcraft Engine Shampoo and
Degreaser on all parts that require
cleaning and pressure rinse clean. In
Canada, use Motorcraft Engine
Shampoo.
• Never wash or rinse the engine while it
is hot or running; water in the running
engine may cause internal damage.
• Never wash or rinse any ignition coil,
spark plug wire or spark plug well, or
the area in and around these locations.
• Cover the battery, power distribution
box, and air filter assembly to prevent
water damage when cleaning the
engine. CLEANING THE ALLOY
WHEELS (If Equipped)
Note: Do not apply a cleaning chemical to
warm or hot wheel rims and covers.
Note: Some automatic car washes may
cause damage to the finish on your wheel
rims and covers.
Note: Industrial-strength or heavy-duty
cleaners in combination with brush agitation
to remove brake dust and dirt, could wear
away the clear coat finish over a period time.
Note: Do not use hydrofluoric acid-based
or high caustic-based wheel cleaners, steel
wool, fuels or strong household detergents.
Note: If you intend parking your vehicle for
an extended period after cleaning the
wheels with a wheel cleaner, drive your
vehicle for a few minutes before doing so.
This will reduce the risk of increased
corrosion of the brake discs.
Alloy wheels and wheel covers are coated
with a clear coat paint finish. To maintain
their condition we recommend that you:
• Clean the wheels weekly using
Motorcraft Wheel and Tire Cleaner.
Apply using manufacturer's
instructions.
• Use a sponge to remove heavy
deposits of dirt and brake dust
accumulation.
• Rinse thoroughly with a strong stream
of water when you have completed the
cleaning process.
• To remove tar and grease, use
Motorcraft Bug and Tar Remover.
102
Motorhome (TY3) Canada/United States of America, enUSA, First Printing Vehicle Care