2017 FORD EXPLORER sport mode
[x] Cancel search: sport modePage 23 of 541

7. Try to pull the belt out of the retractor
to make sure the retractor is in the
automatic locking mode (you should
not be able to pull more belt out). If the
retractor is not locked, unbuckle the
belt and repeat Steps 5 and 6. 8.
Remove remaining slack from the belt.
Force the seat down with extra weight,
for example, by pressing down or
kneeling on the child restraint while
pulling up on the shoulder belt in order
to force slack from the belt. This is
necessary to remove the remaining
slack that will exist once the extra
weight of the child is added to the child
restraint. It also helps to achieve the
proper snugness of the child seat to
your vehicle. Sometimes, a slight lean
toward the buckle will provide extra
help to remove remaining slack from
the belt.
9. Attach the tether strap (if the child seat
is equipped). 10. Before placing the child in the seat,
forcibly move the seat forward and
back to make sure the seat is securely
held in place. To check this, grab the
seat at the belt path and attempt to
move it side to side and forward and
back. There should be no more than
1 inch (2.5 centimeters) of movement
for proper installation.
We recommend checking with a NHTSA
Certified Child Passenger Safety
Technician to make certain the child
restraint is properly installed. In Canada,
check with Transport Canada for referral
to a Child Car Seat Clinic.
Inflatable seatbelts 1. Position the child safety seat in a seat
with a combination lap and shoulder
belt.
20
Explorer (TUB) Canada/United States of America, enUSA, Edition date: 03/2016, First Printing Child SafetyE142533 E142534 E142528
Page 25 of 541

Note:
Unlike the standard seatbelt, the
inflatable seatbelt's unique lap portion locks
the child seat for installation. The ability for
the shoulder portion of the belt to move
freely is normal, even after the lap belt has
been put into the automatic locking mode.
Note: The lock-off device on some child
restraints may not accommodate the
shoulder portion of the inflatable seatbelt.
Follow all instructions provided by the
manufacturer of the child restraint regarding
the necessary and proper use of the lock-off
device. In some instances, these devices
have been provided only for use in vehicles
with seatbelt systems that would otherwise
require a locking clip.
6. Allow the belt to retract to remove slack. The belt will click as it retracts
to indicate it is in the automatic locking
mode.
7. Try to pull the belt out of the retractor to make sure the retractor is in the
automatic locking mode (you should
not be able to pull more belt out). If the
retractor is not locked, unbuckle the
belt and repeat Steps 5 and 6. 8.
Remove remaining slack from the belt.
Force the seat down with extra weight,
for example, by pressing down or
kneeling on the child restraint while
pulling down on the lap belt in order to
force slack from the belt. This is necessary to remove the remaining
slack that will exist once the extra
weight of the child is added to the child
restraint. It also helps to achieve the
proper snugness of the child seat to
your vehicle. Sometimes, a slight lean
toward the buckle will additionally help
to remove remaining slack from the
belt.
9. Attach the tether strap (if the child seat
is equipped). 10. Before placing the child in the seat,
forcibly move the seat forward and
back to make sure the seat is securely
held in place. To check this, grab the
seat at the belt path and attempt to
move it side to side and forward and
back. There should be no more than
1 inch (2.5 centimeters) of movement
for proper installation.
We recommend checking with a NHTSA
Certified Child Passenger Safety
Technician to make certain the child
restraint is properly installed. In Canada,
check with Transport Canada for referral
to a Child Car Seat Clinic.
22
Explorer (TUB) Canada/United States of America, enUSA, Edition date: 03/2016, First Printing Child SafetyE146525 E142534
Page 124 of 541

Lane Keeping System
Action
Message
The system has malfunctioned. Contact an authorized dealer as soon as possible.
Lane Keeping Sys.
Malfunction Service Required
The system has detected a condition that has caused thesystem to be temporarily unavailable.
Front Camera Tempor-
arily Not Available
The system has detected a condition that requires a cleanwindshield to operate properly.
Front Camera Low Visib-
ility Clean Screen
The system has malfunctioned. Contact an authorized dealeras soon as possible.
Front Camera Malfunc-
tion Service Required
The system requests the driver to keep their hands on thesteering wheel.
Keep Hands on Steering
Wheel
Maintenance Action
Message
Stop your vehicle as soon as safely possible. Switch off the
engine. Check the oil level. If the warning stays on or continues to come on with your engine running, contact an authorized dealer as soon as possible.
LOW Engine Oil Pressure
The engine oil life remaining is 10% or less. See Engine Oil
Check (page 277).
Change Engine Oil Soon
The oil life left reaches 0%. See
Engine Oil Check (page 277).
Oil Change Required
The engine coolant temperature is excessively high.
Engine Coolant Overtem-
perature
The washer fluid is low and needs refilling.
Washer Fluid Level Low
Indicates that your vehicle is still in Transport mode. This maynot allow some features to operate properly. Contact an authorized dealer.
Transport Mode Contact
Dealer
Indicates that your vehicle is still in Factory mode. This maynot allow some features to operate properly. Contact an authorized dealer.
Factory Mode Contact
Dealer
121
Explorer (TUB) Canada/United States of America, enUSA, Edition date: 03/2016, First Printing Information Displays
Page 182 of 541

In order to prevent the engine from running
at too low an RPM, which may cause it to
stall, SelectShift still automatically makes
some downshifts if it has determined that
you have not downshifted in time.
Although SelectShift makes some
downshifts for you, it still allows you to
downshift at any time as long as the
SelectShift determines that damage will
not be caused to the engine from
over-revving.
Note:
Engine damage may occur if you
maintain excessive engine revving without
shifting.
SelectShift does not automatically upshift,
even if the engine is approaching the RPM
limit. It must be shifted manually by
pressing the + button. Notice should be
taken of the shift indicator lamp, which
alerts you when to shift to make sure you
achieve the highest level or efficiency and
fuel economy.
Pull the + paddle on the steering wheel
to activate SelectShift.
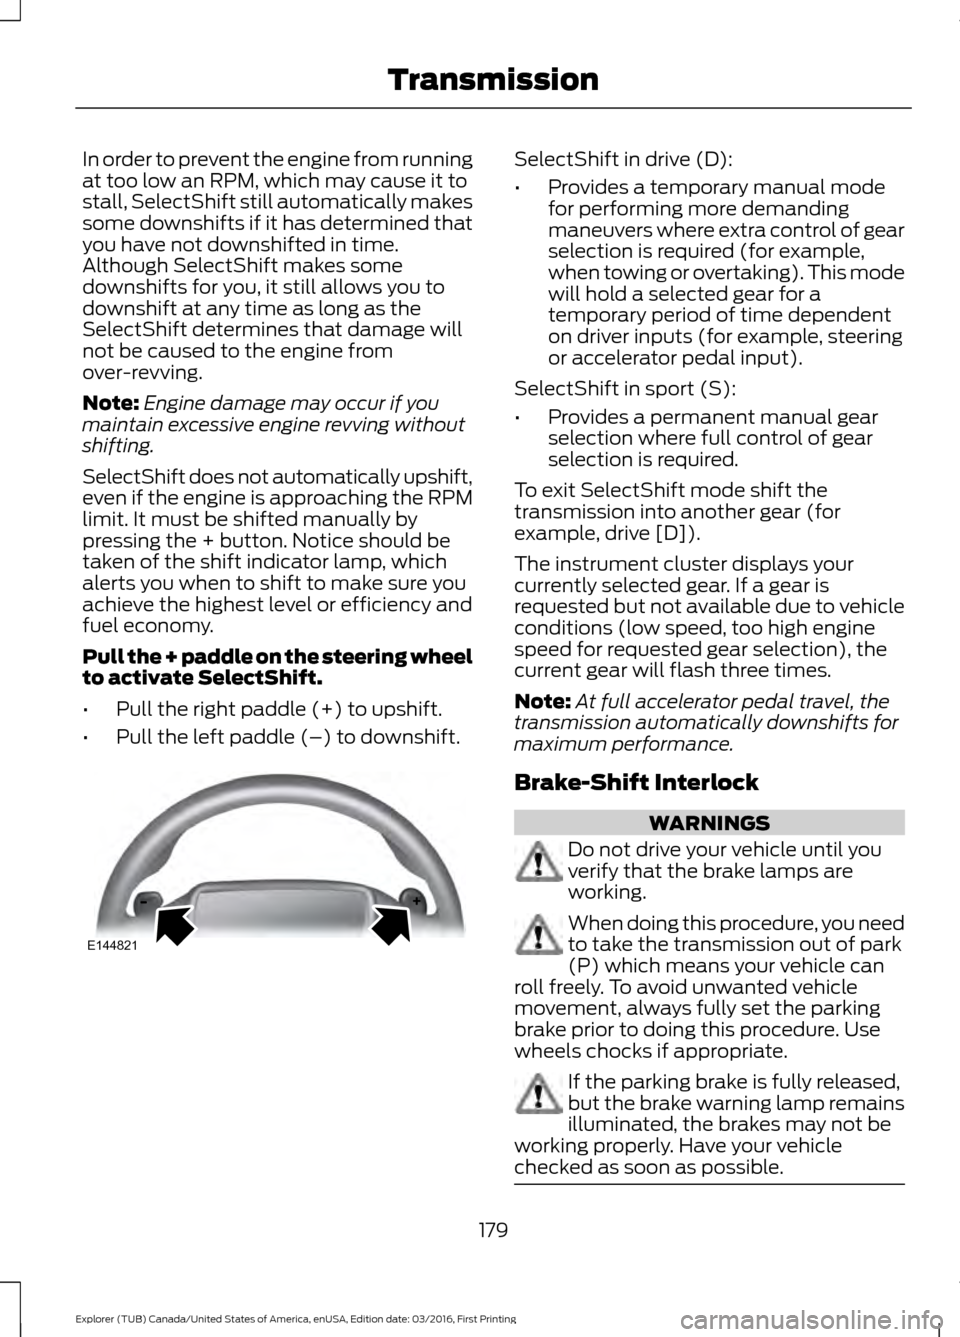
• Pull the right paddle (+) to upshift.
• Pull the left paddle (–) to downshift. SelectShift in drive (D):
•
Provides a temporary manual mode
for performing more demanding
maneuvers where extra control of gear
selection is required (for example,
when towing or overtaking). This mode
will hold a selected gear for a
temporary period of time dependent
on driver inputs (for example, steering
or accelerator pedal input).
SelectShift in sport (S):
• Provides a permanent manual gear
selection where full control of gear
selection is required.
To exit SelectShift mode shift the
transmission into another gear (for
example, drive [D]).
The instrument cluster displays your
currently selected gear. If a gear is
requested but not available due to vehicle
conditions (low speed, too high engine
speed for requested gear selection), the
current gear will flash three times.
Note: At full accelerator pedal travel, the
transmission automatically downshifts for
maximum performance.
Brake-Shift Interlock WARNINGS
Do not drive your vehicle until you
verify that the brake lamps are
working.
When doing this procedure, you need
to take the transmission out of park
(P) which means your vehicle can
roll freely. To avoid unwanted vehicle
movement, always fully set the parking
brake prior to doing this procedure. Use
wheels chocks if appropriate. If the parking brake is fully released,
but the brake warning lamp remains
illuminated, the brakes may not be
working properly. Have your vehicle
checked as soon as possible. 179
Explorer (TUB) Canada/United States of America, enUSA, Edition date: 03/2016, First Printing TransmissionE144821
Page 184 of 541

PRINCIPLE OF OPERATION
This system is a proactive system. It has
the ability to anticipate wheel slip and
transfer torque to the rear wheels before
slip occurs. Even when wheel slip is not
present, the system is continuously making
adjustments to the torque distribution, in
an attempt to improve straight line and
cornering behavior, both on and off road.
The system automatically turns on every
time you switch the ignition on.
If any component requires maintenance,
a message appears in the information
display.
USING FOUR-WHEEL DRIVE
WARNING
Vehicles with a higher center of
gravity such as utility and four-wheel
drive vehicles handle differently than
vehicles with a lower center of gravity.
Utility and four-wheel drive vehicles are
not designed for cornering at speeds as
high as passenger cars any more than
low-slung sports cars are designed to
perform satisfactorily under off-road
conditions. Avoid sharp turns, excessive
speed and abrupt maneuvers in these
vehicles. Failure to drive cautiously could
result in an increased risk of loss of vehicle
control, vehicle rollover, personal injury and
death. The intelligent 4WD system continuously
monitors vehicle conditions and
automatically adjusts the power
distribution between the front and rear
wheels. It combines transparent
all-surface operation with highly capable
four-wheel drive. The 4WD system is always active and
requires no driver input. It is capable of
handling all road conditions, including
street and highway driving as well as
off-road and winter driving. The driver can
optimize more 4WD control by moving the
terrain management switch for the correct
terrain. See Using Terrain Response
(page 192).
Note: A warning message will be displayed
in the information display when an 4WD
system fault is present
See Information
Messages (page 113). An 4WD system fault
will cause the 4WD system to default to
front-wheel drive only mode. When this
warning message is displayed, have your
vehicle serviced at an authorized dealer
Note: A warning message will be displayed
in the information display if the 4WD system
has overheated
See Information
Messages (page 113). This condition may
occur if the vehicle was operated in extreme
conditions with excessive wheel slip, such
as deep sand. To resume normal 4WD
function as soon as possible, stop the
vehicle in a safe location and stop the
engine for at least 10 minutes. After the
engine has been restarted and the 4WD
system has adequately cooled, the warning
message will turn off and normal 4WD
function will return.
Do not use a spare tire of a different size
other than the tire provided. If the
mini-spare tire is installed, the 4WD system
may disable automatically and enter
front-wheel drive only mode to protect
driveline components. This condition will
be indicated by a warning in the
information display
See Information
Messages (page 113). If there is a warning
message in the information display from
using the spare tire, this indicator should
turn off after reinstalling the repaired or
replaced normal road tire and cycling the
ignition off and on. It is recommended to
181
Explorer (TUB) Canada/United States of America, enUSA, Edition date: 03/2016, First Printing Four-Wheel Drive
(If Equipped)
Page 246 of 541

2. Set your vehicle parking brake.
3. Place the automatic transmission in
position P.
4. Place wheel chocks in front and back of the trailer wheels. (Chocks not
included with vehicle.)
Launching or Retrieving a Boat or
Personal Watercraft (PWC)
Note: Disconnect the wiring to the trailer
before
backing the trailer into the water.
Note: Reconnect the wiring to the trailer
after
removing the trailer from the water.
When backing down a ramp during boat
launching or retrieval:
• Do not allow the static water level to
rise above the bottom edge of the rear
bumper.
• Do not allow waves to break higher
than
6 in (15 cm) above the bottom
edge of the rear bumper.
Exceeding these limits may allow water to
enter vehicle components:
• Causing internal damage to the
components.
• Affecting driveability, emissions, and
reliability.
Replace the rear axle lubricant anytime
the rear axle has been submerged in water.
Water may have contaminated the rear
axle lubricant, which is not normally
checked or changed unless a leak is
suspected or other axle repair is required. TOWING THE VEHICLE ON
FOUR WHEELS - 2.3L
ECOBOOST™
Emergency Towing
If your vehicle becomes inoperable
(without access to wheel dollies,
car-hauling trailer, or flatbed transport
vehicle), it can be flat-towed (all wheels
on the ground, regardless of the powertrain
and transmission configuration) under the
following conditions:
•
Your vehicle is facing forward for
towing in a forward direction.
• Place the transmission in position
N. If
you cannot move the transmission into
N
, you may need to override it. See
Transmission (page 178).
• Maximum speed is 35 mph (56 km/h).
• Maximum distance is
50 mi (80 km). WARNING
If your vehicle has a steering wheel
lock make sure the ignition is in the
accessory or on position when being
towed. Recreational Towing
Note:
Put your climate control system in
recirculated air mode to prevent exhaust
fumes from entering the vehicle. See
Climate Control
(page 127).
Follow these guidelines if you have a need
for recreational (RV) towing. An example
of recreational towing would be towing
your vehicle behind a motorhome. We
designed these guidelines to prevent
damage to your transmission.
243
Explorer (TUB) Canada/United States of America, enUSA, Edition date: 03/2016, First Printing Towing
Page 247 of 541

Front-wheel drive vehicles CANNOT be
flat-towed (all wheels on the ground) as
vehicle or transmission damage may occur.
You must place the front wheels on a
two-wheel tow dolly. If you are using a tow
dolly, follow the instructions specified by
the equipment provider.
Four-wheel drive vehicles
CANNOT be
flat-towed (all wheels on the ground), as
vehicle or transmission damage may occur.
It is recommended to tow your vehicle with
all four (4) wheels off the ground such as
when using a car-hauling trailer. Otherwise,
you cannot recreational tow your vehicle.
TOWING THE VEHICLE ON
FOUR WHEELS - 3.5L
DURATEC/3.5L ECOBOOST™
Emergency Towing
If your vehicle becomes inoperable
(without access to wheel dollies or vehicle
transport trailer), it can be flat-towed (all
wheels on the ground, regardless of the
powertrain and transmission
configuration) under the following
conditions:
• Your vehicle is facing forward for
towing in a forward direction.
• Shift into neutral (N). If you cannot
shift into neutral (N), you may need to
override it. See
Transmission (page
178).
• Maximum speed is 35 mph (56 km/h).
• Maximum distance is
50 mi (80 km). WARNING
If your vehicle has a steering wheel
lock make sure the ignition is in the
accessory or on position when being
towed. Recreational Towing
Note:
Put your climate control system in
recirculated air mode to prevent exhaust
fumes from entering the vehicle. See
Climate Control
(page 127).
Follow these guidelines if you have a need
for recreational (RV) towing. An example
of recreational towing would be towing
your vehicle behind a motorhome. We
designed these guidelines to prevent
damage to your transmission.
You can tow your 3.5L EcoBoost or 3.5L
Duratec equipped vehicle with all four
wheels on the ground.
If you tow your vehicle with all four wheels
on the ground:
• Tow only in the forward direction.
• Release the parking brake.
Vehicles with Keyless Start
1. Start the vehicle by pressing the brake pedal, and then pressing the keyless
start button until the vehicle starts.
2. Press the brake pedal and shift the gearshift into neutral (N).
3. Turn the vehicle off by pressing the keyless start button once.
4. Disconnect the negative (black) cable from the battery. You need the door
key to lock and unlock doors when the
battery cable is disconnected. See
Changing the 12V Battery (page 286).
Note: The anti-theft system does not work
until you reconnect the battery cable.
Start the engine within 15 minutes of
reconnecting the battery cable.
Vehicles with an Ignition Key
1. Start the vehicle by pressing the brake pedal, and then turning the ignition key
until the vehicle starts.
244
Explorer (TUB) Canada/United States of America, enUSA, Edition date: 03/2016, First Printing Towing
Page 309 of 541

Utility vehicles and trucks handle
differently than passenger cars in the
various driving conditions that are
encountered on streets, highways and
off-road. Utility vehicles and trucks are not
designed for cornering at speeds as high
as passenger cars any more than low-slung
sports cars are designed to perform
satisfactorily under off-road conditions.
Study your owner's manual and any
supplements for specific information about
equipment features, instructions for safe
driving and additional precautions to
reduce the risk of an accident or serious
injury.
Four-wheel drive system (If Equipped)
WARNING
Do not become overconfident in the
ability of four-wheel drive vehicles.
Although a four-wheel drive vehicle
may accelerate better than a two-wheel
drive vehicle in low traction situations, it
won't stop any faster than two-wheel drive
vehicles. Always drive at a safe speed. A vehicle equipped with four-wheel drive
(when selected) has the ability to use all
four wheels to power itself. This increases
traction which may enable you to safely
drive over terrain and road conditions that
a conventional two-wheel drive vehicle
cannot.
Power is supplied to all four wheels
through a transfer case or power transfer
unit. Four-wheel drive vehicles allow you
to select different modes as necessary. For
information on transfer case operation and
shifting procedures, See
Four-Wheel
Drive (page 181). For information on
transfer case maintenance, See
Maintenance
(page 272). You should
become thoroughly familiar with this
information before you operate your
vehicle. On some four-wheel drive vehicles, the
initial shift from two-wheel to four-wheel
drive while the vehicle is moving can cause
a momentary clunk and ratcheting sound.
These sounds are normal and are not
cause for concern.
For four-wheel drive vehicles, a spare tire
of a different size other than the tire
provided should never be used. A dissimilar
spare tire size (other than the spare tire
provided) or major dissimilar tire sized
between the front and rear axles could
cause the four-wheel drive system to stop
functioning and default to front-wheel
drive. See
Principle of Operation (page
181).
How your vehicle differs from
other vehicles
Sport utility vehicles and trucks can differ
from some other vehicles in a few
noticeable ways. Your vehicle may be:
306
Explorer (TUB) Canada/United States of America, enUSA, Edition date: 03/2016, First Printing Wheels and Tires