2017 FORD EXPLORER weight
[x] Cancel search: weightPage 249 of 541

BREAKING-IN
You need to break in new tires for
approximately 300 miles (480
kilometers). During this time, your vehicle
may exhibit some unusual driving
characteristics.
Avoid driving too fast during the first 1000
miles (1600 kilometers). Vary your speed
frequently and change up through the
gears early. Do not labor the engine.
Do not tow during the first 1000 miles
(1600 kilometers).
ECONOMICAL DRIVING
Your fuel economy is affected by several
things, such as how you drive, the
conditions you drive under, and how you
maintain your vehicle.
You may improve your fuel economy by
keeping these things in mind:
•
Accelerate and slow down in a smooth,
moderate fashion.
• Drive at steady speeds without
stopping.
• Anticipate stops; slowing down may
eliminate the need to stop.
• Combine errands and minimize
stop-and-go driving.
• Close the windows for high-speed
driving.
• Drive at reasonable speeds (traveling
at 55 mph [88 km/h] uses 15% less
fuel than traveling at 65 mph [105
km/h]).
• Keep the tires properly inflated and use
only the recommended size.
• Use the recommended engine oil.
• Perform all regularly scheduled
maintenance. Avoid these actions; they reduce your fuel
economy:
•
Sudden accelerations or hard
accelerations.
• Revving the engine before turning it off.
• Idle for periods longer than one minute.
• Warm up your vehicle on cold
mornings.
• Use the air conditioner or front
defroster.
• Use the speed control in hilly terrain.
• Rest your foot on the brake pedal while
driving.
• Drive a heavily loaded vehicle or tow a
trailer.
• Carry unnecessary weight
(approximately 1 mpg [0.4 km/L] is
lost for every 400 lb [180 kilogram] of
weight carried).
• Driving with the wheels out of
alignment.
Conditions
• Heavily loading a vehicle or towing a
trailer may reduce fuel economy at any
speed.
• Adding certain accessories to your
vehicle (for example bug deflectors,
rollbars, light bars, running boards, ski
racks or luggage racks) may reduce
fuel economy.
• To maximize the fuel economy, drive
with the tonneau cover installed (if
equipped).
• Using fuel blended with alcohol may
lower fuel economy.
• Fuel economy may decrease with lower
temperatures during the first 8– 10
miles (12 –16 kilometers) of driving.
• Driving on flat terrain offers improved
fuel economy as compared to driving
on hilly terrain.
246
Explorer (TUB) Canada/United States of America, enUSA, Edition date: 03/2016, First Printing Driving Hints
Page 276 of 541

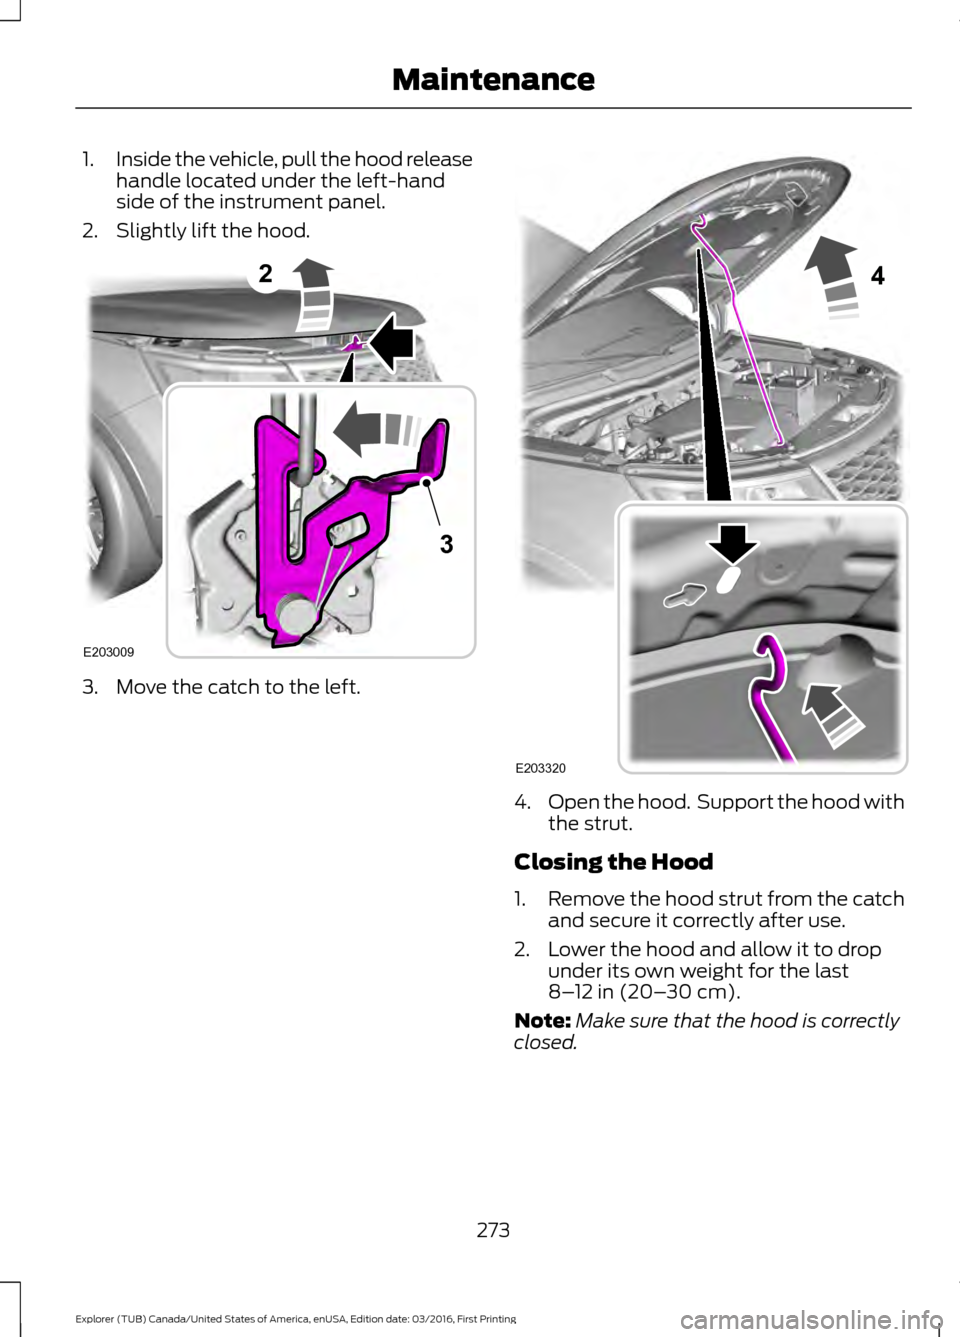
1.
Inside the vehicle, pull the hood release
handle located under the left-hand
side of the instrument panel.
2. Slightly lift the hood. 3. Move the catch to the left.
4.
Open the hood. Support the hood with
the strut.
Closing the Hood
1. Remove the hood strut from the catch
and secure it correctly after use.
2. Lower the hood and allow it to drop under its own weight for the last
8–12 in (20– 30 cm).
Note: Make sure that the hood is correctly
closed.
273
Explorer (TUB) Canada/United States of America, enUSA, Edition date: 03/2016, First Printing Maintenance2
E203009
3 4
E203320
Page 312 of 541

The traction grades, from highest
to lowest are AA, A, B, and C. The
grades represent the tire
’s ability
to stop on wet pavement as
measured under controlled
conditions on specified
government test surfaces of
asphalt and concrete. A tire
marked C may have poor traction
performance.
Temperature A B C WARNING
The temperature grade for
this tire is established for a
tire that is properly inflated and
not overloaded. Excessive speed,
underinflation, or excessive
loading, either separately or in
combination, can cause heat
buildup and possible tire failure. The temperature grades are A
(the highest), B and C,
representing the tire
’s resistance
to the generation of heat and its
ability to dissipate heat when
tested under controlled conditions
on a specified indoor laboratory
test wheel. Sustained high
temperature can cause the
material of the tire to degenerate
and reduce tire life, and excessive
temperature can lead to sudden
tire failure. The grade C
corresponds to a level of
performance which all passenger
car tires must meet under the Federal Motor Vehicle Safety
Standard No. 139. Grades B and A
represent higher levels of
performance on the laboratory
test wheel than the minimum
required by law.
Glossary of Tire Terminology
*Tire label: A label showing the
original equipment tire sizes,
recommended inflation pressure
and the maximum weight the
vehicle can carry.
*
Tire Identification Number
(TIN): A number on the sidewall
of each tire providing information
about the tire brand and
manufacturing plant, tire size and
date of manufacture. Also referred
to as DOT code.
*
Inflation pressure: A measure
of the amount of air in a tire.
*
Standard load: A class of
P-metric or Metric tires designed
to carry a maximum load at set
pressure. For example: For
P-metric tires
35 psi (2.4 bar) and
for Metric tires 36 psi (2.5 bar).
Increasing the inflation pressure
beyond this pressure will not
increase the tire ’s load carrying
capability.
*
Extra load: A class of P-metric
or Metric tires designed to carry a
heavier maximum load at
42 psi
(2.9 bar). Increasing the inflation
pressure beyond this pressure will
not increase the tire ’s load
carrying capability.
309
Explorer (TUB) Canada/United States of America, enUSA, Edition date: 03/2016, First Printing Wheels and Tires
Page 314 of 541

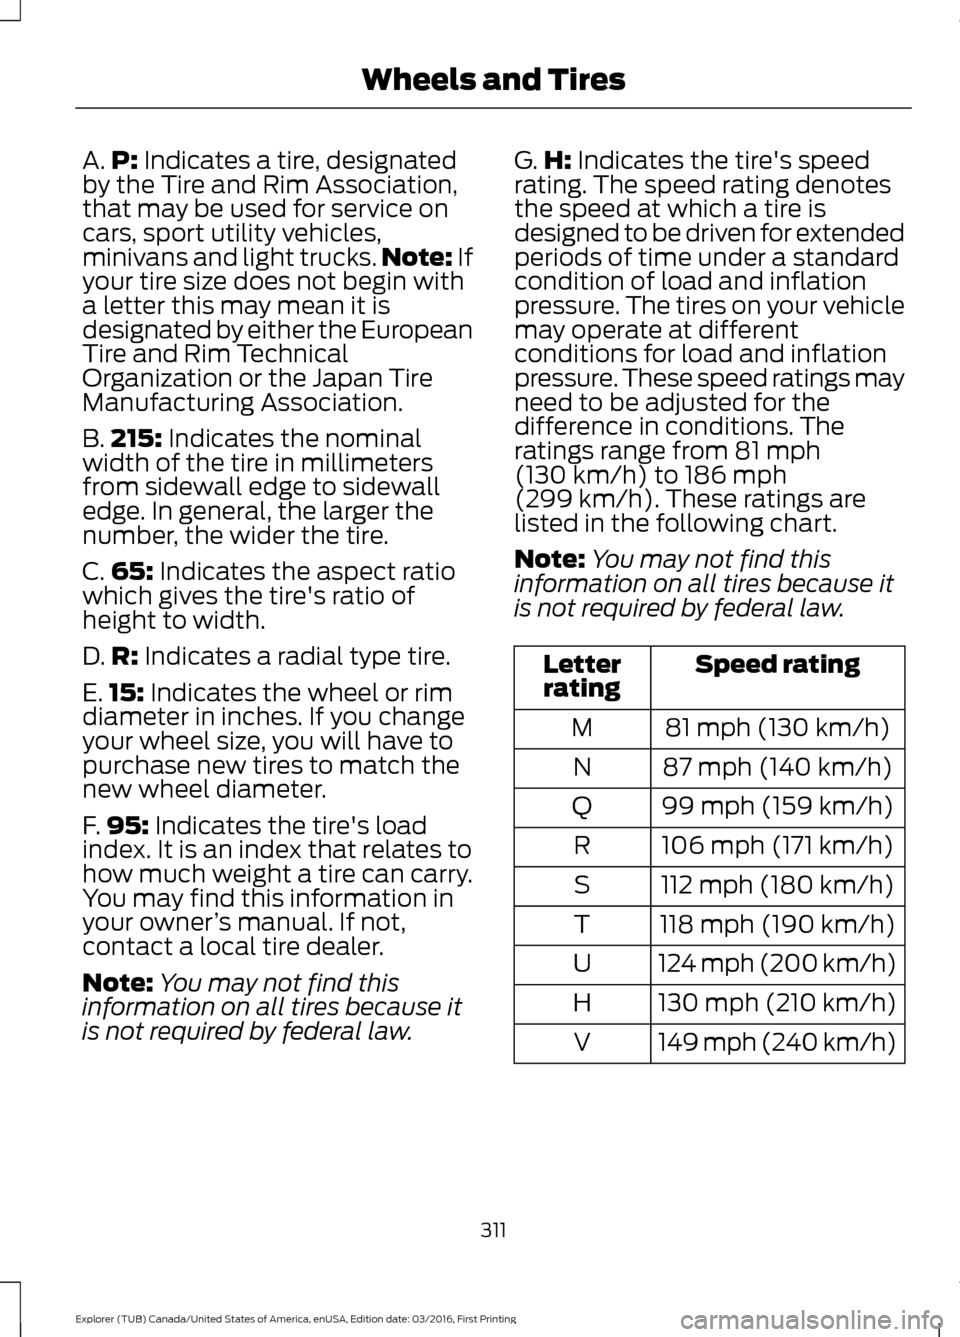
A.
P: Indicates a tire, designated
by the Tire and Rim Association,
that may be used for service on
cars, sport utility vehicles,
minivans and light trucks. Note:
If
your tire size does not begin with
a letter this may mean it is
designated by either the European
Tire and Rim Technical
Organization or the Japan Tire
Manufacturing Association.
B. 215:
Indicates the nominal
width of the tire in millimeters
from sidewall edge to sidewall
edge. In general, the larger the
number, the wider the tire.
C. 65:
Indicates the aspect ratio
which gives the tire's ratio of
height to width.
D. R:
Indicates a radial type tire.
E. 15:
Indicates the wheel or rim
diameter in inches. If you change
your wheel size, you will have to
purchase new tires to match the
new wheel diameter.
F. 95:
Indicates the tire's load
index. It is an index that relates to
how much weight a tire can carry.
You may find this information in
your owner ’s manual. If not,
contact a local tire dealer.
Note: You may not find this
information on all tires because it
is not required by federal law. G.
H:
Indicates the tire's speed
rating. The speed rating denotes
the speed at which a tire is
designed to be driven for extended
periods of time under a standard
condition of load and inflation
pressure. The tires on your vehicle
may operate at different
conditions for load and inflation
pressure. These speed ratings may
need to be adjusted for the
difference in conditions. The
ratings range from
81 mph
(130 km/h) to 186 mph
(299 km/h). These ratings are
listed in the following chart.
Note: You may not find this
information on all tires because it
is not required by federal law. Speed rating
Letter
rating
81 mph (130 km/h)
M
87 mph (140 km/h)
N
99 mph (159 km/h)
Q
106 mph (171 km/h)
R
112 mph (180 km/h)
S
118 mph (190 km/h)
T
124 mph (200 km/h)
U
130 mph (210 km/h)
H
149 mph (240 km/h)
V
311
Explorer (TUB) Canada/United States of America, enUSA, Edition date: 03/2016, First Printing Wheels and Tires
Page 331 of 541

WARNINGS
Do not attempt to change a tire on
the side of the vehicle close to
moving traffic. Pull far enough off the
road to avoid the danger of being hit when
operating the jack or changing the wheel. Always use the jack provided as
original equipment with your vehicle.
If using a jack other than the one
provided, make sure the jack capacity is
adequate for the vehicle weight, including
any vehicle cargo or modifications. If you
are unsure if the jack capacity is adequate,
contact the authorized dealer. Note:
Passengers should not remain in your
vehicle when the vehicle is being jacked.
Note: Jack at the specified locations to
avoid damage to the vehicle.
1. Park on a level surface, set the parking
brake and activate the hazard flashers.
2. Place the transmission in park (P) and
turn the engine off. 3. Block the diagonally opposite wheel. 4. Turn the two knobs on the floor filler
counterclockwise, then remove the
floor filler and carpeted floor panel
located in the rear of the vehicle. 5. Remove the wing nut securing the
spare tire by turning it
counterclockwise.
6. Remove the spare tire from the spare tire well.
7. Remove the wing nut bolt that secures
the jack kit by turning it
counterclockwise.
8. Remove the jack kit, which includes the
jack, lug wrench, L-shaped bolt and
tow recovery hook.
328
Explorer (TUB) Canada/United States of America, enUSA, Edition date: 03/2016, First Printing Wheels and TiresE142551 E194295 E226763
Page 340 of 541

VEHICLE IDENTIFICATION
NUMBER
The vehicle identification number is
located on the left-hand side of the
instrument panel.
Please note that in the graphic, XXXX is
representative of your vehicle identification
number.
The Vehicle Identification Number contains
the following information: World manufacturer identifier
A
Brake system, Gross Vehicle
Weight Rating, Restraint Devices
and their locations
B
Make, vehicle line, series, body
type
C
Engine type
D
Check digit
E
Model year
F
Assembly plant
G
Production sequence number
H
337
Explorer (TUB) Canada/United States of America, enUSA, Edition date: 03/2016, First Printing Capacities and SpecificationsE142476 E142477
Page 483 of 541

For maximum vehicle performance, keep
the following information in mind when
adding accessories or equipment to your
vehicle:
•
When adding accessories, equipment,
passengers and luggage to your
vehicle, do not exceed the total weight
capacity of the vehicle or of the front
or rear axle (GVWR or GAWR as
indicated on the Safety Compliance
Certification label). Ask an authorized
dealer for specific weight information.
• The Federal Communications
Commission (FCC) and Canadian
Radio Telecommunications
Commission (CRTC) regulate the use
of mobile communications systems
that are equipped with radio
transmitters, for example, two-way
radios, telephones and theft alarms.
Any such equipment installed in your
vehicle should comply with Federal
Communications Commission (FCC)
and Canadian Radio
Telecommunications Commission
(CRTC) regulations and should be
installed only by an authorized dealer.
• An authorized dealer needs to install
mobile communications systems.
Improper installation may harm the
operation of your vehicle, particularly
if the manufacturer did not design the
mobile communication system
specifically for automotive use.
• If you or an authorized Ford dealer add
any non-Ford electrical or electronic
accessories or components to your
vehicle, you may adversely affect
battery performance and durability. In
addition, you may also adversely affect
the performance of other electrical
systems in the vehicle.
480
Explorer (TUB) Canada/United States of America, enUSA, Edition date: 03/2016, First Printing Accessories
Page 537 of 541

Power Seats.....................................................141
Multi-Contour Front Seats With Active
Motion ............................................................... 142
Power Lumbar..................................................... 142
Power Steering Fluid Check....................285
Power Windows.............................................85 Accessory Delay................................................... 85
Bounce-Back......................................................... 85
One-Touch Down................................................. 85
One-Touch Up....................................................... 85
Window Lock......................................................... 85
Pre-Collision Assist
......................................227
Using the Pre-Collision Assist
System.............................................................. 228
Protecting the Environment........................15
R
Rear Parking Aid............................................195 Obstacle Distance Indicator.......................... 196
Rear Passenger Climate Controls..........134
Rear Seats
.......................................................144
Adjusting the Rear Seats................................. 144
Rear Under Floor Storage.........................230 Adjustable Load Floor...................................... 230
Cargo Management System......................... 230
Rear View Camera
......................................204
Camera Guidelines........................................... 206
Manual Zoom...................................................... 207
Obstacle Distance Indicator.......................... 207
Rear Camera Delay........................................... 207
Using the Rear View Camera System.............................................................. 205
Rear View Camera See: Rear View Camera.................................. 204
Rear Window Wiper and Washers
...........76
Rear Camera Washer........................................... 77
Rear Window Washer.......................................... 77
Rear Window Wiper............................................. 76
Recommended Towing Weights
...........239
Refueling...........................................................171 System Warnings................................................ 173
Remote Control..............................................50 Car Finder................................................................ 53
Integrated Keyhead Transmitters .................50
Intelligent Access Key........................................ 50
Memory Feature.................................................... 52
Remote Start......................................................... 53Replacing the Battery..........................................
51
Sounding a Panic Alarm.................................... 53
Remote Start.................................................136 Automatic Settings............................................ 136
Removing a Headlamp.............................290
Repairing Minor Paint Damage..............302
Replacement Parts Recommendation........................................12
Collision Repairs.................................................... 12
Scheduled Maintenance and Mechanical Repairs.................................................................. 12
Warranty on Replacement Parts..................... 12
Replacing a Lost Key or Remote Control............................................................54
Reporting Safety Defects (Canada Only).............................................................260
Reporting Safety Defects (U.S. Only).............................................................260
Roadside Assistance
..................................249
Vehicles Sold in Canada: Getting Roadside
Assistance....................................................... 249
Vehicles Sold in Canada: Roadside Assistance Program Coverage................250
Vehicles Sold in Canada: Using Roadside Assistance....................................................... 250
Vehicles Sold in the United States: Getting Roadside Assistance................................... 249
Vehicles Sold in the United States: Using Roadside Assistance................................... 249
Roadside Emergencies..............................249
Roof Racks and Load Carriers
..................231
Adjusting the Crossbar..................................... 232
Thumbwheel Kit.................................................. 231
Running-In See: Breaking-In................................................. 246
Running Out of Fuel
.....................................170
Adding Fuel From a Portable Fuel
Container............................................................ 171
Filling a Portable Fuel Container.................... 171
S
Safety Canopy ™
............................................46
Safety Precautions......................................168
Satellite Radio..............................................362
Satellite Radio Electronic Serial Number
(ESN)................................................................ 363
Satellite Radio Reception Factors..............363
534
Explorer (TUB) Canada/United States of America, enUSA, Edition date: 03/2016, First Printing Index