2017 FORD EXPLORER ESP
[x] Cancel search: ESPPage 190 of 541

PARKING BRAKE
WARNING
Always set the parking brake fully
and make sure the transmission is
locked in park (P). Failure to set the
parking brake and engage park could result
in vehicle roll-away, property damage or
bodily injury. To set the parking brake, press the parking
brake pedal down to its fullest extent. The
brake warning lamp in the instrument
cluster will illuminate and remains
illuminated until the parking brake is
released.
To release the parking brake, press the
parking brake pedal down again.
If you are parking your vehicle on a grade
or with a trailer, press and hold the brake
pedal down, then set the parking brake.
There may be a little vehicle movement as
the parking brake sets to hold the vehicle's
weight. This is normal and should be no
reason for concern. If needed, press and
hold the service brake pedal down, then
try reapplying the parking brake. Chock the
wheels if required. If the parking brake
cannot hold the weight of the vehicle, the
parking brake may need to be serviced or
the vehicle may be overloaded.
HILL START ASSIST
WARNINGS
The system does not replace the
parking brake. When you leave your
vehicle, always apply the parking
brake. Failure to leave your vehicle securely
parked may lead to a crash or injury. See
Parking Brake (page 187). WARNINGS
You must remain in your vehicle
when the system turns on. At all
times, you are responsible for
controlling your vehicle, supervising the
system and intervening, if required. Failure
to take care may result in the loss of
control of your vehicle, serious personal
injury or death. The system will turn off if a
malfunction is apparent or if you rev
the engine excessively. Failure to
take care may result in the loss of control
of your vehicle, serious personal injury or
death. The system makes it easier to pull away
when your vehicle is on a slope without the
need to use the parking brake.
When the system is active, your vehicle
remains stationary on the slope for two to
three seconds after you release the brake
pedal. This allows time to move your foot
from the brake to the accelerator pedal.
The system releases the brakes
automatically once the engine has
developed sufficient torque to prevent your
vehicle from rolling down the slope. This
is an advantage when pulling away on a
slope, for example from a car park ramp,
traffic lights or when reversing uphill into
a parking space.
Note:
The system only functions when you
bring your vehicle to a complete standstill
in an uphill gear (for example, drive (D)
when facing uphill or reverse (R) when
facing downhill).
Note: There is no warning light to indicate
the system is either on or off.
Using Hill Start Assist
1. Press the brake pedal to bring your vehicle to a complete standstill. Keep
the brake pedal pressed.
187
Explorer (TUB) Canada/United States of America, enUSA, Edition date: 03/2016, First Printing Brakes
Page 195 of 541
USING TERRAIN RESPONSE
The terrain management system optimizes
drivability and comfort as well as
maximizing traction while operating on
different types of terrain.
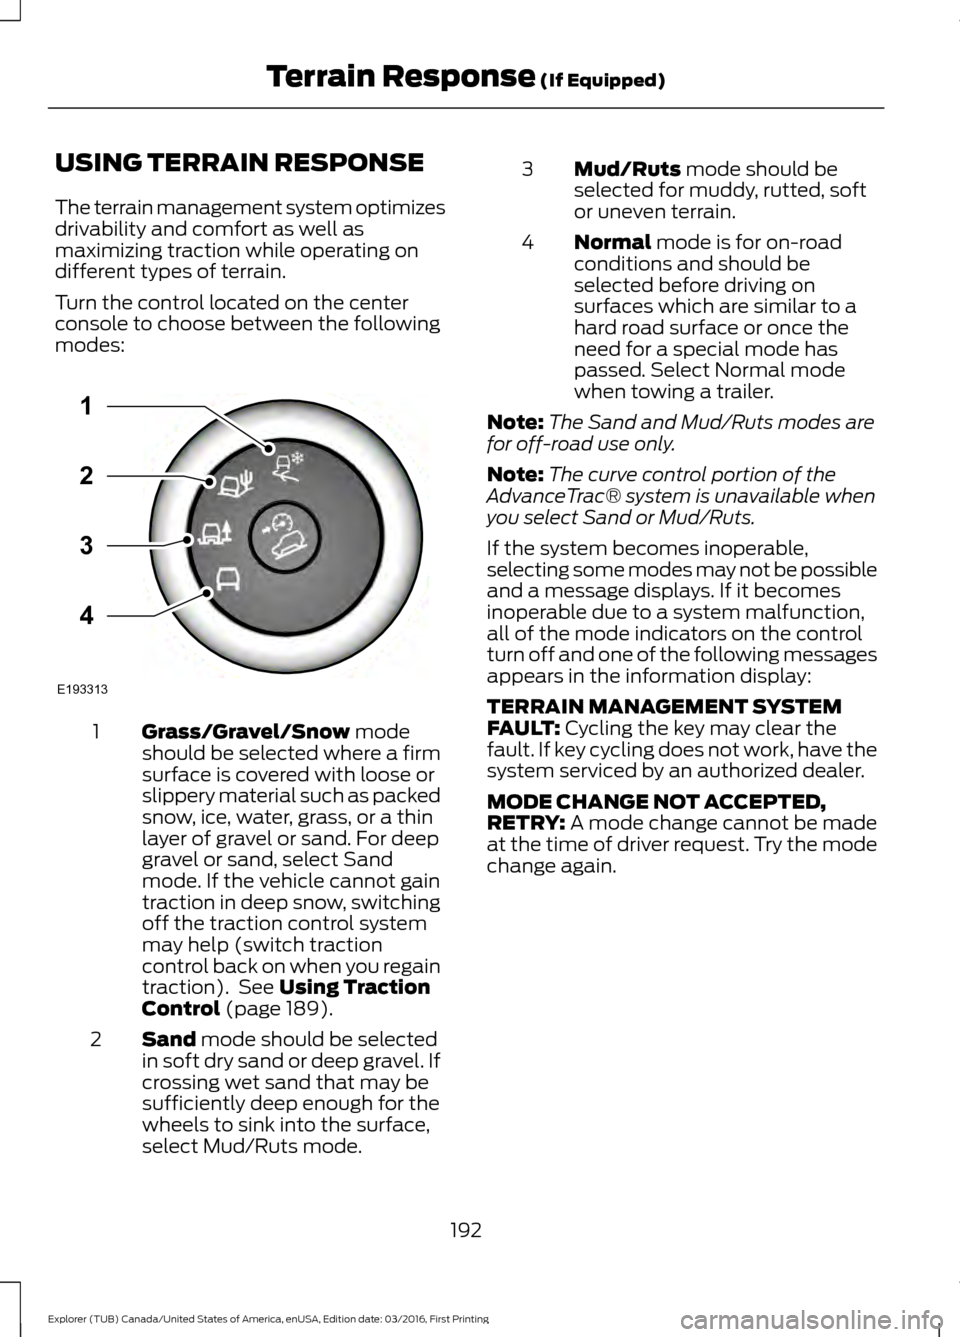
Turn the control located on the center
console to choose between the following
modes:
Grass/Gravel/Snow mode
should be selected where a firm
surface is covered with loose or
slippery material such as packed
snow, ice, water, grass, or a thin
layer of gravel or sand. For deep
1
gravel or sand, select Sand
mode. If the vehicle cannot gain
traction in deep snow, switching
off the traction control system
may help (switch traction
control back on when you regain
traction). See
Using Traction
Control (page 189).
Sand
mode should be selected
in soft dry sand or deep gravel. If
crossing wet sand that may be
sufficiently deep enough for the
wheels to sink into the surface,
select Mud/Ruts mode.
2 Mud/Ruts
mode should be
selected for muddy, rutted, soft
or uneven terrain.
3
Normal
mode is for on-road
conditions and should be
selected before driving on
surfaces which are similar to a
hard road surface or once the
need for a special mode has
passed. Select Normal mode
when towing a trailer.
4
Note: The Sand and Mud/Ruts modes are
for off-road use only.
Note: The curve control portion of the
AdvanceTrac® system is unavailable when
you select Sand or Mud/Ruts.
If the system becomes inoperable,
selecting some modes may not be possible
and a message displays. If it becomes
inoperable due to a system malfunction,
all of the mode indicators on the control
turn off and one of the following messages
appears in the information display:
TERRAIN MANAGEMENT SYSTEM
FAULT:
Cycling the key may clear the
fault. If key cycling does not work, have the
system serviced by an authorized dealer.
MODE CHANGE NOT ACCEPTED,
RETRY:
A mode change cannot be made
at the time of driver request. Try the mode
change again.
192
Explorer (TUB) Canada/United States of America, enUSA, Edition date: 03/2016, First Printing Terrain Response
(If Equipped)E193313
3
2
1
4
Page 196 of 541
USING HILL DESCENT
CONTROL
Principle of operation
WARNINGS
Hill descent control cannot control
descent in all surface conditions and
circumstances, such as ice or
extremely steep grades. Hill descent
control is a driver assist system and cannot
substitute for good judgment by the driver.
Failure to do so may result in loss of vehicle
control, crash or serious injury. Hill descent control does not provide
hill hold at zero miles per hour (0
kilometers per hour). When stopped,
the parking brake must be applied or the
vehicle must be placed in P (Park) or it
may roll away. Hill descent control allows the driver to set
and maintain vehicle speed while
descending steep grades in various surface
conditions.
Hill descent control can maintain vehicle
speeds on downhill grades between 3 mph
(5 km/h)
and 20 mph (32 km/h). Above
20 mph (32 km/h), the system remains
armed, but descent speed cannot be set
or maintained.
Hill descent control requires a cooling
down interval after a period of sustained
use. The amount of time that the feature
can remain active before cooling varies
with conditions. The system provides a
warning in the message center and a chime
sounds when the system is about to
disengage for cooling. At this time,
manually apply the brakes as needed to
maintain descent speed. Using hill descent control Press and release the hill
descent button located in the
center of the terrain
management control. A light in the control
illuminates and a chime sounds when this
feature activates.
To increase descent speed, press the
accelerator pedal until you reach the
desired speed. To decrease descent speed,
press the brake pedal until you reach the
desired speed.
Whether accelerating or decelerating, once
you reach the desired descent speed,
remove your feet from the pedals and hill
descent control maintains the chosen
vehicle speed.
Note: You may observe noise from the ABS
pump motor during hill descent control
operation. This is a normal characteristic of
the ABS and should be no reason for
concern.
Hill descent modes
• At speeds below
20 mph (32 km/h):
When you press the Hill Descent
Control and Hill Descent Control
activates, HILL DESCENT CONTROL
ACTIVE
appears in the message
center for several seconds.
• At speeds below
20 mph (32 km/h):
When you press the Hill Descent
Control switch and conditions are not
correct for hill descent activation, the
Hill Descent Control system enables,
the light on the button is solid and HILL
DESCENT CONTROL READY
displays in the message center for
several seconds.
193
Explorer (TUB) Canada/United States of America, enUSA, Edition date: 03/2016, First Printing Terrain Response
(If Equipped)
Page 197 of 541
•
At speeds above 20 mph (32 km/h):
When you press the Hill Descent
Control switch, the Hill Descent Control
system enables, the light on the button
illuminates and FOR HILL CNTRL, 20
MPH OR LESS
displays in the
message center for several seconds.
• For Hill Descent Control to enable, the
vehicle must be in a drive gear or (R)
Reverse. If the vehicle is in P (Park) or
N (Neutral) and you press the button,
FOR HILL CNTRL, SELECT GEAR
displays in the message center for
several seconds.
Refer to the Information Displays for
additional Hill Descent Control messages.
See
Information Messages (page 113).
194
Explorer (TUB) Canada/United States of America, enUSA, Edition date: 03/2016, First Printing Terrain Response
(If Equipped)
Page 202 of 541

ACTIVE PARK ASSIST (If Equipped)
Parallel Parking, Perpendicular
Parking, Parallel Park Out Assist
WARNINGS
You must remain in your vehicle
when the system turns on. At all
times, you are responsible for
controlling your vehicle, supervising the
system and intervening, if required. Failure
to take care may result in the loss of
control of your vehicle, serious personal
injury or death. The sensors may not detect objects
in heavy rain or other conditions that
cause interference.
Active park assist does not apply the
brakes under any circumstances.
At all times, you are responsible for
controlling your vehicle, supervising
the system and intervening, if
required. Failure to take care may result in
the loss of control of your vehicle, serious
personal injury or death. The system detects an available parallel
or perpendicular parking space and
automatically steers your vehicle into the
space (hands-free) while you control the
accelerator, gearshift and brakes. The
system visually and audibly guides you to
park your vehicle.
If you are uncomfortable with the proximity
to any vehicle or object, you may choose
to override the system.
Parallel Park Out Assist automatically
steers your vehicle out of a parallel parking
space (hands-free) while you control the
accelerator, gearshift and brakes. The
system visually and audibly guides you to
enter traffic. Note:
The Blind Spot Information System
does not detect traffic alongside or behind
your vehicle during a park assist maneuver.
The system may not correctly operate in
any of the following conditions:
• You use a spare tire or a tire
significantly worn more than the other
tires.
• One or more tires are improperly
inflated.
• You try to park on a tight curve.
• Something passes between the front
bumper and the parking space (a
pedestrian or cyclist).
• The edge of the neighboring parked
vehicle is high off the ground (for
example, a bus, tow truck or flatbed
truck).
• The weather conditions are poor
(heavy rain, snow, fog, etc).
Note: Keep the sensors, located on the
bumper or fascia, free from snow, ice and
large accumulations of dirt. Covered sensors
can affect the system's accuracy. Do not
clean the sensors with sharp objects.
Note: The sensors may not detect objects
with surfaces that absorb ultrasonic waves
or cause ultrasonic interference (motorcycle
exhaust, truck air brakes or horns).
Do not use the system if:
• You have attached a bike rack, trailer
or other object near the sensors on the
front or rear of your vehicle.
• You have attached an overhanging
object (surfboard) to the roof.
• A foreign object damages or obstructs
the front or rear bumper or side
sensors.
• The correct tire size is not in use on your
vehicle (for example, a mini-spare tire).
199
Explorer (TUB) Canada/United States of America, enUSA, Edition date: 03/2016, First Printing Parking Aids
Page 203 of 541
Using Active Park Assist - Parallel
Parking
Press the button located on the
center console near the gearshift
lever or the right side of the
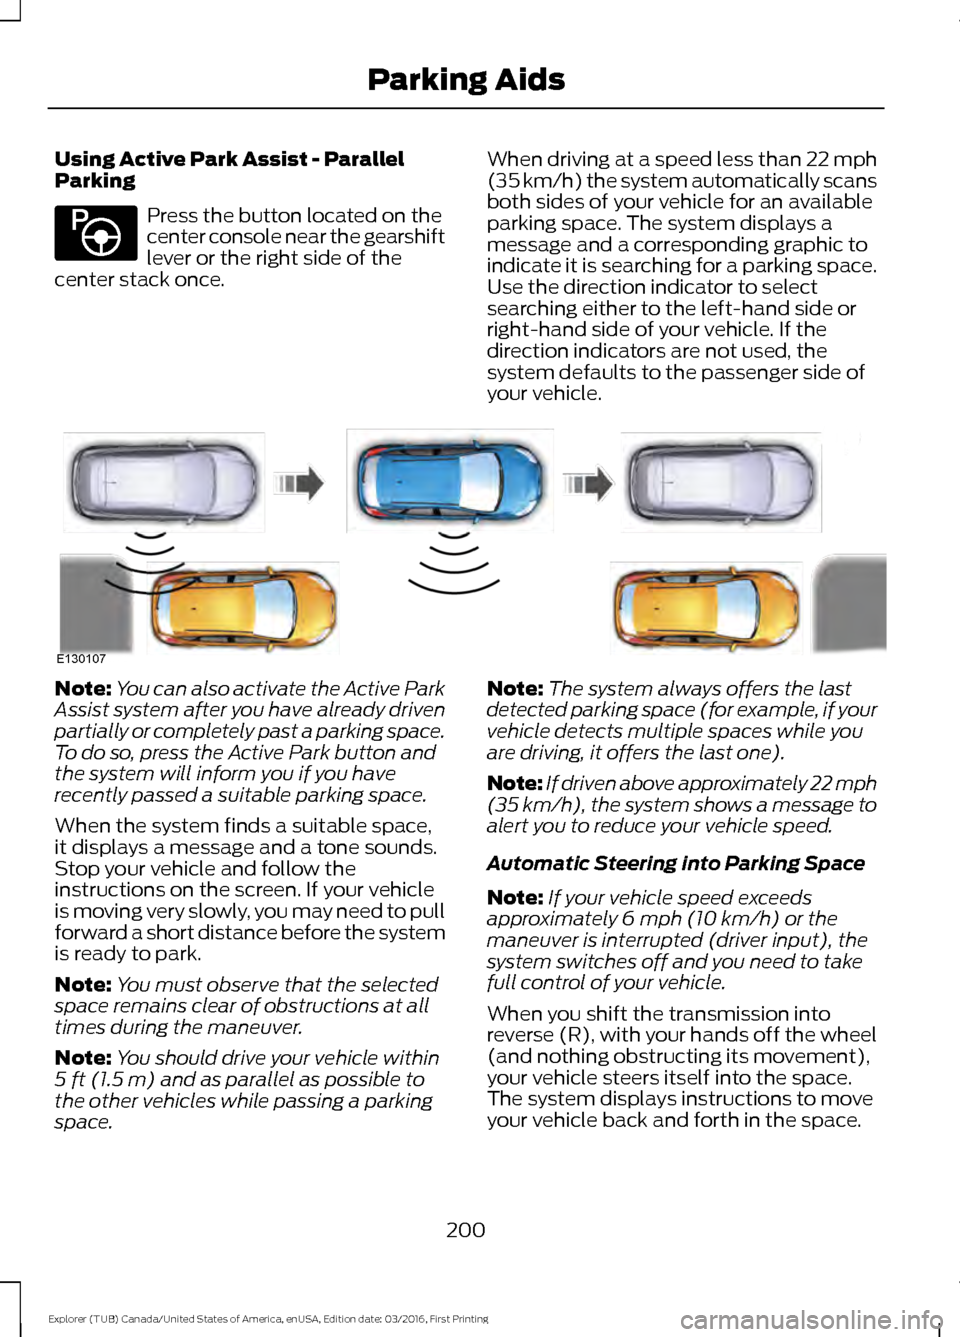
center stack once. When driving at a speed less than 22 mph
(35 km/h) the system automatically scans
both sides of your vehicle for an available
parking space. The system displays a
message and a corresponding graphic to
indicate it is searching for a parking space.
Use the direction indicator to select
searching either to the left-hand side or
right-hand side of your vehicle. If the
direction indicators are not used, the
system defaults to the passenger side of
your vehicle.Note:
You can also activate the Active Park
Assist system after you have already driven
partially or completely past a parking space.
To do so, press the Active Park button and
the system will inform you if you have
recently passed a suitable parking space.
When the system finds a suitable space,
it displays a message and a tone sounds.
Stop your vehicle and follow the
instructions on the screen. If your vehicle
is moving very slowly, you may need to pull
forward a short distance before the system
is ready to park.
Note: You must observe that the selected
space remains clear of obstructions at all
times during the maneuver.
Note: You should drive your vehicle within
5 ft (1.5 m) and as parallel as possible to
the other vehicles while passing a parking
space. Note:
The system always offers the last
detected parking space (for example, if your
vehicle detects multiple spaces while you
are driving, it offers the last one).
Note: If driven above approximately 22 mph
(35 km/h)
, the system shows a message to
alert you to reduce your vehicle speed.
Automatic Steering into Parking Space
Note: If your vehicle speed exceeds
approximately
6 mph (10 km/h) or the
maneuver is interrupted (driver input), the
system switches off and you need to take
full control of your vehicle.
When you shift the transmission into
reverse (R), with your hands off the wheel
(and nothing obstructing its movement),
your vehicle steers itself into the space.
The system displays instructions to move
your vehicle back and forth in the space.
200
Explorer (TUB) Canada/United States of America, enUSA, Edition date: 03/2016, First Printing Parking AidsE146186 E130107
Page 204 of 541
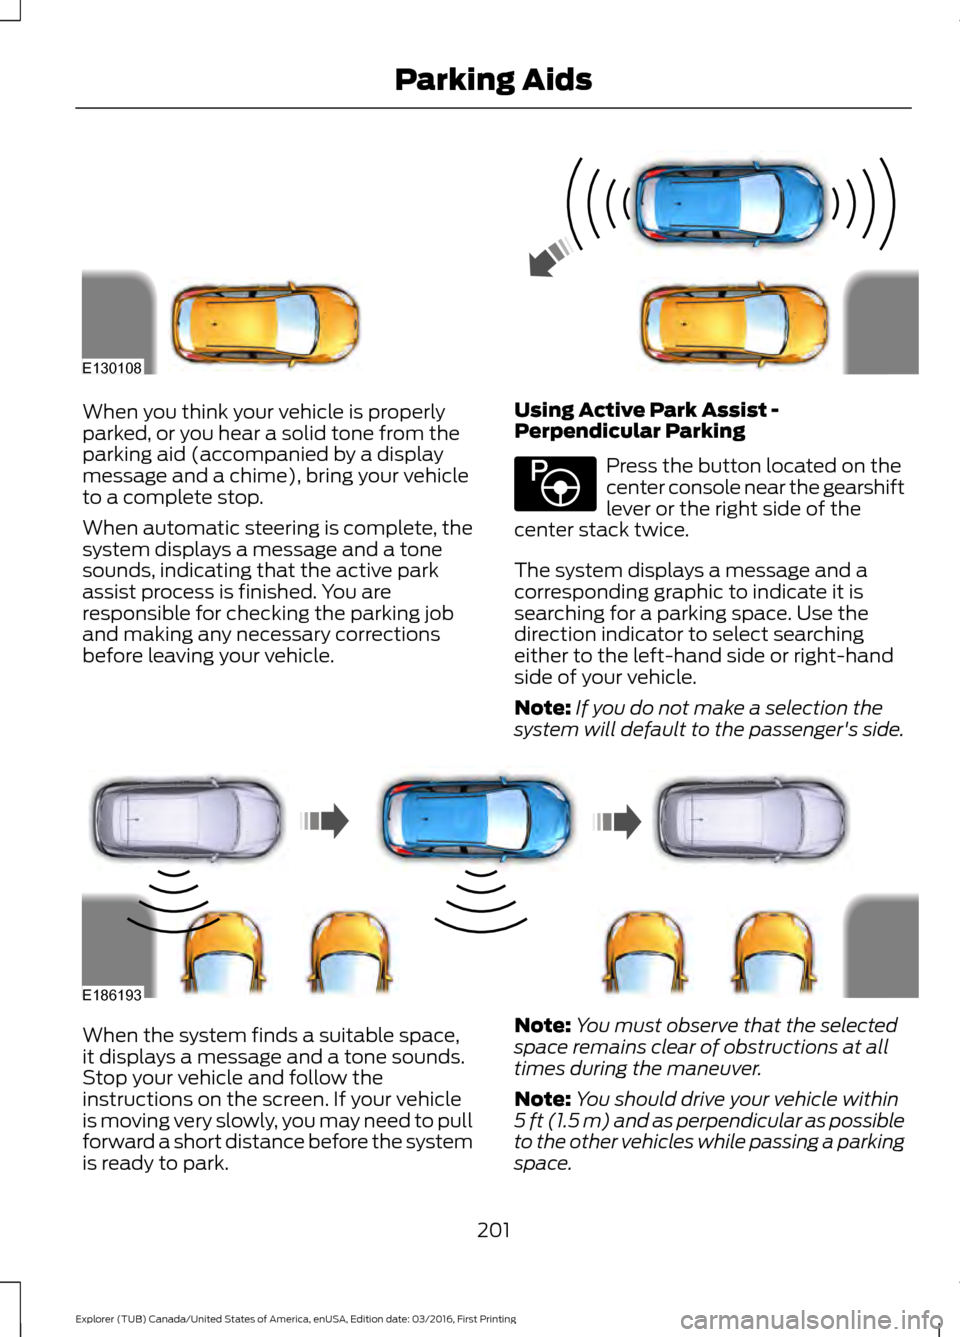
When you think your vehicle is properly
parked, or you hear a solid tone from the
parking aid (accompanied by a display
message and a chime), bring your vehicle
to a complete stop.
When automatic steering is complete, the
system displays a message and a tone
sounds, indicating that the active park
assist process is finished. You are
responsible for checking the parking job
and making any necessary corrections
before leaving your vehicle.
Using Active Park Assist -
Perpendicular Parking Press the button located on the
center console near the gearshift
lever or the right side of the
center stack twice.
The system displays a message and a
corresponding graphic to indicate it is
searching for a parking space. Use the
direction indicator to select searching
either to the left-hand side or right-hand
side of your vehicle.
Note: If you do not make a selection the
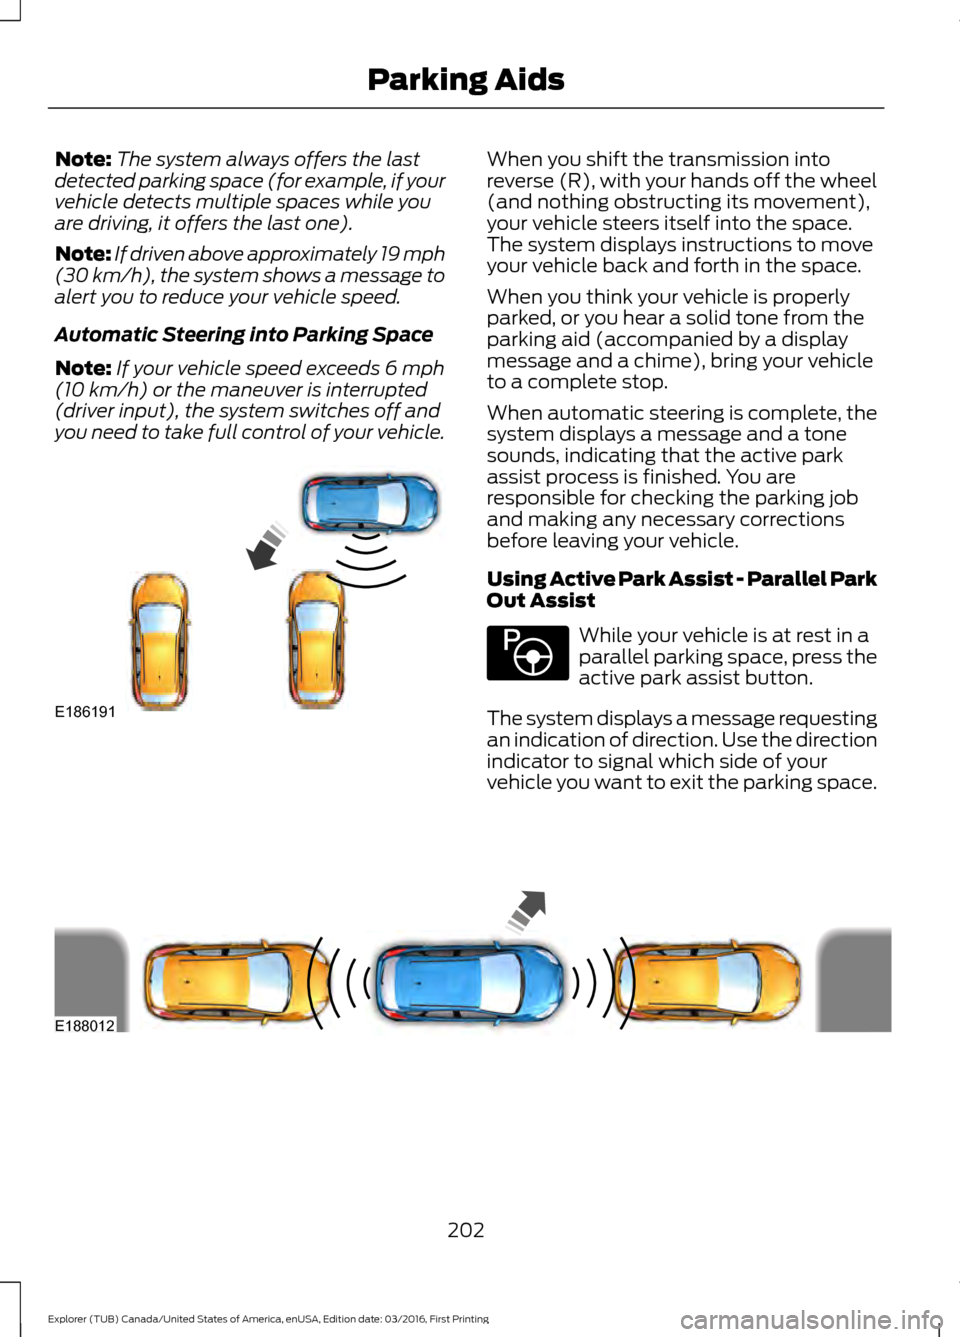
system will default to the passenger's side. When the system finds a suitable space,
it displays a message and a tone sounds.
Stop your vehicle and follow the
instructions on the screen. If your vehicle
is moving very slowly, you may need to pull
forward a short distance before the system
is ready to park.
Note:
You must observe that the selected
space remains clear of obstructions at all
times during the maneuver.
Note: You should drive your vehicle within
5 ft (1.5 m) and as perpendicular as possible
to the other vehicles while passing a parking
space.
201
Explorer (TUB) Canada/United States of America, enUSA, Edition date: 03/2016, First Printing Parking AidsE130108 E146186 E186193
Page 205 of 541
Note:
The system always offers the last
detected parking space (for example, if your
vehicle detects multiple spaces while you
are driving, it offers the last one).
Note: If driven above approximately 19 mph
(30 km/h), the system shows a message to
alert you to reduce your vehicle speed.
Automatic Steering into Parking Space
Note: If your vehicle speed exceeds
6 mph
(10 km/h) or the maneuver is interrupted
(driver input), the system switches off and
you need to take full control of your vehicle. When you shift the transmission into
reverse (R), with your hands off the wheel
(and nothing obstructing its movement),
your vehicle steers itself into the space.
The system displays instructions to move
your vehicle back and forth in the space.
When you think your vehicle is properly
parked, or you hear a solid tone from the
parking aid (accompanied by a display
message and a chime), bring your vehicle
to a complete stop.
When automatic steering is complete, the
system displays a message and a tone
sounds, indicating that the active park
assist process is finished. You are
responsible for checking the parking job
and making any necessary corrections
before leaving your vehicle.
Using Active Park Assist - Parallel Park
Out Assist
While your vehicle is at rest in a
parallel parking space, press the
active park assist button.
The system displays a message requesting
an indication of direction. Use the direction
indicator to signal which side of your
vehicle you want to exit the parking space. 202
Explorer (TUB) Canada/United States of America, enUSA, Edition date: 03/2016, First Printing Parking AidsE186191 E146186 E188012