2017 FORD EXPEDITION EL fuel
[x] Cancel search: fuelPage 156 of 500
WARNINGS
The fuel system may be underpressure. If you hear a hissing soundnear the fuel filler door, do not refueluntil the sound stops. Otherwise, fuel mayspray out, which could cause seriouspersonal injury.
Do not remove the fuel pump nozzlefrom its fully inserted position whenrefueling.
Do not overfill the fuel tank. Thepressure in an overfilled tank maycause leakage and lead to fuel sprayand fire.
Stop refueling when the fuel pumpnozzle automatically shuts off for thefirst time. Failure to follow this willfill the expansion space in the fuel tank andcould lead to fuel overflowing.
Wait at least 10 seconds beforeremoving the fuel pump nozzle toallow any residual fuel to drain intothe fuel tank.
Do not try to pry open or push openthe capless fuel system with foreignobjects. This could damage the fuelsystem and its seal and cause injury to youor others.
Note:Your vehicle does not have a fuel fillercap.
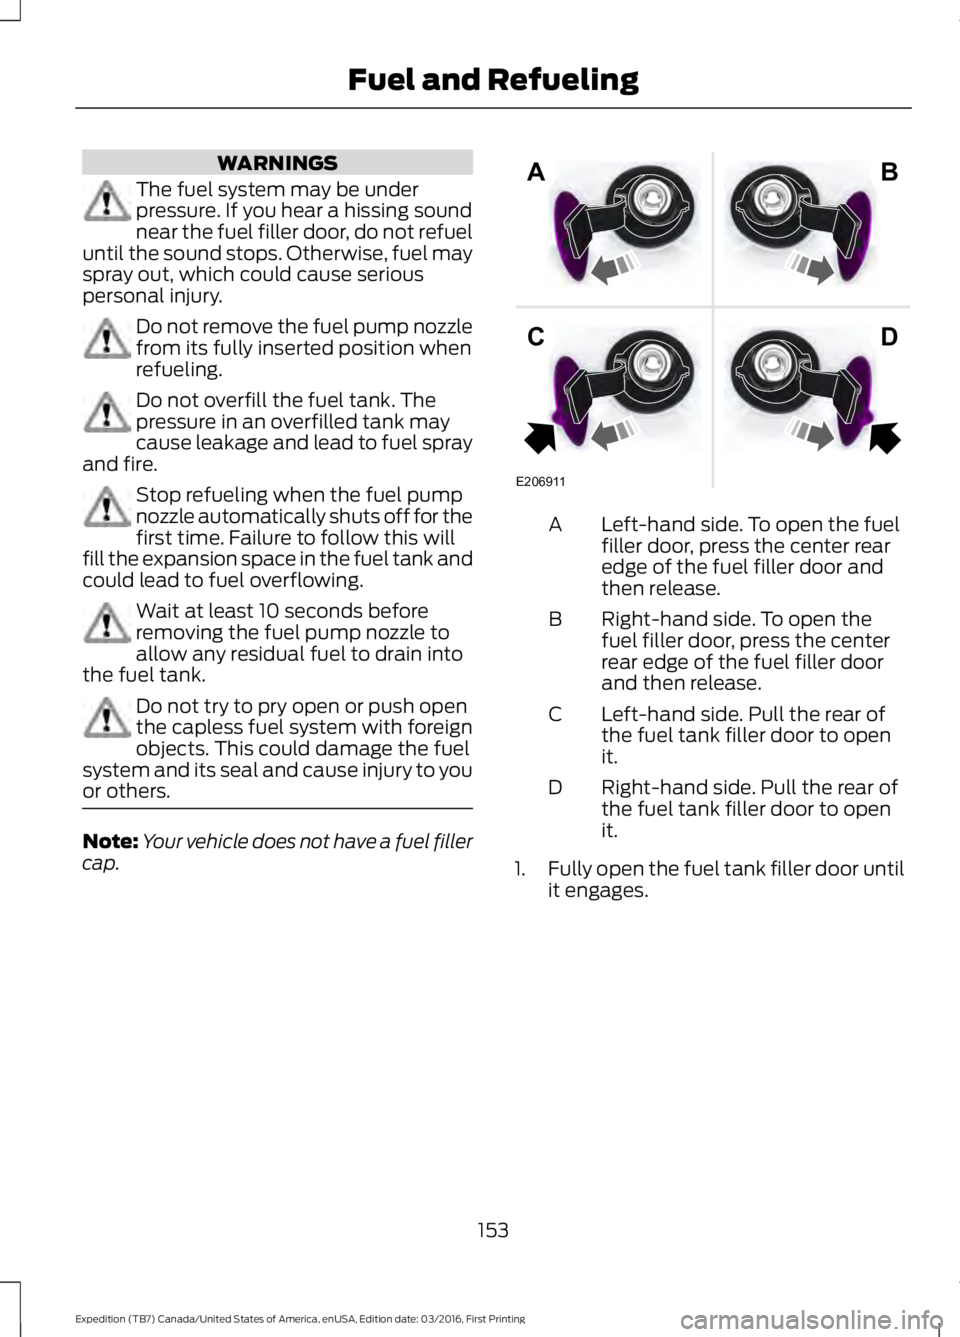
Left-hand side. To open the fuelfiller door, press the center rearedge of the fuel filler door andthen release.
A
Right-hand side. To open thefuel filler door, press the centerrear edge of the fuel filler doorand then release.
B
Left-hand side. Pull the rear ofthe fuel tank filler door to openit.
C
Right-hand side. Pull the rear ofthe fuel tank filler door to openit.
D
1.Fully open the fuel tank filler door untilit engages.
153
Expedition (TB7) Canada/United States of America, enUSA, Edition date: 03/2016, First Printing
Fuel and RefuelingE206911
AB
CD
Page 157 of 500
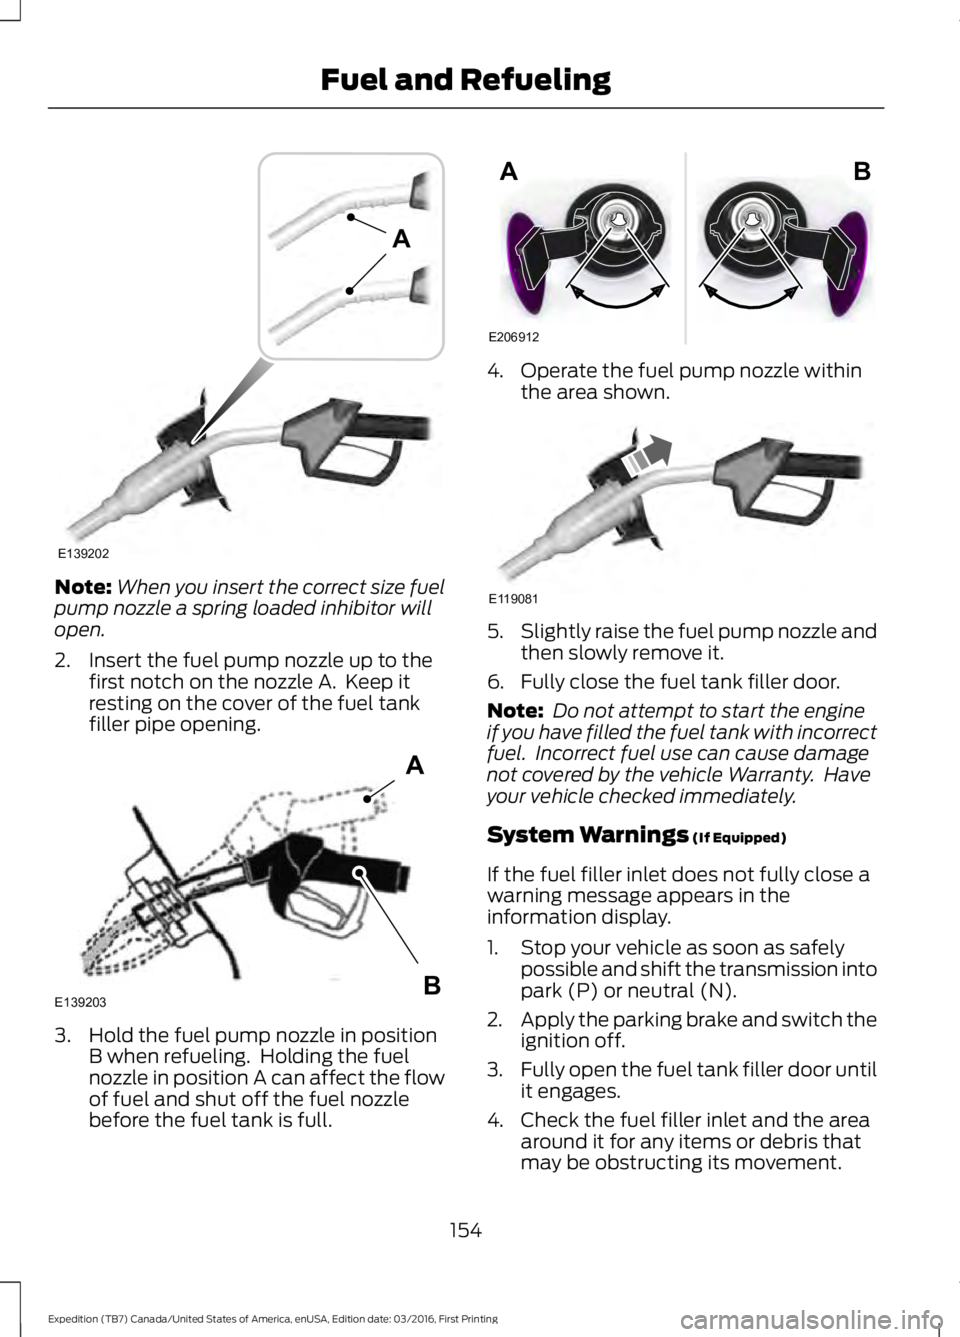
Note:When you insert the correct size fuelpump nozzle a spring loaded inhibitor willopen.
2. Insert the fuel pump nozzle up to thefirst notch on the nozzle A. Keep itresting on the cover of the fuel tankfiller pipe opening.
3. Hold the fuel pump nozzle in positionB when refueling. Holding the fuelnozzle in position A can affect the flowof fuel and shut off the fuel nozzlebefore the fuel tank is full.
4. Operate the fuel pump nozzle withinthe area shown.
5.Slightly raise the fuel pump nozzle andthen slowly remove it.
6. Fully close the fuel tank filler door.
Note: Do not attempt to start the engineif you have filled the fuel tank with incorrectfuel. Incorrect fuel use can cause damagenot covered by the vehicle Warranty. Haveyour vehicle checked immediately.
System Warnings (If Equipped)
If the fuel filler inlet does not fully close awarning message appears in theinformation display.
1. Stop your vehicle as soon as safelypossible and shift the transmission intopark (P) or neutral (N).
2.Apply the parking brake and switch theignition off.
3.Fully open the fuel tank filler door untilit engages.
4. Check the fuel filler inlet and the areaaround it for any items or debris thatmay be obstructing its movement.
154
Expedition (TB7) Canada/United States of America, enUSA, Edition date: 03/2016, First Printing
Fuel and RefuelingE139202
A E139203
A
B E206912
AB E119081
Page 158 of 500
5. Insert a fuel pump nozzle or the fuelfiller funnel provided with your vehiclein to the fuel tank filler pipe opening.This action should dislodge any debristhat may be preventing the fuel fillerinlet from fully closing.
Note: If this action corrects the problemthe message may not reset immediately. Ifthe message remains and the service enginesoon warning lamp appears in theinformation display, have your vehiclechecked as soon as possible.
FUEL CONSUMPTION
Empty reserve is the amount of fuelremaining in the tank after the fuel gaugeindicates empty. The amount of usablefuel in the empty reserve varies and shouldnot be relied upon to increase driving range.
•The usable capacity of the fuel tank isthe amount of fuel that you can add tothe fuel tank when the fuel gaugeindicates empty, before the first fuelfiller nozzle automatic shutoff event.
•The advertised capacity is equal to thevolumetric difference between actualfuel fill before the first fuel filler nozzleautomatic shutoff event and the fuelquantity when the fuel gauge indicatesempty. See Capacities andSpecifications (page 304). It is theusable capacity minus the emptyreserve.
•Due to the empty reserve, you may beable to add more fuel than theadvertised capacity of the fuel tankwhen the fuel gauge indicates empty.
Filling the Fuel Tank
For consistent results when refueling:
•Turn the ignition off before fueling; aninaccurate reading results if the engineis left running.
•Use the same fill rate(low-medium-high) each time the tankis filled.
•Allow no more than one automaticshut-off when refueling.
Results are most accurate when the fillingmethod is consistent.
Calculating Fuel Economy
Do not measure fuel economy during thefirst 1,000 mi (1,600 km) of driving (this isyour engine’s break-in period). A moreaccurate measurement is obtained after2,000 mi (3,200 km) to 3,000 mi(4,800 km). Also, fuel expense, frequencyof fill ups or fuel gauge readings are notaccurate ways to measure fuel economy.
1.Fill the fuel tank completely and recordthe initial odometer reading.
2. Each time you fill the fuel tank, recordthe amount of fuel added.
3. After at least three fill ups, fill the fueltank and record the current odometerreading.
4. Subtract your initial odometer readingfrom the current odometer reading.
To calculate L/100 km (liters per 100kilometers) fuel consumption, multiply theliters used by 100, then divide by kilometerstraveled. To calculate MPG (miles pergallon) fuel consumption, divide milestraveled by gallons used.
155
Expedition (TB7) Canada/United States of America, enUSA, Edition date: 03/2016, First Printing
Fuel and Refueling
Page 159 of 500
Keep a record for at least one month andrecord the type of driving (city or highway).This provides an accurate estimate of yourvehicle’s fuel economy under currentdriving conditions. Keeping records duringsummer and winter will show howtemperature impacts fuel economy.
Conditions
•Heavily loading your vehicle reducesfuel economy.
•Carrying unnecessary weight in yourvehicle may reduce fuel economy.
•Adding certain accessories to yourvehicle such as bug deflectors, rollbarsor light bars, running boards and skiracks may reduce fuel economy.
•Using fuel blended with alcohol maylower fuel economy.
•Fuel economy may decrease with lowertemperatures.
•Fuel economy may decrease whendriving short distances.
•You will get better fuel economy whendriving on flat terrain than when drivingon hilly terrain.
EMISSION CONTROL SYSTEM
WARNINGS
Do not park, idle, or drive your vehiclein dry grass or other dry ground cover.The emission system heats up theengine compartment and exhaust system,which can start a fire.
Exhaust leaks may result in entry ofharmful and potentially lethal fumesinto the passenger compartment. Ifyou smell exhaust fumes inside yourvehicle, have your dealer inspect yourvehicle immediately. Do not drive if yousmell exhaust fumes.
Your vehicle is equipped with variousemission control components and acatalytic converter that will enable yourvehicle to comply with applicable exhaustemission standards.
To make sure that the catalytic converterand other emission control componentscontinue to work properly:
•Use only the specified fuel listed.
•Avoid running out of fuel.
•Do not turn off the ignition while yourvehicle is moving, especially at highspeeds.
•Have the items listed in scheduledmaintenance information performedaccording to the specified schedule.
The scheduled maintenance items listedin scheduled maintenance information areessential to the life and performance ofyour vehicle and to its emissions system.
If you use anything other than Ford,Motorcraft or Ford-authorized parts formaintenance replacements or for serviceof components affecting emission control,such non-Ford parts should be equivalentto genuine Ford Motor Company parts inperformance and durability.
Illumination of the service engine soonindicator, charging system warning light orthe temperature warning light, fluid leaks,strange odors, smoke or loss of enginepower could indicate that the emissioncontrol system is not working properly.
An improperly operating or damagedexhaust system may allow exhaust toenter the vehicle. Have a damaged orimproperly operating exhaust systeminspected and repaired immediately.
Do not make any unauthorized changes toyour vehicle or engine. By law, vehicleowners and anyone who manufactures,repairs, services, sells, leases, tradesvehicles, or supervises a fleet of vehiclesare not permitted to intentionally remove
156
Expedition (TB7) Canada/United States of America, enUSA, Edition date: 03/2016, First Printing
Fuel and Refueling
Page 160 of 500
an emission control device or prevent itfrom working. Information about yourvehicle’s emission system is on the VehicleEmission Control Information Decallocated on or near the engine. This decalalso lists engine displacement.
Please consult your warranty informationfor complete details.
On-Board Diagnostics (OBD-II)
Your vehicle has a computer known as theon-board diagnostics system (OBD-II) thatmonitors the engine’s emission controlsystem. The system protects theenvironment by making sure that yourvehicle continues to meet governmentemission standards. The OBD-II systemalso assists a service technician in properlyservicing your vehicle.
When the service engine soonindicator illuminates, the OBD-IIsystem has detected amalfunction. Temporary malfunctions maycause the service engine soon indicator toilluminate. Examples are:
1. Your vehicle has run out of fuel—theengine may misfire or run poorly.
2. Poor fuel quality or water in thefuel—the engine may misfire or runpoorly.
3. The fuel fill inlet may not have closedproperly. See Refueling (page 152).
4. Driving through deep water—theelectrical system may be wet.
You can correct these temporarymalfunctions by filling the fuel tank withgood quality fuel, properly closing the fuelfill inlet or letting the electrical system dryout. After three driving cycles without theseor any other temporary malfunctions
present, the service engine soon indicatorshould stay off the next time you start theengine. A driving cycle consists of a coldengine startup followed by mixed city andhighway driving. No additional vehicleservice is required.
If the service engine soon indicator remainson, have your vehicle serviced at the firstavailable opportunity. Although somemalfunctions detected by the OBD-II maynot have symptoms that are apparent,continued driving with the service enginesoon indicator on can result in increasedemissions, lower fuel economy, reducedengine and transmission smoothness andlead to more costly repairs.
Readiness for Inspection andMaintenance (I/M) Testing
Some state and provincial and localgovernments may haveInspection/Maintenance (I/M) programsto inspect the emission control equipmenton your vehicle. Failure to pass thisinspection could prevent you from gettinga vehicle registration.
If the service engine soonindicator is on or the bulb doesnot work, your vehicle may needservice. See On-Board Diagnostics.
Your vehicle may not pass the I/M test ifthe service engine soon indicator is on ornot working properly (bulb is burned out),or if the OBD-II system has determinedthat some of the emission control systemshave not been properly checked. In thiscase, the vehicle is not ready for I/Mtesting.
If the vehicle’s engine or transmission hasjust been serviced, or the battery hasrecently run down or been replaced, theOBD-II system may indicate that thevehicle is not ready for I/M testing. Todetermine if the vehicle is ready for I/Mtesting, turn the ignition key to the on
157
Expedition (TB7) Canada/United States of America, enUSA, Edition date: 03/2016, First Printing
Fuel and Refueling
Page 161 of 500
position for 15 seconds without crankingthe engine. If the service engine soonindicator blinks eight times, it means thatthe vehicle is not ready for I/M testing; ifthe service engine soon indicator stays onsolid, it means that your vehicle is readyfor I/M testing.
The OBD-II system checks the emissioncontrol system during normal driving. Acomplete check may take several days.
If the vehicle is not ready for I/M testing,you can perform the following driving cycleconsisting of mixed city and highwaydriving:
1. 15 minutes of steady driving on anexpressway or highway followed by 20minutes of stop-and-go driving with atleast four 30-second idle periods.
2. Allow your vehicle to sit for at leasteight hours with the ignition off. Then,start the vehicle and complete theabove driving cycle. The vehicle mustwarm up to its normal operatingtemperature. Once started, do not turnoff the vehicle until the above drivingcycle is complete.
If the vehicle is still not ready for I/Mtesting, you need to repeat the abovedriving cycle.
158
Expedition (TB7) Canada/United States of America, enUSA, Edition date: 03/2016, First Printing
Fuel and Refueling
Page 162 of 500
AUTOMATIC TRANSMISSION
WARNINGS
Always set the parking brake fullyand make sure you shift the gearshiftlever to park (P). Switch the ignitionoff and remove the key whenever you leaveyour vehicle.
Do not use the tow/haul featurewhen driving in icy or slipperyconditions as the increased enginebraking can cause the rear wheels to slideand your vehicle to swing around with thepossible loss of vehicle control.
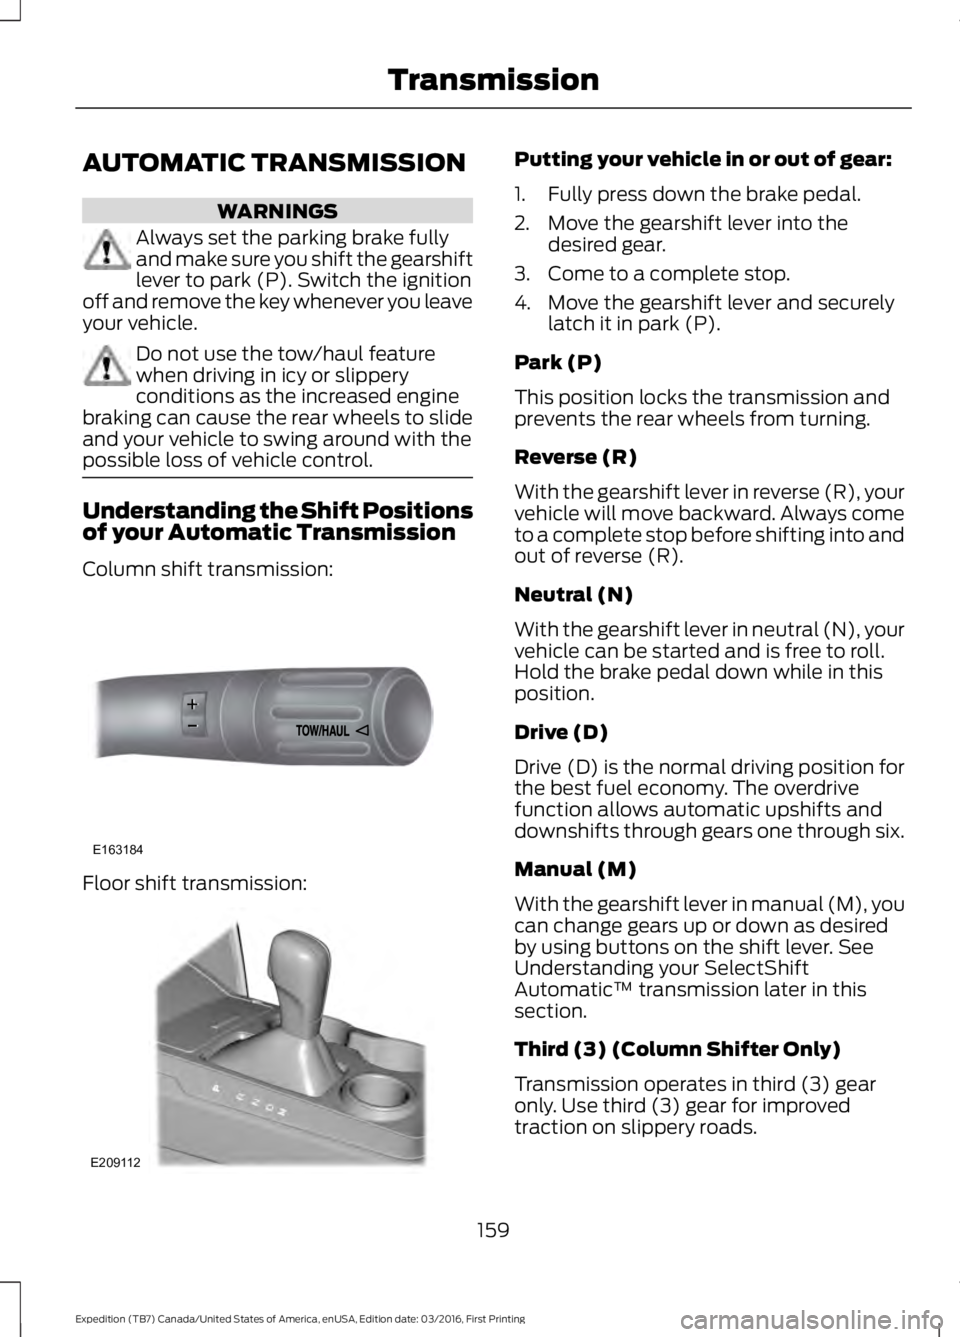
Understanding the Shift Positionsof your Automatic Transmission
Column shift transmission:
Floor shift transmission:
Putting your vehicle in or out of gear:
1. Fully press down the brake pedal.
2. Move the gearshift lever into thedesired gear.
3. Come to a complete stop.
4. Move the gearshift lever and securelylatch it in park (P).
Park (P)
This position locks the transmission andprevents the rear wheels from turning.
Reverse (R)
With the gearshift lever in reverse (R), yourvehicle will move backward. Always cometo a complete stop before shifting into andout of reverse (R).
Neutral (N)
With the gearshift lever in neutral (N), yourvehicle can be started and is free to roll.Hold the brake pedal down while in thisposition.
Drive (D)
Drive (D) is the normal driving position forthe best fuel economy. The overdrivefunction allows automatic upshifts anddownshifts through gears one through six.
Manual (M)
With the gearshift lever in manual (M), youcan change gears up or down as desiredby using buttons on the shift lever. SeeUnderstanding your SelectShiftAutomatic™ transmission later in thissection.
Third (3) (Column Shifter Only)
Transmission operates in third (3) gearonly. Use third (3) gear for improvedtraction on slippery roads.
159
Expedition (TB7) Canada/United States of America, enUSA, Edition date: 03/2016, First Printing
TransmissionE163184 E209112
Page 164 of 500
Automatic Transmission AdaptiveLearning
This feature may increase durability andprovide consistent shift feel over the lifeof your vehicle. A new vehicle ortransmission may have firm shifts, softshifts or both. This operation is considerednormal and will not affect function ordurability of the transmission. Over time,the adaptive learning process will fullyupdate transmission operation.
SelectShift™ AutomaticTransmission (If Equipped)
This feature gives you the ability to changegears up or down as desired.
As long as the engine speed does notexceed the maximum allowable limit youcan downshift. SelectShift automaticallydownshifts at low engine speeds in orderto prevent engine stalls.
Note:Engine damage may occur if youmaintain excessive engine revving withoutshifting.
SelectShift does not automatically upshift,even if the engine is approaching the RPMlimit, unless the accelerator pedal is at fulltravel. Take notice of the shift indicatorlamp, which alerts you when to shift tomake sure you achieve the highest level ofefficiency and fuel economy.
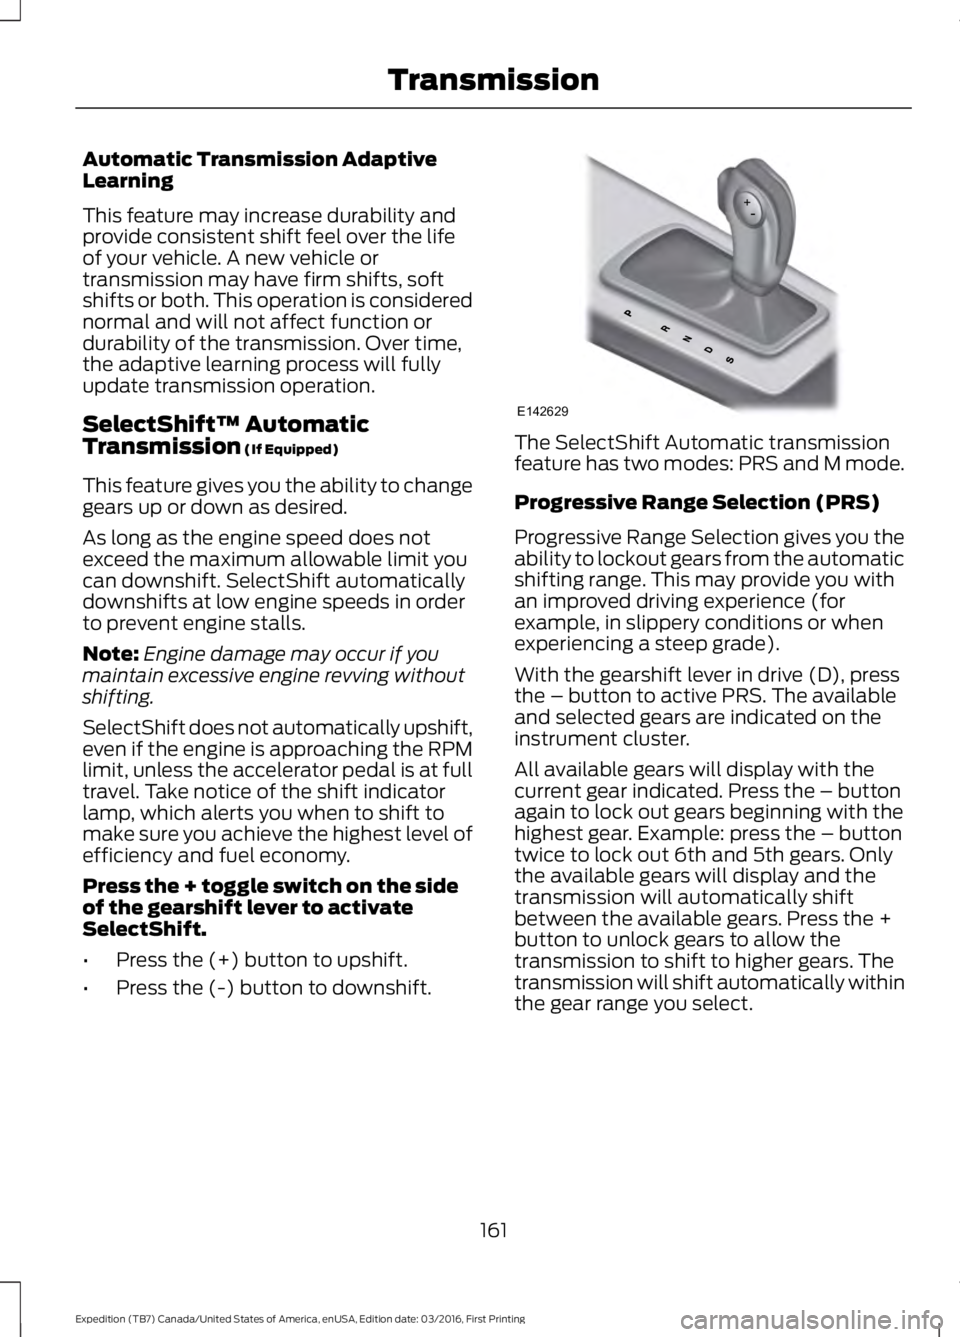
Press the + toggle switch on the sideof the gearshift lever to activateSelectShift.
•Press the (+) button to upshift.
•Press the (-) button to downshift.
The SelectShift Automatic transmissionfeature has two modes: PRS and M mode.
Progressive Range Selection (PRS)
Progressive Range Selection gives you theability to lockout gears from the automaticshifting range. This may provide you withan improved driving experience (forexample, in slippery conditions or whenexperiencing a steep grade).
With the gearshift lever in drive (D), pressthe – button to active PRS. The availableand selected gears are indicated on theinstrument cluster.
All available gears will display with thecurrent gear indicated. Press the – buttonagain to lock out gears beginning with thehighest gear. Example: press the – buttontwice to lock out 6th and 5th gears. Onlythe available gears will display and thetransmission will automatically shiftbetween the available gears. Press the +button to unlock gears to allow thetransmission to shift to higher gears. Thetransmission will shift automatically withinthe gear range you select.
161
Expedition (TB7) Canada/United States of America, enUSA, Edition date: 03/2016, First Printing
TransmissionE142629