2017 FORD EXPEDITION EL lights
[x] Cancel search: lightsPage 194 of 500

System Lights and Messages
The Blind Spot Information and CrossTraffic Alert systems illuminate an amberalert indicator in the outside mirror on theside of your vehicle the approachingvehicle is coming from.
The alert indicator dims when the systemdetects nighttime darkness.
Cross Traffic Alert sounds also sounds anaudible alarm and a message appears inthe information display indicating a vehicleis coming from the right or left. CrossTraffic Alert works with the reverse sensingsystem which sounds its own audiblealarm. See Rear Parking Aid (page 182).
System Sensor Blockage
WARNING
Never use the Blind SpotInformation System as areplacement for using the interiorand exterior mirrors or looking over yourshoulder before changing lanes. The BlindSpot Information System is not areplacement for careful driving.
Note:It is possible to get a blockagewarning with no blockage present; this israre and known as a false blockage warning.A false blocked condition eitherself-corrects or clears after a key cycle.
The system uses radar sensors which arelocated behind the bumper fascia on eachside of your vehicle. Do not allow theseareas to become obstructed by mud, snowor bumper stickers, as this can causedegraded system performance.
If the system detects a degradedperformance condition, a blocked sensorwarning or low visibility warning will appearin the information display and the alertindicator illuminates in the appropriatemirror(s). The information display warningcan be cleared but the alert indicatorremains illuminated.
191
Expedition (TB7) Canada/United States of America, enUSA, Edition date: 03/2016, First Printing
Driving AidsE142442 E205199
Page 210 of 500
ESSENTIAL TOWING CHECKS
Follow these guidelines for safe towing:
•Do not tow a trailer until you drive yourvehicle at least 1000 miles (1600kilometers).
•Consult your local motor vehicle lawsfor towing a trailer.
•See the instructions included withtowing accessories for the properinstallation and adjustmentspecifications.
•Service your vehicle more frequently ifyou tow a trailer. See your scheduledmaintenance information.
•If you use a rental trailer, follow theinstructions the rental agency givesyou.
See Load limits in the Load Carryingchapter for load specification terms foundon the tire label and Safety Compliancelabel and instructions on calculating yourvehicle's load.
Remember to account for the trailertongue weight as part of your vehicle loadwhen calculating the total vehicle weight.
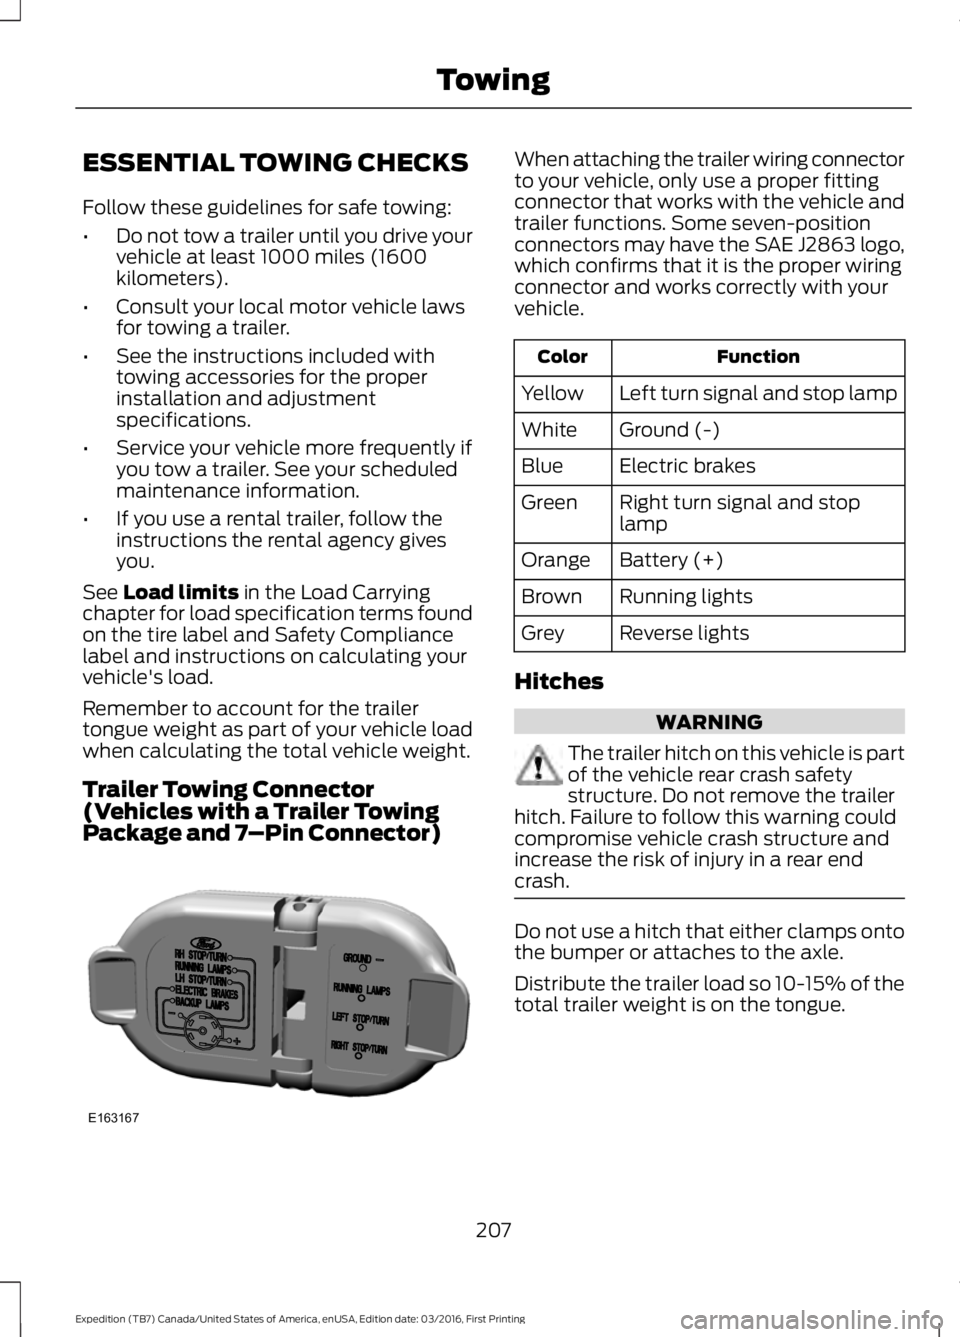
Trailer Towing Connector(Vehicles with a Trailer TowingPackage and 7–Pin Connector)
When attaching the trailer wiring connectorto your vehicle, only use a proper fittingconnector that works with the vehicle andtrailer functions. Some seven-positionconnectors may have the SAE J2863 logo,which confirms that it is the proper wiringconnector and works correctly with yourvehicle.
FunctionColor
Left turn signal and stop lampYellow
Ground (-)White
Electric brakesBlue
Right turn signal and stoplampGreen
Battery (+)Orange
Running lightsBrown
Reverse lightsGrey
Hitches
WARNING
The trailer hitch on this vehicle is partof the vehicle rear crash safetystructure. Do not remove the trailerhitch. Failure to follow this warning couldcompromise vehicle crash structure andincrease the risk of injury in a rear endcrash.
Do not use a hitch that either clamps ontothe bumper or attaches to the axle.
Distribute the trailer load so 10-15% of thetotal trailer weight is on the tongue.
207
Expedition (TB7) Canada/United States of America, enUSA, Edition date: 03/2016, First Printing
TowingE163167
Page 216 of 500
•Your vehicle's brake system and thetrailer brake system workindependently of each other. Changingthe gain setting on the controller doesnot affect the operation of yourvehicle's brakes whether you attach atrailer or not.
•When you switch the engine off, thecontroller output is disabled and thedisplay and module shut down. Thecontroller module and display turn onwhen you switch the ignition on.
•The trailer brake controller is only afactory-installed or dealer-installeditem. Ford is not responsible forwarranty or performance of thecontroller due to misuse or customerinstallation.
Trailer Lamps
WARNING
Never connect any trailer lamp wiringto the vehicle's tail lamp wiring; thismay damage the electrical systemresulting in fire. Contact your authorizeddealer as soon as possible for assistancein proper trailer tow wiring installation.Additional electrical equipment may berequired.
Trailer lamps are required on most towedvehicles. Make sure all running lights, brakelights, turn signals and hazard lights areworking.
Before Towing a Trailer
Practice turning, stopping and backing upto get the feel of your vehicle-trailercombination before starting on a trip.When turning, make wider turns so thetrailer wheels clear curbs and otherobstacles.
When Towing a Trailer
•Do not drive faster than 70 mph (113km/h) during the first 500 miles (800kilometers).
•Do not make full-throttle starts.
•Check your hitch, electrical connectionsand trailer wheel lug nuts thoroughlyafter you have traveled 50 miles (80kilometers).
•When stopped in congested or heavytraffic during hot weather, place thegearshift in position P to aid engine andtransmission cooling and to help A/Cperformance.
•Turn off the speed control with heavyloads or in hilly terrain. The speedcontrol may turn off automaticallywhen you are towing on long, steepgrades.
•Shift to a lower gear when driving downa long or steep hill. Do not apply thebrakes continuously, as they mayoverheat and become less effective.
•If your transmission is equipped with aGrade Assist or Tow/Haul feature, usethis feature when towing. This providesengine braking and helps eliminateexcessive transmission shifting foroptimum fuel economy andtransmission cooling.
•If your vehicle is equipped withAdvanceTrac with RSC, this systemmay turn on during typical corneringmaneuvers with a heavily loaded trailer.This is normal. Turning the corner at aslower speed while towing may reducethis tendency.
•If you are towing a trailer frequently inhot weather, hilly conditions, at thegross combined weight rating (or anycombination of these factors), considerrefilling your rear axle with syntheticgear lubricant (if the axle is not alreadyfilled with it). See Capacities andSpecifications (page 304).
213
Expedition (TB7) Canada/United States of America, enUSA, Edition date: 03/2016, First Printing
Towing
Page 222 of 500

•Avoid using speed control in hillyterrain.
•Do not rest your foot on the brakepedal while driving.
•Avoid carrying unnecessary weight.
•Avoid adding particular accessories toyour vehicle (e.g. bug deflectors,rollbars/light bars, running boards, skiracks).
•Avoid driving with the wheels out ofalignment.
DRIVING THROUGH WATER
WARNING
Do not drive through flowing or deepwater as you may lose control of yourvehicle.
Note:Driving through standing water cancause vehicle damage.
Note:Engine damage can occur if waterenters the air filter.
Before driving through standing water,check the depth. Never drive through waterthat is higher than the bottom of the wheelhubs.
When driving through standing water, drivevery slowly and do not stop your vehicle.Your brake performance and traction maybe limited. After driving through water andas soon as it is safe to do so:
•Lightly press the brake pedal to dry thebrakes and to check that they work.
•Check that the horn works.
•Check that the exterior lights work.
•Turn the steering wheel to check thatthe steering power assist works.
FLOOR MATS (If Equipped)
WARNINGS
Always use floor mats that aredesigned to fit the foot well of yourvehicle. Only use floor mats thatleave the pedal area unobstructed. Onlyuse floor mats that are firmly secured toretention posts so that they cannot slip outof position and interfere with the pedalsor impair safe operation of your vehicle inother ways.
Pedals that cannot move freely cancause loss of vehicle control andincrease the risk of serious personalinjury.
Always make sure that the floormats are properly attached to theretention posts in the carpet that aresupplied with your vehicle. Floor mats mustbe properly secured to both retention poststo make sure mats do not shift out ofposition.
Never place floor mats or any othercovering in the vehicle foot well thatcannot be properly secured toprevent them from moving and interferingwith the pedals or the ability to control thevehicle.
219
Expedition (TB7) Canada/United States of America, enUSA, Edition date: 03/2016, First Printing
Driving HintsE176913
Page 339 of 500
Sending a Text Message
Note:You can only send a text message toone recipient at a time.
1. Select the send option when thedesired selection highlights in the audiodisplay.
2. Select the confirmation option whenthe contact appears.
3. Press the OK button again to confirmwhen the system asks if you want tosend the message. A pre-definedsignature appears on each textmessage.
Note:You can send text messages eitherby choosing a contact from the phonebookand selecting the text option from the audiodisplay or by replying to a received messagein the inbox.
Accessing Your Phone Settings
These are phone-dependent features. Yourphone settings allow you to access andadjust features such as your ring tone andtext message notification, modify yourphonebook, and set up automaticdownload.
1. Press the PHONE button.
2. Scroll until the phone settings optionappears, and then press the OK button.
Scroll to select from the following options:
Description and actionMenu Item
If this option is checked, the system uses the cellular phoneas the master when there is more than one cellular phonepaired to the system. This option can be changed for allcellular phones (not only the active phone) using theBluetooth Devices menu.
Set as master
See the cellular phone name, provider name, cellularphone number, and signal level. When done, press the leftarrow buttons to return to the phone status menu.
Phone status
Select which ringtone sounds during an incoming call (oneof the system's tones or your cellular phone's). If yourphone supports in-band ringing, your phone's ringtonesounds when you choose the cellular phone ringtoneoption.
Set ringtone
1. Press the OK button to select and scroll to hear eachringtone.2. Press the OK button to select a ringtone.
Have the option of hearing an audible tone to notify youwhen a text message arrives. Press the OK button toswitch the audible tone off or on.
Text msg notify
Modify the contents of your phonebook (such as add,delete or download). Press the OK button to select andscroll between the choices in the phonebook preferencestable below.
Phonebook pref.
336
Expedition (TB7) Canada/United States of America, enUSA, Edition date: 03/2016, First Printing
SYNC™ (If Equipped)
Page 400 of 500
Note: The heated steering wheel may remain on after remote starting thevehicle, based on your remote start settings. The heated steering wheel mayalso turn on when you start your vehicle, if it was on when you switched yourvehicle off.
Note: For steering wheels with wood trim, the heating feature will not heat thewheel between the 10 and 2 o'clock positions.
Defrost: A pop up appears on the screen to display the defrost options.C
MAX Defrost: Touch the button to maximize defrosting. Air flows through thewindshield vents, the fan automatically adjusts to the highest speed and thedriver and passenger temperatures are set to HI. You can use this setting todefog or clear a thin covering of ice from the windshield. The heated rear windowalso automatically turns on when you select MAX Defrost.
Defrost: Distributes air through the windshield defroster vents and demistervents.
Heated rear window: Turns the heated rear window on and off. See HeatedWindows and Mirrors (page 120).
AUTO: Touch the button to switch on automatic operation. Select the desiredtemperature using the temperature control. The system adjusts fan speed, airdistribution, air conditioning operation, and selects outside air or recirculatedair to heat or cool the vehicle in order to maintain the desired temperature.
D
Power: Touch the button to switch the system on and off. Switching off theclimate control system prevents outside air from entering the vehicle.E
DUAL: This button lights up when the passenger controls are active. To switchthe off and link the passenger temperature to the driver temperature, touch theDUAL button.
F
Note: the passenger side temperature and the DUAL indication automaticallyturn on when you or your passenger adjust the passenger temperature.
Passenger temperature: Touch up or down to adjust the temperature.G
Fan speed: Touch up or down to increase or decrease the volume of air thatcirculates in your vehicle.H
Note: You cannot adjust the fan speed when the system is set to AUTO or MAXA/C.
Rear: A pop up appears on the screen to display the rear control options.I
Touch the power icon to switch the rear climate control functions off and on.
Touch Rear Climate to allow the rear seat passengers to adjust the rear climatesettings. Touch it again to prevent the rear seat passengers from adjusting thesettings. Rear Control automatically turns off when you use the touchscreento adjust the rear climate settings.
Touch + or – to adjust the temperature.
397
Expedition (TB7) Canada/United States of America, enUSA, Edition date: 03/2016, First Printing
SYNC™ 3 (If Equipped)
Page 408 of 500
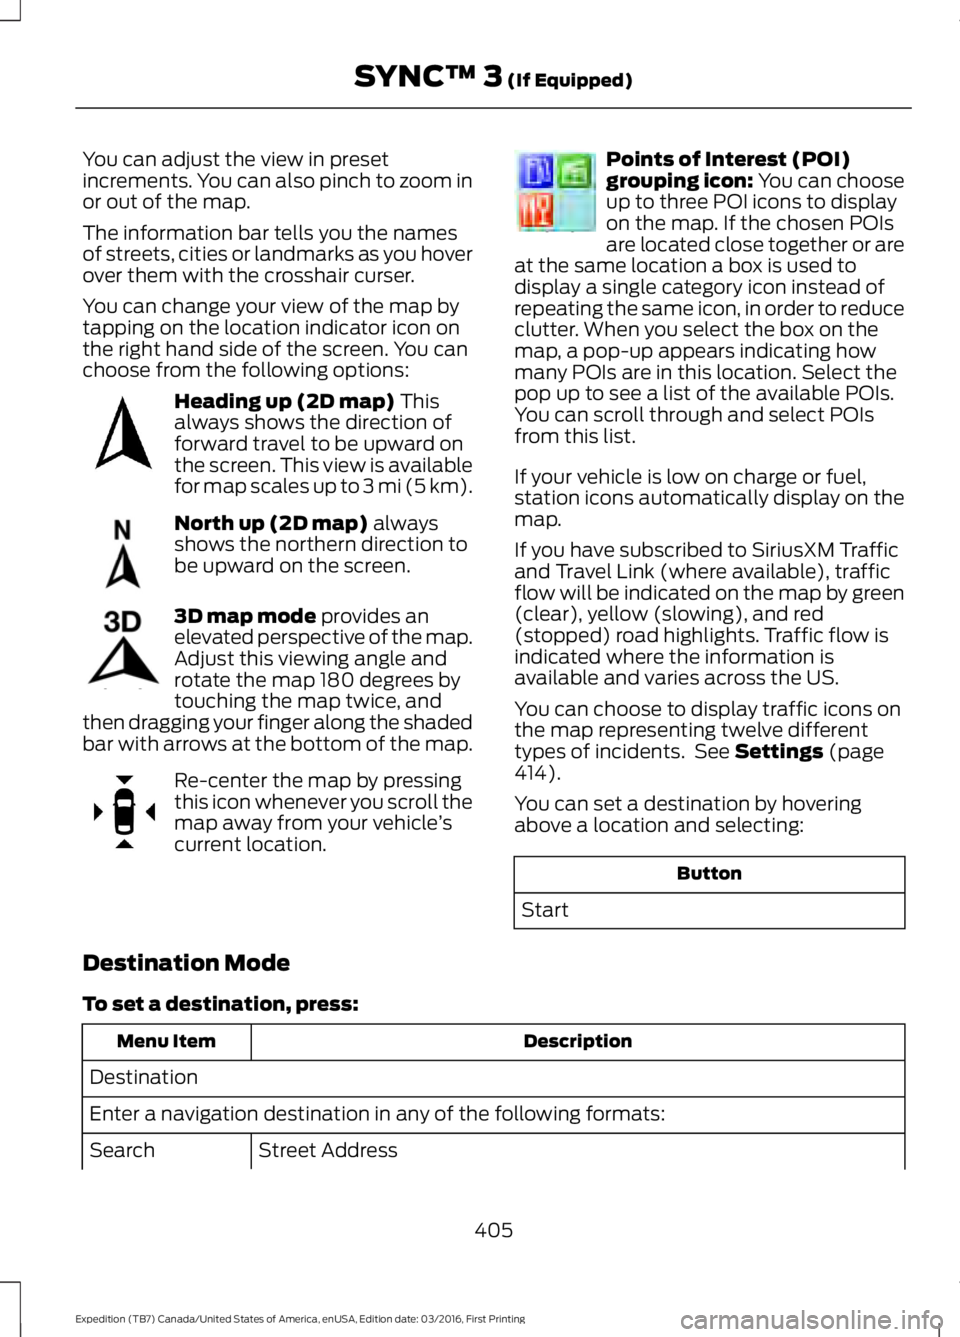
You can adjust the view in presetincrements. You can also pinch to zoom inor out of the map.
The information bar tells you the namesof streets, cities or landmarks as you hoverover them with the crosshair curser.
You can change your view of the map bytapping on the location indicator icon onthe right hand side of the screen. You canchoose from the following options:
Heading up (2D map) Thisalways shows the direction offorward travel to be upward onthe screen. This view is availablefor map scales up to 3 mi (5 km).
North up (2D map) alwaysshows the northern direction tobe upward on the screen.
3D map mode provides anelevated perspective of the map.Adjust this viewing angle androtate the map 180 degrees bytouching the map twice, andthen dragging your finger along the shadedbar with arrows at the bottom of the map.
Re-center the map by pressingthis icon whenever you scroll themap away from your vehicle’scurrent location.
Points of Interest (POI)grouping icon: You can chooseup to three POI icons to displayon the map. If the chosen POIsare located close together or areat the same location a box is used todisplay a single category icon instead ofrepeating the same icon, in order to reduceclutter. When you select the box on themap, a pop-up appears indicating howmany POIs are in this location. Select thepop up to see a list of the available POIs.You can scroll through and select POIsfrom this list.
If your vehicle is low on charge or fuel,station icons automatically display on themap.
If you have subscribed to SiriusXM Trafficand Travel Link (where available), trafficflow will be indicated on the map by green(clear), yellow (slowing), and red(stopped) road highlights. Traffic flow isindicated where the information isavailable and varies across the US.
You can choose to display traffic icons onthe map representing twelve differenttypes of incidents. See Settings (page414).
You can set a destination by hoveringabove a location and selecting:
Button
Start
Destination Mode
To set a destination, press:
DescriptionMenu Item
Destination
Enter a navigation destination in any of the following formats:
Street AddressSearch
405
Expedition (TB7) Canada/United States of America, enUSA, Edition date: 03/2016, First Printing
SYNC™ 3 (If Equipped)E207750 E207749 E207748 E207751 E207754
Page 448 of 500
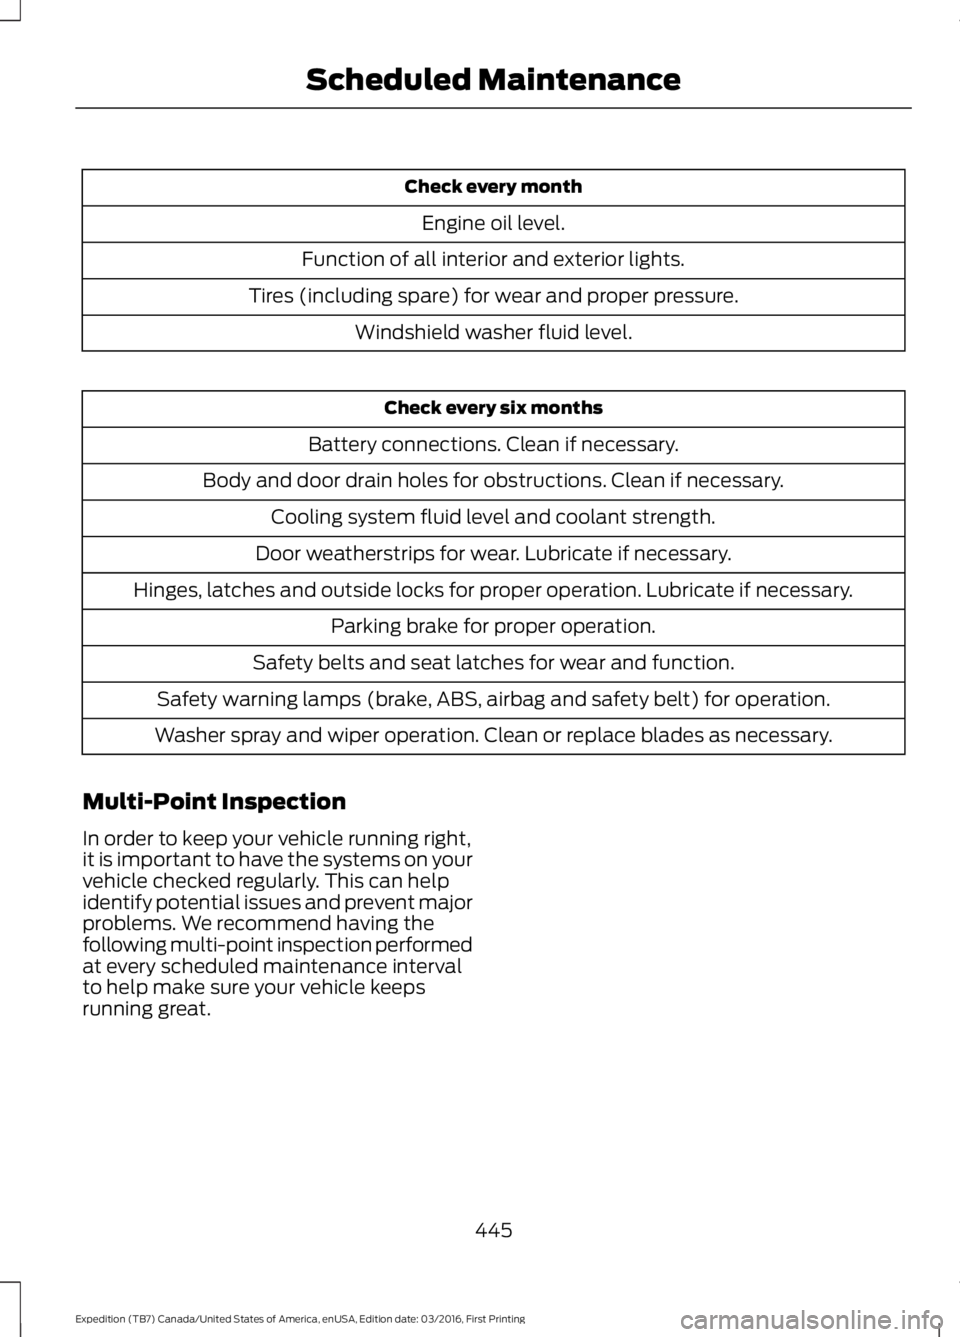
Check every month
Engine oil level.
Function of all interior and exterior lights.
Tires (including spare) for wear and proper pressure.
Windshield washer fluid level.
Check every six months
Battery connections. Clean if necessary.
Body and door drain holes for obstructions. Clean if necessary.
Cooling system fluid level and coolant strength.
Door weatherstrips for wear. Lubricate if necessary.
Hinges, latches and outside locks for proper operation. Lubricate if necessary.
Parking brake for proper operation.
Safety belts and seat latches for wear and function.
Safety warning lamps (brake, ABS, airbag and safety belt) for operation.
Washer spray and wiper operation. Clean or replace blades as necessary.
Multi-Point Inspection
In order to keep your vehicle running right,it is important to have the systems on yourvehicle checked regularly. This can helpidentify potential issues and prevent majorproblems. We recommend having thefollowing multi-point inspection performedat every scheduled maintenance intervalto help make sure your vehicle keepsrunning great.
445
Expedition (TB7) Canada/United States of America, enUSA, Edition date: 03/2016, First Printing
Scheduled Maintenance