2017 FIAT TIPO 5DOORS STATION WAGON ECU
[x] Cancel search: ECUPage 21 of 264
Removing the rear parcel shelf
(TIPO 5DOOR version)
To remove the parcel shelf, proceed as
follows:
open the tailgate and unhook the two
side cords (one on each side) from their
supports;
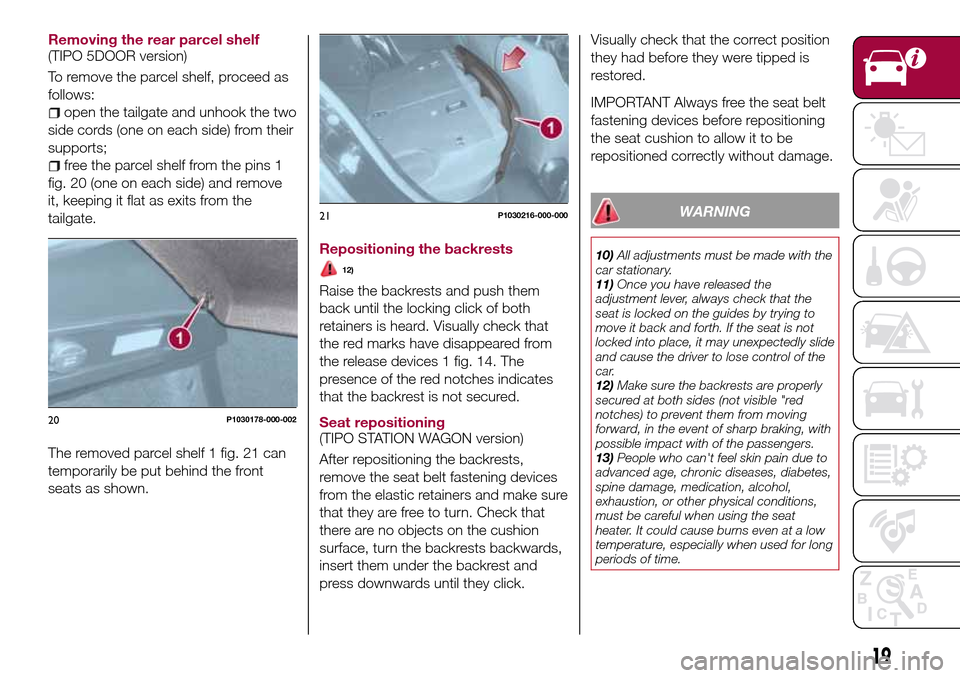
free the parcel shelf from the pins 1
fig. 20 (one on each side) and remove
it, keeping it flat as exits from the
tailgate.
The removed parcel shelf 1 fig. 21 can
temporarily be put behind the front
seats as shown.
Repositioning the backrests
12)
Raise the backrests and push them
back until the locking click of both
retainers is heard. Visually check that
the red marks have disappeared from
the release devices 1 fig. 14. The
presence of the red notches indicates
that the backrest is not secured.
Seat repositioning
(TIPO STATION WAGON version)
After repositioning the backrests,
remove the seat belt fastening devices
from the elastic retainers and make sure
that they are free to turn. Check that
there are no objects on the cushion
surface, turn the backrests backwards,
insert them under the backrest and
press downwards until they click.Visually check that the correct position
they had before they were tipped is
restored.
IMPORTANT Always free the seat belt
fastening devices before repositioning
the seat cushion to allow it to be
repositioned correctly without damage.
WARNING
10)All adjustments must be made with the
car stationary.
11)Once you have released the
adjustment lever, always check that the
seat is locked on the guides by trying to
move it back and forth. If the seat is not
locked into place, it may unexpectedly slide
and cause the driver to lose control of the
car.
12)Make sure the backrests are properly
secured at both sides (not visible "red
notches) to prevent them from moving
forward, in the event of sharp braking, with
possible impact with of the passengers.
13)People who can't feel skin pain due to
advanced age, chronic diseases, diabetes,
spine damage, medication, alcohol,
exhaustion, or other physical conditions,
must be careful when using the seat
heater. It could cause burns even at a low
temperature, especially when used for long
periods of time.
20P1030178-000-002
21P1030216-000-000
19
Page 38 of 264

CLOSING
To close the tailgate, lower it onto the
lock until you hear it click.
IMPORTANT Before closing the tailgate
make sure that you have the keys,
since the tailgate is automatically
locked.
INITIALISATION
IMPORTANT If the battery is
disconnected or the protective fuse
blows, the tailgate opening/closing
mechanism must be reinitialised as
follows:
close all the doors and the tailgate;
press the"FIAT" button on the
remote control;
press thebutton on the remote
control.
TOOL BOX
(where provided)
It consists of a preformed box
fig. 49 (for TIPO 5DOOR versions) or
fig. 50 (for TIPO STATION WAGON
versions), which is located in the
luggage compartment and can be used
to store objects, making it possible to
have a flat load platform.
SECURING YOUR LOAD
TIPO 5DOOR version
There are four rings at the corners of
the luggage compartment (two at the
front 1 and two at the rear 2 fig. 51 ) for
attaching cables for firmly securing the
carried load.
TIPO STATION WAGON version
There are four rings in the luggage
compartment (two at the front 1 and
two at the rear 2 fig. 52 ) for anchoring
the carried load.
48P2000093-000-000
4904206J005EM
50P2000123
51P1030204-000-000
36
KNOWING YOUR CAR
Page 39 of 264
LUGGAGE COVERING
CURTAIN
TIPO STATION WAGON version
30)
Complete closure
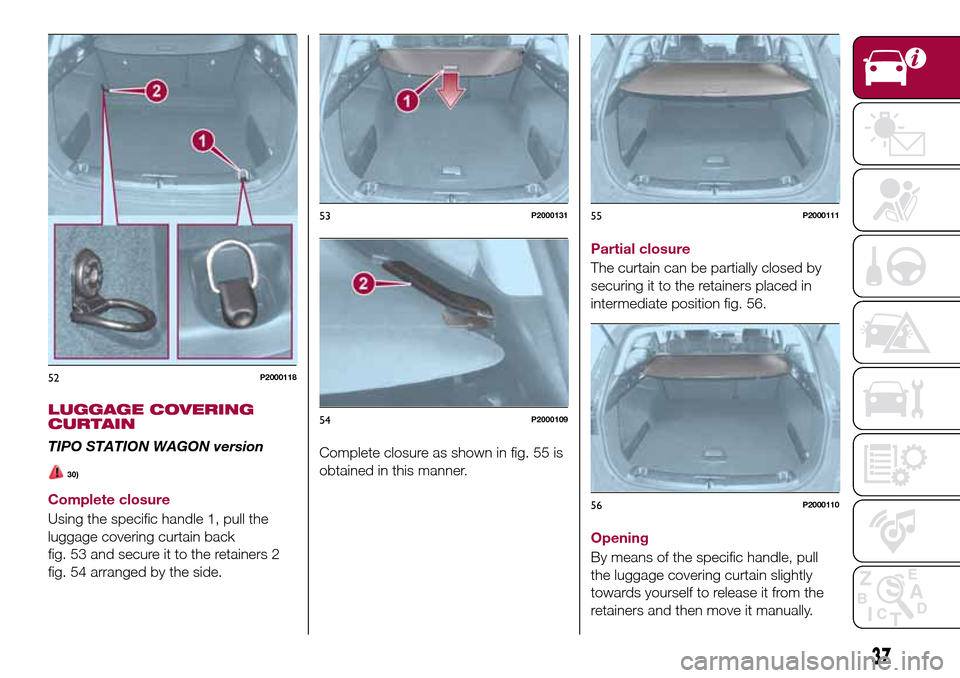
Using the specific handle 1, pull the
luggage covering curtain back
fig. 53 and secure it to the retainers 2
fig. 54 arranged by the side.Complete closure as shown in fig. 55 is
obtained in this manner.Partial closure
The curtain can be partially closed by
securing it to the retainers placed in
intermediate position fig. 56.
Opening
By means of the specific handle, pull
the luggage covering curtain slightly
towards yourself to release it from the
retainers and then move it manually.
52P2000118
53P2000131
54P2000109
55P2000111
56P2000110
37
Page 46 of 264
SYSTEM FUNCTIONAL DIAGRAM
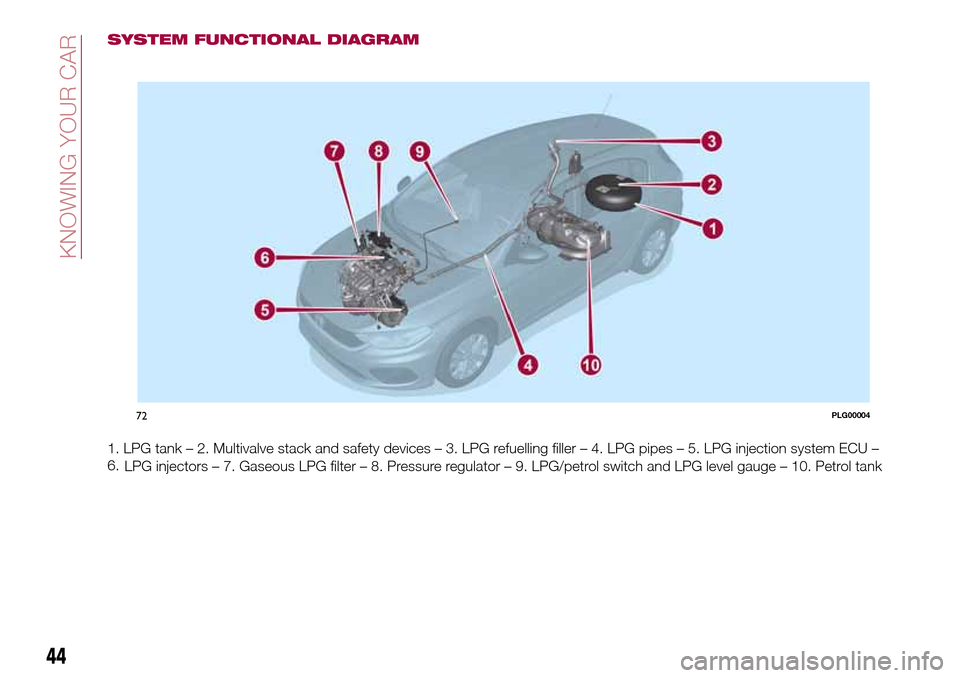
1. LPG tank – 2. Multivalve stack and safety devices – 3. LPG refuelling filler – 4. LPG pipes – 5. LPG injection system ECU –
6.
LPG injectors – 7. Gaseous LPG filter – 8. Pressure regulator – 9. LPG/petrol switch and LPG level gauge – 10. Petrol tank
72PLG00004
44
KNOWING YOUR CAR
Page 58 of 264
display will be in km or miles according
to the unit of measurement set.
When the following scheduled servicing
is approaching ("coupon"), the word
"Service" will be displayed, followed by
the number of kilometres/miles or days
left, when the ignition device is turned
to MAR. Go to a Fiat Dealership, where
the "Scheduled Servicing Plan"
operations will be performed and the
message will be reset.
Driver Assist
This menu item allows you to view and
change the Adaptive Cruise Control
(ACC) settings on the instrument panel
display.
Audio
(function available in versions and
markets where present)
This Menu item allows some
information displayed on the
Uconnect™system to be repeated on
the instrument panel display (for further
information see the dedicated chapter).
Phone
(function available in versions and
markets where present)
This Menu item allows some
information displayed on the
Uconnect™system to be repeated on
the instrument panel display (for further
information see the dedicated chapter).The information displayed includes the
mobile pairing condition (mobile paired
or not paired), active/incoming/on hold
calls and the management of double
calls (first incoming, second on hold,
etc.).
In the phone menu, you can also select
3 sub-menus “SMS reader”, “recent
calls” and “favourite numbers” (available
with theUconnect™7'' HDsystem),
which can be selected with the arrows
or. This menu can also be used
to select and manage the last 10 calls
or the last 10 SMS using the directional
buttons on the steering wheel.
Navigation
(function available in versions and
markets where present)
This Menu item allows some
information displayed on the
Uconnect™ 5"o7" HDsystem to be
shown on the instrument panel display
(for further information see the
dedicated chapter).
Alerts
This menu item displays information/
failure messages stored by the system.
Vehicle Settings
This menu item allows you to change
the settings for:
Display;
Units;
Clock & Date;
Security;
Safety & Assistance;
Lights;
Doors & Locks.
Display
By selecting item "Display" you can
access the following settings:
Display Settings (changing
instrument panel display settings): this
menu item makes it possible to change
the displaying of the information, for
example the Compass (where present),
Outside temperature, Date (day/month),
Time (hours/minutes), Audio information
(where present). Selecting “Reset of the
default settings” makes it possible to
reset and restore the default settings;
Language: allows you to select the
language for showing the
information/warnings;
See phone: used to activate/
deactivate the display of pop-ups on
the instrument panel when there are
incoming calls, outgoing calls, on hold
calls, audio conference and incoming
SMS (available in versions and markets
where present);
See navigation: allows you to display
the information about the Navigation
mode on the instrument panel (available
in versions and markets where present);
56
KNOWING THE INSTRUMENT PANEL
Page 59 of 264

Automatic Trip B reset: allows you to
set the reset options for Trip B;
Display brightness: this function is
used to set the brightness level
(8 levels) for the display and all the other
backlit components. The display
brightness can be adjusted in all
environmental conditions, whereas all
the other components (e.g. climate
control, radio, dashboard, buttons, etc.)
can only be adjusted at night or when
the dipped headlights are on. To set the
brightness, briefly press theOKbutton,
the display will show the previously set
brightness “level”; then press the
or
button to adjust. To return to the
previous screen, briefly press the
button.
Units
Selecting the item "Units" you can
choose the unit of measurement to be
used for displaying the various values.
The possible options are:
Imperial
Metric
Customised
Clock & Date
Select item "Clock & Date" to adjust the
clock.
The possible options are:
Set time: hours/minutes adjustment;
Time format: adjustment of the time
format "12h" (12-hour) or "24h"
(24-hour);
Set date: adjustment of
day/month/year.
Security
Select item "Security" to make the
following adjustments:
Passenger AIR BAG: passenger side
airbag activation/deactivation “Off” (to
deactivate) or “On” (to activate).
Passenger's protection not active:
the
LED comes on constantly in the
instrument panel dashboard;
Speed beep: setting of the vehicle
speed limit (km/h or mph). When this is
exceeded, the driver is notified through
an acoustic and visual signal;
Seat belt buzzer: this function can be
only displayed after a Fiat Dealership
has deactivated the SBR system (see
the "SBR system" paragraph in the
"Security" chapter).
Safety & Assistance
Select item "Safety & Assistance" to
make the following adjustments:
Rain sensor: activation/deactivation
of the automatic switching on of the
wipers in the case of rain;
Buzzer volume: selection of the
volume of the buzzer that accompanies
the display of the failure/warning;
Brake Control: selection of the
intervention mode for the Full Brake
Control system;
“Brake C.Sensitivity": selection of the
"readiness" of the Full Brake Control
system to intervene, on the basis of the
distance from the obstacle;
Park Assist: selection of the type of
warning provided by the Park Assist
system;
Park Assist Vol.: selection of the
volume of the acoustic warnings
provided by the Park Assist system.
Lights
Select item "Lights" to make the
following adjustments:
Courtesy lights: interior light
brightness selection;
Daytime running lights:
activation/deactivation of the daytime
running lights;
Cornering lights: activation/
deactivation of cornering lights (where
provided);
Headlamp sensor: adjustment of
headlight activation sensitivity;
Follow me home: setting of the
headlight deactivation delay after
switching off the engine.
57
Page 91 of 264
comfortably. Depending on the
characteristics of the child restraint
systems used, you are advised to keep
children in rearward facing child
restraint systems for as long as possible
(at least until 3-4 years old), since this is
the most protected position in the event
of an impact.
It is recommended to always choose
the restraint system most suitable for
the child; for this reason always refer to
the Owner Handbook provided with the
child restraint system, to be sure that it
is of the right type for the children it is
intended for.
In Europe the characteristics of child
restraint systems are ruled by the
regulation ECE-R44, dividing them into
five weight groups:
Group Weight groups
Group 0up to 10 kg in
weight
Group 0+up to 13 kg in
weight
Group 1 9 - 18 kg
Group 2 15 - 25 kg
Group 3 22 - 36 kg
All restraint devices must bear the
certification data, together with the
control mark, on a label solidly fixed to
the child restraint system which must
never be removed.
Lineaccessori MOPAR
®includes child
restraint systems for each weight
group. These devices are
recommended having been specifically
designed for Fiat vehicles.
FITTING A CHILD
RESTRAINT SYSTEM
WITH SEAT BELTS
The Universal child restraint systems
installed with the seat belts only are
type-approved on the basis of the ECE
R44 standard and are divided into
various weight groups.
83) 84) 85) 86)
IMPORTANT The figures are indicative
and provided for assembly purposes
only. Fit the child restraint system
according to the instructions, which
must be included.
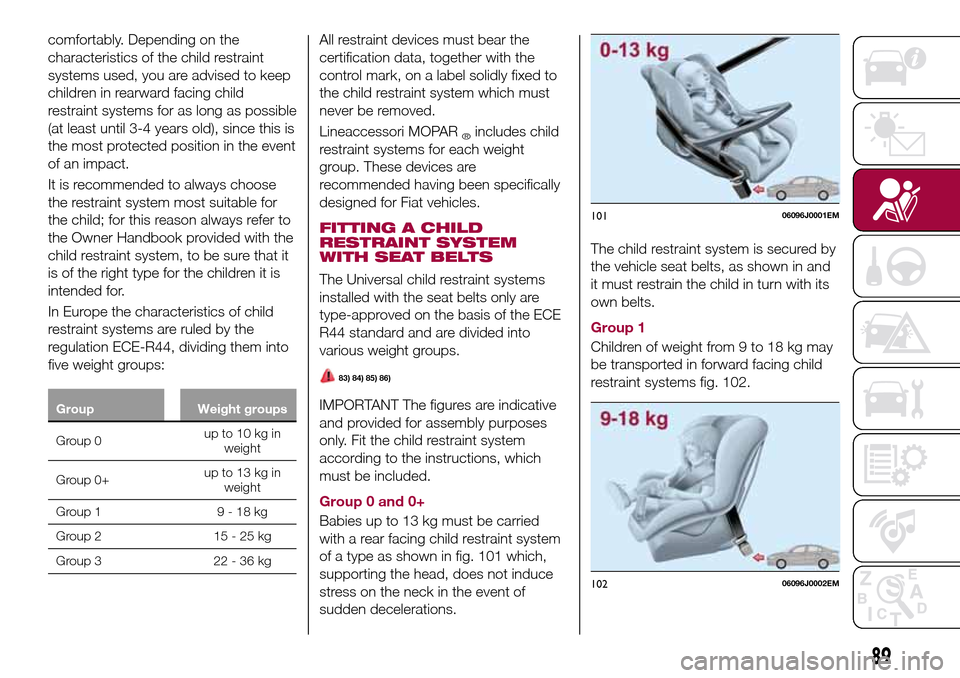
Group 0 and 0+
Babies up to 13 kg must be carried
with a rear facing child restraint system
of a type as shown in fig. 101 which,
supporting the head, does not induce
stress on the neck in the event of
sudden decelerations.The child restraint system is secured by
the vehicle seat belts, as shown in and
it must restrain the child in turn with its
own belts.
Group 1
Children of weight from 9 to 18 kg may
be transported in forward facing child
restraint systems fig. 102.
10106096J0001EM
10206096J0002EM
89
Page 102 of 264
Main recommendations to carry
children safely
Install the child restraint systems on
the rear seat, which is the most
protected position in the event of an
impact.
Keep children in rearward facing child
restraint systems for as long as
possible, until 3–4 years old if possible.
If the passenger's front airbag is
deactivated always check the
dedicated warning light on the trim
located on the dashboard to make sure
that it has actually been deactivated.
Carefully follow the instructions
supplied with the child restraint system.
Keep the instructions in the vehicle
along with the other documents and
this handbook. Do not use
second-hand child restraint systems
without instructions.
Only one child is to be strapped into
each restraint system; never carry two
children using one child restraint
system.
Always check that the seat belts do
not rest on the child’s neck.
Always check that the seat belt is
well fastened by pulling on it.
While travelling, do not let the child
sit incorrectly or unfasten the belts.
Never allow a child to put the belt's
diagonal section under an arm or
behind their back.
Never carry children on your lap,
even newborns. No one can hold a
child in the case of an accident.
If the car has been involved in a road
accident, replace the child restraint
system with a new one. In addition, and
depending on the type of child restraint
system installed, replace the isofix
anchorages or the seat belt with which
the child restraint system was
connected.
Any child restraint systems fitted
facing forward on an outside rear seat,
independently of its weight group, must
be fitted after removing the headrest
relative to the seat where it is to be
fitted. This does not apply to child
restraint systems that only consist of a
cushion (without backrest): these child
restraint systems must be installed
when the relative headrest is fitted.
WARNING
79)SEVERE DANGER When a front
passenger airbag is fitted, do not install
rearward facing child restraint systems on
the front passenger seat. Deployment of
the airbag in an accident could cause fatal
injuries to the child regardless of the
severity of the collision. It is advisable to
always carry children in a child restraint
system on the rear seat, which is the most
protected position in the event of a
collision.80)On the sun visor there is a label with
suitable symbols reminding the user that it
is compulsory to deactivate the airbag if a
rearward facing child restraint system is
fitted. Always comply with the instructions
on the passenger side sun visor (see the
"Supplementary Restraint System (SRS) -
Airbag" paragraph).
81)Should it be necessary to carry a child
on the passenger side front seat in a rear
facing child restraint system, the passenger
side front airbag and side bag must be
deactivated through the Connect system
main menu (see the "Supplementary
Restraint System (SRS) - Airbag"
paragraph), verifying deactivation by
checking whether the
LED has
illuminated on the dashboard. Move the
passenger's seat as far back as possible to
avoid contact between the child seat and
the dashboard.
82)Do not move the front or rear seat if a
child is seated on it or on the dedicated
child restraint system
83)Incorrect fitting of the child restraint
system may result in an inefficient
protection system. In the event of an
accident the child restraint system may
become loose and the child may be
injured, even fatally. When fitting a restraint
system for newborns or children, strictly
comply with the instructions provided by
the Manufacturer.
84)When the child restraint system is not
used, secure it with the seat belt or with
the ISOFIX anchorages, or remove it from
the vehicle. Do not leave it unsecured
inside the passenger compartment. In this
way, in the case of sudden braking or an
accident, it will not cause injuries to the
occupants.
100
SAFETY