2017 FIAT TIPO 5DOORS STATION WAGON key
[x] Cancel search: keyPage 25 of 264

Heated
Pressing the
button (heated rear
window) on the central dashboard
panel activates the demisting/defrosting
of the external rear view mirrors.
WARNING
18)As the driver's door mirror is curved, it
may slightly alter the perception of
distance.
EXTERNAL LIGHTS
The left-hand stalk 1 fig. 30 operates
most of the external lights. The exterior
lights turn on also with the ignition key
in the MAR position. The instrument
panel and the various dashboard
controls will come on with the external
lights.
DAYTIME RUNNING
LIGHTS (DRL)
"Daytime Running Lights"
19) 20)
With the key in MAR position and the
ring nut turned to the
position, the
daytime running lights and the rear side
lights switch on automatically; the other
lights and the internal lighting remain
off. If the daytime running lights are
deactivated (for versions/markets whereit is provided), no light comes on when
the ring nut is turned to
.
DIPPED HEADLIGHTS
With the ignition key turned to MAR,
turn the ring nut 1 fig. 30 to
.Ifthe
dipped beam headlights are activated,
the daytime running lights are switched
off and the dipped beam headlights,
rear side lights and number plate lights
are switched on. The
warning light
switches on in the instrument panel.
PARKING LIGHTS
These lights can be turned on with
ignition device in STOP position or with
the key removed, by moving the left
stalk ring nut first to position
and
then to position
.
The
warning light switches on in
the instrument panel.
Repeat the same operation to switch
them off.
AUTO FUNCTION(Dusk sensor)
(where provided)
This is an infrared LED sensor that
works in conjunction with the rain
sensor and is located on the
windscreen. It is able to detect
variations in outside lighting based on
the light sensitivity set in the display
Menu or theUconnect™ 5"or7" HD
system (where provided).
3004126J0001EM
23
Page 28 of 264

INTERIOR LIGHTS
FRONT CEILING LIGHT
Switch 1 fig. 35 is used to switch on/off
the ceiling light bulbs.
Switch 1 positions:
central position: lights 2 and 5 switch
on/off when the doors are
opened/closed;
pressed to the left (OFF): lights 2 and
5 are always switched off;
pressed to the right (): lights
2 and 5 are always switched on.
The lights switch on/off gradually.
Switch 3 switches on/off light 2.
Switch 4 switches on/off light 5.
IMPORTANT Before getting out of the
vehicle, make sure that the roof light
bulbs are off; this will prevent thebattery from being drained once the
doors are closed. In any case, if a light
is left on by mistake, the ceiling light
switches off automatically about
15 minutes after the engine has been
switched off.
Ceiling light timing
On certain versions, to facilitate getting
in/out of the vehicle at night or in
poorly-lit areas, two timed modes have
been provided.
Timing while getting into the car
The ceiling lights switch on according to
the following modes:
for a few seconds when the doors
are unlocked;
for about 3 minutes when one of the
doors is opened;
for a few seconds when the doors
are locked.
Timing is interrupted when the ignition
device is turned to MAR.
Timing while getting out of the car
The roof lights come on when the key is
removed from the ignition within
2 minutes of switching off the engine,
on opening and closing a door with the
removed key.
The timing stops automatically when
the doors are locked.
WINDSCREEN /
REAR WINDOW
WIPERS
The right stalk controls screen
wiper/washer operation.
Operation is only possible with the
ignition device at MAR.
WINDSCREEN WIPER /
WASHER
Operation
21)
5) 6)
Ring 1 fig. 36 can be set to the
following positions:
windscreen wiper off
slow intermittent operation
fast intermittent operation
LOWslow continuous operation
HIGHfast continuous operation
MIST function3504136J0001EM
26
KNOWING YOUR CAR
Page 29 of 264

Move the stalk upwards (unstable
position) to activate the MIST
function: operation is limited to the
time for which the stalk is held in this
position. When released, the stalk will
return to its default position and the
windscreen wiper will be stopped.
“Smart washing” function
Pull the stalk towards the steering
wheel (unstable position) to operate the
windscreen washer.
When the stalk is held pulled for longer
than half a second, the windscreen
wiper is moved with active control.
When the driver releases the stalk, the
windscreen wiper makes three strokes.
Afterwards, if the control is in position
, the washing cycle is concluded by
one last stroke after a 6 second pause.If the position isLOWorHIGH, the
smart washing function is not carried
out.
“Service Position” function
This function makes it possible to
replace the wipers or protect them in
conditions of ice and/or snow.
It can only be activated after stopping
the engine.
The "Service Position" function can be
explicitly requested within two minutes
of stopping the engine, when the
wipers have correctly returned to the
parking position.
The function can be activated by
turning the ring nut to position
and
moving the stalk upwards, to the MIST
position, more than three times. The
activations are used to position the
wipers as preferred. The function is
deactivated when the vehicle is turned
on, with a wiping request or when the
vehicle is moving (speed above
5 Km/h).
IMPORTANT Make sure, when starting
the engine, that the windscreen is free
of snow or ice before turning the
ignition key.RAIN SENSOR
(where provided)
7) 8)
This is a device located behind the
interior rear view mirrorfig. 37, in
contact with the windscreen and can
measure the amount of rain and,
consequently, manage the automatic
wiping mode of the windscreen in
accordance with the amount of water
on the screen (see the “Automatic
Wiping” paragraph).
REAR WINDOW WIPER /
WASHER
Ring nut 2, shown in fig. 38 can be set
to the following positions:
rear window wiper stopped
intermittent operation
continuous operation, without
pausing between two strokes.
36P2000061-000-000
3704146J0003EM
27
Page 30 of 264

The rear window wiper can be activated
in the following ways:
intermittent with a 2-second pause
between two strokes, when ring nut 2 is
in position
and the windscreen
wiper is not in operation;
synchronous (at half the windscreen
wiper frequency), when ring nut 2 is in
position
and the windscreen
wiper is in operation or when ring nut
2 is in position
, reverse gear is
engaged and the windscreen wiper is in
operation;
continuous when ring nut 2 is in
position
.
Push the stalk towards the dashboard
(rocking position) to activate the rear
window washer jet. Keep pushing the
lever to automatically activate both the
rear window washer jet and the rear
window wiper with a single movement.
Releasing the stalk will activate threestrokes, as described for the
windscreen wiper. If the position is
(rear window wiper stopped), after a
6 second pause, the washing cycle is
completed by a single stroke. The
smart wash cycle will not be performed
if the position is
.
WARNING
21)If the window needs to be cleaned,
make sure the device is deactivated or the
key is on STOP.
IMPORTANT
5)Never use the windscreen wipers to
remove layers of snow or ice from the
windscreen. In such conditions, the
windscreen wiper may be subjected to
excessive stress and the motor cut-out
switch, which prevents operation for a few
seconds, may intervene. If operation is not
subsequently restored, even after restarting
the engine, contact a Fiat Dealership.
6)Do not operate the windscreen wiper
with the blades lifted from the windscreen.
7)Do not activate the rain sensor when
washing the car in an automatic car wash.
8)Make sure the device is switched off if
there is ice on the windscreen.
38P2000062-000-000
28
KNOWING YOUR CAR
Page 35 of 264
ELECTRIC WINDOWS
22)
Electric windows operate with the
ignition device at MAR and for about
3 minutes after the ignition device
switches to STOP (or key removed).
When one of the front doors is opened
this operation is disabled.
Driver side front door controls
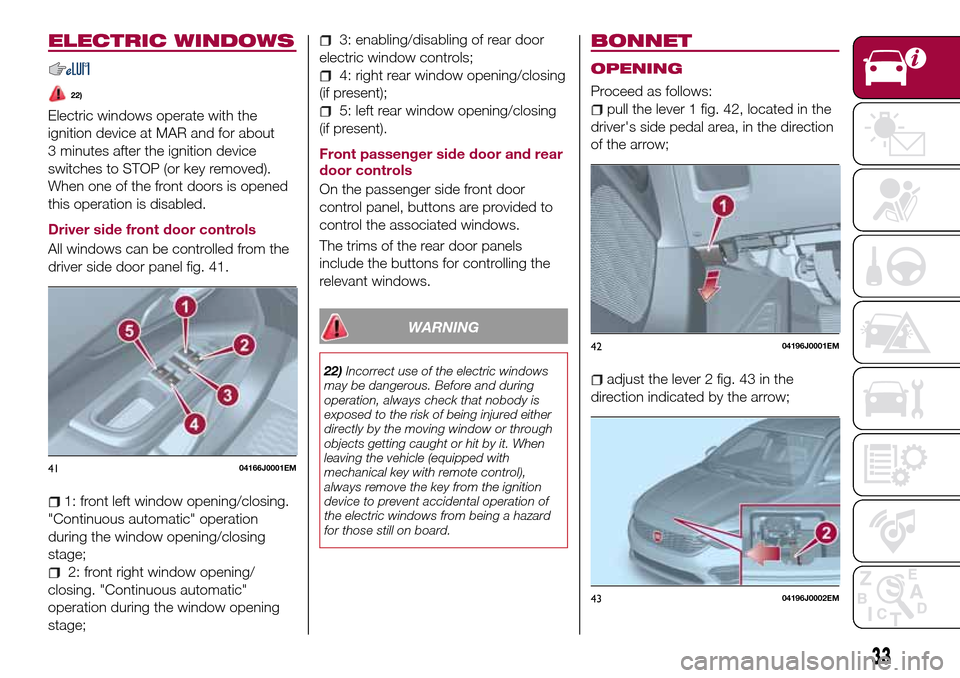
All windows can be controlled from the
driver side door panel fig. 41.
1: front left window opening/closing.
"Continuous automatic" operation
during the window opening/closing
stage;
2: front right window opening/
closing. "Continuous automatic"
operation during the window opening
stage;
3: enabling/disabling of rear door
electric window controls;
4: right rear window opening/closing
(if present);
5: left rear window opening/closing
(if present).
Front passenger side door and rear
door controls
On the passenger side front door
control panel, buttons are provided to
control the associated windows.
The trims of the rear door panels
include the buttons for controlling the
relevant windows.
WARNING
22)Incorrect use of the electric windows
may be dangerous. Before and during
operation, always check that nobody is
exposed to the risk of being injured either
directly by the moving window or through
objects getting caught or hit by it. When
leaving the vehicle (equipped with
mechanical key with remote control),
always remove the key from the ignition
device to prevent accidental operation of
the electric windows from being a hazard
for those still on board.
BONNET
OPENING
Proceed as follows:
pull the lever 1 fig. 42, located in the
driver's side pedal area, in the direction
of the arrow;
adjust the lever 2 fig. 43 in the
direction indicated by the arrow;
4104166J0001EM
4204196J0001EM
4304196J0002EM
33
Page 36 of 264
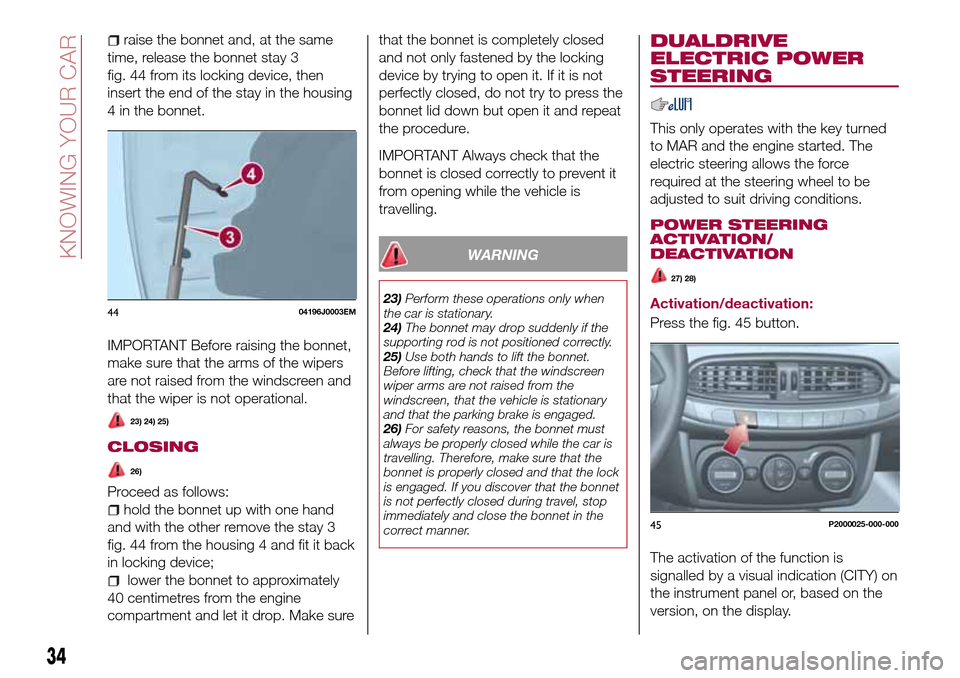
raise the bonnet and, at the same
time, release the bonnet stay 3
fig. 44 from its locking device, then
insert the end of the stay in the housing
4 in the bonnet.
IMPORTANT Before raising the bonnet,
make sure that the arms of the wipers
are not raised from the windscreen and
that the wiper is not operational.
23) 24) 25)
CLOSING
26)
Proceed as follows:
hold the bonnet up with one hand
and with the other remove the stay 3
fig. 44 from the housing 4 and fit it back
in locking device;
lower the bonnet to approximately
40 centimetres from the engine
compartment and let it drop. Make surethat the bonnet is completely closed
and not only fastened by the locking
device by trying to open it. If it is not
perfectly closed, do not try to press the
bonnet lid down but open it and repeat
the procedure.
IMPORTANT Always check that the
bonnet is closed correctly to prevent it
from opening while the vehicle is
travelling.
WARNING
23)Perform these operations only when
the car is stationary.
24)The bonnet may drop suddenly if the
supporting rod is not positioned correctly.
25)Use both hands to lift the bonnet.
Before lifting, check that the windscreen
wiper arms are not raised from the
windscreen, that the vehicle is stationary
and that the parking brake is engaged.
26)For safety reasons, the bonnet must
always be properly closed while the car is
travelling. Therefore, make sure that the
bonnet is properly closed and that the lock
is engaged. If you discover that the bonnet
is not perfectly closed during travel, stop
immediately and close the bonnet in the
correct manner.
DUALDRIVE
ELECTRIC POWER
STEERING
This only operates with the key turned
to MAR and the engine started. The
electric steering allows the force
required at the steering wheel to be
adjusted to suit driving conditions.
POWER STEERING
ACTIVATION/
DEACTIVATION
27) 28)
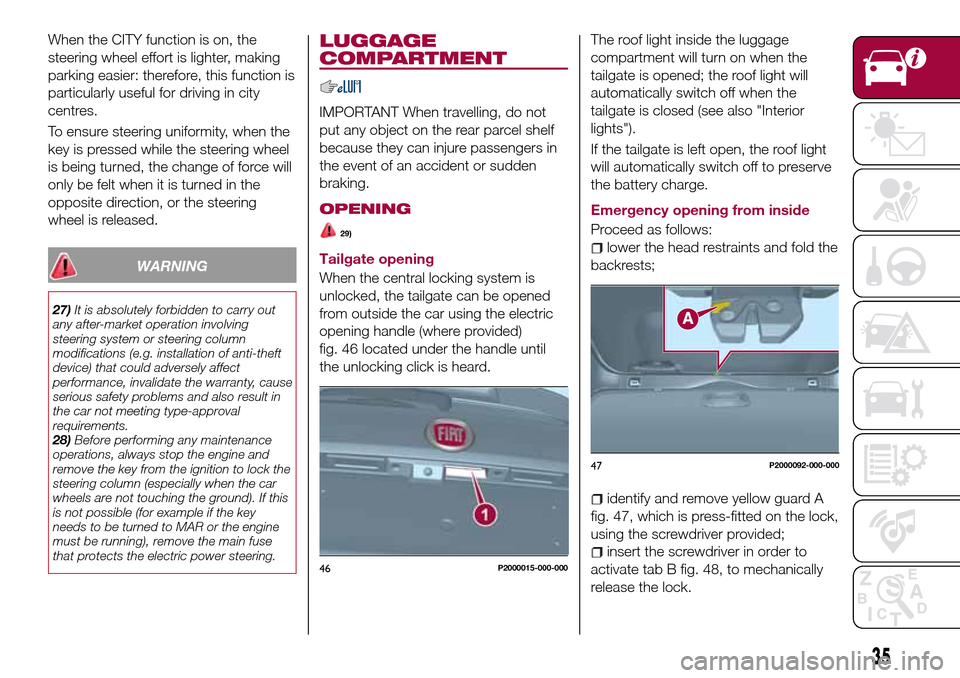
Activation/deactivation:
Press the fig. 45 button.
The activation of the function is
signalled by a visual indication (CITY) on
the instrument panel or, based on the
version, on the display.4404196J0003EM
45P2000025-000-000
34
KNOWING YOUR CAR
Page 37 of 264
When the CITY function is on, the
steering wheel effort is lighter, making
parking easier: therefore, this function is
particularly useful for driving in city
centres.
To ensure steering uniformity, when the
key is pressed while the steering wheel
is being turned, the change of force will
only be felt when it is turned in the
opposite direction, or the steering
wheel is released.
WARNING
27)It is absolutely forbidden to carry out
any after-market operation involving
steering system or steering column
modifications (e.g. installation of anti-theft
device) that could adversely affect
performance, invalidate the warranty, cause
serious safety problems and also result in
the car not meeting type-approval
requirements.
28)Before performing any maintenance
operations, always stop the engine and
remove the key from the ignition to lock the
steering column (especially when the car
wheels are not touching the ground). If this
is not possible (for example if the key
needs to be turned to MAR or the engine
must be running), remove the main fuse
that protects the electric power steering.
LUGGAGE
COMPARTMENT
IMPORTANT When travelling, do not
put any object on the rear parcel shelf
because they can injure passengers in
the event of an accident or sudden
braking.
OPENING
29)
Tailgate opening
When the central locking system is
unlocked, the tailgate can be opened
from outside the car using the electric
opening handle (where provided)
fig. 46 located under the handle until
the unlocking click is heard.The roof light inside the luggage
compartment will turn on when the
tailgate is opened; the roof light will
automatically switch off when the
tailgate is closed (see also "Interior
lights").
If the tailgate is left open, the roof light
will automatically switch off to preserve
the battery charge.
Emergency opening from inside
Proceed as follows:lower the head restraints and fold the
backrests;
identify and remove yellow guard A
fig. 47, which is press-fitted on the lock,
using the screwdriver provided;
insert the screwdriver in order to
activate tab B fig. 48, to mechanically
release the lock.46P2000015-000-000
47P2000092-000-000
35
Page 38 of 264

CLOSING
To close the tailgate, lower it onto the
lock until you hear it click.
IMPORTANT Before closing the tailgate
make sure that you have the keys,
since the tailgate is automatically
locked.
INITIALISATION
IMPORTANT If the battery is
disconnected or the protective fuse
blows, the tailgate opening/closing
mechanism must be reinitialised as
follows:
close all the doors and the tailgate;
press the"FIAT" button on the
remote control;
press thebutton on the remote
control.
TOOL BOX
(where provided)
It consists of a preformed box
fig. 49 (for TIPO 5DOOR versions) or
fig. 50 (for TIPO STATION WAGON
versions), which is located in the
luggage compartment and can be used
to store objects, making it possible to
have a flat load platform.
SECURING YOUR LOAD
TIPO 5DOOR version
There are four rings at the corners of
the luggage compartment (two at the
front 1 and two at the rear 2 fig. 51 ) for
attaching cables for firmly securing the
carried load.
TIPO STATION WAGON version
There are four rings in the luggage
compartment (two at the front 1 and
two at the rear 2 fig. 52 ) for anchoring
the carried load.
48P2000093-000-000
4904206J005EM
50P2000123
51P1030204-000-000
36
KNOWING YOUR CAR