2017 FIAT TIPO 4DOORS Central
[x] Cancel search: CentralPage 10 of 240

INSTRUMENT PANEL
1. Adjustable side air diffusers 2. Left stalk: direction indicators, main beam headlights, flashings 3. Instrument panel
4. Steering wheel controls 5. Right stalk: windscreen wiper / windscreen washer, setting of the rain sensor sensitivity level
6.Uconnect™7. Control buttons 8. Passenger front airbag (where provided) 9. Adjustable central air diffusers
10. Glove compartment 11. Climate controls 12. Buttons on the central console: seat heating, USB port + AUX plug
panel, socket/cigarette lighter 13. Ignition device 14. Driver front airbag 15. Steering wheel controls 16. Control panel:
front fog lights (where present), rear fog lights, headlight alignment adjustment, iTPMS reset, ESC OFF (where present).
1P03036J001
8
KNOWING YOUR CAR
Page 11 of 240

Right hand drive versions
1. Adjustable side air diffusers 2. Right stalk: windscreen wiper/windscreen washer, setting of the rain sensor sensitivity
level 3. Instrument panel 4. Steering wheel controls 5. Left stalk: direction indicators, main beam headlights, flashings
6.Uconnect™7. Control buttons 8. Passenger front airbag (where provided) 9. Adjustable central air
diffusers 10. Glove compartment 11. Climate controls 12. Buttons on the central console: seat heating, USB port + AUX
plug panel, socket/cigarette lighter 13. Ignition device 14. Driver front airbag 15. Steering wheel controls 16. Control
panel: front fog lights (where present), rear fog lights, headlight alignment adjustment, iTPMS reset, ESC OFF (where present).
2PDX6J008H
9
Page 13 of 240

IGNITION DEVICE
OPERATION
The key can be turned to three different
positions fig. 4:
STOP: engine off, key can be
removed, steering column locked (with
key removed). Some electrical devices
(e.g. central door locking system, etc.)
are still available;
MAR: driving position. All electrical
devices are available;
AVV: engine starting.
The ignition device is fitted with a safety
system that requires the ignition key to
be turned back to STOP if the engine
does not start, before the starting
operation can be repeated.On versions with automatic
transmission (if present) the ignition key
can only be removed when the gear
lever is at P (Park).
2) 3)
STEERING LOCK
Activation
When the key is in the STOP position,
remove the key and turn the steering
wheel until it locks.
IMPORTANT If the ignition key has been
moved from the MAR to the STOP
position, the steering lock cannot
engage until the key is removed from
the ignition device.
Deactivation
Move the steering wheel slightly and
turn the key to MAR.
4) 5) 6) 7)
WARNING
2)If the ignition device has been tampered
with (e.g. an attempted theft), have it
checked by a Fiat Dealership before driving
again.
3)Always take the key with you when you
leave your vehicle to prevent someone
from accidentally operating the controls.
Remember to engage the parking brake.
Never leave children unattended in the
vehicle.4)It is absolutely forbidden to carry out any
after-market operation involving steering
system or steering column modifications
(e.g. installation of anti-theft device) that
could adversely affect performance,
invalidate the warranty, cause serious
safety problems and also result in the car
not meeting type-approval requirements.
5)Never extract the mechanical key while
the vehicle is moving. The steering wheel
will automatically lock as soon as it is
turned. This holds true for cars being
towed as well.
6)Before exiting the vehicle, ALWAYS
engage the parking brake, steer the
wheels, engage the first gear if uphill and
the reverse if downhill. On versions with
automatic transmission (where present),
bring the gear lever to P (Park) and turn the
ignition device to bring it to STOP. If the
vehicle is parked on a steep slope, chock
the wheels with wedges or stones. When
leaving the vehicle, always lock all the
doors by pressing the button on the key.
7)On versions with automatic transmission
(where present), it is advisable to put the
transmission in P, release the brake pedal
safely and then stop the engine to release
the key smoothly.
404026J0001EM
11
Page 14 of 240

FIAT CODE
The Fiat Code system prevents
unauthorised use of the vehicle,
disabling engine starting.
The system does not need to be
enabled/activated: operation is
automatic, regardless of the fact that
the vehicle's doors are locked or
unlocked.
When the ignition device is set to MAR,
the Fiat Code system identifies the
code transmitted by the key. If the code
is recognised as valid, the Fiat Code
system enables engine starting.
When the ignition device is brought
back to STOP, the Fiat Code system
deactivates the control unit controlling
the engine, thus preventing its starting.
For the correct engine starting
procedures, see the instructions in the
"Starting the engine" paragraph,
"Starting and driving" chapter.IRREGULAR OPERATION
If, during starting, the key code is not
correctly recognised, theicon is
displayed on the instrument panel (see
the instructions in the "Warning lights
and messages" paragraph, "Knowing
the instrument panel" chapter). This
condition leads to the engine switching
off after 2 seconds. In this case, bring
the ignition device to STOP and then to
MAR; if it is still blocked, try with the
other keys provided. If it is still not
possible to start the engine, contact a
Fiat Dealership.
If the
icon is displayed while
driving, this means that the system is
running a self-diagnosis (e.g. due to a
voltage drop). If the display persists,
contact a Fiat Dealership.
DOORS
LOCKING / UNLOCKING
DOORS FROM THE
INSIDE
Automatic locking in motion
(where present)
If all doors are closed properly, they will
automatically be locked once the
vehicle has exceeded 20 km/h
("Autoclose" function). This function can
also be disabled using the menu on the
instrument panel.
Manual locking/unlocking
Press the button shown in fig. 5 on the
central dashboard panel.
LED on button on: doors locked.
LED on button off: doors unlocked.
504056J0001EM
12
KNOWING YOUR CAR
Page 16 of 240

To restore the starting condition of the
door locks (only if battery charge
restored) press the
button on the
remote control or the
button on the
dashboard or introduce the metal insert
of the ignition key in the driver's side
front door pawl and pull the door inner
handle.
WARNING
8)If the child lock was engaged and the
previously described locking procedure
carried out, operating the internal opening
handle will not open the door: in this case,
to open the door, the outside handle must
be used. The door central locking/
unlocking button is not disabled by the
engagement of the emergency lock.
9)NEVER leave children unattended inside
the car, let alone leave the car with the
doors unlocked in a place that children can
access easily. Children may seriously, or
even fatally, injure themselves. Also ensure
that children do not inadvertently operate
the parking brake, the brake pedal or the
automatic transmission lever (where
present).
10)Always use this device when carrying
children. After engaging the child lock on
both rear doors, check for effective
engagement by trying to open a door with
the internal handle.
IMPORTANT
2)Make sure to take the key with you once
a door or the tailgate is locked, to prevent
locking the same key inside the vehicle. If
the key has been locked in, it can only be
recovered using the second provided key.
3)If the child lock was engaged and the
previously described locking procedure
carried out, operating the internal opening
handle will not open the door: in this case,
to open the door, the outside handle must
be used. The central locking/unlocking
button is not disabled by the engagement
of the emergency lock.
SEATS
FRONT SEATS WITH
MANUAL ADJUSTMENT
11)
4)
Longitudinal adjustment
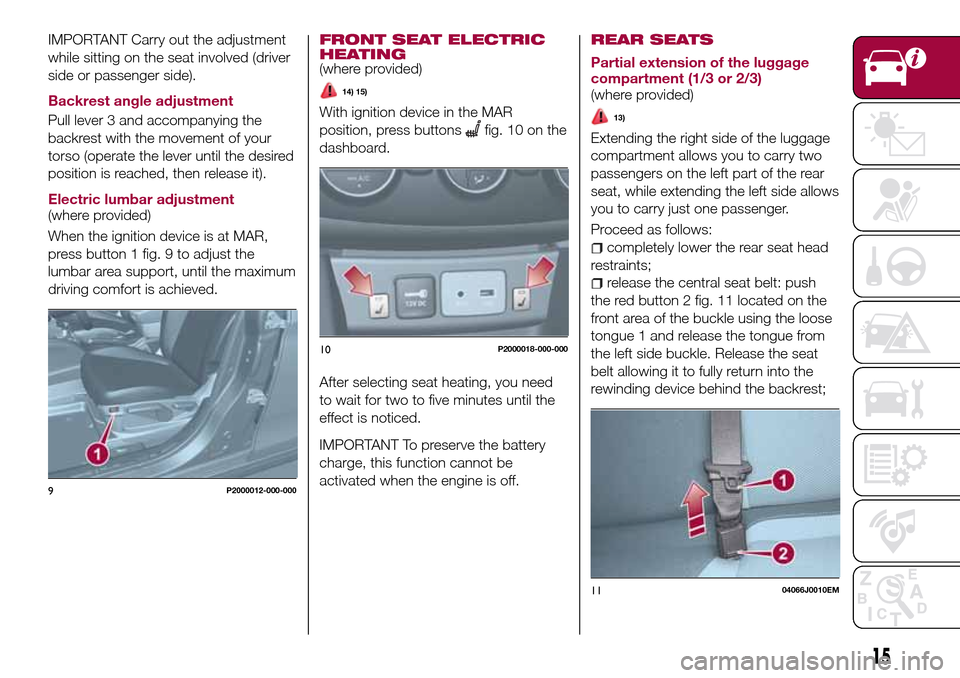
Lift lever 1 fig. 8 and push the seat
forwards or backwards.
12)
IMPORTANT Carry out the adjustment
while sitting on the seat involved (driver
side or passenger side).
Height adjustment
(where provided)
Move lever 2 upwards or downwards to
achieve the required height.
8P2000013-000-000
14
KNOWING YOUR CAR
Page 17 of 240

IMPORTANT Carry out the adjustment
while sitting on the seat involved (driver
side or passenger side).
Backrest angle adjustment
Pull lever 3 and accompanying the
backrest with the movement of your
torso (operate the lever until the desired
position is reached, then release it).
Electric lumbar adjustment
(where provided)
When the ignition device is at MAR,
press button 1 fig. 9 to adjust the
lumbar area support, until the maximum
driving comfort is achieved.
FRONT SEAT ELECTRIC
HEATING
(where provided)
14) 15)
With ignition device in the MAR
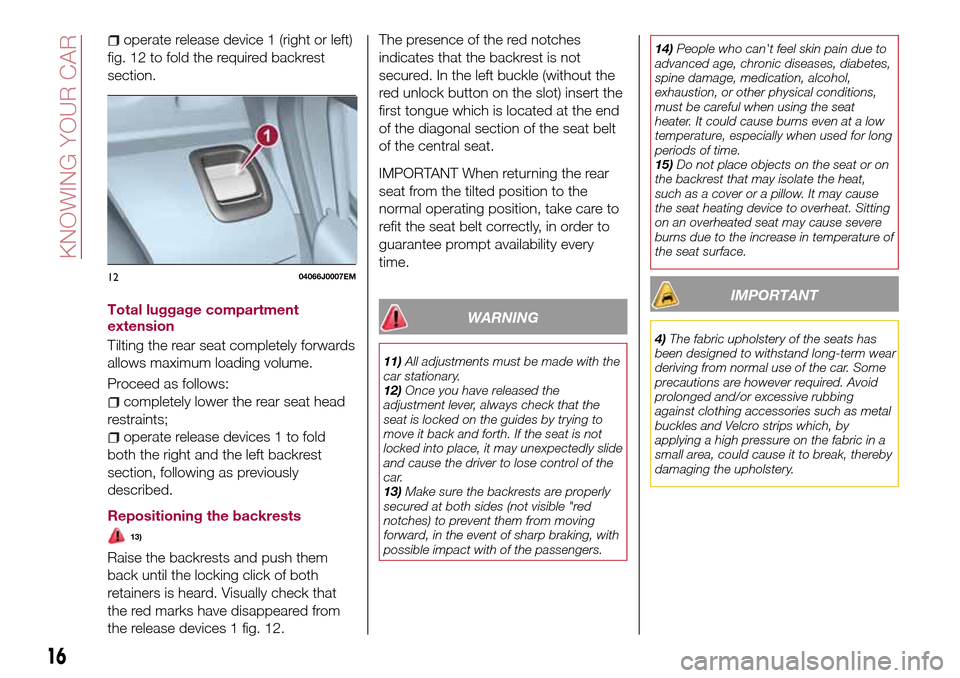
position, press buttons
fig. 10 on the
dashboard.
After selecting seat heating, you need
to wait for two to five minutes until the
effect is noticed.
IMPORTANT To preserve the battery
charge, this function cannot be
activated when the engine is off.REAR SEATS
Partial extension of the luggage
compartment (1/3 or 2/3)
(where provided)
13)
Extending the right side of the luggage
compartment allows you to carry two
passengers on the left part of the rear
seat, while extending the left side allows
you to carry just one passenger.
Proceed as follows:
completely lower the rear seat head
restraints;
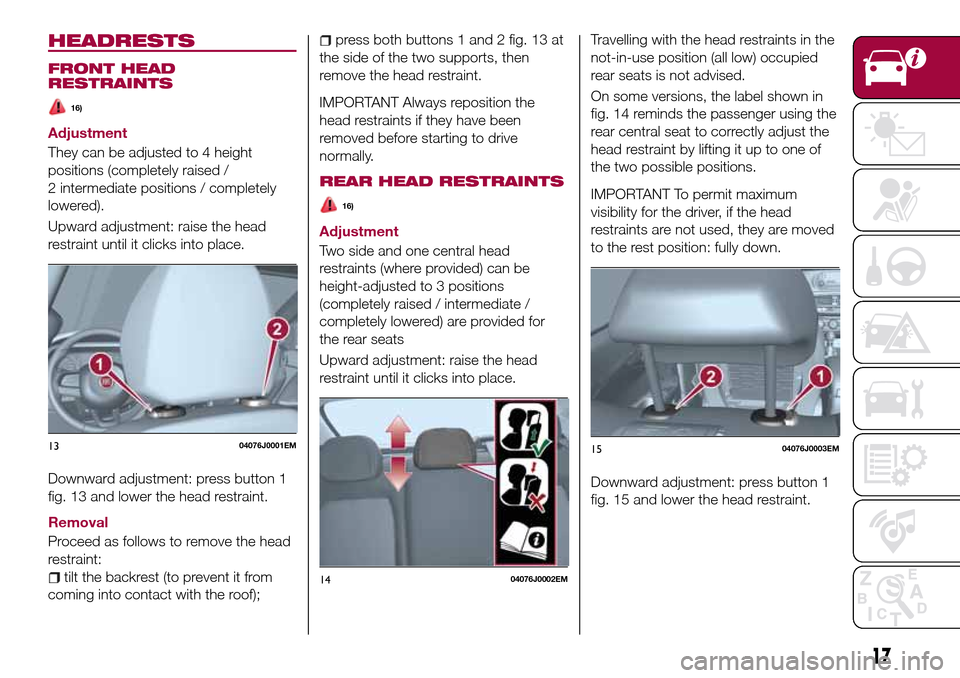
release the central seat belt: push
the red button 2 fig. 11 located on the
front area of the buckle using the loose
tongue 1 and release the tongue from
the left side buckle. Release the seat
belt allowing it to fully return into the
rewinding device behind the backrest;
9P2000012-000-000
10P2000018-000-000
1104066J0010EM
15
Page 18 of 240

operate release device 1 (right or left)
fig. 12 to fold the required backrest
section.
Total luggage compartment
extension
Tilting the rear seat completely forwards
allows maximum loading volume.
Proceed as follows:
completely lower the rear seat head
restraints;
operate release devices 1 to fold
both the right and the left backrest
section, following as previously
described.
Repositioning the backrests
13)
Raise the backrests and push them
back until the locking click of both
retainers is heard. Visually check that
the red marks have disappeared from
the release devices 1 fig. 12.The presence of the red notches
indicates that the backrest is not
secured. In the left buckle (without the
red unlock button on the slot) insert the
first tongue which is located at the end
of the diagonal section of the seat belt
of the central seat.
IMPORTANT When returning the rear
seat from the tilted position to the
normal operating position, take care to
refit the seat belt correctly, in order to
guarantee prompt availability every
time.
WARNING
11)All adjustments must be made with the
car stationary.
12)Once you have released the
adjustment lever, always check that the
seat is locked on the guides by trying to
move it back and forth. If the seat is not
locked into place, it may unexpectedly slide
and cause the driver to lose control of the
car.
13)Make sure the backrests are properly
secured at both sides (not visible "red
notches) to prevent them from moving
forward, in the event of sharp braking, with
possible impact with of the passengers.14)People who can't feel skin pain due to
advanced age, chronic diseases, diabetes,
spine damage, medication, alcohol,
exhaustion, or other physical conditions,
must be careful when using the seat
heater. It could cause burns even at a low
temperature, especially when used for long
periods of time.
15)Do not place objects on the seat or on
the backrest that may isolate the heat,
such as a cover or a pillow. It may cause
the seat heating device to overheat. Sitting
on an overheated seat may cause severe
burns due to the increase in temperature of
the seat surface.
IMPORTANT
4)The fabric upholstery of the seats has
been designed to withstand long-term wear
deriving from normal use of the car. Some
precautions are however required. Avoid
prolonged and/or excessive rubbing
against clothing accessories such as metal
buckles and Velcro strips which, by
applying a high pressure on the fabric in a
small area, could cause it to break, thereby
damaging the upholstery.
1204066J0007EM
16
KNOWING YOUR CAR
Page 19 of 240

HEADRESTS
FRONT HEAD
RESTRAINTS
16)
Adjustment
They can be adjusted to 4 height
positions (completely raised /
2 intermediate positions / completely
lowered).
Upward adjustment: raise the head
restraint until it clicks into place.
Downward adjustment: press button 1
fig. 13 and lower the head restraint.
Removal
Proceed as follows to remove the head
restraint:
tilt the backrest (to prevent it from
coming into contact with the roof);
press both buttons 1 and 2 fig. 13 at
the side of the two supports, then
remove the head restraint.
IMPORTANT Always reposition the
head restraints if they have been
removed before starting to drive
normally.
REAR HEAD RESTRAINTS
16)
Adjustment
Two side and one central head
restraints (where provided) can be
height-adjusted to 3 positions
(completely raised / intermediate /
completely lowered) are provided for
the rear seats
Upward adjustment: raise the head
restraint until it clicks into place.Travelling with the head restraints in the
not-in-use position (all low) occupied
rear seats is not advised.
On some versions, the label shown in
fig. 14 reminds the passenger using the
rear central seat to correctly adjust the
head restraint by lifting it up to one of
the two possible positions.
IMPORTANT To permit maximum
visibility for the driver, if the head
restraints are not used, they are moved
to the rest position: fully down.
Downward adjustment: press button 1
fig. 15 and lower the head restraint.
1304076J0001EM
1404076J0002EM
1504076J0003EM
17