2017 FIAT TIPO 4DOORS change time
[x] Cancel search: change timePage 3 of 240

Dear Customer,
We would like to congratulate and thank you for choosing a Fiat.
We have written this handbook to help you get to know all the features of your vehicle and use it in the best possible way.
Here you will find information, advice and important warnings regarding use of your vehicle and how to achieve the best
performance from its technical features.
You are advised to read it right through before taking to the road for the first time, to become familiar with the controls and
above all with those concerning brakes, steering and gearbox; at the same time, you can understand the vehicle behaviour on
different road surfaces.
This document also provides a description of special features and tips, as well as essential information for the safe driving, care
and maintenance of your vehicle over time.
After reading it, you are advised to keep the handbook inside the vehicle, for an easy reference and for making sure it remains
on board the vehicle should it be sold.
In the attached Warranty Booklet you will also find a description of the Services that Fiat offers to its customers, the Warranty
Certificate and the detail of the terms and conditions for maintaining its validity.
We are sure that these will help you to get in touch with and appreciate your new vehicle and the service provided by the
people at Fiat.
Enjoy reading. Happy motoring!
This Owner Handbook describes all vehicle versions. Options, equipment dedicated to specific markets or
versions are not explicitly indicated in the text: as a consequence, you should only consider the information which
is related to the trim level, engine and version that you have purchased. Any content introduced throughout the
production of the model, outside the specific request of options at the time of purchase, will be identified with the
wording(where provided).
All data contained in this publication are intended to help you use your vehicle in the best possible way. FCA Italy
S.p.A. aims at a constant improvement of the vehicles produced. For this reason it reserves the right to make
changes to the model described for technical and/or commercial reasons.
For further information, contact a Fiat Dealership.
Page 24 of 240

Deactivation
Keep the left stalk in main beam
headlights flashing position for a few
seconds or turn the key to MAR
position or wait until the period
previously set has ended.
MAIN BEAM HEADLIGHTS
With ring nut in position, push the
stalk forward toward the dashboard
(stable position). The
warning light
switches on in the instrument panel.
They are switched off by pulling the
stalk towards the steering wheel.
Flashing the headlights
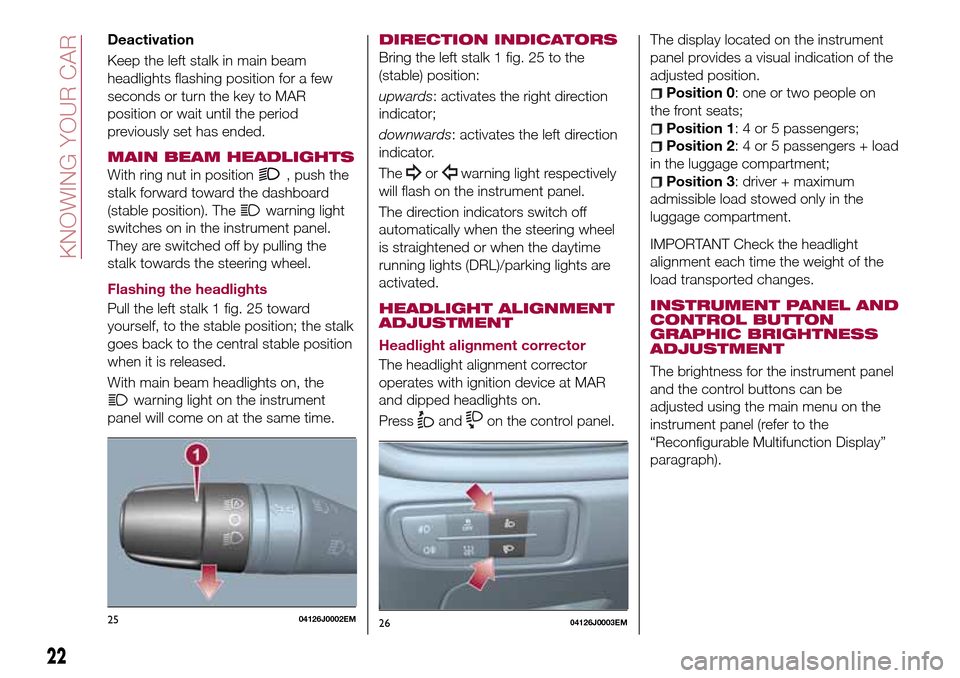
Pull the left stalk 1 fig. 25 toward
yourself, to the stable position; the stalk
goes back to the central stable position
when it is released.
With main beam headlights on, the
warning light on the instrument
panel will come on at the same time.
DIRECTION INDICATORS
Bring the left stalk 1 fig. 25 to the
(stable) position:
upwards: activates the right direction
indicator;
downwards: activates the left direction
indicator.
The
orwarning light respectively
will flash on the instrument panel.
The direction indicators switch off
automatically when the steering wheel
is straightened or when the daytime
running lights (DRL)/parking lights are
activated.
HEADLIGHT ALIGNMENT
ADJUSTMENT
Headlight alignment corrector
The headlight alignment corrector
operates with ignition device at MAR
and dipped headlights on.
Press
andon the control panel.The display located on the instrument
panel provides a visual indication of the
adjusted position.
Position 0: one or two people on
the front seats;
Position 1: 4 or 5 passengers;
Position 2: 4 or 5 passengers + load
in the luggage compartment;
Position 3: driver + maximum
admissible load stowed only in the
luggage compartment.
IMPORTANT Check the headlight
alignment each time the weight of the
load transported changes.
INSTRUMENT PANEL AND
CONTROL BUTTON
GRAPHIC BRIGHTNESS
ADJUSTMENT
The brightness for the instrument panel
and the control buttons can be
adjusted using the main menu on the
instrument panel (refer to the
“Reconfigurable Multifunction Display”
paragraph).
2504126J0002EM2604126J0003EM
22
KNOWING YOUR CAR
Page 40 of 240

LPG TANK
The car has a pressurised tank for
storing LPG in a liquid state. It is
toroidal and is located in the spare
wheel compartment with suitable
protection.
LPG tank certification
The LPG tank is certified in accordance
with the regulations in force.
In Italy, the tank has a life of 10 years
starting from the car registration date. If
the vehicle has been registered in a
country other than Italy, the duration
and the testing/inspection procedures
of the LPG tank can vary depending on
the national provisions in force in that
country. In all case, when the time limit
for your country has expired, go to a
Fiat Dealer to have the tank replaced.
LPG/PETROL SWITCH
This engine normally runs on LPG
except during starting when it runs on
petrol. Switching to LPG is automatic,
the warning light
1 fig. 50 on the
instrument panel, switches off.If you specifically want to use petrol,
press the button on the dashboard
fig. 51. If the LED located above the
button turns on, it indicates that
switching has taken place correctly.
Regardless of the last fuel system used,
at the following engine starting, after the
initial petrol stage, the system will
automatically switch to LPG.The bars 2 fig. 52 on the display
indicate the level of LPG in the tank.
To guarantee switching in full safety, the
actual change to the chosen fuel
system takes place depending on the
car usage conditions; it may not
therefore be immediate. Switching is
confirmed by the switching on/off of the
green warning light
on the
instrument panel.
When switching is requested, metallic
noise from the valves which pressurise
the circuit can be heard. For the
switching logic described above, a
delay between the valve ticking and the
switching off of the instrument panel
indication is completely normal.
50PGL00022
51PGL6J0032
52PGL00023
38
KNOWING YOUR CAR
Page 41 of 240

Moreover, when starting with outside
temperatures below about -10°C, the
switching times from petrol to LPG
increase to allow the pressure
regulator/reduction unit to heat up.
To change fuel type, press the
fig. 52 button on the dashboard with
the car stationary and engine running,
or while driving.
14) 15)
LPG FUEL RESERVE
When the residual quantity of LPG
drops below 1/5 of the tank capacity:
the first bar on the display 1
fig. 53 remains on;
the yellow warning light2onthe
instrument panel turns on;
an acoustic signal is emitted.This condition will last until the next
LPG refuelling, also in the event of
petrol operation.
If the LPG runs out, the system
automatically switches to petrol and the
1 fig. 50 warning light on the
dashboard turns on.
SYSTEM FAILURE SIGNALLING
In the event of an LPG system failure,
the
symbol will be displayed and all
the level bars will turn off.
In this case, contact a Fiat Dealership
as soon as possible, running on petrol.
REFUELLING
16) 17)
LPG
Maximum refuelling capacity (including
reserve): 42 litres. The figure already
takes into account the 80% tank filling
limit and the residual fluid required for
priming; this figure represents the
maximum permitted capacity. In
addition, after different refuelling
processes, this figure may vary due to
differences between the network pump
supply pressures, pumps having
different supply/locking features, tank
not completely run out of fuel.
IMPORTANT In order to avoid
inconsistent information by the LPG
gauge on the instrument panel, it is
recommended to refill with at least
10 litres each time.
WARNING
31)Note that in some countries (including
Italy) there are legal restrictions in force for
parking/garaging motor vehicles fuelled by
gas that is denser than air; LPG comes
under this category.
32)If gas is smelt, switch from LPG
operation to petrol operation and
immediately go to a Fiat Dealership to have
the vehicle checked and possible system
faults excluded.
IMPORTANT
10)The car is equipped with a gaseous
LPG injection system designed specifically
for it: it is therefore absolutely forbidden to
alter the configuration of the system or its
components. The use of other components
or materials could cause malfunctions and
lead to a reduction in safety; therefore, in
the case of problems, contact a Fiat
Dealership. To prevent damage to the gas
system parts when towing or raising the
vehicle, follow the instructions in the
"Towing the vehicle" paragraph of the
Owner Handbook.
11)The system operates at temperatures
ranging between −20°C and 100°C.
53PGL00024
39
Page 49 of 240

DISPLAY
DESCRIPTION
The vehicle is equipped with a display
that can show useful information to the
driver while driving.
GEAR SHIFT INDICATOR
The Gear Shift Indicator (GSI) system
advises the driver to change gear
through a special indication on the
display.
Through the GSI, the driver is informed
that the gear change will allow a
reduction in fuel consumption.
When the
icon appears on the
display, the GSI suggests switching to a
higher gear, while when the
icon is
displayed, the GSI suggests changing
to a lower gear.
The indication in the display remains
until a gear is shifted or the driving
conditions go back to a situation where
gearshifting is not required to improve
consumption.
MULTIFUNCTION
DISPLAY
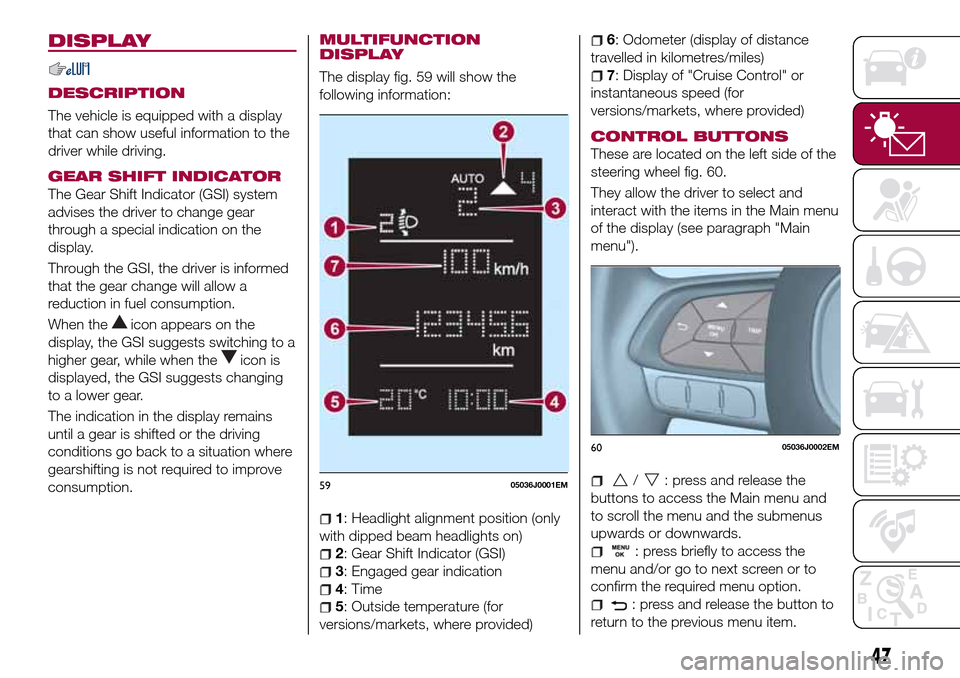
The display fig. 59 will show the
following information:
1: Headlight alignment position (only
with dipped beam headlights on)
2: Gear Shift Indicator (GSI)
3: Engaged gear indication
4: Time
5: Outside temperature (for
versions/markets, where provided)
6: Odometer (display of distance
travelled in kilometres/miles)
7: Display of "Cruise Control" or
instantaneous speed (for
versions/markets, where provided)
CONTROL BUTTONS
These are located on the left side of the
steering wheel fig. 60.
They allow the driver to select and
interact with the items in the Main menu
of the display (see paragraph "Main
menu").
/: press and release the
buttons to access the Main menu and
to scroll the menu and the submenus
upwards or downwards.
: press briefly to access the
menu and/or go to next screen or to
confirm the required menu option.
: press and release the button to
return to the previous menu item.
5905036J0001EM
6005036J0002EM
47
Page 50 of 240

: press and release the button
to display the "Trip computer"
information.
MAIN MENU
The Menu includes the following items:
“Dimmer” (lighting)
“Speed”
“Hour” (Set time)
“Buzzer” (Acoustic warning)
“Units” (Units of measure)
“Corner” (Cornering lights)
“Bag P” (Passenger air bag)
“DRL” (Daytime running lights) (for
versions/markets where provided)
Bag P (Passenger air bag)
This function is used to activate/
deactivate the front passenger's airbag.
Proceed as follows:
press theMENU OKbutton and,
after the displaying of the message
(Bag pass: Off, to deactivate) or the
message "Bag pass: On, to activate) by
pressing
/, press thebutton;
a confirmation request message will
appear on the display;
press buttons/to select (Yes)
(confirming activation/deactivation) or
(No) (to abort);
press theMENU OKbutton briefly; a
message confirming the selection is
displayed and you can return to the
menu screen.
WithPassenger's protection not
activethe
LED comes on
constantly in the instrument panel
dashboard.
With theUconnect™system, some
Menu items are shown and managed
on the display of the latter and not on
the instrument panel display (refer to
the dedicated Multimedia chapter or to
the supplement available online).RECONFIGURABLE
MULTIFUNCTION
DISPLAY
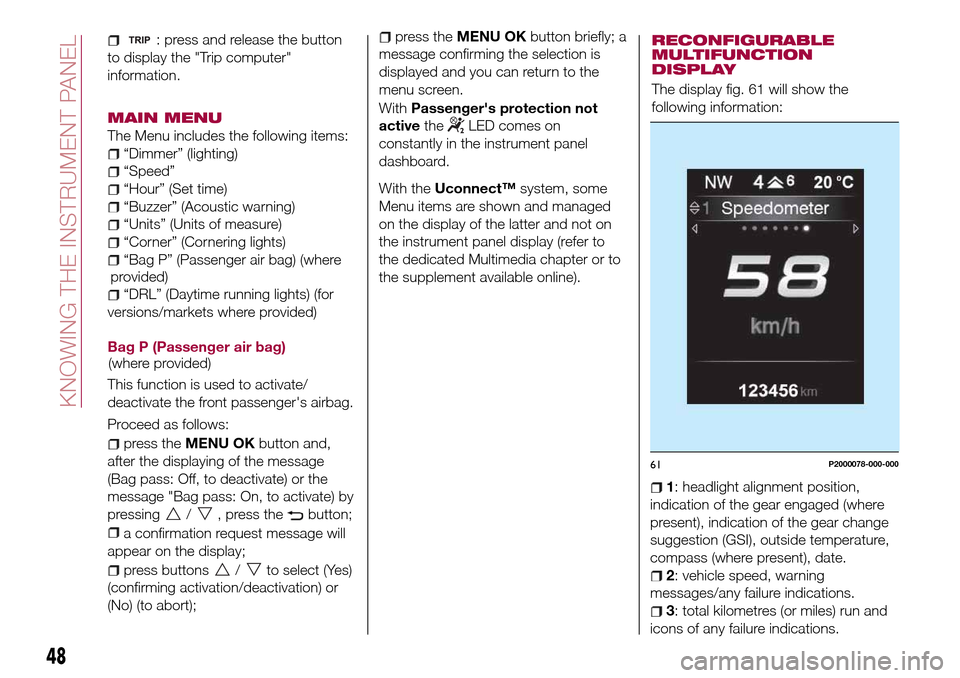
The display fig. 61 will show the
following information:
1: headlight alignment position,
indication of the gear engaged (where
present), indication of the gear change
suggestion (GSI), outside temperature,
compass (where present), date.
2: vehicle speed, warning
messages/any failure indications.
3: total kilometres (or miles) run and
icons of any failure indications.
61P2000078-000-000
48
KNOWING THE INSTRUMENT PANEL
(where provided)(where
provided)
Page 51 of 240

CONTROL BUTTONS
These are located on the left side of the
steering wheel fig. 62.
They allow the driver to select and
interact with the items in the Main menu
of the display (see paragraph "Main
menu").
/: press and release the
buttons to access the Main menu and
to scroll the menu and the submenus
upwards or downwards.
/: press and release the
buttons to access the information
displays or the submenus of an item of
the Main menu.
OK: press this button to
access/select the info displays or the
submenus of an item of the Main menu.
Hold the button pressed for 1 second
to reset the displayed/selected
functions.
MAIN MENU
The Menu includes the following items:
TRIP
GSI
VEHICLE INFO
AUDIO (function available in versions
and markets where present)
PHONE (function available in versions
and markets where present)
NAVIGATION (function available in
versions and markets where present)
ALERTS
VEHICLE SETUP
Vehicle Setup
This menu item allows you to change
the settings for:
Display;
Units;
Clock & Date;
Security
Safety & Assistance;
Lights;
Doors & Locks.
Display
By selecting item "Display" you can
access the settings/information
regarding: " Display Settings”,
Language", "See phone" (available in
versions and markets where present),
"See navigation" (available in versions
and markets where present),
"Automatic reset Trip B", “Display
lighting”.Units
Select item "Units" to choose the unit of
measurement between: "Imperial",
"Metric", "Customised".
Clock & Date
Select item "Clock & Date" to make the
following adjustments: "Set time",
"Mode", "Set date".
Security
Select item "Security" to make the
following adjustments: “Passenger
AIRBAG” (where present), "Speed
buzzer", "Seat belt buzzer".
“Passenger AIRBAG" adjustment allows
you to activate/deactivate the
passenger airbag (where present):
Passenger's protection not active:
the
LED comes on constantly in the
instrument panel dashboard.
Safety & Assistance
Select item "Safety & Assistance" to
make the following adjustments: Rain
sensor, Warning volume, Park Assist,
Vol. Park Assist.
Lights
Select item "Lights" to make the
following adjustments: "Courtesy
lights", "Daytime running lights",
"Cornering lights", "Headlamp sensor",
"Follow me home".6205036J0004EM
49
Page 62 of 240

Warning light What it means
FIAT CODE SYSTEM FAILURE
Fiat CODE system failure
The warning light or symbol switches on to indicate a failure of the Fiat CODE system. Contact a Fiat
Dealership as soon as possible.
PARKING SENSOR FAILURE (PARK ASSIST)
The warning light or yellow symbol switches on in the case of temporary failure of the parking sensors. If
the problem is still present after cleaning the parking sensor area, contact a Fiat Dealership.
WATER IN DIESEL FILTER (Diesel versions)
The warning light or symbol switches on constantly when driving (along with a message in the display), to
indicate the presence of water in the Diesel filter.
21)
ENGINE OIL DETERIORATED
(where provided)
Diesel versions: the warning light or symbol turns on and is displayed for 3 minute cycles and intervals of
5 seconds until the oil is changed.
The symbol is displayed until the problem is solved.
Petrol versions: the warning light or symbol switches on and then is not displayed when the display cycle
is completed.
IMPORTANT After the first indication, each time the engine is started the symbol will continue to switch on
as described above until the oil is changed.
If the warning light or symbol flashes, this does not mean that there is a fault on the vehicle, rather it simply
reports that it is now necessary to change the oil as a result of regular use of the vehicle.
The deterioration of engine oil is accelerated by using the vehicle for short drives, preventing the engine
from reaching operating temperature.
Contact a Fiat Dealership as soon as possible.
22) 23)
60
KNOWING THE INSTRUMENT PANEL