2017 FIAT TIPO 4DOORS air condition
[x] Cancel search: air conditionPage 98 of 240
84)After installing a child restraint system,
do not move the seat: always remove the
child restraint system before making any
adjustment.
85)Always make sure that the diagonal
section of the seat belt does not pass
under the arms or behind the back of the
child. In the event of an accident the seat
belt will not be able to secure the child,
with the risk of injury, including fatal injury.
Therefore the child must always wear the
seat belt correctly.
86)Do not use the same lower anchorage
to install more than one child restraint
system.
87)If a Universal ISOFIX child restraint
system is not fixed to all three anchorages,
it will not be able to protect the child
correctly. In a crash, the child could be
seriously or fatally injured.
88)Fit the child restraint system when the
car is stationary. The child restraint system
is correctly fixed to the brackets when you
hear the click. Follow the instructions for
assembly, disassembly and positioning that
the Manufacturer must supply with the
child restraint system.SUPPLEMENTARY
RESTRAINT SYSTEM
(SRS) - AIRBAG
The vehicle is equipped with:
front driver airbag;
passenger front airbag (where
provided);
driver and passenger front side bags
(if present) for pelvis, chest and
shoulder protection (Side bags);
side bags (if present) for head
protection of front seat passengers and
rear side seat passengers (window
bag).
The location of the airbags on the
vehicle is marked by the word "AIR
BAG" in the middle of the steering
wheel, on the dashboard, on the side
trim or on a label placed next to the
airbag deployment area.
FRONT AIRBAGS
The front driver and passenger airbags
(where present) protect the front seat
occupants in the event of head-on
crashes of medium-high severity, by
placing the cushion between the
occupant and the steering wheel or
dashboard.The non-activation of airbags in other
types of collisions (side impacts, rear
shunts, roll-overs, etc...) (if present)
therefore does not indicate a system
malfunction.
Driver and passenger front airbags
(where present) are not a replacement
of but complementary to the seat belts,
which should always be worn, as
specified by law in Europe and most
non-European countries.
In the event of impact, those not
wearing a seat belt are projected
forwards and may come into contact
with the bag which is still inflating. The
protection offered by the bag is
compromised in these circumstances.
Front airbags may not activate in the
following situations:
frontal impacts against highly
deformable objects not involving the
front surface of the vehicle (e.g. wing
collision against guard rail, etc.);
vehicle wedging under other
vehicles or protective barriers (e.g.
trucks or guard rails).
Failure to activate in the conditions
described above is due to the fact that
they may not provide any additional
protection compared with seat belts, so
their activation would be inappropriate.
In these cases, non-deployment does
not indicate a system malfunction.
96
SAFETY
Page 100 of 240
Deactivating passenger front airbag
(where provided) and side bag
(where provided) for pelvis, chest
and shoulders protection
If a child must be carried on the front
seat in a rearward facing child restraint
system, deactivate the passenger front
airbag (where provided) and front side
bag (where provided).
To deactivate the airbags use the
display Menu (see the instructions in the
"Display" paragraph, "Knowing the
instrument panel" chapter).
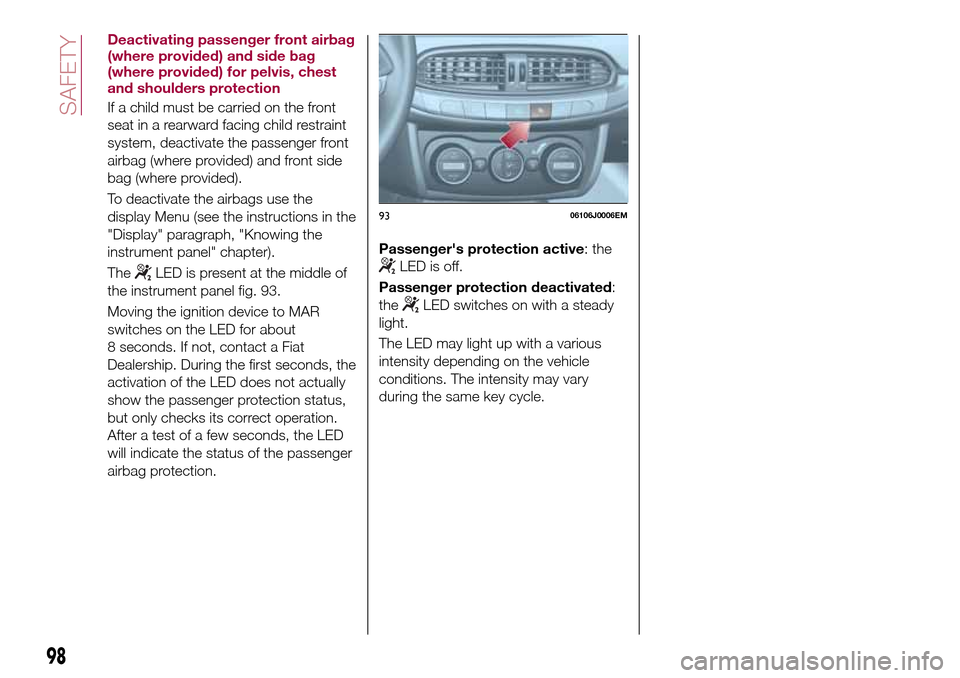
The
LED is present at the middle of
the instrument panel fig. 93.
Moving the ignition device to MAR
switches on the LED for about
8 seconds. If not, contact a Fiat
Dealership. During the first seconds, the
activation of the LED does not actually
show the passenger protection status,
but only checks its correct operation.
After a test of a few seconds, the LED
will indicate the status of the passenger
airbag protection.Passenger's protection active: theLED is off.
Passenger protection deactivated:
the
LED switches on with a steady
light.
The LED may light up with a various
intensity depending on the vehicle
conditions. The intensity may vary
during the same key cycle.
9306106J0006EM
98
SAFETY
Page 137 of 240
CHANGING A WHEEL
JACK
Please note that:
the jack weight is 2.15 kg;
the jack cannot be repaired and in
the event of a fault it must be replaced
by another genuine one;
No tool other than its cranking device
may be fitted on the jack.
Maintenance
Prevent any dirt from depositing on
the "worm screw";
Keep the "worm screw" lubricated;
Never modify the jack.
Conditions for non-use
Temperatures below −40°C;
On sandy or muddy ground;
On uneven ground;
On steep roads;
In extreme weather conditions:
thunderstorms, typhoons, hurricanes,
blizzards, storms, etc.
In direct contact with the engine or
for repairs under the vehicle;
On boats.
CHANGING PROCEDURE
134) 135) 136) 137) 138) 139)
52) 53)
Proceed as follows:
stop the car in a position that is not
dangerous for oncoming traffic where
you can change the wheel safely. The
ground must be flat and sufficiently
compact;
stop the engine, engage the hazard
warning lights and the parking brake;
engage first gear or reverse or, for
versions with automatic transmission (if
present), move the lever to position P
(Park);
wear the reflective safety jacket
before getting out of the car (anyway
comply with the laws in force in the
country you are driving in);
open the luggage compartment and
lift up the mat;
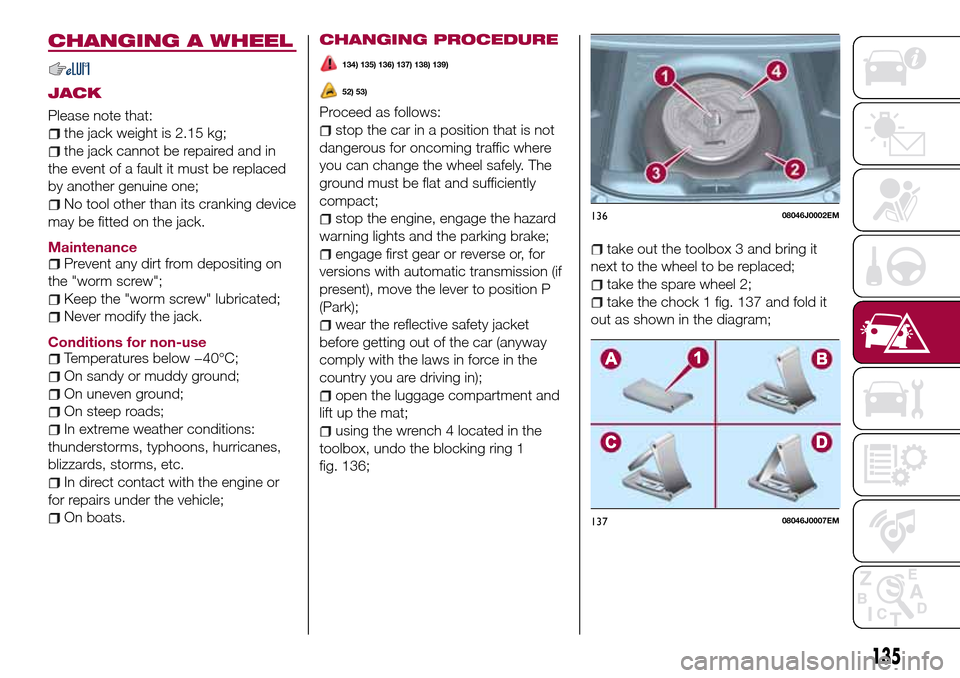
using the wrench 4 located in the
toolbox, undo the blocking ring 1
fig. 136;
take out the toolbox 3 and bring it
next to the wheel to be replaced;
take the spare wheel 2;
take the chock 1 fig. 137 and fold it
out as shown in the diagram;
13608046J0002EM
13708046J0007EM
135
Page 142 of 240
If after 5 minutes from the compressor
ignition, the pressure gauge indicates a
pressureless than 1.8 bar / 26 psi,
switch off the compressor, disconnect
the sealing fluid tube from the tyre
valve, re-screw the valve cap and move
the vehicle about 10 meters to allow the
distribution of sealing fluid in the tyre.
Securely stop the vehicle and repeat
the operation above until reaching the
required pressure. If after other 5 min.
from the compressor ignition, the
pressure gauge still indicates a pressure
lower than 1.8 bar / 26 psi, the TYRE IS
TOO DAMAGED AND CANNOT BE
REPAIRED. Remove and place the kit in
the specific compartment and contact a
Fiat Dealership;
if the required pressure is reached,
restart driving. Do not exceed 80 km/h.
Avoid sudden acceleration or braking.After driving for about 8 km / 5 miles,
place the vehicle in a safe and suitable
area, engaging the parking brake. Pick
up the kit, ensure the on-off button is in
0position, insert the electrical
connector in the car’s 12V socket.
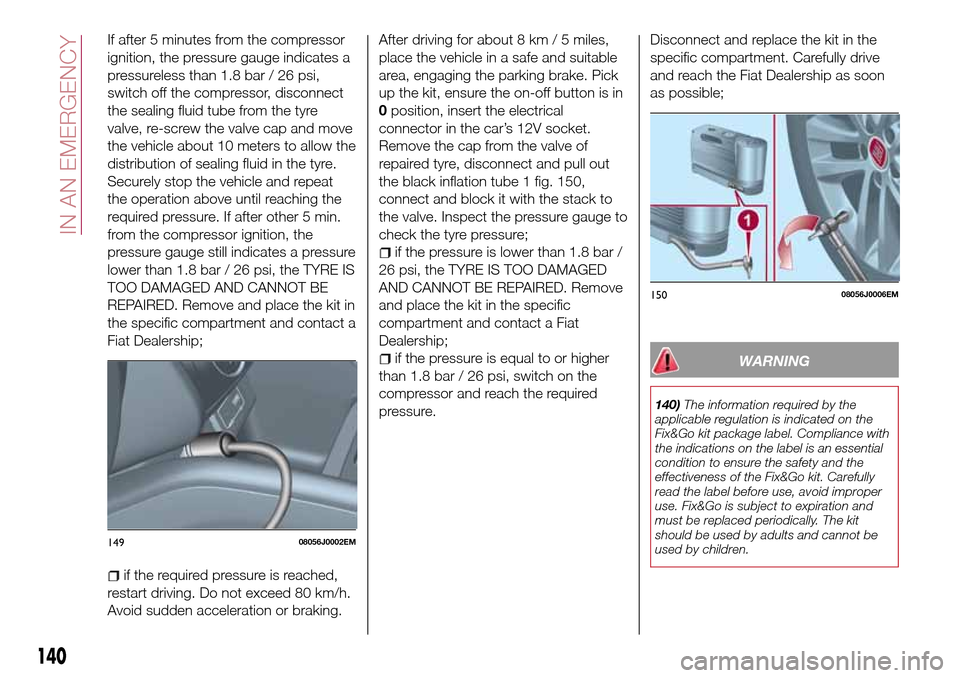
Remove the cap from the valve of
repaired tyre, disconnect and pull out
the black inflation tube 1 fig. 150,
connect and block it with the stack to
the valve. Inspect the pressure gauge to
check the tyre pressure;
if the pressure is lower than 1.8 bar /
26 psi, the TYRE IS TOO DAMAGED
AND CANNOT BE REPAIRED. Remove
and place the kit in the specific
compartment and contact a Fiat
Dealership;
if the pressure is equal to or higher
than 1.8 bar / 26 psi, switch on the
compressor and reach the required
pressure.Disconnect and replace the kit in the
specific compartment. Carefully drive
and reach the Fiat Dealership as soon
as possible;WARNING
140)The information required by the
applicable regulation is indicated on the
Fix&Go kit package label. Compliance with
the indications on the label is an essential
condition to ensure the safety and the
effectiveness of the Fix&Go kit. Carefully
read the label before use, avoid improper
use. Fix&Go is subject to expiration and
must be replaced periodically. The kit
should be used by adults and cannot be
used by children.
14908056J0002EM
15008056J0006EM
140
IN AN EMERGENCY
Page 143 of 240

IMPORTANT
54)Show the package and the label to the
personnel charged with handling the tyre
treated with the tyre repair kit.
55)Fix&Go provides a temporary repair,
therefore the tyre must be examined and
repaired by a specialist as soon as
possible. The sealing fluid is effective at
temperatures between -40°C and +50°C. It
is possible to repair tyres which have been
damaged on tread up to a diameter of
4mm; however, tyres damaged on their
side cannot be repaired. Before using
Fix&Go kit, ensure that the tyre isn't
excessively damaged and that the rim is in
good condition, otherwise do not use it and
contact a Fiat Dealership. Do not remove
foreign bodies from the tyre. Do not let the
compressor turned on for more than
20 consecutive minutes - overheating
hazard.
EMERGENCY
STARTING
If the battery is flat, a jump starting can
be performed using the battery and the
cables of another vehicle, or using an
auxiliary battery. In all cases, the battery
used must have a capacity equal to or
a little higher than the flat one.
56)
IMPORTANT NOTES
Do not use an auxiliary battery or any
other source of external supply with a
voltage above 12 V: the battery, the
starter, the alternator and the electrical
system of the vehicle could be
damaged.
Do not attempt jump starting if the
battery is frozen. The battery could
break and explode!
PREPARATION TO JUMP
STARTING
The vehicle battery is located in the
engine compartment, behind the left
light cluster.
141) 142) 143) 144)
IMPORTANT The positive terminal (+) of
the battery is shielded by a protective
element. Raise it to access the terminal.
Proceed as follows:
operate the parking brake, move the
lever to P (Park), for versions equipped
with automatic transmission (if present),
or neutral, for versions with manual
gearbox, then set the ignition device to
STOP;
switch off all the other electrical
devices in the vehicle;
should you be using the battery of
another vehicle, park the other vehicle
within the range of the cables used for
the connection, operate the parking
brake and ensure that its ignition is off.
IMPORTANT Never connect the
negative terminals of the two batteries
directly! If the auxiliary battery is
installed on another vehicle, check that
there is no accidental contact of metal
parts between the two vehicles, since
an earth connection may result, with
the risk of serious injury to any people
who may be nearby.
IMPORTANT If the procedure below is
carried out incorrectly, it can cause
severe injury to people or damage the
recharging system of one or both
vehicles. Carefully follow the
instructions given below.
141
Page 152 of 240
SCHEDULED
SERVICING
Correct servicing is crucial for
guaranteeing a long life for the vehicle
under the best conditions.
For this reason, Fiat has planned a
series of checks and services at fixed
distance intervals and, for
versions/markets, where provided, at
fixed time intervals, as described in the
Scheduled Servicing Plan.
Regardless of the above, it is always
necessary to carefully follow the
instructions in the Scheduled Servicing
Plan (e.g. periodically check level of
liquids, tyre pressure, etc.).
Scheduled Servicing is offered by all
Fiat Dealerships according to fixed time
or kilometres/miles intervals. If, during
each operation, in addition to the ones
scheduled, the need arises for further
replacements or repairs, these may be
carried out with the owner's explicit
agreement only. If your vehicle is used
frequently for towing, the interval
between one service operation and the
next should be reduced.IMPORTANT NOTES
Scheduled Servicing interventions are
set out by the Manufacturer. Failure to
comply with the schedule may
invalidate the warranty.
It is advisable to inform a Fiat
Dealership of any small operating
irregularities without waiting for the next
service.
150
SERVICING AND CARE
Page 153 of 240

SCHEDULED SERVICING PLAN (petrol versions — LPG versions)
The checks listed in the Scheduled Servicing Plan, after reaching 120,000 km/8 years, must be cyclically repeated starting from
the first interval, thus following the same intervals as before.
Thousands of miles9 182736455463728190
Thousands of kilometres15 30 45 60 75 90 105 120 135 150
Years12345678910
Check tyre condition/wear and adjust pressure, if
necessary. Check quick tyre repair kit recharge
conditions/expiry date (if provided)
Check operation of lighting system (headlights, direction
indicators, hazard warning lights, boot, passenger
compartment, glove compartment, instrument panel
warning lights, etc.)
Check and, if necessary, top up fluid levels (1)
Visually inspect condition of: LPG pipes and connectors,
LPG tank fixing (1.4 T-jet 120hp LPG E6 versions)
Check exhaust emissions/smokiness
Use the diagnosis socket to check engine management
system operation; emissions and (where provided) engine
oil deterioration
Visually inspect conditions of: exterior bodywork,
underbody protection, pipes and hoses (exhaust, fuel
system, brakes), rubber elements (gaiters, sleeves,
bushes, etc.)
(1) Always only use the liquids shown in the handbook for topping up after having checked that the system is not damaged.
151
Page 158 of 240

SCHEDULED SERVICING PLAN (Diesel versions)
The checks listed in the Scheduled Servicing Plan, after reaching 120,000 km/6 years, must be cyclically repeated starting from
the first interval, thus following the same intervals as before.
Thousands of miles12 24 36 48 60 72 84 96 108 120
Thousands of kilometres20 40 60 80 100 120 140 160 180 200
Years12345678910
Check tyre condition/wear and adjust pressure, if
necessary. Check quick tyre repair kit recharge
conditions/expiry date (if provided)
Check operation of lighting system (headlights, direction
indicators, hazard warning lights, boot, passenger
compartment, glove compartment, instrument panel
warning lights, etc.)
Check and, if necessary, top up fluid levels (1)
Check exhaust emissions/smokiness
Use the diagnosis socket to check engine management
system operation; emissions and (where provided) engine
oil deterioration
Visually inspect conditions of: exterior bodywork,
underbody protection, pipes and hoses (exhaust, fuel
system, brakes), rubber elements (gaiters, sleeves,
bushes, etc.)
Check windscreen wiper blade position/wear
(1) Always only use the liquids shown in the handbook for topping up after having checked that the system is not damaged.
156
SERVICING AND CARE