Page 13 of 240

SEATS
7) 9)2) 3)
FRONT SEATS
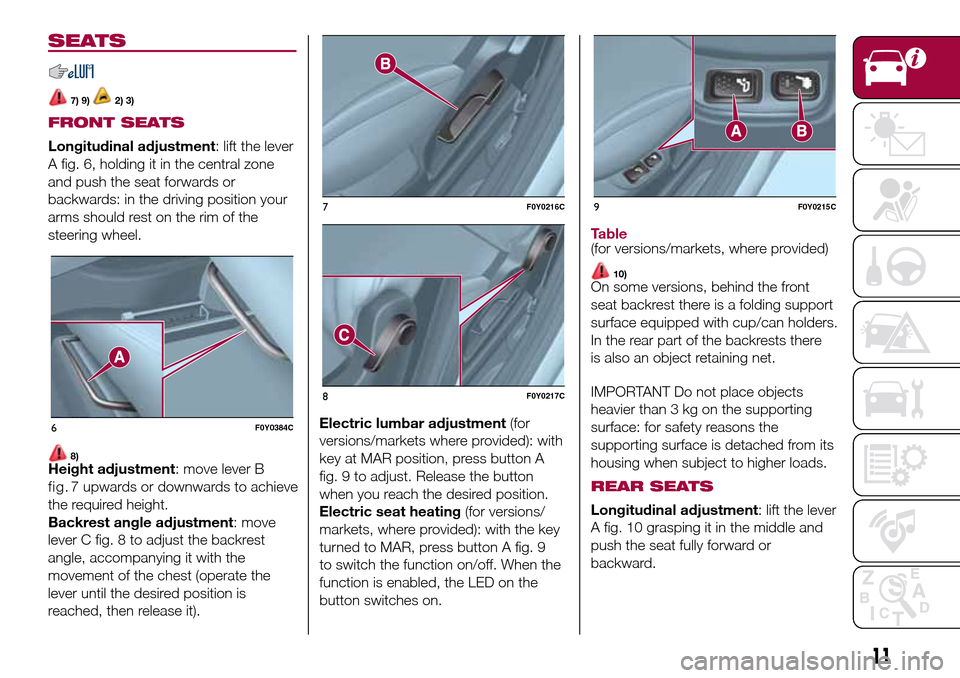
Longitudinal adjustment: lift the lever
A fig. 6, holding it in the central zone
and push the seat forwards or
backwards: in the driving position your
arms should rest on the rim of the
steering wheel.
8)Height adjustment: move lever B
the required height.
Backrest angle adjustment: move
lever C fig. 8 to adjust the backrest
angle, accompanying it with the
movement of the chest (operate the
lever until the desired position is
reached, then release it).Electric lumbar adjustment(for
versions/markets where provided): with
key at MAR position, press button A
fig. 9 to adjust. Release the button
when you reach the desired position.
Electric seat heating(for versions/
markets, where provided): with the key
turned to MAR, press button A fig. 9
to switch the function on/off. When the
function is enabled, the LED on the
button switches on.
Table(for versions/markets, where provided)
10)On some versions, behind the front
seat backrest there is a folding support
surface equipped with cup/can holders.
In the rear part of the backrests there
is also an object retaining net.
IMPORTANT Do not place objects
heavier than 3 kg on the supporting
surface: for safety reasons the
supporting surface is detached from its
housing when subject to higher loads.
REAR SEATS
Longitudinal adjustment: lift the lever
A fig. 10 grasping it in the middle and
push the seat fully forward or
backward.
6F0Y0384C
7F0Y0216C
8F0Y0217C
9F0Y0215C
11
fig. 7upwards or downwards to achieve
Page 16 of 240

REMOVAL
To remove head restraints, lift them to
the max. height, press buttons A and B
fig. 15 (front head restraints) or A and
B fig. 16 (rear head restraints) at the
side of the two supports, then remove
the head restraints by pulling them
upwards.
IMPORTANT If the rear seats are used,
always set the head restraints in the
"completely raised" position.
WARNING
16)The head restraints must be adjusted
so that the head, rather than the neck,
rests on them. Only in this case can they
protect your head correctly.
STEERING WHEEL
17) 18)
ADJUSTMENTS
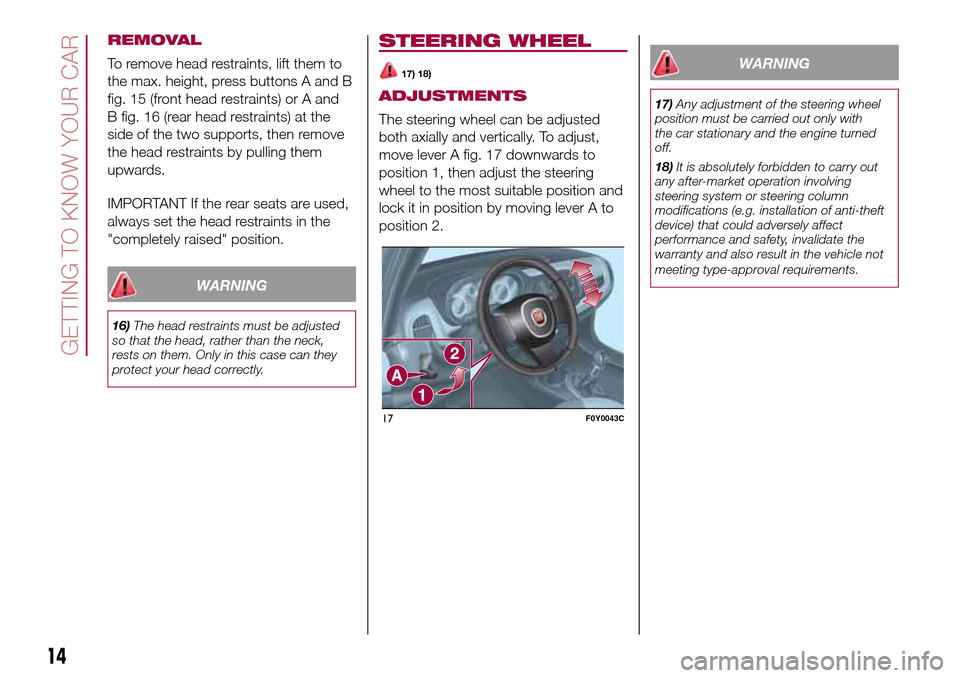
The steering wheel can be adjusted
both axially and vertically. To adjust,
move lever A fig. 17 downwards to
position 1, then adjust the steering
wheel to the most suitable position and
lock it in position by moving lever A to
position 2.
WARNING
17)Any adjustment of the steering wheel
position must be carried out only with
the car stationary and the engine turned
off.
18)It is absolutely forbidden to carry out
any after-market operation involving
steering system or steering column
modifications (e.g. installation of anti-theft
device) that could adversely affect
performance and safety, invalidate the
warranty and also result in the vehicle not
meeting type-approval requirements.
17F0Y0043C
14
GETTING TO KNOW YOUR CAR
Page 96 of 240

WARNING
99)It is dangerous to run the engine in
enclosed areas. The engine burns oxygen
and releases carbon dioxide, carbon
monoxide and other toxic gases.
100)Remember that the brake servo and
power steering are not operational until the
engine has been started, therefore you
need to apply much more force than usual
to the brake pedal and steering wheel.
101)If the engine fails to start with a gear
engaged, the potentially dangerous
situation due to the fact that the gearbox is
automatically placed in neutral will be
signalled by an acoustic signal.
WARNING
51)Warning lightflashing for 60
seconds after starting or during prolonged
cranking of the engine indicates a fault
with the glow plug heating system. You
can use the vehicle as usual if the engine
starts but you should contact a Fiat
Dealership as soon as possible.
52)It is advisable not to demand maximum
performance from your vehicle (e.g.
excessive acceleration, long distances at
maximum rpm, excessively intense braking,
etc.) when it is first used.
53)When the engine is off, do not leave
the key turned to MAR to prevent
unnecessary electrical consumption from
draining the battery.54)Never jump start the engine by
pushing, towing or coasting downhill.
These actions could cause the fuel to flow
into the catalytic converter and damage
it beyond repair.
55)Revving up before stopping the engine
is useless, it causes unnecessary fuel
consumption and can damage the engine,
in particular engines equipped with
turbocharger.
HANDBRAKE
102) 103)
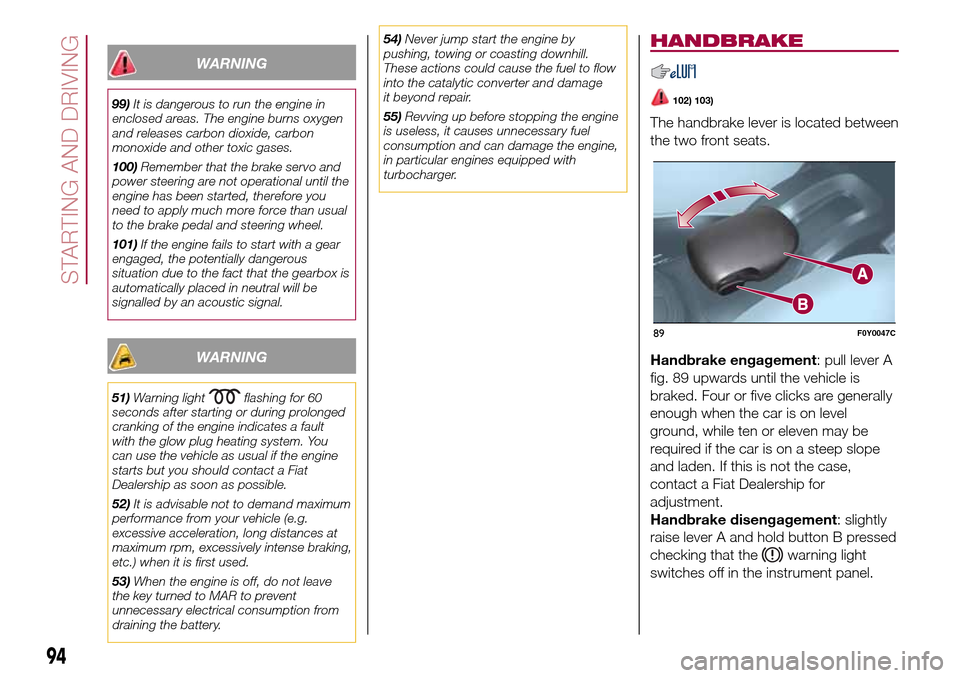
The handbrake lever is located between
the two front seats.
Handbrake engagement: pull lever A
fig. 89 upwards until the vehicle is
braked. Four or five clicks are generally
enough when the car is on level
ground, while ten or eleven may be
required if the car is on a steep slope
and laden. If this is not the case,
contact a Fiat Dealership for
adjustment.
Handbrake disengagement: slightly
raise lever A and hold button B pressed
checking that the
warning light
switches off in the instrument panel.
89F0Y0047C
94
STARTING AND DRIVING