2017 FIAT 500L LIVING lights
[x] Cancel search: lightsPage 8 of 240
GETTING TO KNOW YOUR CAR
In-depth knowledge of your new vehicle
starts here.
The handbook that you are reading
simply and directly explains how it
is made and how it works.
That’s why we advise you to read it
seated comfortably on board, so that
you can see immediately what is
described here for yourself.DASHBOARD ................................. 7
THE FIAT CODE SYSTEM ............... 8
THE KEYS....................................... 8
IGNITION DEVICE ........................... 10
SEATS ............................................ 11
HEAD RESTRAINTS ........................ 13
STEERING WHEEL ......................... 14
REAR VIEW MIRRORS .................... 15
CLIMATE CONTROL SYSTEM ....... 16
EXTERIOR LIGHTS ......................... 19
WINDOW CLEANING ...................... 21
ROOF LIGHTS ................................ 23
FIXED GLASS ROOF ....................... 23
ELECTRIC SUN ROOF .................... 24
DOORS ........................................... 26
ELECTRIC WINDOWS .................... 28
LUGGAGE COMPARTMENT ........... 29
BONNET ......................................... 31
DUALDRIVE ELECTRIC POWER
STEERING ...................................... 32
VERSION WITH LPG SYSTEM ........ 33
VERSION WITH METHANE
SYSTEM (NATURAL POWER) ......... 36
6
GETTING TO KNOW YOUR CAR
Page 11 of 240
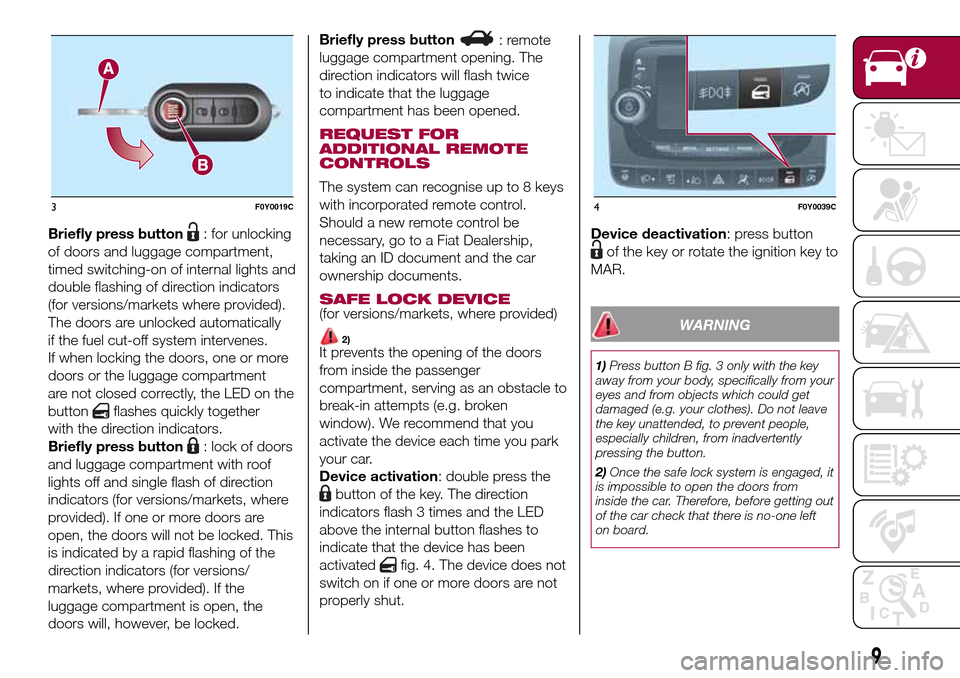
Briefly press button: for unlocking
of doors and luggage compartment,
timed switching-on of internal lights and
double flashing of direction indicators
(for versions/markets where provided).
The doors are unlocked automatically
if the fuel cut-off system intervenes.
If when locking the doors, one or more
doors or the luggage compartment
are not closed correctly, the LED on the
button
flashes quickly together
with the direction indicators.
Briefly press button
: lock of doors
and luggage compartment with roof
lights off and single flash of direction
indicators (for versions/markets, where
provided). If one or more doors are
open, the doors will not be locked. This
is indicated by a rapid flashing of the
direction indicators (for versions/
markets, where provided). If the
luggage compartment is open, the
doors will, however, be locked.Briefly press button
: remote
luggage compartment opening. The
direction indicators will flash twice
to indicate that the luggage
compartment has been opened.
REQUEST FOR
ADDITIONAL REMOTE
CONTROLS
The system can recognise up to 8 keys
with incorporated remote control.
Should a new remote control be
necessary, go to a Fiat Dealership,
taking an ID document and the car
ownership documents.
SAFE LOCK DEVICE(for versions/markets, where provided)
2)It prevents the opening of the doors
from inside the passenger
compartment, serving as an obstacle to
break-in attempts (e.g. broken
window). We recommend that you
activate the device each time you park
your car.
Device activation: double press the
button of the key. The direction
indicators flash 3 times and the LED
above the internal button flashes to
indicate that the device has been
activated
fig. 4. The device does not
switch on if one or more doors are not
properly shut.Device deactivation: press button
of the key or rotate the ignition key to
MAR.
WARNING
1)Press button B fig. 3 only with the key
away from your body, specifically from your
eyes and from objects which could get
damaged (e.g. your clothes). Do not leave
the key unattended, to prevent people,
especially children, from inadvertently
pressing the button.
2)Once the safe lock system is engaged, it
is impossible to open the doors from
inside the car. Therefore, before getting out
of the car check that there is no-one left
on board.
3F0Y0019C4F0Y0039C
9
Page 21 of 240
STOP/START SYSTEM
HANDLING
The dual-zone automatic climate
control manages the Stop/Start system
(engine off and vehicle at a standstill)
in order to guarantee sufficient comfort
inside the vehicle.
IMPORTANT In particularly severe
climate conditions it is recommended to
limit the use of the Stop/Start system
to prevent the compressor from
continuously switching on and off, with
consequent rapid misting of the
windows and accumulation of humidity
with unpleasant smells in the passenger
compartment.
IMPORTANT When the Stop/Start
system is on (engine off and vehicle at a
standstill), the automatic recirculation
management is turned off always taking
air in from outside, to reduce the
probability of the windows misting up
(as the compressor is off).
WARNING
19)It is inadvisable to use internal air
recirculation when the outside temperature
is low, since the windows could mist up
rapidly.
WARNING
5)The climate control system detects the
passenger compartment temperature
using a mean radiant temperature sensor
located in the interior rear view mirror
and protected by a specific cover.
Obstructing the field of view of this sensor
with any object could cause the climate
control system to operate with less than
optimal efficiency.
WARNING
2)The system uses R134a coolant which
does not pollute the environment in the
event of accidental leakage. Under no
circumstances use R12 fluid, which is
incompatible with the components of the
system.
EXTERIOR LIGHTS
The ignition key has to be in the MAR
position for the exterior lights to come
on.
DAYTIME RUNNING
LIGHTS (DRL)
"Daytime Running Lights"
(for versions/markets, where provided)
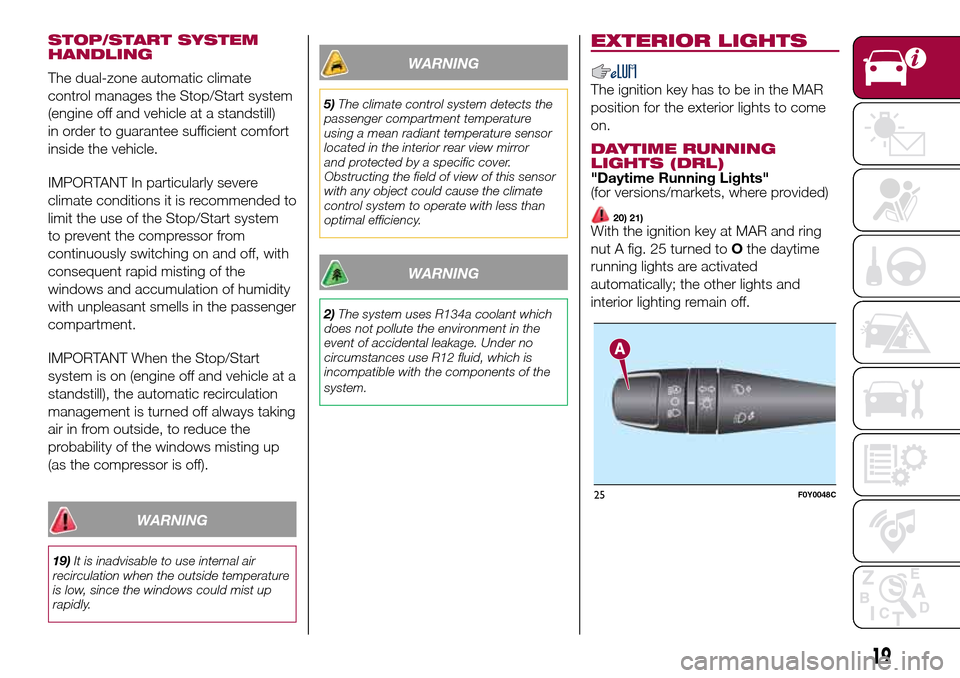
20) 21)With the ignition key at MAR and ring
nut A fig. 25 turned toOthe daytime
running lights are activated
automatically; the other lights and
interior lighting remain off.
25F0Y0048C
19
Page 22 of 240
SIDE LIGHTS AND
DIPPED BEAM
HEADLIGHTS
With the ignition key turned to MAR,
turn ring nut A fig. 25 to
. If dipped
headlights are activated, the daytime
running lights switch off and the side
lights and dipped headlights switch on.
The
warning light will come on
in the instrument panel.
When the ignition key is turned to
STOP or removed and the ring nut A is
turned fromOto
, all the side
lights and number plate lights come on.
The
warning light will come on in
the instrument panel.
AUTOMATIC LIGHT
CONTROL (AUTOLIGHT)
(Dusk sensor)
(for versions/markets, where provided)
This infrared LED sensor is located
on the windscreen and detects the
variations in outside brightness
depending on the light sensitivity set
through the Setup Menu.
Activation: Turn ring nut A fig. 25 to
position
.
With dusk sensor active, it is not
possible to keep the main beam
headlights on constantly; only flashing
is permitted. To switch high beams
on constantly, turn ring nut A to
and
pull the stalk towards the steering
wheel.On automatic sensor controlled
deactivation, the dipped headlights are
deactivated first, followed by the side
lights a few seconds later.
IMPORTANT The sensor cannot detect
the presence of fog. These lights must
therefore be switched on manually in
these circumstances.
MAIN BEAM HEADLIGHTS
To activate the main beam headlights,
with ring nut A fig. 25 at
, pull the
stalk towards the steering wheel
beyond the end of travel position. The
warning light switches on in the
instrument panel.
When the stalk is pulled towards the
steering wheel again, beyond the end
of travel position, the main beam
headlights deactivate, the dipped
headlights reactivate and the
warning light switches off.
It is not possible to switch on the main
beam headlights constantly if automatic
light control is active.
FLASHING
Lights can flash by pulling the stalk
towards the steering wheel (unstable
position) regardless of the position
of ring nut A fig. 25. The
warning
light switches on in the instrument
panel.
DIRECTION INDICATORS
Bring the stalk to the (stable) position:
upwards:right direction indicator
activation /downwards:left direction
indicator activation.
Warning light
orwill blink on the
instrument panel.
The direction indicators are switched off
automatically when the steering wheel
is straightened.
"Lane Change" function
If you wish to signal a lane change,
place the left stalk in the unstable
position for less than half a second.
The direction indicator on the side
selected will flash five times and then
switch off automatically.
“Cornering lights”
When the dipped beam headlights are
on and the speed is below 40 km/h,
if the steering wheel rotation angle
is large or the direction indicators are
on, a light (incorporated in the fog light)
will be operated on the relevant side
to improve visibility at night time.
20
GETTING TO KNOW YOUR CAR
Page 23 of 240
"FOLLOW ME HOME"
DEVICE
This allows the space in front of the
vehicle to be lit for a set time.
Activation
The lights turning on time is adjustable
and programmable interacting via
the Setup Menu of the instrument
panel.
It is possible to choose between 0, 30,
60 up to 90 seconds. The device is
activated automatically after turning off
the car and having rotated the ring
nut A fig. 25 to positionO.
It is also possible (if the program
described above is set to "0" seconds)
to set the headlights start time by
pulling the left stalk toward you once or
more times (same procedure to activate
the main beam lights). In this case it is
possible to choose between 0, 30,
60, 90 up to a maximum of 210
seconds.
Each time the stalk is operated, the
warning light
on the instrument
panel switches on. The display shows a
message and the time set for the
function. The
warning light comes
on when the stalk is first moved and
stays on until the function is
automatically deactivated.
Deactivation
This function is deactivated by
switching on the headlights, the side
lights or bringing the ignition device to
MAR.
WARNING
20)The daytime running lights are an
alternative to the dipped beam headlights
for driving in countries where it is
compulsory to have lights on during the
day; where it is not compulsory, the use of
daytime running lights is permitted.
21)Daytime running lights cannot replace
dipped beam headlights when driving at
night or through tunnels. The use of
daytime running lights is governed by the
highway code of the country in which
you are driving. Comply with legal
requirements.
WINDOW CLEANING
WINDSCREEN
WIPER/WASHER
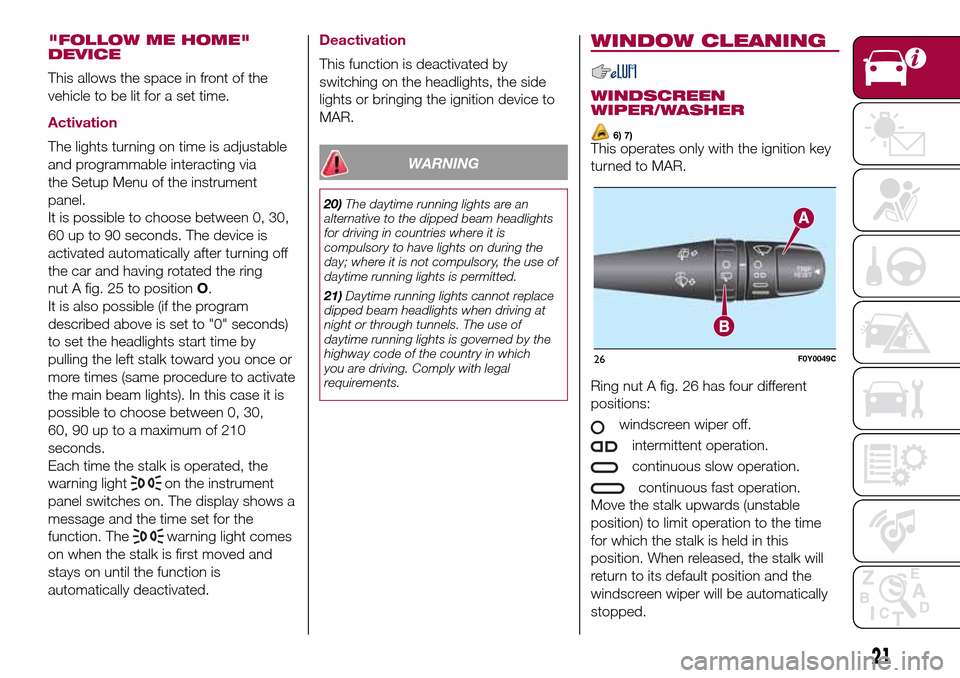
6) 7)This operates only with the ignition key
turned to MAR.
Ring nut A fig. 26 has four different
positions:
windscreen wiper off.
intermittent operation.
continuous slow operation.
continuous fast operation.
Move the stalk upwards (unstable
position) to limit operation to the time
for which the stalk is held in this
position. When released, the stalk will
return to its default position and the
windscreen wiper will be automatically
stopped.
26F0Y0049C
21
Page 25 of 240
8)Do not activate the rain sensor while
washing the vehicle in an automatic
washing system.
9)If ice is found on the windscreen, make
sure that the device was disconnected
properly.
10)Do not use the rear window wiper to
remove layers of snow or ice. In such
conditions, the wiper may be subjected to
excessive stress and the motor cut-out
switch, which prevents operation for a few
seconds, may intervene. If operation is
not subsequently restored, contact a Fiat
Dealership.ROOF LIGHTS
FRONT ROOF LIGHT
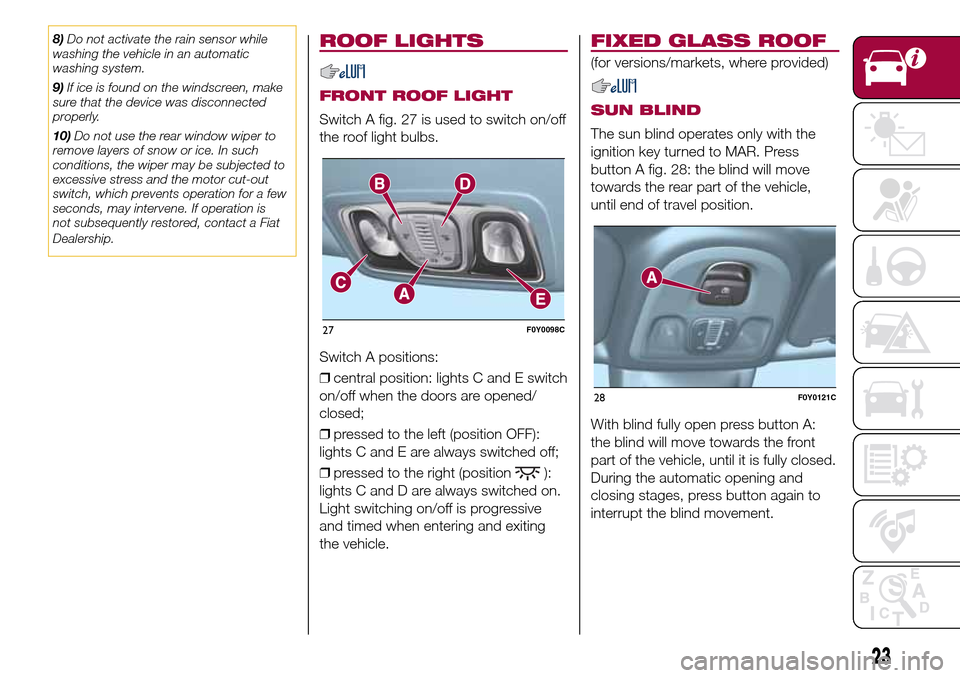
Switch A fig. 27 is used to switch on/off
the roof light bulbs.
Switch A positions:
❒central position: lights C and E switch
on/off when the doors are opened/
closed;
❒pressed to the left (position OFF):
lights C and E are always switched off;
❒pressed to the right (position
):
lights C and D are always switched on.
Light switching on/off is progressive
and timed when entering and exiting
the vehicle.
FIXED GLASS ROOF
(for versions/markets, where provided)
SUN BLIND
The sun blind operates only with the
ignition key turned to MAR. Press
button A fig. 28: the blind will move
towards the rear part of the vehicle,
until end of travel position.
With blind fully open press button A:
the blind will move towards the front
part of the vehicle, until it is fully closed.
During the automatic opening and
closing stages, press button again to
interrupt the blind movement.
27F0Y0098C
28F0Y0121C
23
Page 41 of 240
KNOWING THE INSTRUMENT PANEL
This section of the handbook gives you
all the information you need to
understand, interpret and use the
instrument panel correctly.CONTROL PANEL AND
ON-BOARD INSTRUMENTS ........... 40
DISPLAY ......................................... 42
WARNING LIGHTS AND
MESSAGES .................................... 45
-Red warning lights............................ 45
-Amber warning lights........................ 51
-Green warning lights........................ 58
-Blue warning lights........................... 59
39
Page 42 of 240
CONTROL PANEL AND ON-BOARD INSTRUMENTS
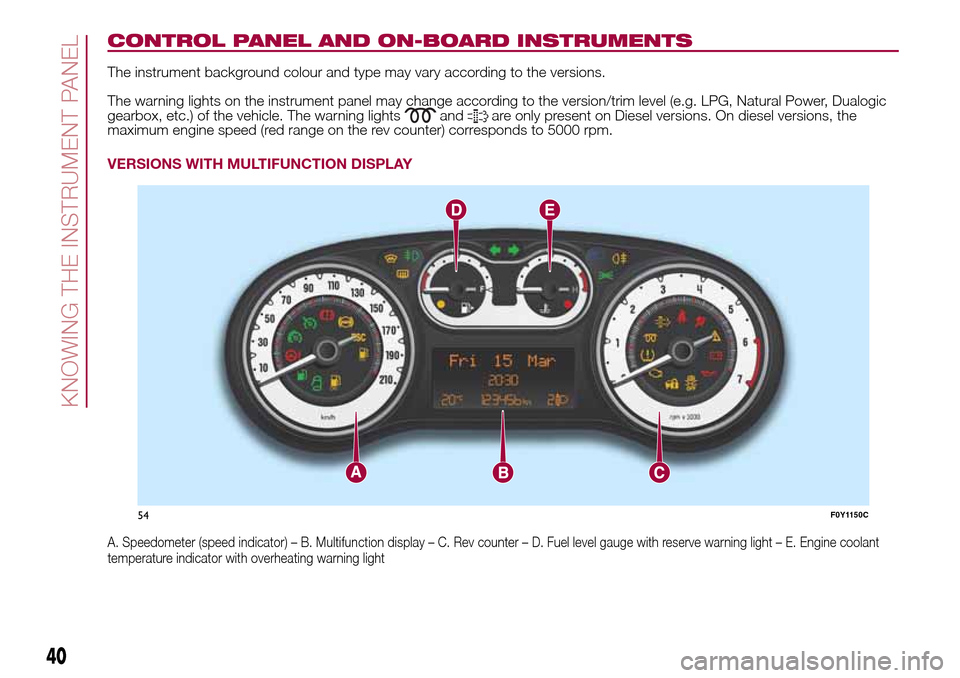
The instrument background colour and type may vary according to the versions.
The warning lights on the instrument panel may change according to the version/trim level (e.g. LPG, Natural Power, Dualogic
gearbox, etc.) of the vehicle. The warning lights
andare only present on Diesel versions. On diesel versions, the
maximum engine speed (red range on the rev counter) corresponds to 5000 rpm.
VERSIONS WITH MULTIFUNCTION DISPLAY
A. Speedometer (speed indicator) – B. Multifunction display – C. Rev counter – D. Fuel level gauge with reserve warning light – E. Engine coolant
temperature indicator with overheating warning light
54F0Y1150C
40
KNOWING THE INSTRUMENT PANEL