2017 FIAT 500L LIVING refuelling
[x] Cancel search: refuellingPage 107 of 240
In addition to the electrical branches,
the car's electrical system can be
connected only to the supply cable for
an electric brake and to the cable for an
internal trailer light, though not more
than 15 W. To connect, use the preset
control unit with a battery cable with
cross-section no less than 2.5 mm
2.
IMPORTANT The use of auxiliary loads
other than external lights (electric brake,
winch, etc.) must occur with engine
running.
IMPORTANT To install a tow hook
contact a Fiat Dealership.
WARNING
112)The ABS with which the vehicle is
equipped will not control the braking
system of the trailer. Take particular care
when travelling on slippery roads.
113)Never modify the braking system of
the vehicle to control the trailer brake. The
trailer braking system must be fully
independent of the vehicle’s hydraulic
system.
114)After fitting, fixing screw holes must
be sealed to prevent an exhaust gas inlet.
REFUELLING THE
VEHICLE
115) 116) 117)61)
During refuelling, switch the engine off,
engage the handbrake, turn the ignition
key to STOP and do not smoke.
PETROL ENGINES
Use unleaded petrol only, with octane
number (RON) no lower than 95.
DIESEL ENGINES
Only use Diesel for motor vehicles (EN
590 specification).
When using or parking the car for a
long time in the mountains or cold
areas, it is advisable to refuel using
locally available diesel. In this case, it is
also advisable to keep the tank over
50% full.
REFUELLING
PROCEDURE
Diesel and petrol versions
Proceed as follows:
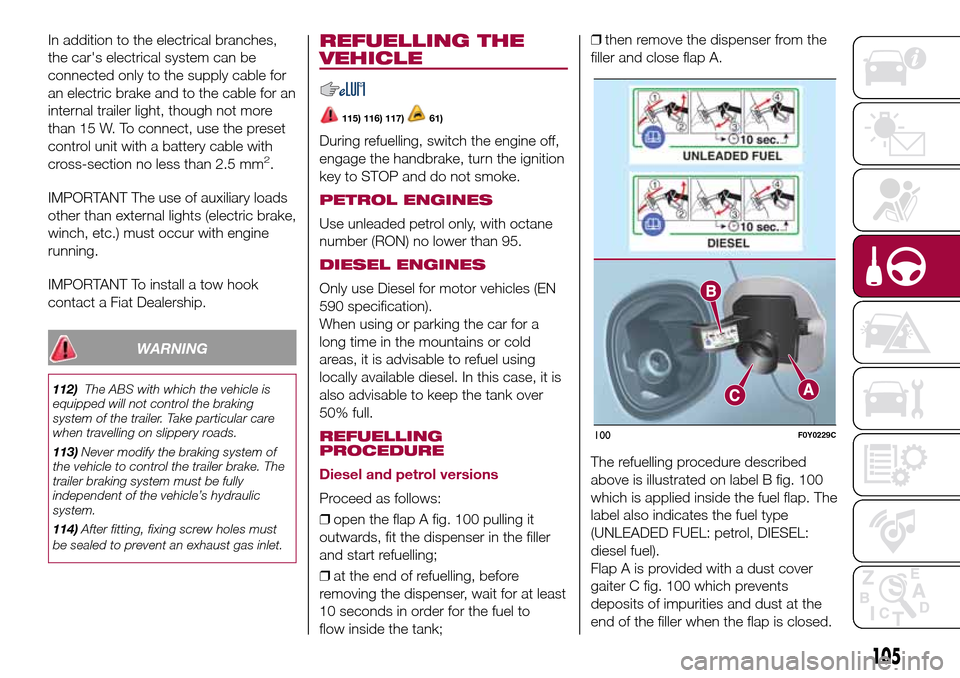
❒open the flap A fig. 100 pulling it
outwards, fit the dispenser in the filler
and start refuelling;
❒at the end of refuelling, before
removing the dispenser, wait for at least
10 seconds in order for the fuel to
flow inside the tank;❒then remove the dispenser from the
filler and close flap A.
The refuelling procedure described
above is illustrated on label B fig. 100
which is applied inside the fuel flap. The
label also indicates the fuel type
(UNLEADED FUEL: petrol, DIESEL:
diesel fuel).
Flap A is provided with a dust cover
gaiter C fig. 100 which prevents
deposits of impurities and dust at the
end of the filler when the flap is closed.
100F0Y0229C
105
Page 108 of 240
Emergency refuelling
Proceed as follows:
❒open the luggage compartment and
take the adapter, located in the tool box
or in the Fix&Go Automatic container
(according to the versions);
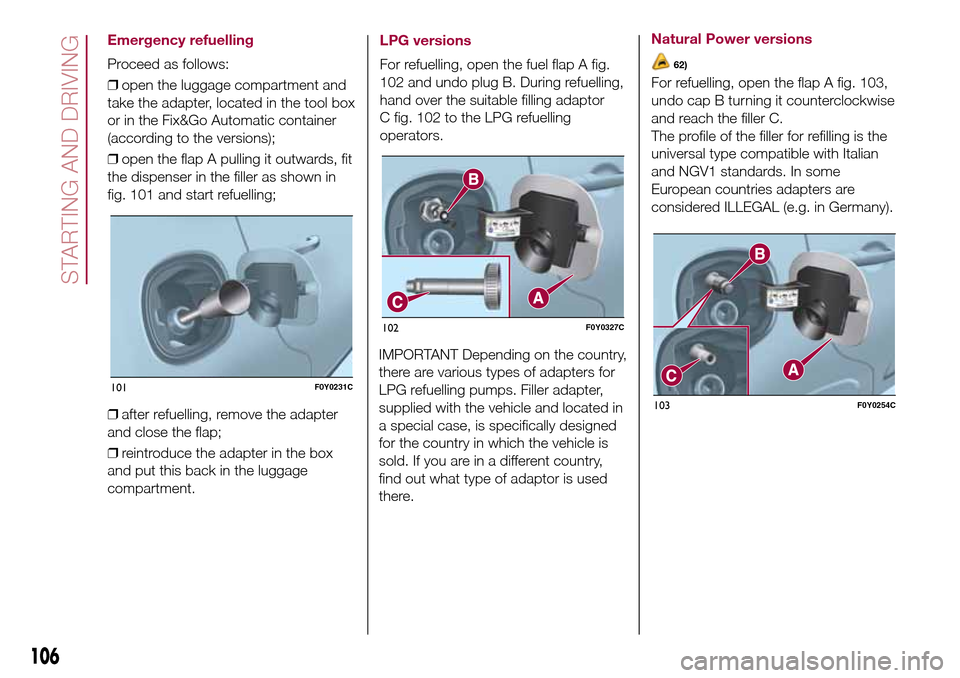
❒open the flap A pulling it outwards, fit
the dispenser in the filler as shown in
fig. 101 and start refuelling;
❒after refuelling, remove the adapter
and close the flap;
❒reintroduce the adapter in the box
and put this back in the luggage
compartment.
LPG versions
For refuelling, open the fuel flap A fig.
102 and undo plug B. During refuelling,
hand over the suitable filling adaptor
C fig. 102 to the LPG refuelling
operators.
IMPORTANT Depending on the country,
there are various types of adapters for
LPG refuelling pumps. Filler adapter,
supplied with the vehicle and located in
a special case, is specifically designed
for the country in which the vehicle is
sold. If you are in a different country,
find out what type of adaptor is used
there.
Natural Power versions
62)
For refuelling, open the flap A fig. 103,
undo cap B turning it counterclockwise
and reach the filler C.
The profile of the filler for refilling is the
universal type compatible with Italian
and NGV1 standards. In some
European countries adapters are
considered ILLEGAL (e.g. in Germany).
101F0Y0231C
102F0Y0327C
103F0Y0254C
106
STARTING AND DRIVING
Page 109 of 240
WARNING
61)The vehicle must only be filled with
diesel fuel for motor vehicles, in
compliance with European Standard EN
590. The use of other products or mixtures
may damage the engine beyond repair
and consequently invalidate the warranty,
due to the damage caused. If you
accidentally refuel with another type of fuel,
do not start the engine, and drain the
tank. If the engine has run, even for a very
short time, you will need to have the entire
fuel supply system emptied in addition to
the tank.
62)The plates (provided with the vehicle
documents) show the date when the
first cylinder inspection/test is due.
Methane refuelling station operators are
not authorised to refill the cylinders when
the inspection date has expired.
107
WARNING
115)Do not apply any object/plug to the
end of the filler which is not provided
for the vehicle. Using non-approved
objects/plugs may cause pressure
increase in the tank, leading to dangerous
conditions.
116)Do not get close to the filler of the
tank with naked flames or lit cigarettes: risk
of fire. Do not get too close to the filler
with your face, in order not to inhale
harmful vapours.
117)Do not use a mobile phone near the
fuel pump: risk of fire.
Page 115 of 240
120)Vehicle handling is modified with the
space-saver wheel fitted. Avoid violent
acceleration and braking, abrupt steering
and fast cornering. The overall duration
of the space-saver wheel is about 3000
km, after which the relevant tyre must be
replaced with another one of the same
type. Never install a standard tyre on a rim
that is designed for use with a space-saver
wheel. Have the wheel repaired and refitted
as soon as possible. Using two or more
space-saver wheels at the same time
is forbidden. Do not grease the threads of
the stud bolts before fitting them: they
might slip out when driving.
121)The jack shall only be used for raising
the car model it has been supplied with.
Never use the jack for other purposes,
such as raising other car models. Never
use the jack for repair operations under the
vehicle. Incorrect positioning of the jack
may cause the vehicle to fall. Do not use
the jack for loads higher than the one
shown on its label. The space-saver wheel
cannot be fitted with snow chains. If a
front (drive) tyre is punctured and chains
are needed, use a standard wheel from the
rear axle and install the space-saver wheel
on the rear axle. This way, with two
standard front driving wheels, you can
install the snow chains on them.
122)Incorrect hub cap assembly may
cause it to come off when the vehicle is
moving. Never tamper with the inflation
valve. Never introduce tools of any kind
between rim and tyre. Check tyre and
space-saver wheel pressures regularly,
complying with the values given in the
"Technical specifications" chapter.123)At the end of the operation of
raising/locking the spare wheel, the ignition
key must be extracted, taking care not to
turn it in the wrong direction to facilitate the
extraction of the key itself, to prevent the
attachment device from being released and
the wheel assembly not being securely
retained.
WARNING
63)Contact a Fiat Dealership as soon as
possible to have the correct tightening
of the wheel stud bolts checked.
"Fix&Go Automatic"
kit
124) 125) 126) 127) 128) 129) 130) 131)
64)3)
DESCRIPTION
The "Fix&Go Automatic" kit is located in
the luggage compartment, inside a
dedicated container. Inside the
container there are also a screwdriver,
the tow ring and the funnel for
refuelling, in the event of an emergency.
To access the kit, open the tailgate,
remove the load platform and lift the
carpet.
LPG versions: a tool box secured to
the luggage compartment carpet with
dedicated fastenings contains the kit.
The kit includes:
❒a bottle A fig. 115 containing sealing
fluid and fitted with: filling tube B and
adhesive label C with the wording
“max. 80 km/h” to be placed in a
clearly visible position (e.g. on
the dashboard) after repairing the tyre;
❒a compressor D including a pressure
gauge and connections, found in the
compartment;
113
Page 237 of 240
Performance (top speed) ................ 177
Prescriptions for handling the
vehicle at the end of its life ........... 205
Pretensioners ................................. 74
Rain sensor .................................. 22
Rear seats...................................... 11
Rear view camera .......................... 103
Rear view mirrors ........................... 15
Rear window wiper/washer ............ 22
Reconfigurable multifunction
display ......................................... 42
Refuelling the vehicle ...................... 105
Rims and tyres provided................. 167
Roof lights...................................... 23
SBR (Seat Belt Reminder)
system ......................................... 73
Scheduled servicing ....................... 133
Seat belts....................................... 72
Seats ............................................. 11
Setup menu ................................... 43
Side bags....................................... 90side direction indicators (bulb
replacement) ................................ 119
Side lights/daytime running lights
(DRL) (bulb replacement) .............. 119
Side/taillights - dipped beam
headlights .................................... 20
Speed Limiter................................. 100
Starting the engine ......................... 93
Steering lock .................................. 10
Steering wheel ............................... 14
Stop/Start system .......................... 98
Supplementary Restraint System
(SRS) - Airbag .............................. 86
Supplies ......................................... 191
Symbols......................................... 4The keys ....................................... 8
Third-row rear seats ....................... 12
Tips, controls and general
information ................................... 207
Towing the vehicle .......................... 130
Towing trailers ................................ 104Traction Plus system ...................... 67
Tyre inflation pressure ..................... 171
Uconnect 5 Radio/Uconnect 5
Radio Nav .................................... 209
Use of the Owner Handbook.......... 3
Using the Dualogic gearbox ........... 96
Using the manual gearbox ............. 95
Version with LPG system .............. 33
Version with methane system
(Natural Power) ............................ 36
Warning lights and messages ....... 45
Weights.......................................... 180
Wheel (changing)............................ 109
Wheels and tyres ........................... 157
Wheels ........................................... 167
Window bag .................................. 90
Window cleaning............................ 21
Windscreen/rear window wiper ...... 155
Windscreen wiper/washer .............. 21