2017 FIAT 500L LIVING headlights
[x] Cancel search: headlightsPage 22 of 240
SIDE LIGHTS AND
DIPPED BEAM
HEADLIGHTS
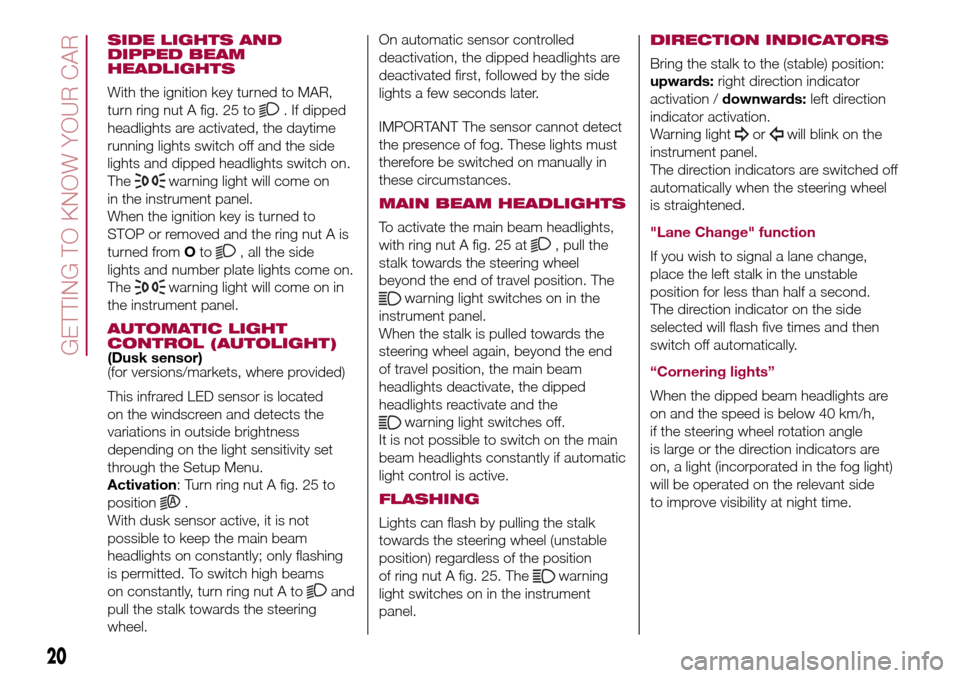
With the ignition key turned to MAR,
turn ring nut A fig. 25 to
. If dipped
headlights are activated, the daytime
running lights switch off and the side
lights and dipped headlights switch on.
The
warning light will come on
in the instrument panel.
When the ignition key is turned to
STOP or removed and the ring nut A is
turned fromOto
, all the side
lights and number plate lights come on.
The
warning light will come on in
the instrument panel.
AUTOMATIC LIGHT
CONTROL (AUTOLIGHT)
(Dusk sensor)
(for versions/markets, where provided)
This infrared LED sensor is located
on the windscreen and detects the
variations in outside brightness
depending on the light sensitivity set
through the Setup Menu.
Activation: Turn ring nut A fig. 25 to
position
.
With dusk sensor active, it is not
possible to keep the main beam
headlights on constantly; only flashing
is permitted. To switch high beams
on constantly, turn ring nut A to
and
pull the stalk towards the steering
wheel.On automatic sensor controlled
deactivation, the dipped headlights are
deactivated first, followed by the side
lights a few seconds later.
IMPORTANT The sensor cannot detect
the presence of fog. These lights must
therefore be switched on manually in
these circumstances.
MAIN BEAM HEADLIGHTS
To activate the main beam headlights,
with ring nut A fig. 25 at
, pull the
stalk towards the steering wheel
beyond the end of travel position. The
warning light switches on in the
instrument panel.
When the stalk is pulled towards the
steering wheel again, beyond the end
of travel position, the main beam
headlights deactivate, the dipped
headlights reactivate and the
warning light switches off.
It is not possible to switch on the main
beam headlights constantly if automatic
light control is active.
FLASHING
Lights can flash by pulling the stalk
towards the steering wheel (unstable
position) regardless of the position
of ring nut A fig. 25. The
warning
light switches on in the instrument
panel.
DIRECTION INDICATORS
Bring the stalk to the (stable) position:
upwards:right direction indicator
activation /downwards:left direction
indicator activation.
Warning light
orwill blink on the
instrument panel.
The direction indicators are switched off
automatically when the steering wheel
is straightened.
"Lane Change" function
If you wish to signal a lane change,
place the left stalk in the unstable
position for less than half a second.
The direction indicator on the side
selected will flash five times and then
switch off automatically.
“Cornering lights”
When the dipped beam headlights are
on and the speed is below 40 km/h,
if the steering wheel rotation angle
is large or the direction indicators are
on, a light (incorporated in the fog light)
will be operated on the relevant side
to improve visibility at night time.
20
GETTING TO KNOW YOUR CAR
Page 23 of 240
"FOLLOW ME HOME"
DEVICE
This allows the space in front of the
vehicle to be lit for a set time.
Activation
The lights turning on time is adjustable
and programmable interacting via
the Setup Menu of the instrument
panel.
It is possible to choose between 0, 30,
60 up to 90 seconds. The device is
activated automatically after turning off
the car and having rotated the ring
nut A fig. 25 to positionO.
It is also possible (if the program
described above is set to "0" seconds)
to set the headlights start time by
pulling the left stalk toward you once or
more times (same procedure to activate
the main beam lights). In this case it is
possible to choose between 0, 30,
60, 90 up to a maximum of 210
seconds.
Each time the stalk is operated, the
warning light
on the instrument
panel switches on. The display shows a
message and the time set for the
function. The
warning light comes
on when the stalk is first moved and
stays on until the function is
automatically deactivated.
Deactivation
This function is deactivated by
switching on the headlights, the side
lights or bringing the ignition device to
MAR.
WARNING
20)The daytime running lights are an
alternative to the dipped beam headlights
for driving in countries where it is
compulsory to have lights on during the
day; where it is not compulsory, the use of
daytime running lights is permitted.
21)Daytime running lights cannot replace
dipped beam headlights when driving at
night or through tunnels. The use of
daytime running lights is governed by the
highway code of the country in which
you are driving. Comply with legal
requirements.
WINDOW CLEANING
WINDSCREEN
WIPER/WASHER
6) 7)This operates only with the ignition key
turned to MAR.
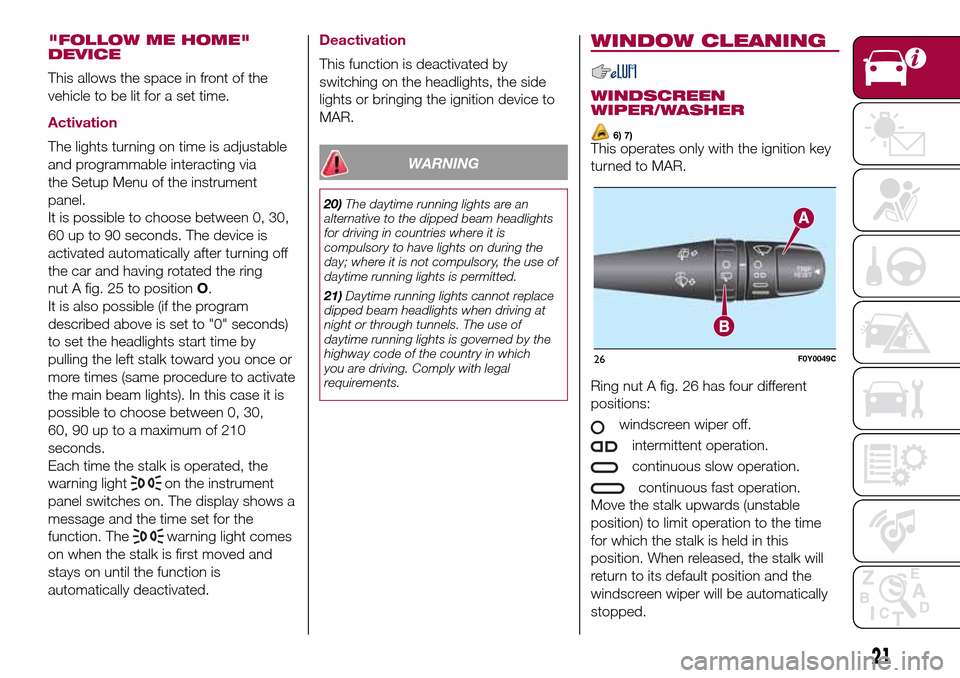
Ring nut A fig. 26 has four different
positions:
windscreen wiper off.
intermittent operation.
continuous slow operation.
continuous fast operation.
Move the stalk upwards (unstable
position) to limit operation to the time
for which the stalk is held in this
position. When released, the stalk will
return to its default position and the
windscreen wiper will be automatically
stopped.
26F0Y0049C
21
Page 44 of 240
DISPLAY
MULTIFUNCTION
DISPLAY
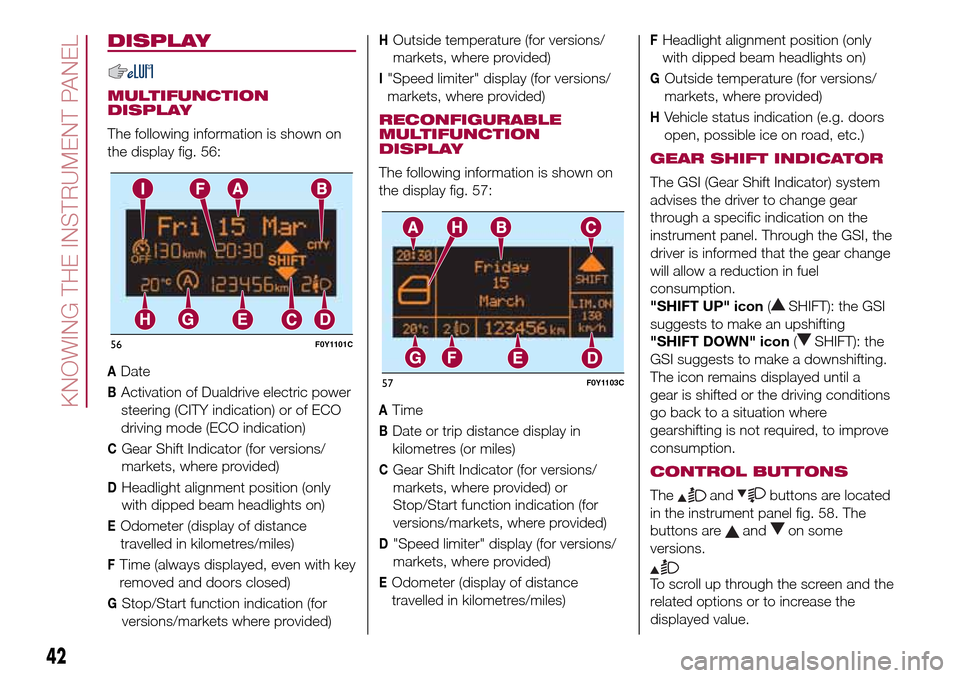
The following information is shown on
the display fig. 56:
ADate
BActivation of Dualdrive electric power
steering (CITY indication) or of ECO
driving mode (ECO indication)
CGear Shift Indicator (for versions/
markets, where provided)
DHeadlight alignment position (only
with dipped beam headlights on)
EOdometer (display of distance
travelled in kilometres/miles)
FTime (always displayed, even with key
removed and doors closed)
GStop/Start function indication (for
versions/markets where provided)
HOutside temperature (for versions/
markets, where provided)
I"Speed limiter" display (for versions/
markets, where provided)
RECONFIGURABLE
MULTIFUNCTION
DISPLAY
The following information is shown on
the display fig. 57:
ATime
BDate or trip distance display in
kilometres (or miles)
CGear Shift Indicator (for versions/
markets, where provided) or
Stop/Start function indication (for
versions/markets, where provided)
D"Speed limiter" display (for versions/
markets, where provided)
EOdometer (display of distance
travelled in kilometres/miles)
FHeadlight alignment position (only
with dipped beam headlights on)
GOutside temperature (for versions/
markets, where provided)
HVehicle status indication (e.g. doors
open, possible ice on road, etc.)
GEAR SHIFT INDICATOR
The GSI (Gear Shift Indicator) system
advises the driver to change gear
through a specific indication on the
instrument panel. Through the GSI, the
driver is informed that the gear change
will allow a reduction in fuel
consumption.
"SHIFT UP" icon(
SHIFT): the GSI
suggests to make an upshifting
"SHIFT DOWN" icon(
SHIFT): the
GSI suggests to make a downshifting.
The icon remains displayed until a
gear is shifted or the driving conditions
go back to a situation where
gearshifting is not required, to improve
consumption.
CONTROL BUTTONS
Theandbuttons are located
in the instrument panel fig. 58. The
buttons are
andon some
versions.
To scroll up through the screen and the
related options or to increase the
displayed value.
56F0Y1101C
57F0Y1103C
42
KNOWING THE INSTRUMENT PANEL
Page 60 of 240
Green warning lights
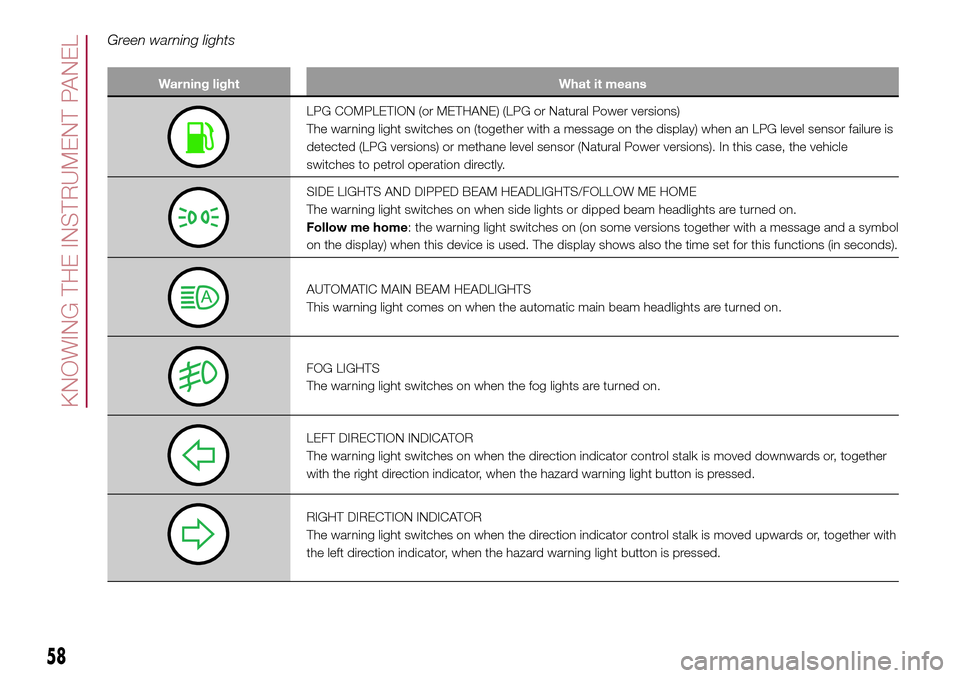
Warning light What it means
LPG COMPLETION (or METHANE) (LPG or Natural Power versions)
The warning light switches on (together with a message on the display) when an LPG level sensor failure is
detected (LPG versions) or methane level sensor (Natural Power versions). In this case, the vehicle
switches to petrol operation directly.
SIDE LIGHTS AND DIPPED BEAM HEADLIGHTS/FOLLOW ME HOME
The warning light switches on when side lights or dipped beam headlights are turned on.
Follow me home: the warning light switches on (on some versions together with a message and a symbol
on the display) when this device is used. The display shows also the time set for this functions (in seconds).
AUTOMATIC MAIN BEAM HEADLIGHTS
This warning light comes on when the automatic main beam headlights are turned on.
FOG LIGHTS
The warning light switches on when the fog lights are turned on.
LEFT DIRECTION INDICATOR
The warning light switches on when the direction indicator control stalk is moved downwards or, together
with the right direction indicator, when the hazard warning light button is pressed.
RIGHT DIRECTION INDICATOR
The warning light switches on when the direction indicator control stalk is moved upwards or, together with
the left direction indicator, when the hazard warning light button is pressed.
58
KNOWING THE INSTRUMENT PANEL
Page 61 of 240
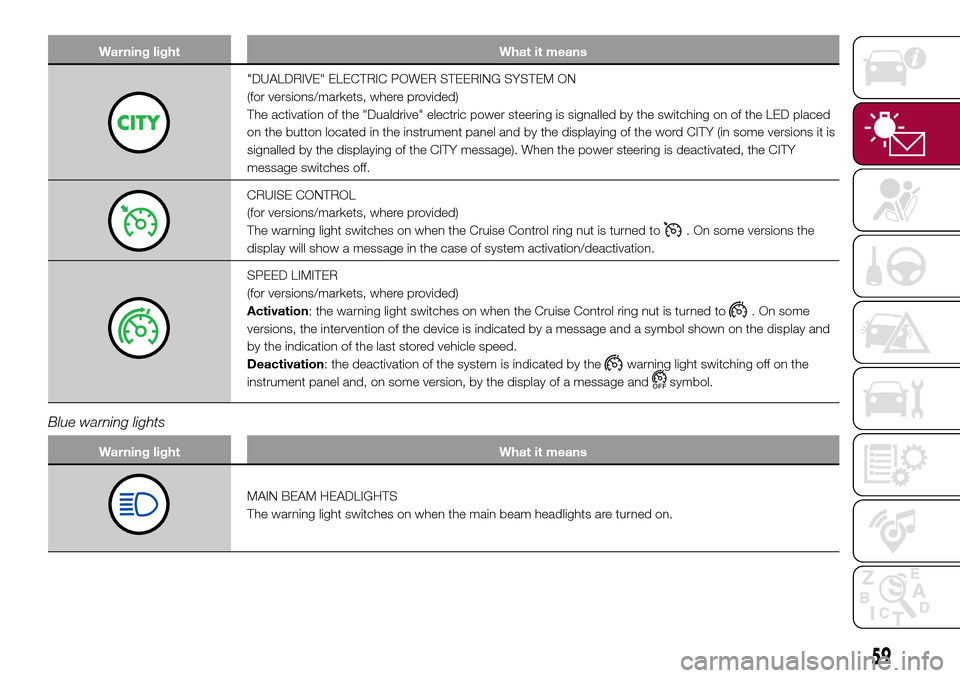
Warning light What it means
"DUALDRIVE" ELECTRIC POWER STEERING SYSTEM ON
(for versions/markets, where provided)
The activation of the "Dualdrive" electric power steering is signalled by the switching on of the LED placed
on the button located in the instrument panel and by the displaying of the word CITY (in some versions it is
signalled by the displaying of the CITY message). When the power steering is deactivated, the CITY
message switches off.
CRUISE CONTROL
(for versions/markets, where provided)
The warning light switches on when the Cruise Control ring nut is turned to
. On some versions the
display will show a message in the case of system activation/deactivation.
SPEED LIMITER
(for versions/markets, where provided)
Activation: the warning light switches on when the Cruise Control ring nut is turned to
. On some
versions, the intervention of the device is indicated by a message and a symbol shown on the display and
by the indication of the last stored vehicle speed.
Deactivation: the deactivation of the system is indicated by the
warning light switching off on the
instrument panel and, on some version, by the display of a message and
symbol.
Blue warning lights
Warning light What it means
MAIN BEAM HEADLIGHTS
The warning light switches on when the main beam headlights are turned on.
59
Page 118 of 240
IMPORTANT When the weather is cold
or damp or after heavy rain or washing,
the surface of headlights or rear lights,
may steam up and/or form drops of
condensation on the inside. This is
a natural phenomenon due to the
difference in temperature and humidity
between the inside and the outside
of the glass which does not indicate a
fault and does not compromise the
normal operation of lighting devices.
The mist disappears quickly when the
lights are turned on, starting from
the centre of the diffuser, extending
progressively towards the edges.
116
IN AN EMERGENCY
Page 119 of 240
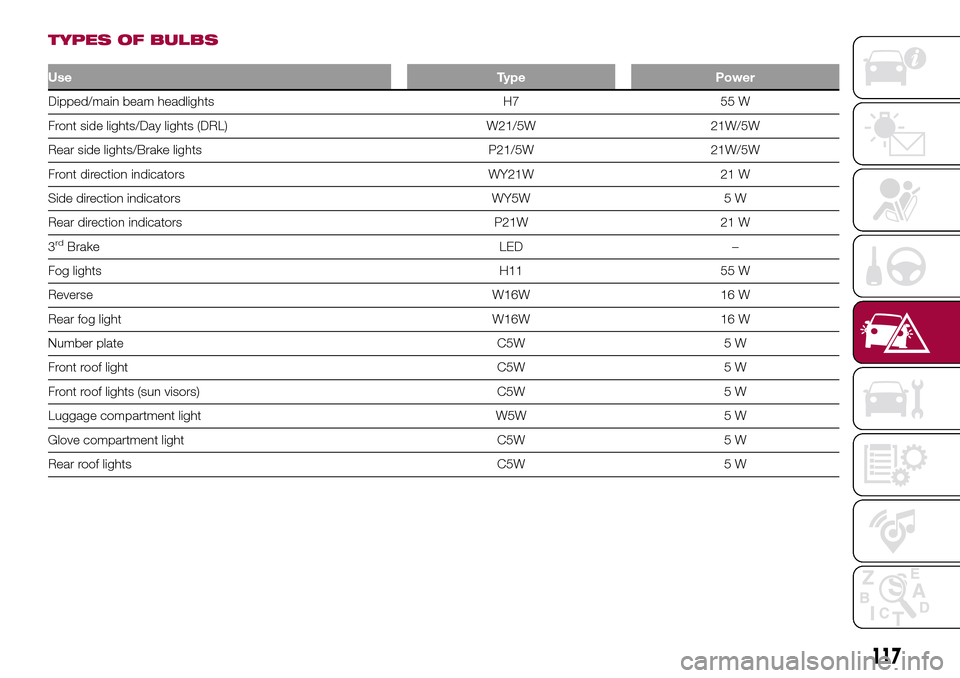
TYPES OF BULBS
UseType Power
Dipped/main beam headlights H7 55 W
Front side lights/Day lights (DRL) W21/5W 21W/5W
Rear side lights/Brake lights P21/5W 21W/5W
Front direction indicators WY21W 21 W
Side direction indicators WY5W 5 W
Rear direction indicators P21W 21 W
3
rdBrake LED –
Fog lights H11 55 W
Reverse W16W 16 W
Rear fog light W16W 16 W
Number plate C5W 5 W
Front roof light C5W 5 W
Front roof lights (sun visors) C5W 5 W
Luggage compartment light W5W 5 W
Glove compartment light C5W 5 W
Rear roof lights C5W 5 W
117
Page 120 of 240
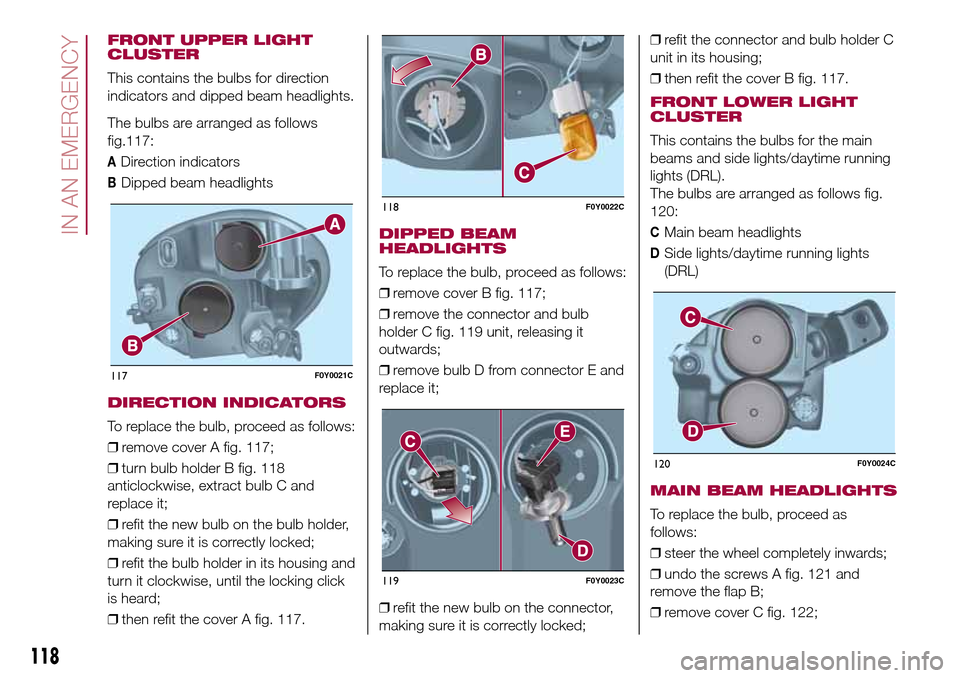
FRONT UPPER LIGHT
CLUSTER
This contains the bulbs for direction
indicators and dipped beam headlights.
The bulbs are arranged as follows
117:
ADirection indicators
BDipped beam headlights
DIRECTION INDICATORS
To replace the bulb, proceed as follows:
❒remove cover A fig. 117;
❒turn bulb holder B fig. 118
anticlockwise, extract bulb C and
replace it;
❒refit the new bulb on the bulb holder,
making sure it is correctly locked;
❒refit the bulb holder in its housing and
turn it clockwise, until the locking click
is heard;
❒then refit the cover A fig. 117.
DIPPED BEAM
HEADLIGHTS
To replace the bulb, proceed as follows:
❒remove cover B fig. 117;
❒remove the connector and bulb
holder C fig. 119 unit, releasing it
outwards;
❒remove bulb D from connector E and
replace it;
❒refit the new bulb on the connector,
making sure it is correctly locked;❒refit the connector and bulb holder C
unit in its housing;
❒then refit the cover B fig. 117.
FRONT LOWER LIGHT
CLUSTER
This contains the bulbs for the main
beams and side lights/daytime running
lights (DRL).
The bulbs are arranged as follows fig.
120:
CMain beam headlights
DSide lights/daytime running lights
(DRL)
MAIN BEAM HEADLIGHTS
To replace the bulb, proceed as
follows:
❒steer the wheel completely inwards;
❒undo the screws A fig. 121 and
remove the flap B;
❒remove cover C fig. 122;
117F0Y0021C
118F0Y0022C
119F0Y0023C
120F0Y0024C
118
IN AN EMERGENCY
fig.