2017 FIAT 124 SPIDER weight
[x] Cancel search: weightPage 160 of 300
Direct mode is cancelled (released)
under the following conditions:
The vehicle is driven for a certain
amount of time or longer (time differs
depending on the driving conditions
while operating).
The vehicle is stopped or moving at a
slow speed.
Note: Shifting up and down while in
direct mode may not be possible
depending on the vehicle speed. In
addition, because direct mode is
cancelled (released) depending on the
rate of acceleration or if the accelerator
is fully depressed, use of the manual
shift mode is recommended if you need
to drive the vehicle in a particular gear
for long periods.
Driving Tips
Overtaking
For extra power when passing another
vehicle or climbing steep grades, press
the accelerator fully. The transmission
will shift to a lower gear, depending on
vehicle speed.
Note:
The accelerator pedal may initially
feel heavy as it is being pressed, then
feel lighter as it is pressed further. This
change in pedal force aids the engine
control system in determining how
much the accelerator pedal has been pressed for performing kickdown, and
functions to control whether or not
kickdown should be performed.
While the gear selector is in the
MANUAL (M) position and the Dynamic
Stability Control (DSC) is turned off,
manual shift mode does not switch to
automatic shift mode even if the
accelerator pedal is completely
pressed. Operate the gear selector.
Climbing steep grades from a stop
To climb a steep grade from a stopped
position:
1. Press the brake pedal.
2. Shift to DRIVE (D) or M1, depending
on the load weight and grade
steepness.
3. Release the brake pedal while
gradually accelerating.
Descending steep grades
When descending a steep grade, shift
to lower gears, depending on load
weight and grade steepness.
Descend slowly, using the brakes only
occasionally to prevent them from
overheating.
ELECTRONIC SPEED
CONTROL
Electronic Speed
Control
This is an electronically controlled
driving assistance feature that allows
the desired vehicle speed to be
maintained, without having to press the
accelerator pedal.
This feature can be used at a speed
above 25 mph (40 km/h) on long
stretches of dry, straight roads with few
variations (e.g. motorways).
It is therefore not recommended to use
this feature on city roads with traffic.
Do not use it in town.
Warning!
Do not use the cruise control under the
following conditions:
hilly terrain
steep inclines
heavy or unsteady traffic
slippery or winding roads
similar restrictions that require
inconsistent speed
Using the cruise control under the following
conditions is dangerous and could result in
loss of vehicle control.
158
STARTING AND OPERATING
Page 173 of 300
eyes that the area behind the vehicle
and the surrounding area are
completely safe:
In the image of the parking space
(or garage) shown below, although the
rear of the vehicle and the distance
guide lines seem parallel on the
monitor, on the ground they may not
be.
When you enter a parking space
with a dividing line only on one side,
the dividing line and the vehicle width
guide line may appear parallel on the
monitor but they may not be so on the
ground.
Road Conditions And
Displayed Image
There are some differences between
the road and what is actually shown on
the display.
The different perception of distance
could lead to an accident. The
conditions that can lead to a different
perception of distance, listed below,
must be taken into consideration. When The Vehicle Slopes Due To
The Weight Of Passengers And
Load:
When the vehicle is rear-heavy, the
object on the screen seems to be
further than it really is.
When The Road Behind The Vehicle
Slopes Steeply:
When the vehicle is on a steep uphill
(downhill) slope, the object on the
screen seems to be further than it
really is.GUID-07080913991991Loaded Vehicle Camera Angle
1 — Object
2— Variance
GUID-07080913992992Downhill Camera Angle
1 — Distance Between The Vehicle And
Object Displayed On The Screen
2 — Actual Distance Between The
Vehicle And Object
3 — Appears Farther Than Actual
Distance
4 — Object At Actual Position
5 — Object On Screen
171
Page 179 of 300
VEHICLE LOADING
Certification Label
As required by National Highway Traffic
Safety Administration regulations, your
vehicle has a certification label affixed to
the driver's side door or pillar.
This label contains the month and year
of manufacture, Gross Vehicle Weight
Rating (GVWR), Gross Axle Weight
Rating (GAWR) front and rear, and
Vehicle Identification Number (VIN). A
Month-Day-Hour (MDH) number is
included on this label and indicates the
Month, Day and Hour of manufacture.
The bar code that appears on the
bottom of the label is your VIN.
Gross Vehicle Weight Rating
(GVWR)
The GVWR is the total permissible
weight of your vehicle including driver,
passengers, vehicle, options and cargo.
The label also specifies maximum
capacities of front and rear axle
systems (GAWR). Total load must be
limited so GVWR and front and rear
GAWR are not exceeded.
Payload
The payload of a vehicle is defined as
the allowable load weight a truck can
carry, including the weight of the driver,
all passengers, options and cargo.
Gross Axle Weight Rating
(GAWR)
The GAWR is the maximum permissible
load on the front and rear axles. The
load must be distributed in the cargo
area so that the GAWR of each axle is
not exceeded.
Each axle GAWR is determined by the
components in the system with the
lowest load carrying capacity (axle,
springs, tires or wheels). Heavier axles
or suspension components sometimes
specified by purchasers for increased
durability does not necessarily increase
the vehicle's GVWR.
Tire Size
The tire size on the Vehicle Certification
Label represents the actual tire size on
your vehicle. Replacement tires must be
equal to the load capacity of this tire
size.
Rim Size
This is the rim size that is appropriate
for the tire size listed.
Inflation Pressure
This is the cold tire inflation pressure for
your vehicle for all loading conditions up
to full GAWR.
Curb Weight
The curb weight of a vehicle is defined
as the total weight of the vehicle with all
fluids, including vehicle fuel, at full
capacity conditions, and with no
occupants or cargo loaded into the
vehicle. The front and rear curb weight
values are determined by weighing your
vehicle on a commercial scale before
any occupants or cargo are added.
Loading
The actual total weight and the weight
of the front and rear of your vehicle at
the ground can best be determined by
weighing it when it is loaded and ready
for operation.
The entire vehicle should first be
weighed on a commercial scale to
insure that the GVWR has not been
exceeded. The weight on the front and
rear of the vehicle should then be
determined separately to be sure that
the load is properly distributed over the
front and rear axle. Weighing the vehicle
may show that the GAWR of either the
front or rear axles has been exceeded
but the total load is within the specified
GVWR. If so, weight must be shifted
from front to rear or rear to front as
appropriate until the specified weight
limitations are met. Store the heavier
items down low and be sure that the
weight is distributed equally. Stow all
loose items securely before driving.
177
Page 180 of 300
Improper weight distributions can have
an adverse effect on the way your
vehicle steers and handles and the way
the brakes operate.
Caution!
Do not load your vehicle any heavier than
the GVWR or the maximum front and rear
GAWR. If you do, parts on your vehicle can
break, or it can change the way your
vehicle handles. This could cause you to
lose control. Also overloading can shorten
the life of your vehicle.
TOWING TRAILERS
Trailer Towing
Your car is not designed for towing.
Recreational Towing
An example of "recreational towing" is
towing your vehicle behind a
motorhome.
The transmission is not designed for
towing this vehicle on all four wheels.
Caution!
DO NOT flat tow this vehicle. Damage
to the drivetrain will result. If this vehicle
requires towing, make sure the drive
wheels are OFF the ground.
Ensure that the Parking Brake is
released, and remains released, while
being towed.
Towing this vehicle in violation of the
above requirements can cause severe
transmission damage. Damage from
improper towing is not covered under the
New Vehicle Limited Warranty.
DRIVING TIPS
Engine Break-In
Recommendation
No special break-in is necessary, but a
few precautions in the first 620 miles
(1000 km) may add to the performance,
economy, and life of the vehicle:
Do not race the engine.
Do not maintain one constant speed,
either slow or fast, for a long period of
time.
Do not drive constantly at full-throttle
or high engine rpm for extended
periods of time.
Avoid unnecessary hard stops.
Avoid full-throttle starts.
Saving Fuel And
Protection Of The
Environment
How you operate your vehicle
determines how far it will travel on a
tank of fuel.
Use these suggestions to help save fuel
andreduceCO
2:
Avoid long warm-ups. Once the
engine runs smoothly, begin driving.
Avoid fast starts.
Drive at lower speeds.
Anticipate when to apply the brakes
(avoid sudden braking).
178
STARTING AND OPERATING
Page 181 of 300

Follow the maintenance schedule
and contact your Authorized Dealer.
Use the air conditioner only when
necessary.
Slow down on rough roads.
Keep the tires properly inflated.
Do not carry unnecessary weight.
Do not rest your foot on the brake
pedal while driving.
Keep the wheels in correct
alignment.
Keep windows closed at high
speeds.
Slow down when driving in
crosswinds and headwinds.
Hazardous Driving
When driving on ice or in water, snow,
mud, sand, or similar hazards:
Be cautious and allow extra distance
for braking.
Avoid sudden braking and sudden
maneuvering.
Do not pump the brakes. Continue to
press down on the brake pedal.
If you get stuck, select a lower gear
and accelerate slowly. Do not spin the
rear wheels.
For more traction in starting on
slippery surfaces such as ice or packed
snow, use sand, rock salt, chains,
carpeting, or other nonslip material
under the rear wheels.
Note: Usesnowchainsonlyonthe
rear wheels.
Floor Mat Safety
Information
Always use floor mats designed to fit
the footwell of your vehicle. Use only
floor mats that leave the pedal area
unobstructed and that are firmly
secured so that they cannot slip out of
position and interfere with the pedals or
impair safe operation of your vehicle in
other ways.
Warning!
An improperly attached, damaged, folded,
or stacked floor mat, or damaged floor mat
fasteners may cause your floor mat to
interfere with the accelerator, brake, or
clutch pedals and cause a loss of vehicle
control. To prevent SERIOUS INJURY or
DEATH:
ALWAYS securely attachyour floor
mat using the floor mat fasteners. DO NOT
install your floor mat upside down or turn
your floor mat over. Lightly pull to confirm
mat is secured using the floor mat
fasteners on a regular basis.
ALWAYS REMOVE THE EXISTING
FLOOR MAT FROM THE VEHICLE
before installing any other floor mat.
NEVER install or stack an additional floor
mat on top of an existing floor mat.
ONLY install floor mats designed to fit
your vehicle. NEVER install a floor mat that
cannot be properly attached and secured
to your vehicle. If a floor mat needs to be
replaced, only use a FCA approved floor
mat for the specific make, model, and year
of your vehicle.
04090400-USA-001Floor Mat Retention Post Location
179
Page 184 of 300

Observe the traction device
manufacturer’s instructions on the method
of installation, operating speed, and
conditions for use. Always use the
suggested operating speed of the device
manufacturer’s if it is less than 30 mph
(48 km/h).
Do not use traction devices on a
compact spare tire.
Driving In Flooded Area
Note: Do not drive the vehicle on
flooded roads as it could cause short
circuit of electrical/electronic parts, or
water enters the engine and causes it
to lock up (hydro-lock) and stall. If the
vehicle has been immersed in water
contact your Authorized Dealer.
Although your vehicle is capable of
driving through shallow standing water,
consider the following Cautions and
Warnings before doing so.
Warning!
Driving through standing water limits
your vehicle’s traction capabilities. Do not
exceed 5 mph (8 km/h) when driving
through standing water.
Driving through standing water limits
your vehicle’s braking capabilities, which
increases stopping distances. Therefore,
after driving through standing water, drive
slowly and lightly press on the brake pedal
several times to dry the brakes.
Failure to follow these warnings may
result in injuries that are serious or fatal to
you, your passengers, and others around
you.
Caution!
Always check the depth of the standing
water before driving through it. Never drive
through standing water that is deeper than
the bottom of the tire rims mounted on the
vehicle.
Determine the condition of the road or
the path that is under water and if there are
any obstacles in the way before driving
through the standing water.
Do not exceed 5 mph (8 km/h) when
driving through standing water. This will
minimize wave effects.
Driving through standing water may
cause damage to your vehicle’s drivetrain
components. Always inspect your vehicle’s
fluids (i.e., engine oil, transmission, axle,
etc.) for signs of contamination (i.e., fluid
that is milky or foamy in appearance) after
driving through standing water. Do not
continue to operate the vehicle if any fluid
appears contaminated, as this may result in
further damage. Such damage is not
covered by the New Vehicle Limited
Warranty.
Getting water inside your vehicle’s
engine can cause it to lock up and stall out,
and cause serious internal damage to the
engine. Such damage is not covered by
the New Vehicle Limited Warranty.
Overloading
Note: Be careful not to overload your
vehicle. The gross axle weight rating
(GAWR) and the gross vehicle weight
rating (GVWR) of the vehicle are on the
Motor Vehicle Safety Standard Label on
the driver's door frame. Exceeding
these ratings can cause an accident or
vehicle damage. You can estimate the
weight of the load by weighing the
items (or people) before putting them in
the vehicle.
182
STARTING AND OPERATING
Page 243 of 300
Tire Loading And Tire Pressure
Note:
The proper cold tire inflation pressure is
listed on the driver’s side B-Pillar or the
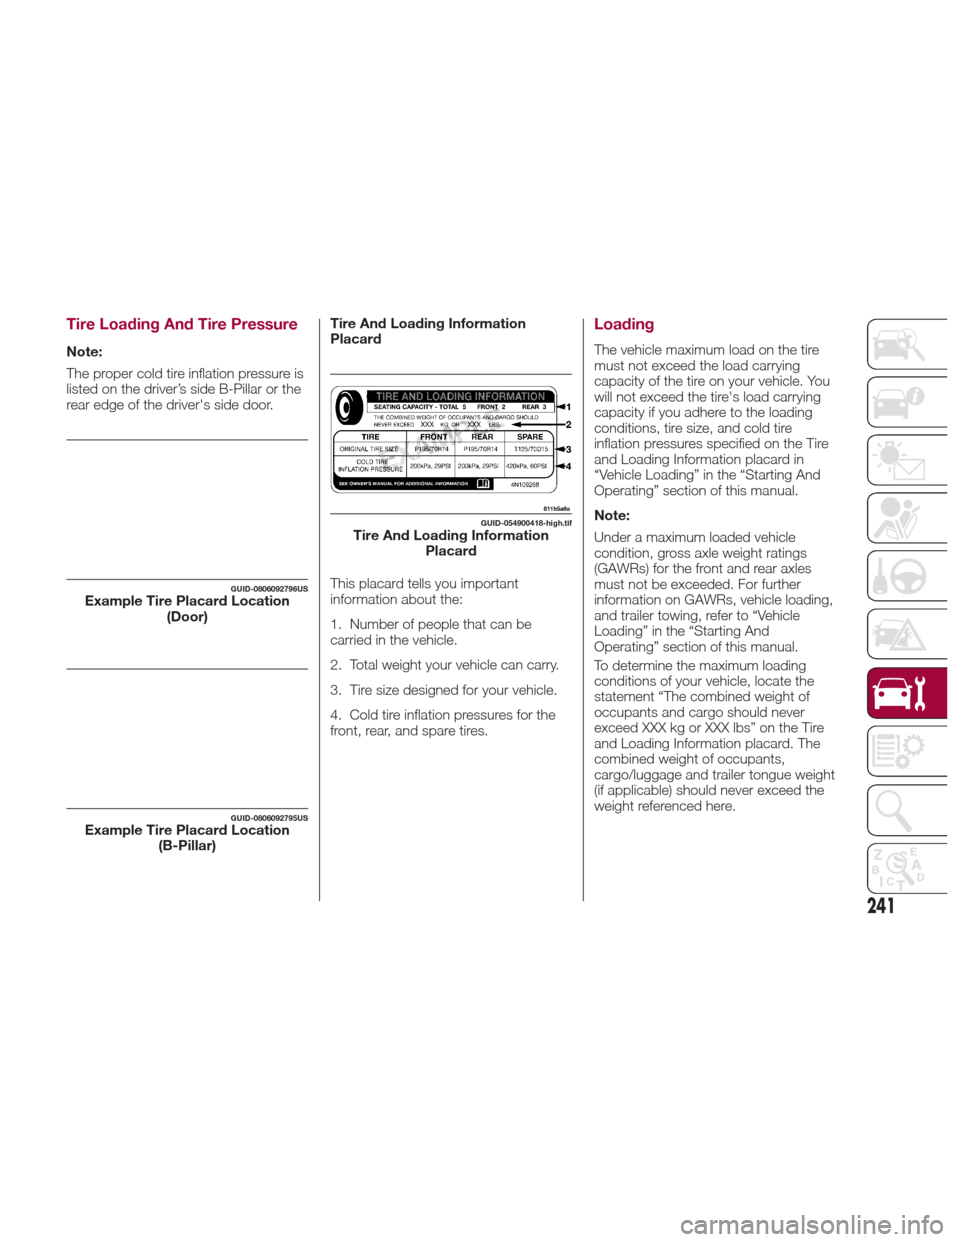
rear edge of the driver's side door.Tire And Loading Information
Placard
This placard tells you important
information about the:
1. Number of people that can be
carried in the vehicle.
2. Total weight your vehicle can carry.
3. Tire size designed for your vehicle.
4. Cold tire inflation pressures for the
front, rear, and spare tires.
Loading
The vehicle maximum load on the tire
must not exceed the load carrying
capacity of the tire on your vehicle. You
will not exceed the tire's load carrying
capacity if you adhere to the loading
conditions, tire size, and cold tire
inflation pressures specified on the Tire
and Loading Information placard in
“Vehicle Loading” in the “Starting And
Operating” section of this manual.
Note:
Under a maximum loaded vehicle
condition, gross axle weight ratings
(GAWRs) for the front and rear axles
must not be exceeded. For further
information on GAWRs, vehicle loading,
and trailer towing, refer to “Vehicle
Loading” in the “Starting And
Operating” section of this manual.
To determine the maximum loading
conditions of your vehicle, locate the
statement “The combined weight of
occupants and cargo should never
exceed XXX kg or XXX lbs” on the Tire
and Loading Information placard. The
combined weight of occupants,
cargo/luggage and trailer tongue weight
(if applicable) should never exceed the
weight referenced here.
GUID-0806092796USExample Tire Placard Location
(Door)
GUID-0806092795USExample Tire Placard Location(B-Pillar)
GUID-054900418-high.tifTire And Loading InformationPlacard
241
Page 244 of 300
Steps For Determining Correct
Load Limit—
(1) Locate the statement “The
combined weight of occupants and
cargo should never exceed XXX kg
or XXX lbs.” on your vehicle's
placard.
(2) Determine the combined weight
of the driver and passengers that
will be riding in your vehicle.
(3) Subtract the combined weight of
the driver and passengers from
XXX kg or XXX lbs.
(4) The resulting figure equals the
available amount of cargo and
luggage load capacity. For
example, if “XXX” amount equals
1400 lbs. and there will be five
150 lb passengers in your vehicle,
the amount of available cargo and
luggage load capacity is 650 lbs.
(1400-750 (5x150) = 650 lbs.)(5) Determine the combined weight
of luggage and cargo being loaded
on the vehicle. That weight may not
safely exceed the available cargo
and luggage load capacity
calculated in Step 4.
(6) If your vehicle will be towing a
trailer, load from your trailer will be
transferred to your vehicle. Consult
this manual to determine how this
reduces the available cargo and
luggage load capacity of your
vehicle.
Metric Example For Load Limit
For example, if “XXX” amount equals
635 kg and there will be five 68 kg
passengers in your vehicle, the amount
of available cargo and luggage load
capacity is 295 kg (635-340 (5x68) =
295 kg) as shown in step 4.
Note:
If your vehicle will be towing a trailer,
load from your trailer will be transferred
to your vehicle. The following table
shows examples on how to calculate
total load, cargo/luggage, and towing
capacities of your vehicle with varying
seating configurations and number and
size of occupants. This table is for
illustration purposes only and may not
be accurate for the seating and load
carry capacity of your vehicle.
For the following example, the
combined weight of occupants and
cargo should never exceed 865 lbs
(392 kg).
242
SERVICING AND MAINTENANCE