2017 FIAT 124 SPIDER change wheel
[x] Cancel search: change wheelPage 136 of 300

Small children must be protected by a
child-restraint system as stipulated by
law in every state and province. In
certain states and provinces, larger
children must use a child-restraint
system. Carefully consider which
child-restraint system is necessary for
your child and follow the installation
directions in this Owner's Manual as
well as the child-restraint system
manufacturer's instructions.
Do not use a child-restraint system
which employs an upper tether
because there is no appropriate means
to anchor the tether.
Warning!
No objects should be placed over or
near the air bag on the instrument panel or
steering wheel because any such objects
could cause harm if the vehicle is in a
collision severe enough to cause the air
bag to inflate.
Do not put anything on or around the air
bag covers or attempt to open them
manually. You may damage the air bags
and you could be injured because the air
bags may no longer be functional. The
protective covers for the air bag cushions
are designed to open only when the air
bags are inflating.
Relying on the air bags alone could lead
to more severe injuries in a collision. The air
bags work with your seat belt to restrain
you properly. In some collisions, air bags
won’t deploy at all. Always wear your seat
belts even though you have air bags.
Warning!
Unapproved modifications or service
procedures to the passenger seat
assembly, its related components, seat
cover, or cushion may inadvertently change
the air bag deployment in case of a frontal
collision. This could result in death or
serious injury to the front passenger if the
vehicle is involved in a collision. A modified
vehicle may not comply with required
Federal Motor Vehicle Safety Standards
(FMVSS) and/or Canadian Motor Vehicle
Safety Standards (CMVSS).
GUID-06070400567567Passenger Air Bag Deactivated Light
134
SAFETY
Page 158 of 300

Depending on the road and driving
conditions/vehicle operations, gear
shifting could be delayed or not occur,
however, this does not indicate a
problem because the AAS mode will
maintain the optimum gear position.
Shift-Lock System
The shift-lock system prevents shifting
out of PARK (P) unless the brake pedal
is depressed.
To shift from PARK (P):
1. Depress and hold the brake pedal.
2. Start the engine.
3. Press and hold the lock-release
button.
4. Move the gear selector.
When the ignition is placed in the ACC
mode or in the OFF mode, the gear
selector cannot be shifted from PARK
(P).
The ignition cannot be placed in the
OFF mode if the gear selector is not in
PARK (P).
Shift — Lock Override
If the gear selector will not move from
Park (P) using the proper shift
procedure, continue to press the brake
pedal.Proceed as follows:
1. Remove the shift — lock override
cover using a cloth-wrapped flat head
screwdriver.
2. Insert a screwdriver and push it
down.
3. Push and hold the lock-release
button and move the gear selector.
4. Take the vehicle to an Authorized
Dealer.
For some models
Proceed as follows:
1. Push the lock-release button while
also pushing down on the Shift - Lock
Override button.
2. Move the gear selector.3. Take the vehicle to an Authorized
Dealer.
Manual Shift Mode
The manual shift mode gives you the
feel of driving a manual transmission
vehicle by allowing you to operate the
gear selector manually.
This allows you to control engine rpm
and torque to the drive wheels much
like a manual transmission when more
control is desired.
To change to MANUAL (M) shift mode,
shift the gear selector from DRIVE (D) to
MANUAL (M). To return to automatic
shift mode, shift the gear selector from
MANUAL (M) to DRIVE (D).05210206-12A-002Shift - Lock Override Access Hole
005210206-122-001Shift - Lock Override
156
STARTING AND OPERATING
Page 164 of 300

RADAR SENSORS —
IF EQUIPPED
Rear Radar Sensors
The following systems use the rear
radar sensors:
Blind Spot Monitoring System (BSM)
Rear Cross Traffic Alert (RCTA)
The radar sensors function by detecting
the radio waves reflected off of a vehicle
approaching from the rear or an
obstruction sent from the radar sensor.
The radar sensors are installed inside
the rear bumper, one each on the left
and right sides.
Always keep the surface of the rear
bumper near the radar sensors clean so
that the radar sensors operate normally.
Also, do not apply items such as
stickers.
Caution!
If the rear bumper receives a severe
impact, the system may no longer operate
normally. Stop the system immediately and
contact an Authorized Dealer.
The detection ability of the radar
sensors has limitations. In the following
cases, the detection ability may lower
and the system may not operate
normally:
The rear bumper near the radar
sensors has become deformed.
Snow, ice or mud adheres to the
radar sensors on the rear bumper.
Under bad weather conditions such
as rain, snow and fog.
Note: Under the following conditions,
the radar sensors cannot detect target
objects or it may be difficult to detect
them:
Stationary objects on a road or a
road side such as small, two-wheeled
vehicles, bicycles, pedestrians,
animals, and shopping carts.
Vehicle shapes which do not reflect
radar waves well such as empty trailers
with a low vehicle height and sports
cars. Vehicles are shipped with the direction
of the radar sensors adjusted for each
vehicle to a loaded vehicle condition so
that the radar sensors detect
approaching vehicles correctly. If the
direction of the radar sensors has
changed, contact an Authorized Dealer.
The radar sensors are regulated by the
relevant radio wave laws of the country
in which the vehicle is driven. If the
vehicle is driven abroad, authorization
from the country in which the vehicle is
driven may be required.
Note:
For repairs or replacement of the
radar sensors, or bumper repairs,
paintwork, and replacement near the
radar sensors, consult an Authorized
Dealer.
Turn off the system while pulling a
trailer or while an accessory such as a
bicycle carrier is installed to the rear of
the vehicle. Otherwise, the radio waves
emitted by the radar will be blocked
causing the system to not operate
normally.
GUID-07080915112112Radar Sensor Locations
162
STARTING AND OPERATING
Page 169 of 300

PARKVIEW REAR
BACKUP CAMERA —
IF EQUIPPED
Operation
The camera is located on the trunk.
Switching the display to rear-view
monitor mode
Put the gear selector in the Reverse (R)
position when the ignition is switched to
ON to switch the display to rear-view
camera mode.
Note:
When the gear selector is moved
from the Reverse (R) position and put
in any other position, the screen
returns to the previous display mode.
When parking, take the utmost care
over obstacles that may be above or
under the camera’s display range.
When the display is cold, the
images could scroll on the monitor or
the screen and could be more blurred
than usual, making it difficult to check
the conditions of the area around the
vehicle. Always use extreme caution
and verify the real conditions of the
area behind the vehicle with you own
eyes.
If water, snow or mud is deposited
on the camera lens, clean it with a soft
cloth. If this does not clean it, use a
mild detergent.
If the camera is subjected to abrupt
temperature changes (from hot to cold
or vice versa), the rear-view monitor
may not work properly.
When replacing tires, contact an
Authorized Dealer. Replacing the tires
can cause the guide lines that appear
on the display to be diverted.
Warning!
Always use extreme caution and verify
the real conditions of the area behind the
vehicle. Backing up while looking only at
the screen is dangerous and can lead to an
accident or collision with an object. The
rear-view monitor is simply a system to aid
reversing. The view on the display can
show a situation that differs from the real
one.
Do not use the rear-view monitor under
the following conditions:
Roads covered in ice or snow.
When snow chains are mounted or the
temporary space saver spare wheel is
fitted.
The rear trunk is not completely closed.
The vehicle is on a sloping road.
Using the rear-view monitor under the
conditions listed above is dangerous and
can cause damage to persons and/or the
vehicle.
07040110-124-008Rear Camera Location
167
Page 180 of 300

Improper weight distributions can have
an adverse effect on the way your
vehicle steers and handles and the way
the brakes operate.
Caution!
Do not load your vehicle any heavier than
the GVWR or the maximum front and rear
GAWR. If you do, parts on your vehicle can
break, or it can change the way your
vehicle handles. This could cause you to
lose control. Also overloading can shorten
the life of your vehicle.
TOWING TRAILERS
Trailer Towing
Your car is not designed for towing.
Recreational Towing
An example of "recreational towing" is
towing your vehicle behind a
motorhome.
The transmission is not designed for
towing this vehicle on all four wheels.
Caution!
DO NOT flat tow this vehicle. Damage
to the drivetrain will result. If this vehicle
requires towing, make sure the drive
wheels are OFF the ground.
Ensure that the Parking Brake is
released, and remains released, while
being towed.
Towing this vehicle in violation of the
above requirements can cause severe
transmission damage. Damage from
improper towing is not covered under the
New Vehicle Limited Warranty.
DRIVING TIPS
Engine Break-In
Recommendation
No special break-in is necessary, but a
few precautions in the first 620 miles
(1000 km) may add to the performance,
economy, and life of the vehicle:
Do not race the engine.
Do not maintain one constant speed,
either slow or fast, for a long period of
time.
Do not drive constantly at full-throttle
or high engine rpm for extended
periods of time.
Avoid unnecessary hard stops.
Avoid full-throttle starts.
Saving Fuel And
Protection Of The
Environment
How you operate your vehicle
determines how far it will travel on a
tank of fuel.
Use these suggestions to help save fuel
andreduceCO
2:
Avoid long warm-ups. Once the
engine runs smoothly, begin driving.
Avoid fast starts.
Drive at lower speeds.
Anticipate when to apply the brakes
(avoid sudden braking).
178
STARTING AND OPERATING
Page 182 of 300

ONLY use the driver’s side floor mat on
the driver’s side floor area. To check for
interference, with the vehicle properly
parked with the engine off, fully depress the
accelerator, the brake, and the clutch pedal
(if present) to check for interference. If your
floor mat interferes with the operation of
any pedal, or is not secure to the floor,
remove the floor mat from the vehicle and
place the floor mat in your trunk.
ONLY use the passenger’s side floor
mat on the passenger’s side floor area.
ALWAYS make sure objects cannot fall
or slide into the driver’s side floor area
when the vehicle is moving. Objects can
become trapped under accelerator, brake,
or clutch pedals and could cause a loss of
vehicle control.
NEVER place any objects under the
floor mat (e.g., towels, keys, etc.). These
objects could change the position of the
floor mat and may cause interference with
the accelerator, brake, or clutch pedals.
If the vehicle carpet has been removed
and re-installed, always properly attach
carpet to the floor and check the floor mat
fasteners are secure to the vehicle carpet.
Fully depress each pedal to check for
interference with the accelerator, brake, or
clutch pedals then re-install the floor mats.
It is recommended to only use mild soap
and water to clean your floor mats. After
cleaning, always check your floor mat has
been properly installed and is secured to
your vehicle using the floor mat fasteners
by lightly pulling mat.
Rocking The Vehicle
Note: Too much rocking may cause
engine overheating, transmission failure,
and tire damage.
If you must rock the vehicle to free it
from snow, sand or mud, depress the
accelerator slightly and slowly move the
gear selector from 1 (D) to R.
Warning!
Fast spinning tires can be dangerous.
Forces generated by excessive wheel
speeds may cause damage, or even
failure, of the axle and tires. A tire could
explode and injure someone. Do not spin
your vehicle's wheels faster than 30 mph
(48 km/h) or for longer than 30 seconds
continuously without stopping when you
are stuck and do not let anyone near a
spinning wheel, no matter what the speed.
Caution!
When “rocking” a stuck vehicle by
shifting between DRIVE and REVERSE, do
not spin the wheels faster than 15 mph
(24 km/h), or drivetrain damage may result.
Revving the engine or spinning the
wheels too fast may lead to transmission
overheating and failure. It can also damage
the tires. Do not spin the wheels above
30 mph (48 km/h) while in gear (no
transmission shifting occurring).
Winter Driving
Carry emergency gear, including tire
chains, window scraper, flares, a small
shovel, jumper leads, and a small bag
of sand or salt.
Contact an Authorized Dealer to check
the following:
Have the proper ratio of antifreeze in
the radiator.
Inspect the battery and its leads.
Cold reduces battery capacity.
Use an engine oil appropriate for the
lowest ambient temperatures that the
vehicle will be driven in.
Inspect the ignition system for
damage and loose connections.
Use winter windshield washer fluid
that will not freeze.
180
STARTING AND OPERATING
Page 206 of 300

CHANGING A WHEEL
Warning!
Do not attempt to change a tire on the
side of the vehicle close to moving traffic.
Pull far enough off the road to avoid the
danger of being hit when operating the jack
or changing the wheel.
Being under a jacked-up vehicle is
dangerous. The vehicle could slip off the
jack and fall on you. You could be crushed.
Never put any part of your body under a
vehicle that is on a jack. If you need to get
under a raised vehicle, take it to a service
center where it can be raised on a lift.
The jack is designed to be used as a
tool for changing tires only. The jack should
not be used to lift the vehicle for service
purposes. The vehicle should be jacked on
a firm level surface only. Avoid ice or
slippery areas.
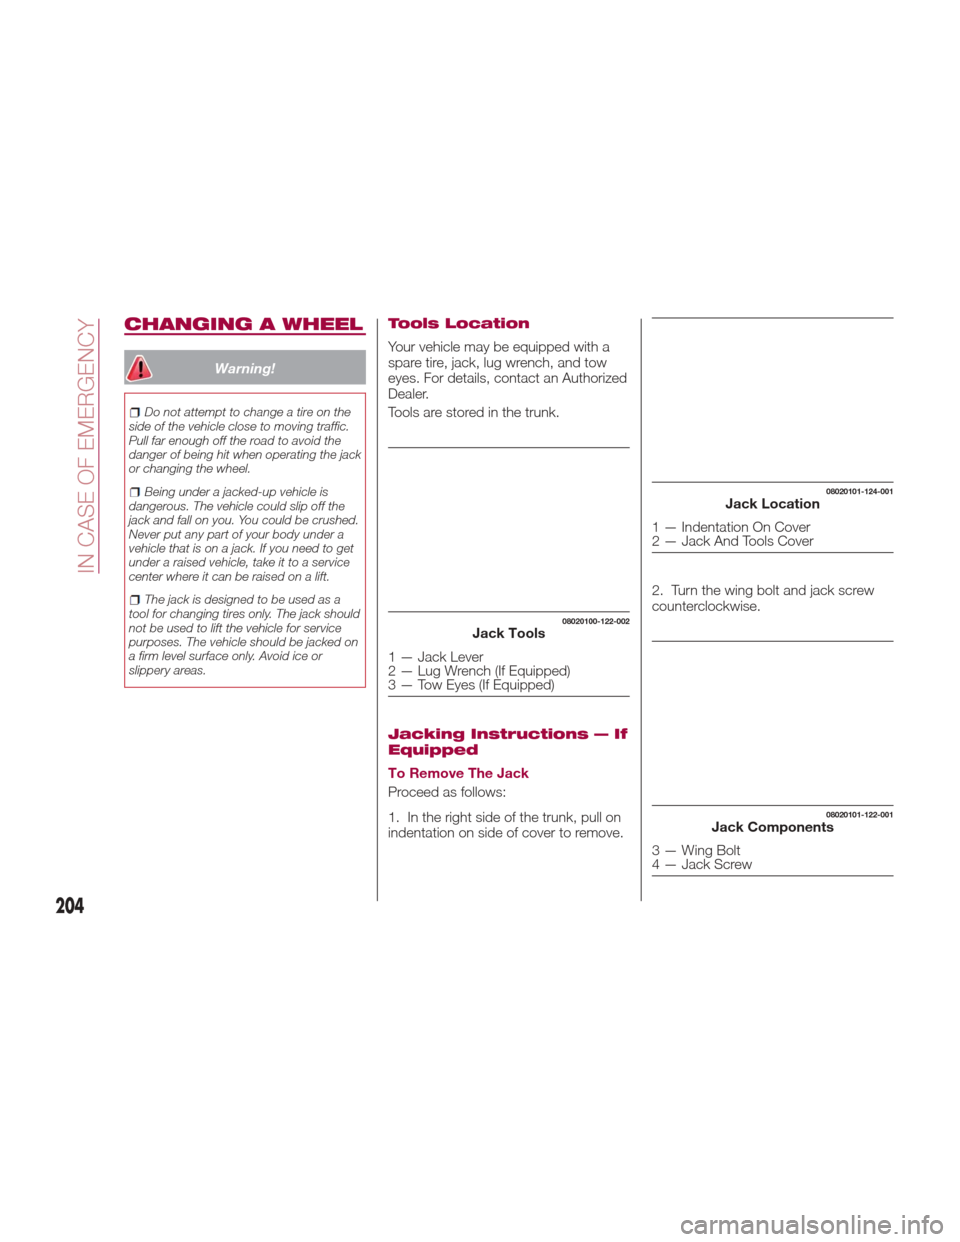
Tools Location
Your vehicle may be equipped with a
spare tire, jack, lug wrench, and tow
eyes. For details, contact an Authorized
Dealer.
Tools are stored in the trunk.
Jacking Instructions — If
Equipped
To Remove The Jack
Proceed as follows:
1. In the right side of the trunk, pull on
indentation on side of cover to remove. 2. Turn the wing bolt and jack screw
counterclockwise.
08020100-122-002Jack Tools
1 — Jack Lever
2 — Lug Wrench (If Equipped)
3 — Tow Eyes (If Equipped)
08020101-124-001Jack Location
1 — Indentation On Cover
2 — Jack And Tools Cover
08020101-122-001Jack Components
3 — Wing Bolt
4 — Jack Screw
204
IN CASE OF EMERGENCY
Page 207 of 300

To Secure The Jack
Proceed as follows:
1. Insert the wing bolt into the jack with
the jack screw pointing back, and turn
the wing bolt clockwise to temporarily
tighten it.
2. Turn the jack screw clockwise.
3. Turn the wing bolt completely to
secure the jack.
4. Insert the cover tabs and install the
cover.
Warning!
A loose tire or jack thrown forward in a
collision or hard stop could endanger the
occupants of the vehicle. Always stow the
jack parts and the spare tire in the places
provided. Have the deflated (flat) tire
repaired or replaced immediately.
Maintenance
Always keep the jack clean.
Make sure the moving parts are kept
free from dirt or rust.
Make sure the screw thread is
adequately lubricated. Conditions Of Non-Use
Temperatures below -40°F (−40°C)
On sandy or muddy ground
On uneven ground
On steep roads
In extreme weather conditions
In direct contact with the engine or
for repairs under the vehicle
On boats
Changing Procedure
Note: Make sure the jack is well
lubricated before using it.
Warning!
Do not attempt to change a tire on the side
of the vehicle close to moving traffic, pull
far enough off the road to avoid being hit
when operating the jack or changing the
wheel.
Proceed as follows:
1. Stop the vehicle in a position that
does not cause any danger to traffic
and lets you change the tire in safety, as
far as possible from the edge of the
driving lane. The ground must be flat
and sufficiently compact. 2. Turn on the hazard warning lights
and engage the parking brake.
3. For vehicles with automatic
transmission, place the gear selector in
Park (P). For vehicles with manual
transmission, place gear selector in
Reverse (R) and turn off the engine.
4. Stop the engine. The motor must be
kept off as long as the vehicle is lifted
off the ground.
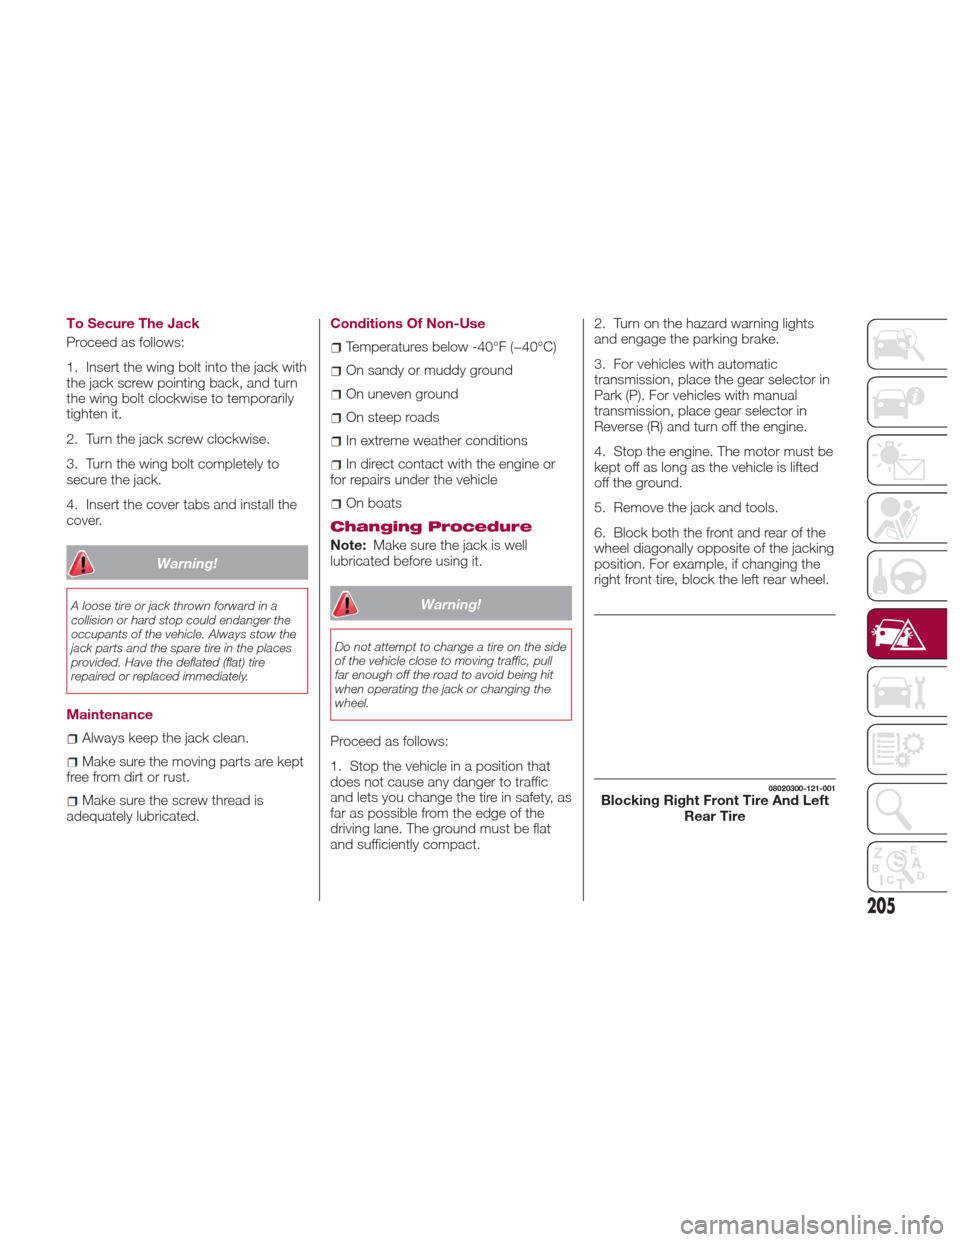
5. Remove the jack and tools.
6. Block both the front and rear of the
wheel diagonally opposite of the jacking
position. For example, if changing the
right front tire, block the left rear wheel.
08020300-121-001Blocking Right Front Tire And Left
Rear Tire
205