2017 FIAT 124 SPIDER ABARTH instrument panel
[x] Cancel search: instrument panelPage 32 of 292

Auto-Lock Function
A beep sound is heard when both
doors are closed while the key is being
carried. Both doors, the trunk lid, and
fuel door are locked automatically after
about three seconds when the
Advanced Keyless Entry key fob is out
of the operational range.
The hazard warning lights will flash
once (even if the driver is in the
operational range, both doors, trunk lid,
and the fuel filler door are locked
automatically after about 30 seconds).
If you are out of the operational range
before the doors and the trunk lid are
completely closed or another key fob is
left in the vehicle, the auto-lock function
will not work.
Always make sure that both doors and
the trunk lid are closed and locked
before leaving the vehicle. The
auto-lock function does not close the
power windows.Auto Re-Lock Function
After unlocking with the request switch
on the exterior door handle, both doors,
and the fuel filler door will automatically
lock if any of the following operations
are not performed within about
60 seconds.
If your vehicle has a Vehicle Security
Alarm System, the hazard warning
lights will flash for confirmation.
The time required for the doors to lock
automatically can be changed (refer to
“Personalization Features” paragraph in
“Knowing the Instrument Panel”
chapter).
Opening a door or the trunk lid.
Placing the ignition in any position
other than the OFF position. Locking/Unlocking With A Key Fob
Both doors, trunk lid, and the fuel filler
door can be locked/unlocked by
operating the keyless entry system key
fob: refer to “Keyless Entry System” in
“Keys” paragraph.
Locking/Unlocking With Door-Lock
Switch
Both doors and the fuel filler door lock
automatically when the lock side is
pushed. They unlock when the unlock
side is pushed.
To lock both the doors and the fuel filler
door from an open door, push the lock
side of the door lock switch and then
close the door.
Note:
When locking the doors this
way, be careful not to leave the key fob
inside the vehicle.
30
GETTING TO KNOW YOUR VEHICLE
Page 35 of 292

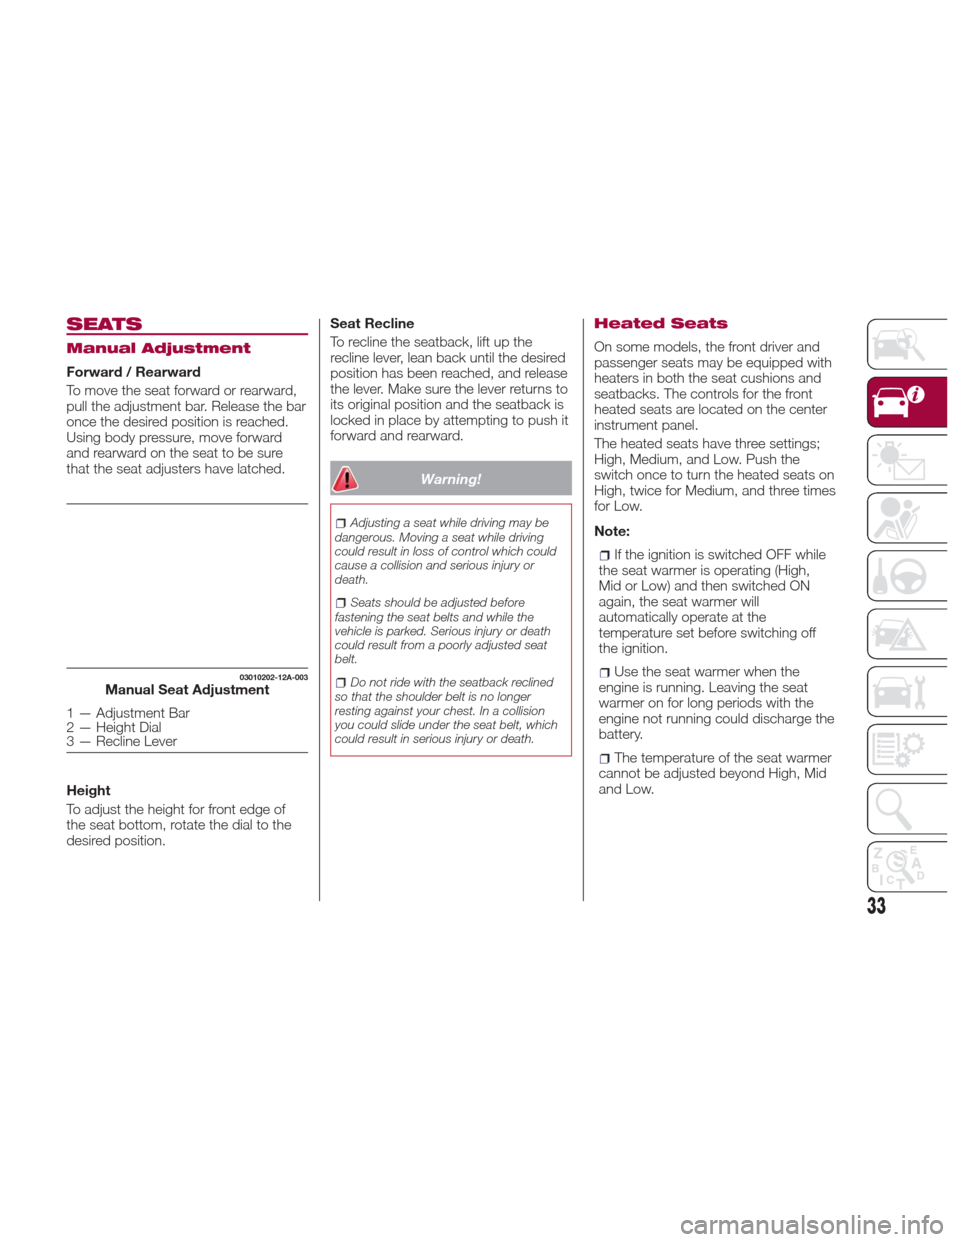
SEATS
Manual Adjustment
Forward / Rearward
To move the seat forward or rearward,
pull the adjustment bar. Release the bar
once the desired position is reached.
Using body pressure, move forward
and rearward on the seat to be sure
that the seat adjusters have latched.
Height
To adjust the height for front edge of
the seat bottom, rotate the dial to the
desired position.Seat Recline
To recline the seatback, lift up the
recline lever, lean back until the desired
position has been reached, and release
the lever. Make sure the lever returns to
its original position and the seatback is
locked in place by attempting to push it
forward and rearward.
Warning!
Adjusting a seat while driving may be
dangerous. Moving a seat while driving
could result in loss of control which could
cause a collision and serious injury or
death.
Seats should be adjusted before
fastening the seat belts and while the
vehicle is parked. Serious injury or death
could result from a poorly adjusted seat
belt.
Do not ride with the seatback reclined
so that the shoulder belt is no longer
resting against your chest. In a collision
you could slide under the seat belt, which
could result in serious injury or death.
Heated Seats
On some models, the front driver and
passenger seats may be equipped with
heaters in both the seat cushions and
seatbacks. The controls for the front
heated seats are located on the center
instrument panel.
The heated seats have three settings;
High, Medium, and Low. Push the
switch once to turn the heated seats on
High, twice for Medium, and three times
for Low.
Note:
If the ignition is switched OFF while
the seat warmer is operating (High,
Mid or Low) and then switched ON
again, the seat warmer will
automatically operate at the
temperature set before switching off
the ignition.
Use the seat warmer when the
engine is running. Leaving the seat
warmer on for long periods with the
engine not running could discharge the
battery.
The temperature of the seat warmer
cannot be adjusted beyond High, Mid
and Low.
03010202-12A-003Manual Seat Adjustment
1 — Adjustment Bar
2 — Height Dial
3 — Recline Lever
33
Page 41 of 292

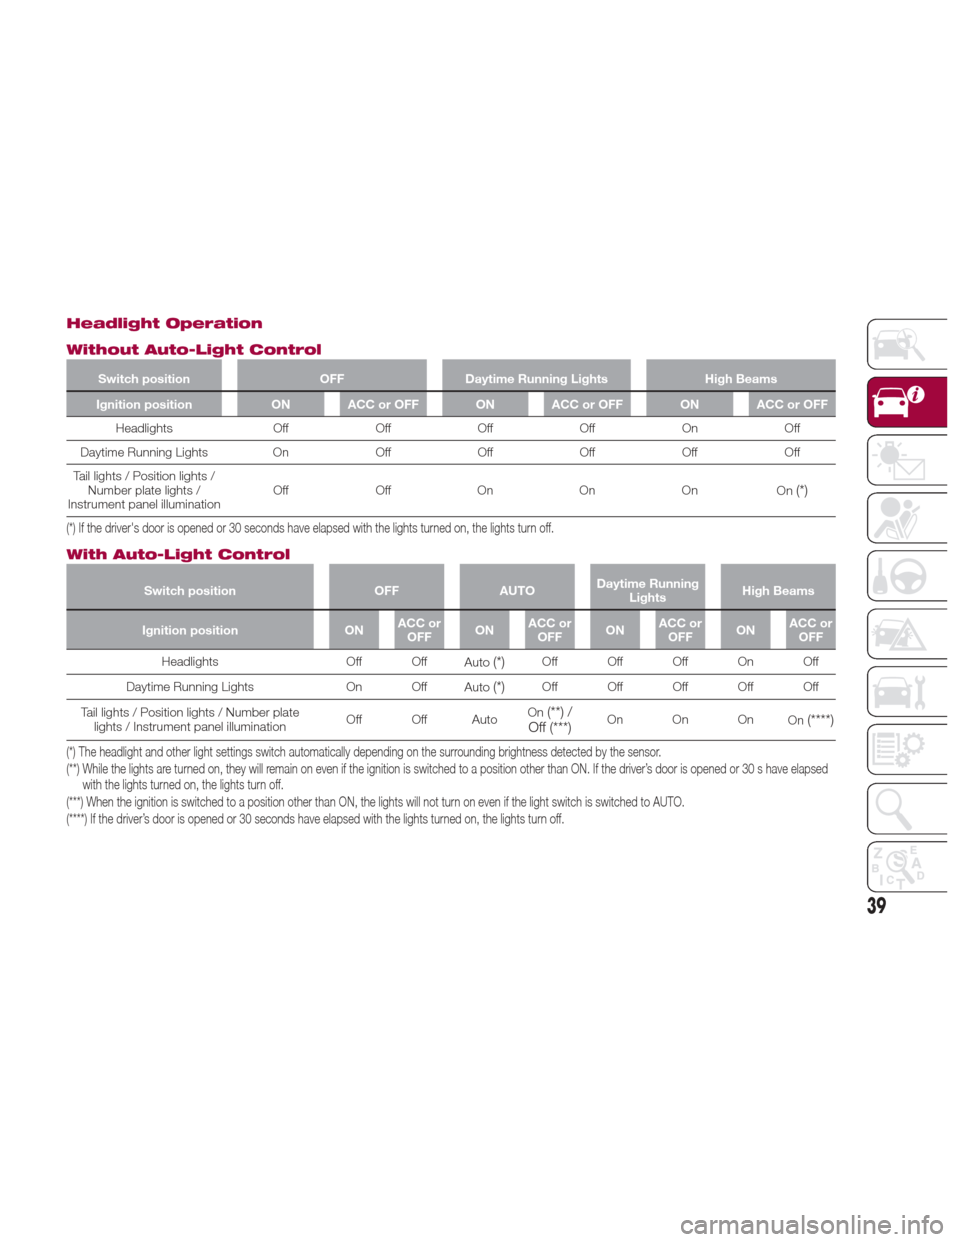
Headlight Operation
Without Auto-Light Control
Switch positionOFFDaytime Running Lights High Beams
Ignition position ON ACC or OFF ON ACC or OFF ON ACC or OFF
Headlights OffOffOffOff On Off
Daytime
Running Lights OnOffOffOff OffOff
Tail lights / Position lights / Number plate lights /
Instrument panel illumination Off
OffOn On On
On
(*)
(*) If the driver's door is opened or 30 seconds have elapsed with the lights turned on, the lights turn off.
With Auto-Light Control
Switch position OFFAUTODaytime Running
Lights High Beams
Ignition position ONACC or
OFF ONACC or
OFF ONACC or
OFF ONACC or
OFF
Headlights Off Off
Auto
(*)Off Off Off On Off
Daytime Running Lights On Off Auto
(*)Off Off Off Off Off
Tail lights / Position lights / Number plate lights / Instrument panel illumination Off Off AutoOn
(**) /
Off (***)On On On On(****)
(*) The headlight and other light settings switch automatically depending on the surrounding brightness detected by the sensor.
(**) While the lights are turned on, they will remain on even if the ignition is switched to a position other than ON. If the driver’s door is opened or 30 s have elapsed
with the lights turned on, the lights turn off.
(***) When the ignition is switched to a position other than ON, the lights will not turn on even if the light switch is switched to AUTO.
(****) If the driver’s door is opened or 30 seconds have elapsed with the lights turned on, the lights turn off.
39
Page 42 of 292

Daytime Running Lights
(DRL)
The daytime running lights turn on
automatically when the vehicle starts
moving.
They turn off when the parking brake is
engaged or the gear selector is shifted
to the Park (P) position (if equipped with
automatic transmission).
Note:In some markets, the daytime
running lights can be deactivated. For
markets that allow deactivation, refer to
“Personalization Features” in “Knowing
Your Instrument Panel” for further
information.
High Beams
The headlights can be switched
between high and low beams by
moving the lever forward or backward.
When the headlight high-beams are on,
the
high beam indicator is
illuminated.
Flash To Pass
You can signal another vehicle with your
headlights by partially pulling the
headlight lever toward the steering
wheel. This will cause the high beam
headlights to turn on until the lever is
released.
The
high beam indicator in the
instrument cluster illuminates
simultaneously.
Automatic Lighting
When the headlight switch is in the
AUTO position and the ignition is
switched ON, the light will sense the
surrounding lightness or darkness and
automatically turns the headlights, other
exterior lights and dashboard
illumination on or off.
Note: Do not shade the light sensor by
placing a sticker or a label on the
windshield. Otherwise the light sensor
will not operate correctly.
The light sensor also works as a rain
sensor for the auto-wiper control. Keep
hands and scrapers clear of the
windshield when the wiper lever is in
the AUTO position and the ignition is
switched ON as fingers could be
pinched or the wipers and wiper blades
damaged when the wipers activate
automatically. If you are going to clean the windshield, be sure the wipers are
turned off completely when the engine
is running.
Note:
The headlights, other exterior lights
and dashboard lights may not turn off
immediately even if the surrounding
area becomes well-lit because the light
sensor determines that it is night time if
the surrounding area is continuously
dark for several minutes such as inside
long tunnels, traffic jams inside tunnels,
or in indoor parking lots. In this case,
the lights turn off if the light switch is
turned to the OFF position.
When the headlight switch is in the
AUTO position and the ignition is
switched to ACC or the ignition is
switched off, the headlights, other
exterior lights and dashboard
illumination will turn off.
The dashboard lights can be
adjusted by rotating the knob in the
instrument cluster. The day/night mode
can be changed by rotating the knob
until a beep sound is heard.
The sensitivity of the automatic
lightsmaybechangedbyan
authorized dealer.
05030101-12A-003Light Sensor
40
GETTING TO KNOW YOUR VEHICLE
Page 78 of 292

GETTING TO KNOW YOUR INSTRUMENT PANEL
ONBOARD DIAGNOSTIC
SYSTEM — OBD II...........77
CONTROL PANEL AND
INSTRUMENTS..............78
MAINTENANCE MONITOR —
IF EQUIPPED ...............85
FUEL ECONOMY MONITOR —
IF EQUIPPED ...............87
WARNING LIGHTS AND
MESSAGES ................89
PERSONALIZATION FEATURES . .107
76
GETTING TO KNOW YOUR INSTRUMENT PANEL
Page 80 of 292

CONTROL PANEL AND INSTRUMENTS
Instrument Cluster
1 — Odometer/Trip Computer And Trip Computer Button/Dashboard Illumination
2 — Tachometer
3 — Speedometer
4 — Automatic Transmission Info Display
5 — Odometer/Trip Computer Info/Engine Coolant Temperature Gauge/Fuel Gauge/Outside Temperature/Cruise Control/Info
Switch Display
05020100-667-333Abarth Instrument Cluster
78
GETTING TO KNOW YOUR INSTRUMENT PANEL
Page 81 of 292

Odometer / Trip
Computer
The display mode can be changed from
odometer to “Trip computer A” to “Trip
computer B” and then back to
odometer by pushing the selector while
one of them is displayed.
The selected mode will be displayed.
When the ignition is placed in the ACC
or OFF position, the odometer or trip
cannot be displayed. Pushing the
selector can switch the trip or reset it
for a ten-minute period in the following
cases:
After the ignition is cycled to OFF
from ON.
After the driver's door is opened. Odometer
The odometer records the total
distance the vehicle has been driven.
Trip Computer
The trip computer can record the total
distance of two trips. One is recorded in
“Trip A”, and the other is recorded in
“Trip B”.
For instance, “Trip A” can record the
distance from the point of origin, and
“Trip B” can record the distance from
where the fuel tank is filled.
When “Trip A” is selected, pushing the
selector again within one second will
change to “Trip B” mode. When “Trip A”
is selected, TRIP A will be displayed.
When “Trip B” is selected, TRIP B will
be displayed.
The trip computer records the total
distance the vehicle is driven until the
meter is again reset. Return it to “0.0”
by depressing and holding the selector
for one second or more.
Use this meter to measure trip
distances and to compute fuel
consumption.
Versions With Fiat Connect 7.0
:if
the fuel economy data is reset using the
fuel economy monitor or Trip A is reset
using the trip meter, the fuel economy
data and Trip A are reset simultaneously
when the fuel economy monitor with
the trip meter is on, .
Note: Only the trip records tenths of
miles (kilometers). Trip Computer Reset
The trip computer will be erased when:
The power supply is interrupted
(blown fuse or the battery is
disconnected).
The vehicle is driven over
9999.9 miles.
Speedometer
The speedometer indicates the speed
of the vehicle.
Instrument Panel
Illumination
When the position lights are turned on
with the ignition switched ON, the
brightness of the instrument panel
illumination is dimmed. When the
position lights are turned on, the
warning light in the instrument
cluster turns on (see “Headlights” in
“Getting To Know Your Vehicle”
chapter).
Brightness Adjustment
The brightness of the instrument panel
and dashboard illuminations can be
adjusted by rotating the knob:
The brightness decreases by
rotating the knob to the left. A beep
sound will be heard when the knob has
been rotated to the maximum dim
position.
05020102-121-001Abarth Instrument Cluster
1 — Trip Selector/Reset Button
79
Page 82 of 292

The brightness increasesby
rotating the knob to the right.
Cancelling Illumination Dimmer
Rotate the knob to the right until a beep
is heard while the instrument cluster is
dimmed with the ignition switched ON.
If the instrument cluster's visibility is
reduced due to glare from surrounding
brightness, cancel the illumination
dimmer.
When the illumination dimmer is
canceled, the instrument cluster cannot
be dimmed even if the position lights
are turned on. When the illumination
dimmer is canceled, the screen in the
center display switches to constant
display of the daytime screen.Trip Computer And Info
Switch
The following information can be
selected by pushing the INFO switch
with the ignition in the ON position:
Distance-to-empty (approximate
distance you can travel on the available
fuel).
Average fuel economy.
Current fuel economy.
Average vehicle speed.
If you have any problems with your trip
computer, contact an Authorized
Dealership. Distance-To-Empty Mode
This mode displays the approximate
distance you can travel on the
remaining fuel based on the fuel
economy.
The distance-to-empty will be
calculated and displayed every second.
05020102-121-001Abarth Instrument Cluster
1 — Instrument Cluster Illumination
Dimmer Knob
0620500-122-001Abarth Instrument Cluster Display
Controls
GUID-0502011019A019Distance To Empty Display Screen
80
GETTING TO KNOW YOUR INSTRUMENT PANEL