2017 DODGE GRAND CARAVAN light
[x] Cancel search: lightPage 490 of 530

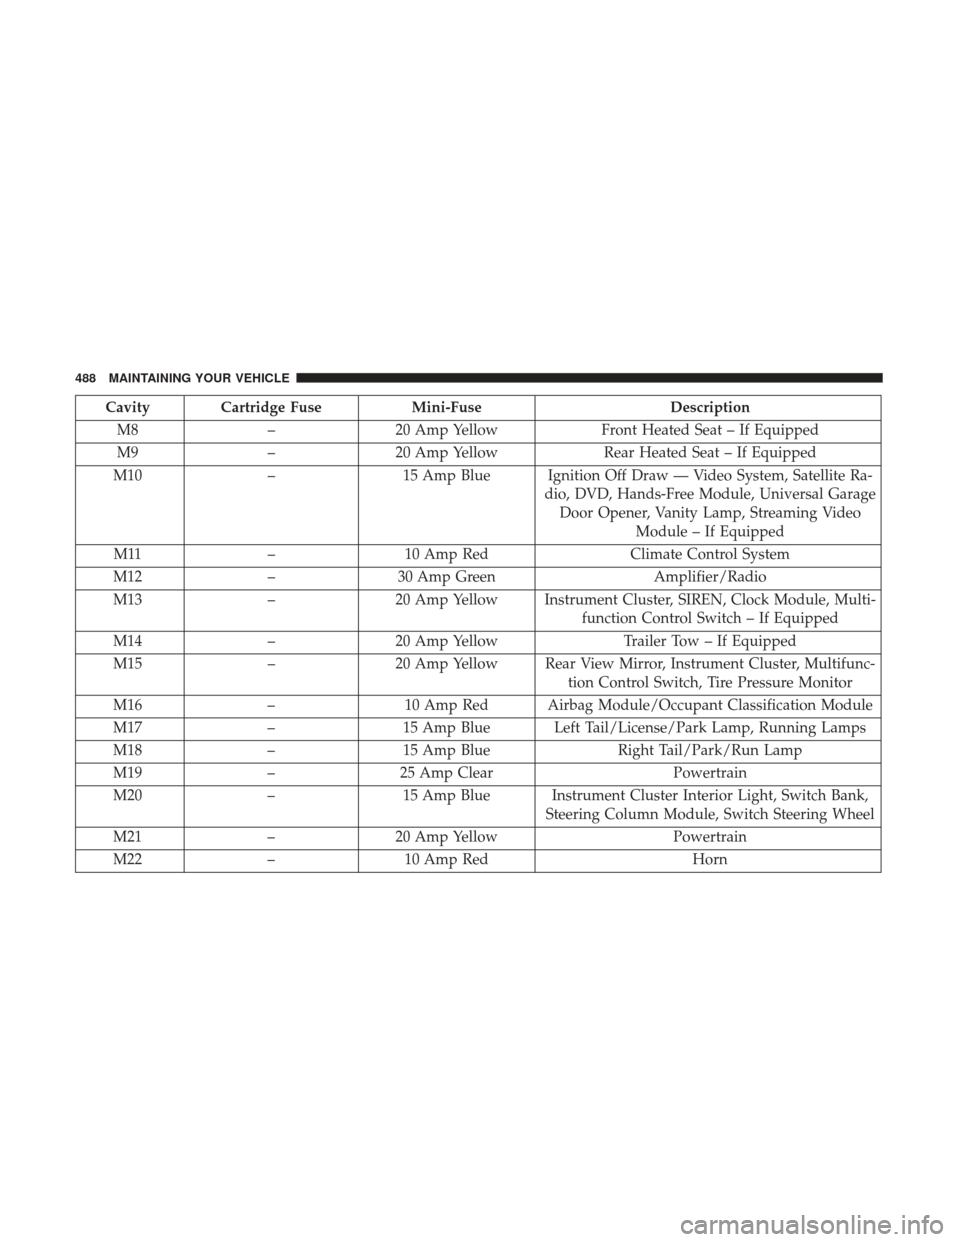
Cavity Cartridge FuseMini-FuseDescription
M8 –20 Amp Yellow Front Heated Seat – If Equipped
M9 –20 Amp Yellow Rear Heated Seat – If Equipped
M10 –15 Amp Blue Ignition Off Draw — Video System, Satellite Ra-
dio, DVD, Hands-Free Module, Universal GarageDoor Opener, Vanity Lamp, Streaming Video Module – If Equipped
M11 –10 Amp Red Climate Control System
M12 –30 Amp Green Amplifier/Radio
M13 –20 Amp Yellow Instrument Cluster, SIREN, Clock Module, Multi-
function Control Switch – If Equipped
M14 –20 Amp Yellow Trailer Tow – If Equipped
M15 –20 Amp Yellow Rear View Mirror, Instrument Cluster, Multifunc-
tion Control Switch, Tire Pressure Monitor
M16 –10 Amp Red Airbag Module/Occupant Classification Module
M17 –15 Amp Blue Left Tail/License/Park Lamp, Running Lamps
M18 –15 Amp Blue Right Tail/Park/Run Lamp
M19 –25 Amp Clear Powertrain
M20 –15 Amp Blue Instrument Cluster Interior Light, Switch Bank,
Steering Column Module, Switch Steering Wheel
M21 –20 Amp Yellow Powertrain
M22 –10 Amp Red Horn
488 MAINTAINING YOUR VEHICLE
Page 491 of 530

Cavity Cartridge FuseMini-FuseDescription
M23 –10 Amp Red Horn
M24 –25 Amp Clear Rear Wiper
M25 –20 Amp Yellow Fuel Pump
M26 –10 Amp Red Power Mirror Switch, Driver Window Switch
M27 –10 Amp Red Wireless Control Module, Keyless Entry Module
M28 –10 Amp Red Powertrain, Transmission Control Module
M29 –10 Amp Red Occupant Classification Module
M30 –15 Amp Blue Diagnostic Feed
M31 –20 Amp Yellow Back-Up Lamps
M32 –10 Amp Red Airbag Module, THATCHUM – If Equipped
M33 –10 Amp Red Powertrain
M34 –10 Amp Red Park Assist, Heater Climate Control Module,
Headlamp Wash, Compass, Rear Camera, DoorLamps, Flashlight, Relay Diesel Cabin Heater
M35 –10 Amp Red Heated Mirrors
M36 –20 Amp Yellow Power Outlet #3 (Instrument Panel or with Con-
sole Center)
7
MAINTAINING YOUR VEHICLE 489
Page 493 of 530

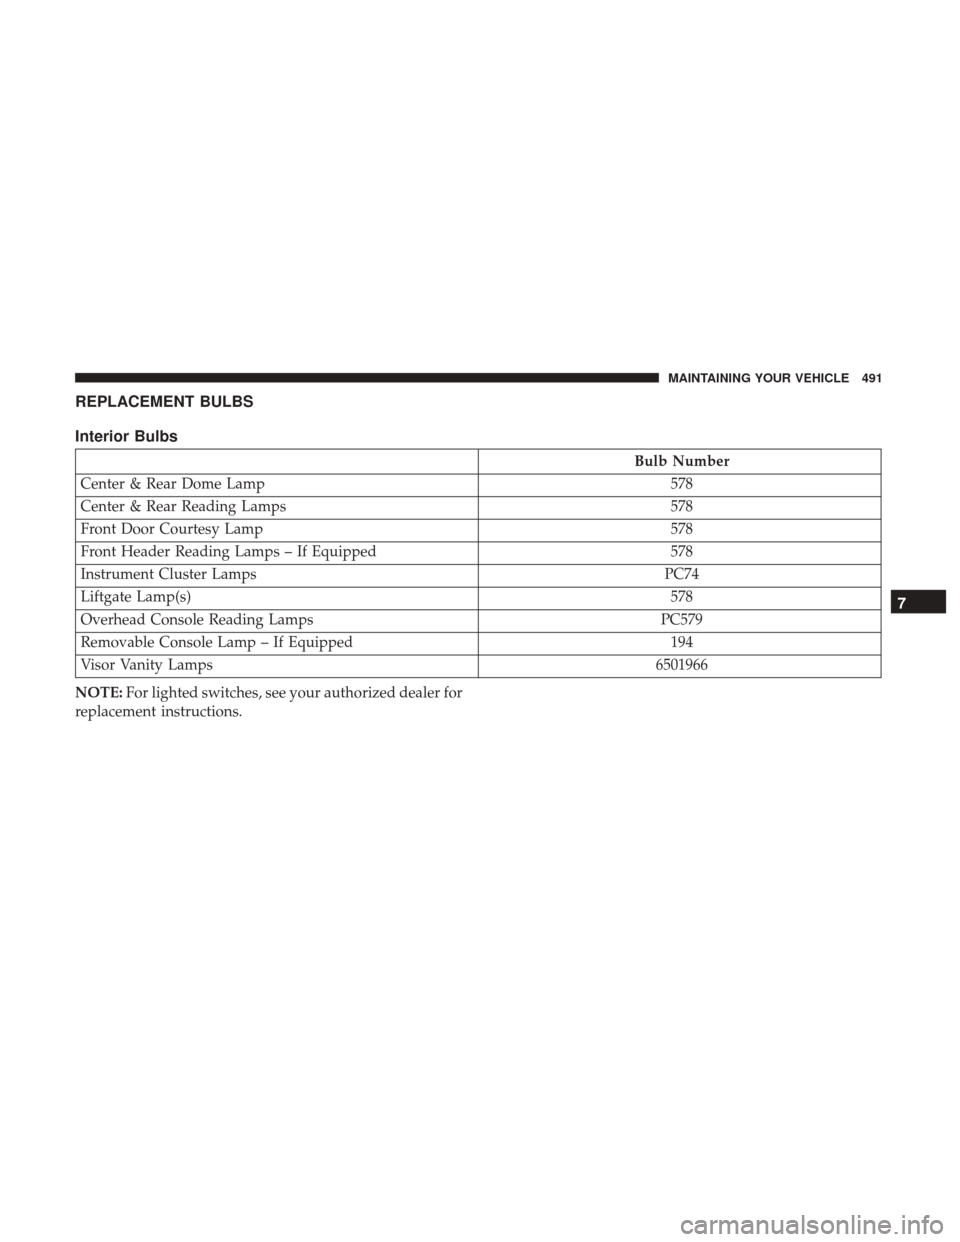
REPLACEMENT BULBS
Interior Bulbs
Bulb Number
Center & Rear Dome Lamp 578
Center & Rear Reading Lamps 578
Front Door Courtesy Lamp 578
Front Header Reading Lamps – If Equipped 578
Instrument Cluster Lamps PC74
Liftgate Lamp(s) 578
Overhead Console Reading Lamps PC579
Removable Console Lamp – If Equipped 194
Visor Vanity Lamps 6501966
NOTE: For lighted switches, see your authorized dealer for
replacement instructions.
7
MAINTAINING YOUR VEHICLE 491
Page 495 of 530

CAUTION!
Do not touch the new bulb with your fingers. Oil
contamination will severely shorten bulb life. If the
bulb comes in contact with an oily surface, clean the
bulb with rubbing alcohol.
5. Connect the wiring connector to bulb and slide red lock tab forward.
Front Park/Turn Signal Lamps
1. Raise the hood to access the rear of the headlamphousing.
2. Twist the turn signal socket and remove from the headlamp housing, then pull the bulb out.
3. Push the new bulb into the socket and reinstall the socket by twisting until locked into the headlamp hous-
ing.
Fog Lamps
NOTE: Access to the fog lamp bulb is from the rear of the
fascia. On the left rear side of the fascia, remove the push
pin and lower the hinged access door on the air dam. 1. From behind the bumper fascia, or the access panel on
the air dam, squeeze the two tabs on the side of the bulb
socket and pull straight out from the fog lamp.
CAUTION!
Do not touch the new bulb with your fingers. Oil
contamination will severely shorten bulb life. If the
bulb comes in contact with an oily surface, clean the
bulb with rubbing alcohol.
2. Disconnect the wire harness from the bulb.
3. Reconnect the wiring harness to the new bulb and reinstall by inserting the new bulb straight into the fog
lamp until it locks into place.
Rear Tail, Stop, Turn Signal, Side Marker And
Backup Lamps
1. Raise the liftgate.
2. Remove the tail lamp assembly by removing the twoscrews from the inboard side. Use a fiber stick or similar
tool to gently pry the light on the outboard side to
disengage the two ball studs.
7
MAINTAINING YOUR VEHICLE 493
Page 496 of 530

NOTE:•If a screwdriver is used, make sure a soft material is
placed between the vehicle body and tool so not to
scratch the paint.
• The PRY location is best closest to the studs while
dislodging them separately.
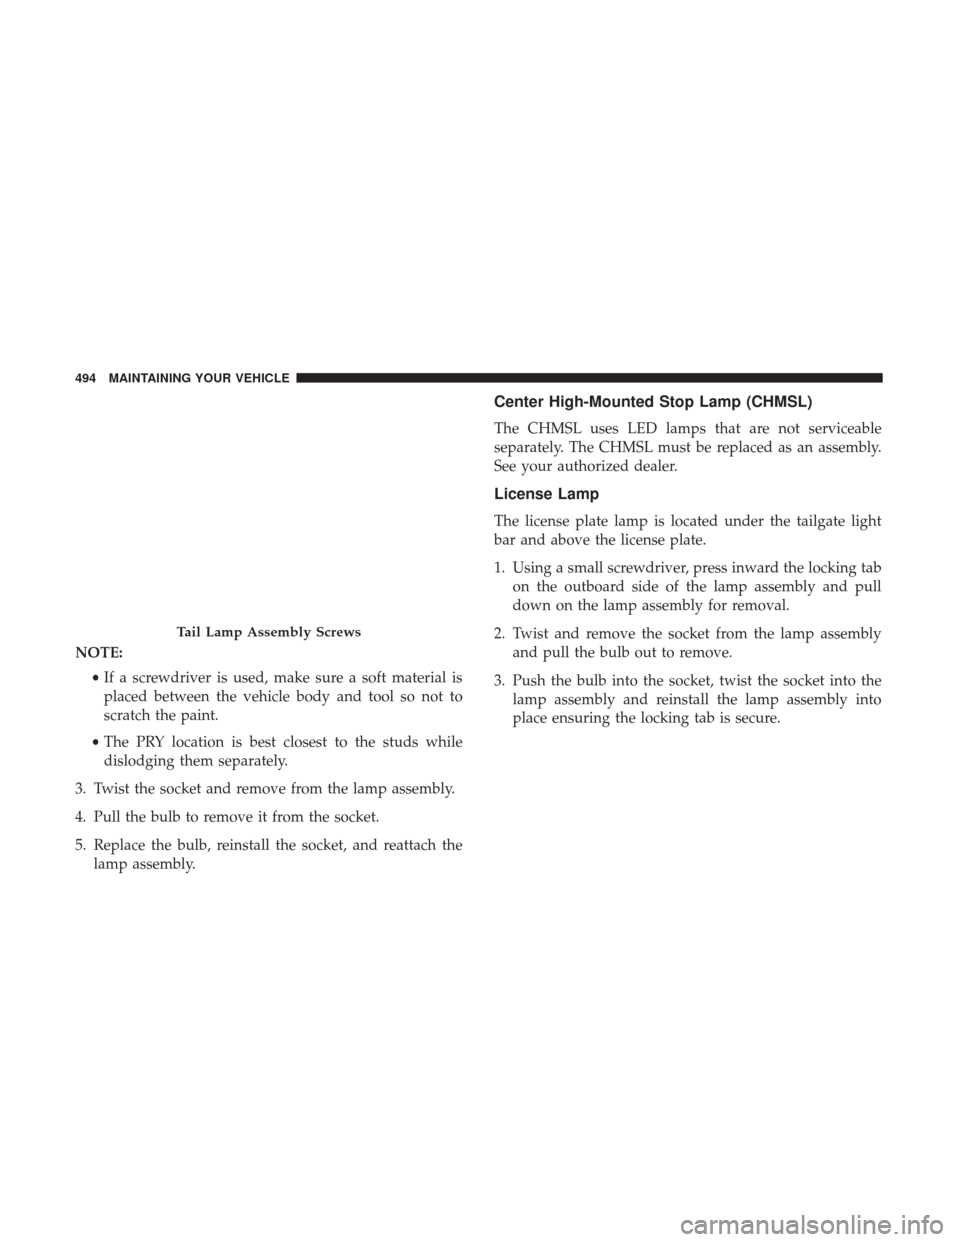
3. Twist the socket and remove from the lamp assembly.
4. Pull the bulb to remove it from the socket.
5. Replace the bulb, reinstall the socket, and reattach the lamp assembly.
Center High-Mounted Stop Lamp (CHMSL)
The CHMSL uses LED lamps that are not serviceable
separately. The CHMSL must be replaced as an assembly.
See your authorized dealer.
License Lamp
The license plate lamp is located under the tailgate light
bar and above the license plate.
1. Using a small screwdriver, press inward the locking tabon the outboard side of the lamp assembly and pull
down on the lamp assembly for removal.
2. Twist and remove the socket from the lamp assembly and pull the bulb out to remove.
3. Push the bulb into the socket, twist the socket into the lamp assembly and reinstall the lamp assembly into
place ensuring the locking tab is secure.
Tail Lamp Assembly Screws
494 MAINTAINING YOUR VEHICLE
Page 502 of 530

MAINTENANCE SCHEDULE
Your vehicle is equipped with an automatic oil change
indicator system. The oil change indicator system will
remind you that it is time to take your vehicle in for
scheduled maintenance.
Based on engine operation conditions, the oil change
indicator message will illuminate. This means that service
is required for your vehicle. Operating conditions such as
frequent short-trips, trailer tow, extremely hot or cold
ambient temperatures, and E85 fuel usage will influence
when the “Oil Change Required” message is displayed.
Severe Operating Conditions can cause the change oil
message to illuminate as early as 3,500 miles (5,600 km)
since last reset. Have your vehicle serviced as soon as
possible, within the next 500 miles (805 km).
Your authorized dealer will reset the oil change indicator
message after completing the scheduled oil change. If a
scheduled oil change is performed by someone other than
your authorized dealer, the message can be reset by
referring to the steps described under “Instrument Cluster
Display” in “Understanding Your Instrument Panel” for
further information.NOTE:
Under no circumstances should oil change inter-
vals exceed 10,000 miles (16,000 km), twelve months or 350
hours of engine run time, whichever comes first. The 350
hours of engine run or idle time is generally only a concern
for fleet customers.
Severe Duty All Models
Change Engine Oil at 4,000 miles (6,500 km) if the vehicle
is operated in a dusty and off road environment or is
operated predominately at idle or only very low engine
RPM’s. This type of vehicle use is considered Severe Duty.
Once A Month Or Before A Long Trip:
• Check engine oil level.
• Check windshield washer fluid level.
• Check tire pressure and look for unusual wear or
damage. Rotate tires at the first sign of irregular wear,
even if it occurs before the oil indicator system turns on.
• Check the fluid levels of the coolant reservoir, brake
master cylinder, and power steering and fill as needed.
• Check function of all interior and exterior lights.
500 MAINTENANCE SCHEDULES
Page 510 of 530

to a TDD or a conventional teletypewriter (TTY) in the
United States, can communicate with the manufacturer by
dialing 1-800-380-CHRY.
Canadian residents with hearing difficulties that require
assistance can use the special needs relay service offered by
Bell Canada. For TTY teletypewriter users, dial 711 and for
Voice callers, dial 1-800-855-0511 to connect with a Bell
Relay Service operator.
Service Contract
You may have purchased a service contract for a vehicle to
help protect you from the high cost of unexpected repairs
after the manufacturer’s New Vehicle Limited Warranty
expires. The manufacturer stands behind only the manu-
facturer’s service contracts. If you purchased a manufac-
turer’s service contract, you will receive Plan Provisions
and an Owner Identification Card in the mail within three
weeks of the vehicle delivery date. If you have any
questions about the service contract, call the manufactur-
er’s Service Contract National Customer Hotline at 1-800-
521-9922 (Canadian residents, call (800) 465-2001 English /
(800) 387-9983 French).
The manufacturer will not stand behind any service con-
tract that is not the manufacturer’s service contract. It is notresponsible for any service contract other than the manu-
facturer’s service contract. If you purchased a service
contract that is not a manufacturer’s service contract, and
you require service after the manufacturer’s New Vehicle
Limited Warranty expires, please refer to the contract
documents, and contact the person listed in those docu-
ments.
We appreciate that you have made a major investment
when you purchased the vehicle. An authorized dealer has
also made a major investment in facilities, tools, and
training to assure that you are absolutely delighted with
the ownership experience. You will be pleased with their
sincere efforts to resolve any warranty issues or related
concerns.
WARNING!
Engine exhaust (internal combustion engines only),
some of its constituents, and certain vehicle compo-
nents contain, or emit, chemicals known to the State of
California to cause cancer and birth defects, or other
reproductive harm. In addition, certain fluids con-
tained in vehicles and certain products of component
wear contain, or emit, chemicals known to the State of
(Continued)
508 IF YOU NEED CONSUMER ASSISTANCE
Page 514 of 530

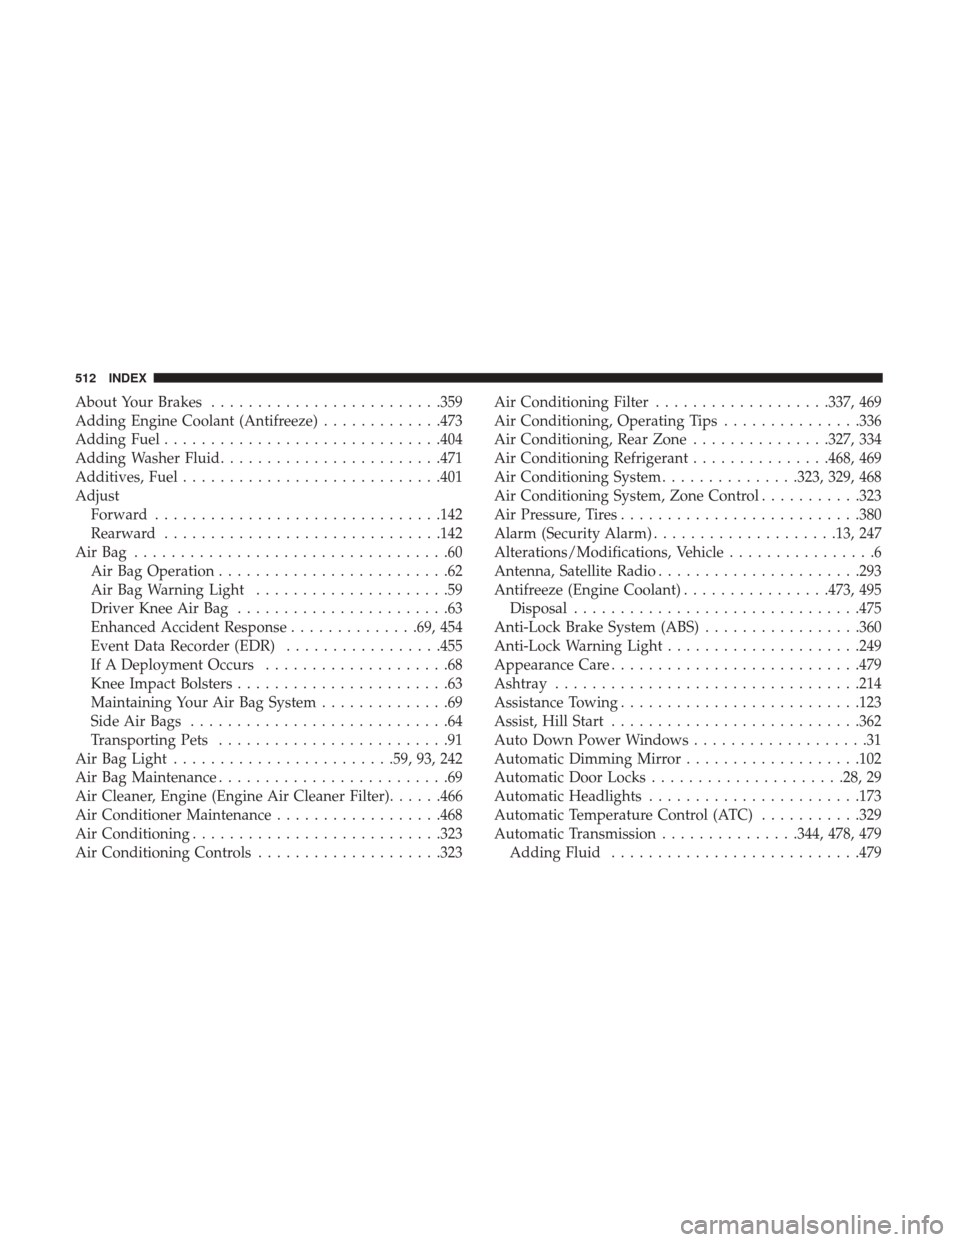
About Your Brakes........................ .359
Adding Engine Coolant (Antifreeze) .............473
Adding Fuel ............................. .404
Adding Washer Fluid ........................471
Additives, Fuel ............................401
Adjust Forward ...............................142
Rearward ............................. .142
AirBag ..................................60 Air Bag Operation .........................62
Air Bag Warning Light .....................59
Driver Knee Air Bag .......................63
Enhanced Accident Response ..............69, 454
Event Data Recorder (EDR) .................455
If A Deployment Occurs ....................68
Knee Impact Bolsters .......................63
Maintaining Your Air Bag System ..............69
Side Air Bags ............................64
Transporting Pets .........................91
Air Bag Light ........................59, 93, 242
Air Bag Maintenance .........................69
Air Cleaner, Engine (Engine Air Cleaner Filter) ......466
Air Conditioner Maintenance ..................468
Air Conditioning .......................... .323
Air Conditioning Controls ....................323 Air Conditioning Filter
...................337, 469
Air Conditioning, Operating Tips ...............336
Air Conditioning, Rear Zone ...............327, 334
Air Conditioning Refrigerant ...............468, 469
Air Conditioning System ...............323, 329, 468
Air Conditioning System, Zone Control ...........323
Air Pressure, Tires ..........................380
Alarm (Security Alarm) ....................13, 247
Alterations/Modifications, Vehicle ................6
Antenna, Satellite Radio ..................... .293
Antifreeze (Engine Coolant) ................473, 495
Disposal ...............................475
Anti-Lock Brake System (ABS) .................360
Anti-Lock Warning Light .....................249
Appearance Car
e .......................... .479
Ashtray .................................214
Assistance Towing ..........................123
Assist, Hill Start .......................... .362
Auto Down Power Windows ...................31
Automatic Dimming Mirror ...................102
Automatic Door Locks .....................28, 29
Automatic Headlights .......................173
Automatic Temperature Control (ATC) ...........329
Automatic Transmission ...............344, 478, 479
Adding Fluid .......................... .479
512 INDEX