Page 51 of 368

49
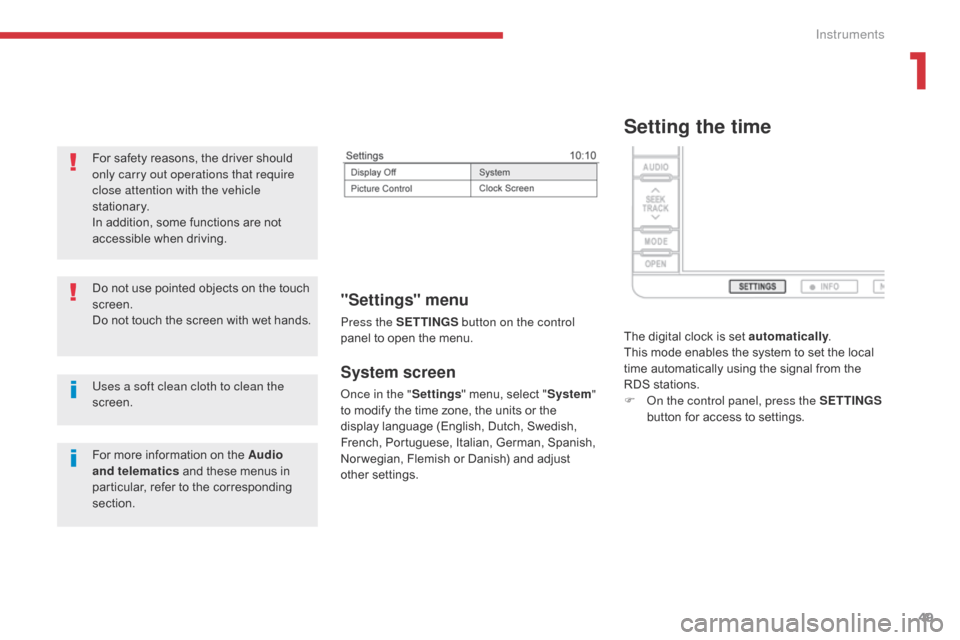
System screen
Once in the "Settings" menu, select " System"
to modify the time zone, the units or the
display language (English, Dutch, Swedish,
French, Portuguese, Italian, German, Spanish,
Nor wegian, Flemish or Danish) and adjust
other settings.
"Settings" menu
Press the S ETTINGS button on the control
panel to open the menu.
Uses a soft clean cloth to clean the
screen. Do not use pointed objects on the touch
screen.
Do not touch the screen with wet hands. For safety reasons, the driver should
only carry out operations that require
close attention with the vehicle
stationary.
In addition, some functions are not
accessible when driving.
For more information on the Audio
and telematics and these menus in
particular, refer to the corresponding
section.
Setting the time
The digital clock is set automatically .
This mode enables the system to set the local
time automatically using the signal from the
RDS stations.
F
O
n the control panel, press the SETTINGS
button for access to settings.
1
Instruments
Page 95 of 368

93
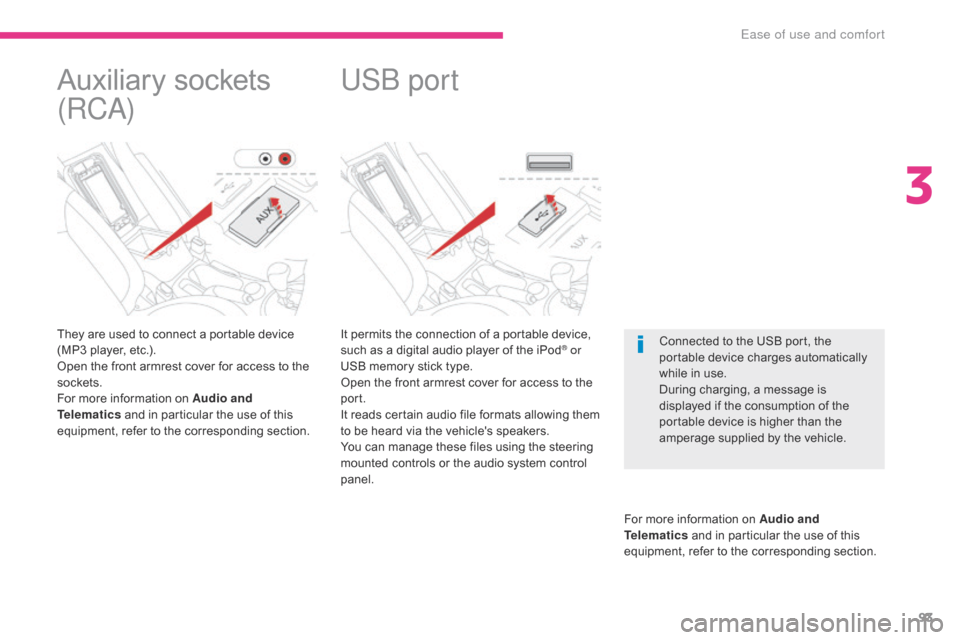
It permits the connection of a portable device,
such as a digital audio player of the iPod® or
USB memory stick type.
Open the front armrest cover for access to the
port.
It reads certain audio file formats allowing them
to be heard via the vehicle's speakers.
You can manage these files using the steering
mounted controls or the audio system control
panel.
For more information on Audio and
Telematics and in particular the use of this
equipment, refer to the corresponding section.
USB port
Connected to the USB port, the
portable device charges automatically
while in use.
During charging, a message is
displayed if the consumption of the
portable device is higher than the
amperage supplied by the vehicle.
Auxiliary sockets
(RCA)
They are used to connect a portable device
(MP3 player, etc.).
Open the front armrest cover for access to the
sockets.
For more information on Audio and
Telematics and in particular the use of this
equipment, refer to the corresponding section.
3
Ease of use and comfort
Page 101 of 368

99
Changing the vehicle's
mode
With the electronic key inside the vehicle ; each
press on the "START/STOP " button, with no
action on the pedals , changes the vehicle's
mode:
F
F
irst press (ACC mode), the button's
warning lamp comes on in orange.
T
he accessories (audio system,
12
V socket, etc.) can be used.
F
S
econd press (ON mode), the button's
warning lamp comes on in green.
S
witching on the ignition.
F
T
hird press (OFF mode), the warning lamp
in the button goes off. If you use the accessories for a
prolonged period with the ignition
switch in position 2 (ACC)
, you risk
discharging the battery. Starting your
vehicle will then no longer be possible.
Ta k e c a r e .
For more information on the Automatic
power cut-off to accessories , refer to
the corresponding section.
Starting - switching off the engine with the Keyless Entry and
Starting system
If the warning lamp flashes orange,
contact a CITROËN dealer or a
qualified workshop as soon as possible.
F
P
ress and release the
" START/STOP " button.
F
W
ith the electronic key inside the vehicle,
depress the clutch pedal fully on vehicles
with a manual gearbox or press the brake
pedal on vehicles with a CVT gearbox.
Starting using the
electronic key
For vehicles fitted with a manual gearbox, put
the gear lever in neutral.
For vehicles fitted with a CVT gearbox, put the
gear lever in P .
4
Driving
Page 178 of 368
176
Removing a front or rear
wiper blade
F Raise the corresponding wiper arm.
F R emove the wiper blade, sliding it towards
the outside.
Changing a wiper
blade
Fitting a front or rear wiper
blade
F At the front, check the size of the wiper blade as the shorter blade is fitted on the
right-hand side of the vehicle.
F
P
ut the corresponding new wiper blade in
place and fix it.
F
F
old down the wiper arm carefully.
Automatic power cut-off to accessories
After the engine has stopped, when the
ignition switch is in the "ACC" position
(or the vehicle in "ACC" mode) you
can still use functions such as the audio
equipment, windscreen wipers, dipped beam
headlamps,
courtesy lamps, etc. for about
thirty
m
inutes.Cutting off
Once the thirty minutes have expired, the
power supply to the accessories will be
automatically cut off.
Restoring power
The power supply will be restored the next time
the ignition is switched on.
Practical information
Page 208 of 368
206
Dashboard fuses
The fusebox is located in the lower dashboard
(left-hand side).
Access to the fuses
F Unclip the cover and remove it completely by pulling it towards you. Fuse N°
Rating Functions
1 * 30 ACabin fan.
2 15 ABrake lamps, third brake lamp.
3 10 ARear foglamps.
4 30 AWindscreen wiper, screenwash.
6 20 ACentral locking, electric door mirrors.
7 15 AAudio equipment, telematics, USB unit, hands-free system.
8 7. 5 ARemote control key, air conditioning control unit, instrument
panel, electric windows, rain and sunshine sensors, alarm,
switch panel, steering mounted controls.
9 15 AInstrument panel and interior lighting.
10 15 AHazard warning lamps.
11 15 ARear wiper.
12 7. 5 AInstrument panel, multifunction screen, parking sensors,
heated seats, heated rear screen, electric blind, automatic
headlamp adjustment.
13 15 ACigarette lighter, accessory socket.
15 20 AElectric blind.
16 10 ADoor mirrors, audio equipment.
In the event of a breakdown
Page 211 of 368
209
Fuse N°Rating Functions
13 10 ADaytime running lamps.
14 10 ALeft-hand main beam headlamp.
15 10 ARight-hand main beam headlamp.
16 20 ALeft-hand dipped beam headlamp (xenon).
17 20 ARight-hand dipped beam headlamp (xenon).
18 10 ALeft-hand dipped beam headlamp (halogen), manual and
automatic headlamp adjustment.
19 10 ARight-hand dipped beam headlamp (halogen).
31 30 AAudio amplifier.
The maxi-fuses provide additional
protection for the electrical systems. All
work on the maxi-fuses must be carried
out by a CITROËN dealer or a qualified
workshop.
Carefully close the cover after replacing
a fuse so as to ensure the correct
sealing of the fusebox.
8
In the event of a breakdown
Page 212 of 368
210
Spare fuses
The spare fuses are located under the engine
compartment fusebox cover.The cover does not contain spare
fuses with an amperage of 7.5 A, 25 A
or 30 A. If one of the fuses with these
amperages develops a fault, replace it
with the following fuse:
A 7.5 A fuse must be replaced with the
10 A spare fuse
, a 25 A fuse with the
20 A spare fuse and a 30 A fuse with
the audio system fuse (N° 31) .
Fuse N°
Rating
33 10 A
34 15 A
35 20 A
In the event of a breakdown
Page 215 of 368

213
If you intend to charge your vehicle's
battery yourself, use only a charger
compatible with lead batteries, with a
nominal voltage of 12 V.F
D
isconnect the battery from the vehicle, if
necessary.
F
F
ollow the instructions for use provided by
the manufacturer of the charger.
F
R
econnect, starting with the (-) terminal.
F
C
heck that the terminals and connectors
are clean. If they are covered with sulphate
(whitish or greenish deposit), remove them
and clean them.Charging the battery using
a battery charger
Follow the instructions for use provided
by the manufacturer of the charger.
Never invert the polarities.
Never start the engine by connecting a
battery charger.
Never use a battery booster of 24 V or
higher.
Check first that the slave battery has a
nominal voltage of 12 V and a capacity
at least equal to that of the discharged
battery.
The two vehicles must not touch.
Switch off all power-consuming
equipment on the two vehicles (audio
system, wipers, lamps, etc.).
Ensure that the slave cables do not
pass near the moving parts of the
engine (fan, belt, etc.).
Do not disconnect the (+) terminal while
the engine is running.
8
In the event of a breakdown