2017 CHEVROLET SUBURBAN instrument panel
[x] Cancel search: instrument panelPage 163 of 465
Chevrolet Tahoe/Suburban Owner Manual (GMNA-Localizing-U.S./Canada/
Mexico-9955986) - 2017 - crc - 7/5/16
162 Instruments and Controls
cylinders the vehicle is running on.
SeeActive Fuel
Management
®0 261.
Press
pto select the distance or
reset best value. Use
wandxto
choose the distance and press
V.
Press
wandxto select “Reset
Best Score.” Press
Vto reset the
best average fuel economy. After
reset, the momentary average fuel
economy will display.
The display provides information on
how current driving behavior affects
the running average and how well
recent driving compares to the best
that has been achieved for the
selected distance.
Timer : This display can be used as
a timer. To start the timer, press
V
while this display is active. The
display will show the amount of time
that has passed since the timer was
last reset. To stop the timer, press
V
briefly while this display is active
and the timer is running. To reset the timer to zero, press and hold
V
while this display is active, or presspand select reset.
Speed Limit (If Equipped) : Shows
sign information, which comes from
a roadway database in the onboard
navigation.
Engine Hours : Shows the total
number of hours the engine has run.
Transmission Fluid
Temperature : Shows the
temperature of the automatic
transmission fluid in either degrees
Celsius (°C) or degrees
Fahrenheit (°F).
Trailer Brake (If Equipped) : On
vehicles with the Integrated Trailer
Brake Control (ITBC) system, the
trailer brake display appears in
the DIC.
TRAILER GAIN shows the trailer
gain setting. This setting can be
adjusted from 0.0 to 10.0 with either
a trailer connected or disconnected.
OUTPUT shows the power output to
the trailer anytime a trailer with
electric brakes is connected. Output is displayed as a bar graph. Dashes
may appear in the OUTPUT display
if a trailer is not connected.
Off Road :
Displays vehicle pitch
and roll information, road wheel
angle, and four-wheel drive (4WD)
status.
Blank Page : Shows no
information.
Head-Up Display (HUD)
{Warning
If the HUD image is too bright or
too high in your field of view, it
may take you more time to see
things you need to see when it is
dark outside. Be sure to keep the
HUD image dim and placed low in
your field of view.
If equipped with HUD, some
information concerning the
operation of the vehicle is projected
onto the windshield. The image is
projected through the HUD lens on
top of the instrument panel. The
Page 190 of 465
Chevrolet Tahoe/Suburban Owner Manual (GMNA-Localizing-U.S./Canada/
Mexico-9955986) - 2017 - crc - 7/5/16
Lighting 189
Lighting
Exterior Lighting
Exterior Lamp Controls . . . . . . . 189
Exterior Lamps OffReminder . . . . . . . . . . . . . . . . . . . 191
Headlamp High/Low-Beam Changer . . . . . . . . . . . . . . . . . . . . 191
Flash-to-Pass . . . . . . . . . . . . . . . . 191
Daytime Running Lamps (DRL) . . . . . . . . . . . . . . . 192
Automatic Headlamp System . . . . . . . . . . . . . . . . . . . . . . 192
Hazard Warning Flashers . . . . . 193
Turn and Lane-Change Signals . . . . . . . . . . . . . . . . . . . . . . 193
Fog Lamps . . . . . . . . . . . . . . . . . . . 194
Interior Lighting
Instrument Panel Illumination Control . . . . . . . . . . . . . . . . . . . . . . 194
Dome Lamps . . . . . . . . . . . . . . . . . 195
Reading Lamps . . . . . . . . . . . . . . 195
Lighting Features
Entry Lighting . . . . . . . . . . . . . . . . 196
Exit Lighting . . . . . . . . . . . . . . . . . . 196
Battery Load Management . . . 196
Battery Power Protection . . . . . 197
Exterior Lighting
Exterior Lamp Controls
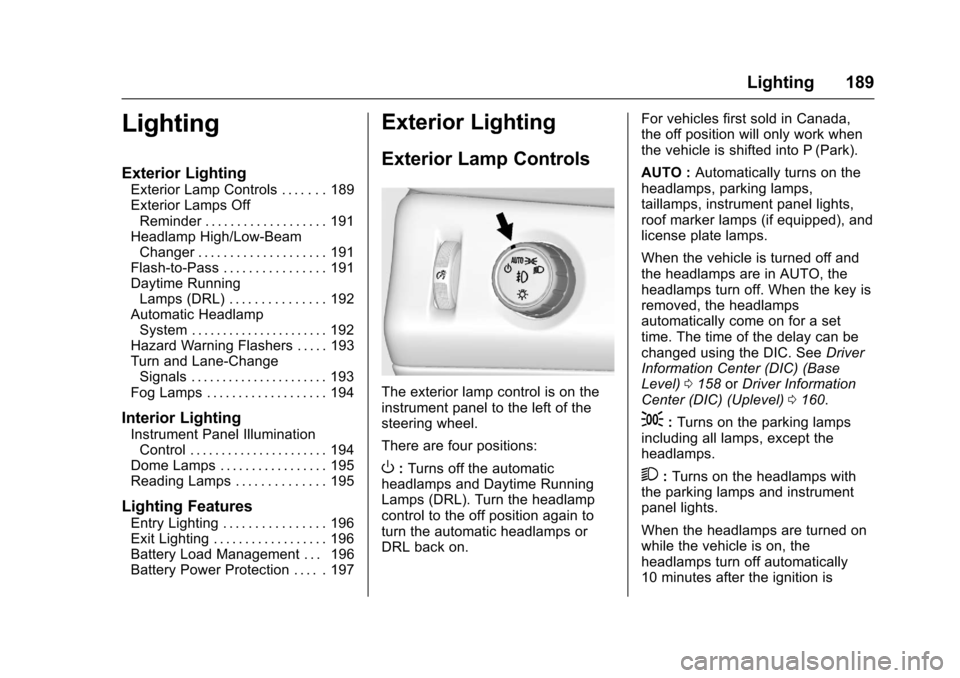
The exterior lamp control is on the
instrument panel to the left of the
steering wheel.
There are four positions:
O: Turns off the automatic
headlamps and Daytime Running
Lamps (DRL). Turn the headlamp
control to the off position again to
turn the automatic headlamps or
DRL back on. For vehicles first sold in Canada,
the off position will only work when
the vehicle is shifted into P (Park).
AUTO :
Automatically turns on the
headlamps, parking lamps,
taillamps, instrument panel lights,
roof marker lamps (if equipped), and
license plate lamps.
When the vehicle is turned off and
the headlamps are in AUTO, the
headlamps turn off. When the key is
removed, the headlamps
automatically come on for a set
time. The time of the delay can be
changed using the DIC. See Driver
Information Center (DIC) (Base
Level) 0158 orDriver Information
Center (DIC) (Uplevel) 0160.
;:Turns on the parking lamps
including all lamps, except the
headlamps.
2: Turns on the headlamps with
the parking lamps and instrument
panel lights.
When the headlamps are turned on
while the vehicle is on, the
headlamps turn off automatically
10 minutes after the ignition is
Page 192 of 465
Chevrolet Tahoe/Suburban Owner Manual (GMNA-Localizing-U.S./Canada/
Mexico-9955986) - 2017 - crc - 7/5/16
Lighting 191
The high beams may not turn off
automatically if the system cannot
detect another vehicle's lamps
because of any of the following:
.The other vehicle's lamps are
missing, damaged, obstructed
from view, or otherwise
undetected.
. The other vehicle's lamps are
covered with dirt, snow, and/or
road spray.
. The other vehicle's lamps cannot
be detected due to dense
exhaust, smoke, fog, snow, road
spray, mist, or other airborne
obstructions.
. The vehicle's windshield is dirty,
cracked, or obstructed by
something that blocks the view
of the light sensor.
. The vehicle is loaded such that
the front end points upward,
causing the light sensor to aim
high and not detect headlamps
and taillamps.
. The vehicle is being driven on
winding or hilly roads. The automatic high-beam
headlamps may need to be disabled
if any of the above conditions exist.
Exterior Lamps Off
Reminder
A reminder chime sounds when the
headlamps or parking lamps are
manually turned on, the ignition is
off, and a door is open. To disable
the chime, turn the lamps off.
Headlamp High/
Low-Beam Changer
$
:
Push the turn signal lever
toward the instrument panel to
change the headlamps from low to
high beam.
Pull the turn signal lever toward you
and release it to return to low-beam
headlamps.
When the high-beam headlamps are
on, this indicator light on the
instrument cluster will also be on.
Flash-to-Pass
This feature lets you use the
high-beam headlamps to signal a
driver in front of you that you want
to pass. It works even if the
headlamps are in the automatic
position.
To use it, pull the turn signal lever
toward you, then release it.
If the headlamps are in the
automatic position or on low beam,
the high-beam headlamps will turn
on. Depending on the type of
headlamp, they will either turn off
after a short duration or stay on as
long as you hold the lever toward
you. The high-beam indicator on the
instrument cluster will come on.
Release the lever to return to
normal operation.
Page 193 of 465
Chevrolet Tahoe/Suburban Owner Manual (GMNA-Localizing-U.S./Canada/
Mexico-9955986) - 2017 - crc - 7/5/16
192 Lighting
Daytime Running
Lamps (DRL)
DRL can make it easier for others to
see the front of the vehicle during
the day. Fully functional DRL are
required on all vehicles first sold in
Canada.
The DRL system comes on when
the following conditions are met:
.The ignition is on.
. The exterior lamp control is
in AUTO.
. The transmission is not in
P (Park).
. The light sensor determines it is
daytime.
When the DRL system is on, only
the DRL are on. The taillamps,
sidemarker lamps, instrument panel
lights, and other lamps will not
be on.
When it begins to get dark, the
automatic headlamp system
switches from DRL to the
headlamps. To turn off the DRL, turn the exterior
lamp control to the off position and
then release. For vehicles first sold
in Canada, off will only work when
the vehicle is in P (Park).
Automatic Headlamp
System
When the exterior lamp control is
set to AUTO and it is dark enough
outside, the headlamps come on
automatically.
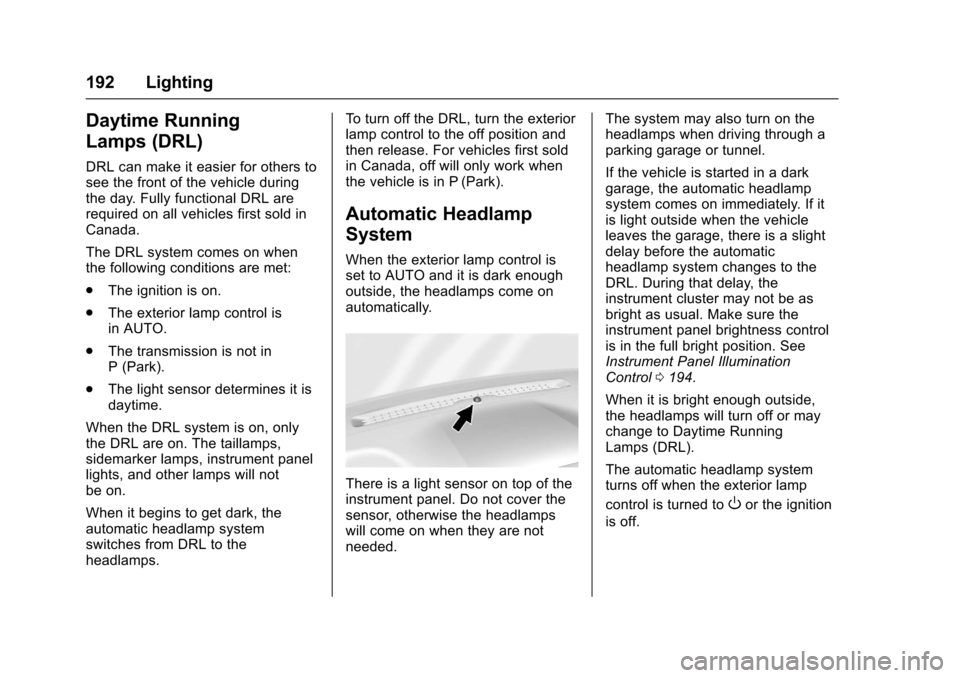
There is a light sensor on top of the
instrument panel. Do not cover the
sensor, otherwise the headlamps
will come on when they are not
needed.
The system may also turn on the
headlamps when driving through a
parking garage or tunnel.
If the vehicle is started in a dark
garage, the automatic headlamp
system comes on immediately. If it
is light outside when the vehicle
leaves the garage, there is a slight
delay before the automatic
headlamp system changes to the
DRL. During that delay, the
instrument cluster may not be as
bright as usual. Make sure the
instrument panel brightness control
is in the full bright position. See
Instrument Panel Illumination
Control
0194.
When it is bright enough outside,
the headlamps will turn off or may
change to Daytime Running
Lamps (DRL).
The automatic headlamp system
turns off when the exterior lamp
control is turned to
Oor the ignition
is off.
Page 195 of 465
Chevrolet Tahoe/Suburban Owner Manual (GMNA-Localizing-U.S./Canada/
Mexico-9955986) - 2017 - crc - 7/5/16
194 Lighting
Fog Lamps
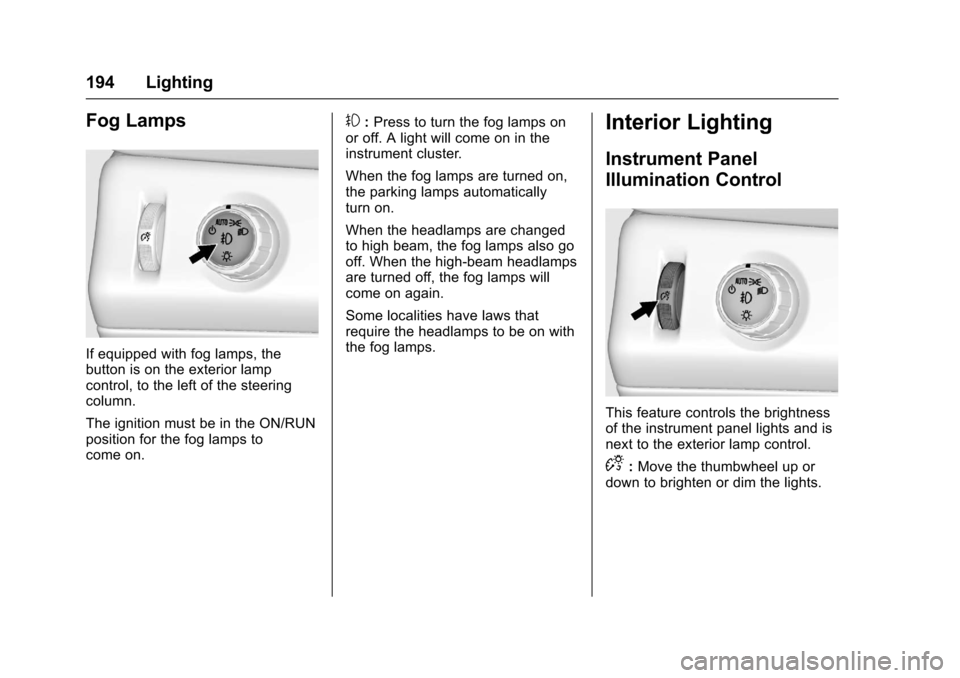
If equipped with fog lamps, the
button is on the exterior lamp
control, to the left of the steering
column.
The ignition must be in the ON/RUN
position for the fog lamps to
come on.
#:Press to turn the fog lamps on
or off. A light will come on in the
instrument cluster.
When the fog lamps are turned on,
the parking lamps automatically
turn on.
When the headlamps are changed
to high beam, the fog lamps also go
off. When the high-beam headlamps
are turned off, the fog lamps will
come on again.
Some localities have laws that
require the headlamps to be on with
the fog lamps.Interior Lighting
Instrument Panel
Illumination Control
This feature controls the brightness
of the instrument panel lights and is
next to the exterior lamp control.
D: Move the thumbwheel up or
down to brighten or dim the lights.
Page 204 of 465
Chevrolet Tahoe/Suburban Owner Manual (GMNA-Localizing-U.S./Canada/
Mexico-9955986) - 2017 - crc - 7/5/16
Infotainment System 203
Valet Mode:
Using the circular numeric keypad,
enter a four-digit code:1. Turn the MENU knob to highlight a number.
2. Press the MENU knob to select it. Do this for each one of the
four digits. Select Enter to go to
the confirmation screen.
3. Re-enter the four-digit code. Select LOCK to lock the
system. This will also lock
access to the storage behind
the radio, if equipped. See
Instrument Panel
Storage 0125.
4. Enter the four-digit code to unlock the system.
Radio : See“Radio Setup” later in
this section.
Vehicle : SeeVehicle
Personalization 0178.
Display : Press the MENU knob to
turn the display on or off.
Return to Factory Settings : See
“Return to Factory Settings” later in
this section. Software Information :
Press the
MENU knob to select Save Vehicle
Info to USB. Press the MENU knob
again to start downloading the
vehicle information to the USB.
Radio Setup
From the RADIO/BAND screen icon,
the following may be displayed:
Manage Favorites:
. Turn the MENU knob and press
to select a favorite.
.
To delete a favorite, press
the button just below the
DELETE screen button.
. To move a favorite, press the
MOVE screen button. Turn
the MENU knob to select a
new location, then press the
DROP screen button to
select the new location.
. Select
oBACK to go back to
the previous menu.
Number of Favorites Shown : To
set the number of favorites for
display, select Auto to automatically
adjust the number of Favorites
pages shown as Favorites are added and removed. Another way to
adjust is to select a number from 5–
25 to show that selection of
favorites.
Audible Touch Feedback :
Select
to turn feedback off or on.
Auto Volume (If Equipped) : This
feature adjusts the volume based on
vehicle speed. The options are Off,
Low, Medium-Low, Medium,
Medium-High, or High. Select the
desired volume.
Maximum Startup Volume : This
feature sets the maximum startup
volume. If the vehicle is started and
the volume is greater than this level,
the volume is adjusted to this level.
To set the maximum startup volume,
Turn the MENU knob to increase or
decrease startup volume.
Rear Camera
From the Rear Camera screen
button, the following may display:
Guidance Lines (If Equipped) :
This feature will display guidance
lines on the screen when in
R (Reverse). Select Off or On.
Page 215 of 465
Chevrolet Tahoe/Suburban Owner Manual (GMNA-Localizing-U.S./Canada/
Mexico-9955986) - 2017 - crc - 7/5/16
214 Infotainment System
Phone
Bluetooth (Overview)
Instructions for using the cell phone
may differ between infotainment
systems. The base radio and base
radio with connectivity instructions
are included in this manual. See the
infotainment manual for instructions
on the uplevel radios.
Bluetooth-capable systems can
interact with many cell phones,
allowing:
.Placement and receipt of calls in
a hands-free mode.
. Sharing of the cell phone’s
address book or contact list with
the vehicle.
To minimize driver distraction,
before driving, and with the vehicle
parked:
. Become familiar with the
features of the cell phone.
Organize the phone book and
contact lists clearly and delete duplicate or rarely used entries.
If possible, program speed dial
or other shortcuts.
. Review the controls and
operation of the infotainment
system.
. Pair cell phone(s) to the vehicle.
The system may not work with
all cell phones. See “Pairing”in
this section.
. If the cell phone has voice
dialing capability, learn to use
that feature to access the
address book or contact list. See
“Voice Pass-Thru” in this
section.
. See “Storing and Deleting Phone
Numbers” in this section.
{Warning
When using a cell phone, it can
be distracting to look too long or
too often at the screen of the
phone or the infotainment system.
Taking your eyes off the road too
(Continued)
Warning (Continued)
long or too often could cause a
crash resulting in injury or death.
Focus your attention on driving.
Vehicles with a Bluetooth system
can use a Bluetooth-capable cell
phone with a Hands-Free Profile to
make and receive phone calls. The
infotainment system and voice
recognition are used to control the
system. The system can be used
while in ON/RUN or ACC/
ACCESSORY. The range of the
Bluetooth system can be up to 9.1 m
(30 ft). Not all phones support all
functions and not all phones work
with the Bluetooth system. See
www.gm.com/bluetooth for more
information about compatible
phones.
Bluetooth Controls
Use the buttons on the instrument
panel, faceplate, and the steering
wheel to operate the Bluetooth
system.
Page 228 of 465

Chevrolet Tahoe/Suburban Owner Manual (GMNA-Localizing-U.S./Canada/
Mexico-9955986) - 2017 - crc - 7/5/16
Climate Controls 227
Front Climate Controls
Automatic Operation
The system automatically controls
the fan speed, air delivery, air
conditioning, and recirculation in
order to heat or cool the vehicle to
the desired temperature.
When AUTO is lit, all four functions
operate automatically. Each function
can also be manually set and the
setting is displayed. Functions not
manually set will continue to be
automatically controlled, even if the
AUTO indicator is not lit.
To place the system in
automatic mode:1. Press AUTO.
2. Set the driver and passenger temperature.
To find your comfort setting,
start with 22 °C (72 °F) and
allow the system time to
stabilize. Then adjust the
temperature as needed for best
comfort. To improve fuel efficiency and to
cool the vehicle faster, recirculation
may be automatically selected in
warm weather.
The recirculation light will not come
on when automatically controlled.
Press
@to manually select
recirculation; press it again to select
outside air.
Do not cover the solar sensor on the
top of the instrument panel near the
windshield. This sensor regulates
air temperature based on sun load.
See “Sensors” later in this section.
Manual Operation
O:Press to turn the climate control
system on or off. The airflow will be
blocked from entering in all air
delivery modes, except defrost.
9: Turn clockwise or
counterclockwise to increase or
decrease the fan speed. Press
AUTO to return to automatic
operation. The maximum auto fan speed can
be adjusted. See
“Climate and Air
Quality” underVehicle
Personalization 0178.
Driver and Passenger
Temperature Control : The
temperature can be adjusted
separately for the driver and
passenger.
Turn the knob clockwise or
counterclockwise to increase or
decrease the driver or passenger
temperature setting.
SYNC : Press to link the passenger
and rear climate temperature
settings to the driver setting. The
SYNC indicator light will turn on.
When the passenger or rear climate
settings are adjusted, the SYNC
indicator light turns off.
Air Delivery Mode Control : Press
Y,\,[, or-to change the
direction of the airflow. An indicator
light comes on in the selected mode
button.