Page 277 of 372

Black plate (49,1)Chevrolet Orlando Owner Manual - 2013 - CRC - 6/5/12
Vehicle Care 10-49
Replace the tire if:
.The indicators at three or
more places around the tire
can be seen.
.There is cord or fabric
showing through the tire's
rubber.
.The tread or sidewall is
cracked, cut, or snagged
deep enough to show cord or
fabric.
.The tire has a bump, bulge,
or split.
.The tire has a puncture, cut,
or other damage that cannot
be repaired well because of
the size or location of the
damage.
Tire Rotation
Tires should be rotated every
12 000 km (7,500 mi). See
Maintenance Schedule on
page 11‑2.
Tires are rotated to achieve a
more uniform wear for all tires.
The first rotation is the most
important.
Anytime unusual wear is
noticed, rotate the tires as soon
as possible, check for proper tire
inflation pressure, and check for
damaged tires or wheels. If the
unusual wear continues after the
rotation, check the wheel
alignment. SeeWhen It Is Time
for New Tires on page 10‑50
and Wheel Replacement on
page 10‑55.
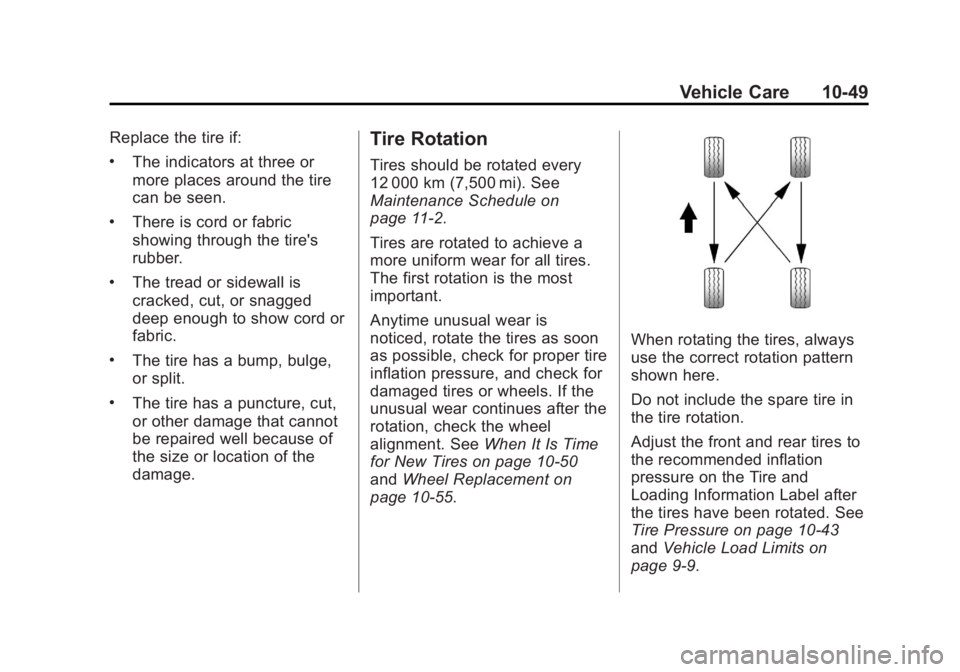
When rotating the tires, always
use the correct rotation pattern
shown here.
Do not include the spare tire in
the tire rotation.
Adjust the front and rear tires to
the recommended inflation
pressure on the Tire and
Loading Information Label after
the tires have been rotated. See
Tire Pressure on page 10‑43
and Vehicle Load Limits on
page 9‑9.
Page 286 of 372

Black plate (58,1)Chevrolet Orlando Owner Manual - 2013 - CRC - 6/5/12
10-58 Vehicle Care
The following information explains
how to repair or change a tire.
Tire Sealant and
Compressor Kit
{WARNING
Idling a vehicle in an enclosed
area with poor ventilation is
dangerous. Engine exhaust may
enter the vehicle. Engine exhaust
contains carbon monoxide (CO)
which cannot be seen or smelled.
It can cause unconsciousness
and even death. Never run the
engine in an enclosed area that
has no fresh air ventilation. For
more information, seeEngine
Exhaust on page 9‑20.
{WARNING
Overinflating a tire could cause
the tire to rupture and you or
others could be injured. Be sure
to read and follow the tire sealant
and compressor kit instructions
and inflate the tire to its
recommended pressure. Do not
exceed the recommended
pressure.
{WARNING
Storing the tire sealant and
compressor kit or other
equipment in the passenger
compartment of the vehicle could
cause injury. In a sudden stop or
collision, loose equipment could
strike someone. Store the tire
sealant and compressor kit in its
original location. If this vehicle has a tire sealant
and compressor kit, there may not
be a spare tire or tire changing
equipment, and on some vehicles
there may not be a place to store
a tire.
The tire sealant and compressor
can be used to temporarily seal
punctures up to 6 mm (0.25 in)
in the tread area of the tire.
It can also be used to inflate an
underinflated tire.
If the tire has been separated from
the wheel, has damaged sidewalls,
or has a large puncture, the tire is
too severely damaged for the tire
sealant and compressor kit to be
effective. See
Roadside Assistance
Program on page 13‑5.
Read and follow all of the tire
sealant and compressor kit
instructions.
Page 296 of 372

Black plate (68,1)Chevrolet Orlando Owner Manual - 2013 - CRC - 6/5/12
10-68 Vehicle Care
Removing the Flat Tire and
Installing the Spare Tire
1. Remove the wheel cover.The cover does not need to be
removed if the wheel bolts are
visible. Do not remove the
retaining rings on the wheel
bolts.
Disengage the wheel bolt caps
with a screwdriver and remove
them if the vehicle has alloy
wheels. To protect the wheel
place a soft cloth between the
screwdriver and the alloy wheel. After removing the wheel cover, use
the following instructions to remove
the flat tire and install the spare tire.
1. Do a safety check before
proceeding. See If a Tire Goes
Flat on page 10‑56 for more
information.
2. Turn the wheel wrench counterclockwise once on each
wheel nut to loosen it. Do not
remove them yet.
3. Place the jack near the flat tire.
4. Place the jack under the vehicle. 5. Attach the jack handle extension
to the jack by sliding the hook
through the end of the jack.
Notice: Make sure that the jack
lift head is in the correct position
or you may damage your vehicle.
The repairs would not be covered
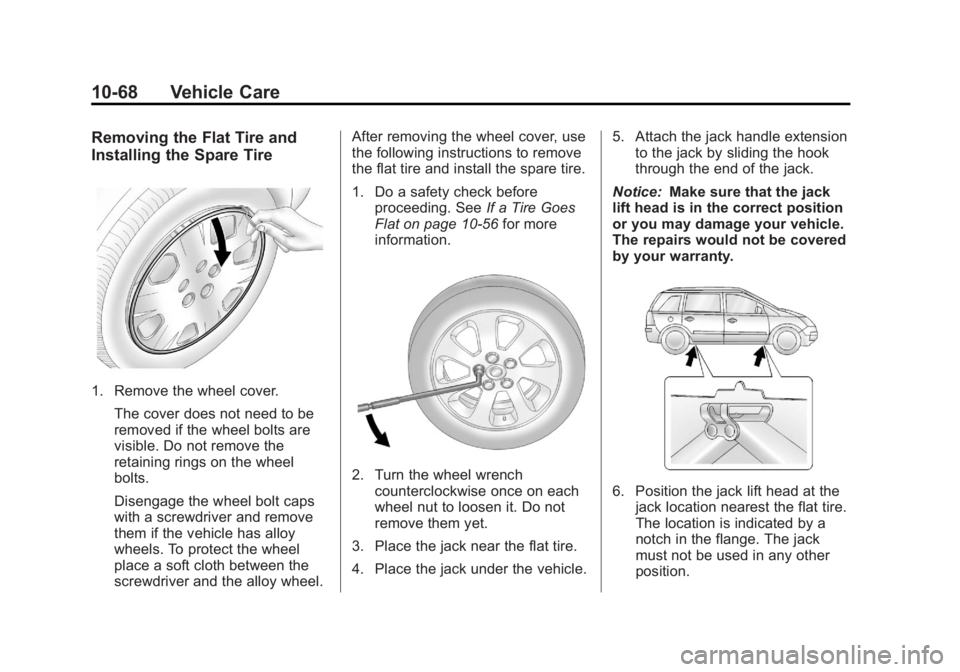
by your warranty.6. Position the jack lift head at the jack location nearest the flat tire.
The location is indicated by a
notch in the flange. The jack
must not be used in any other
position.