2017 CHEVROLET ORLANDO display
[x] Cancel search: displayPage 217 of 372

Black plate (37,1)Chevrolet Orlando Owner Manual - 2013 - CRC - 6/5/12
Driving and Operating 9-37
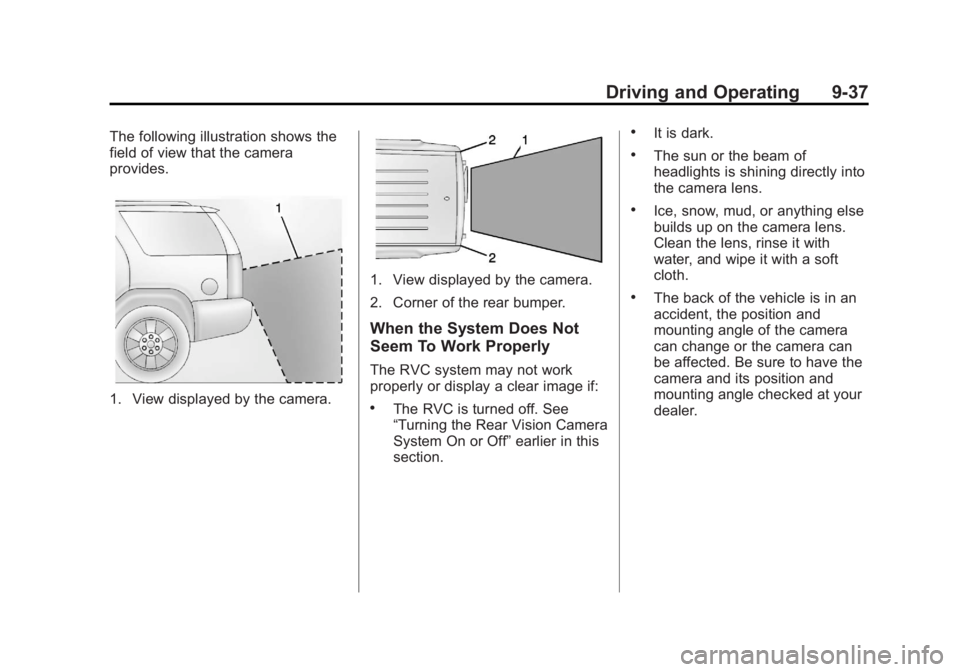
The following illustration shows the
field of view that the camera
provides.
1. View displayed by the camera.
1. View displayed by the camera.
2. Corner of the rear bumper.
When the System Does Not
Seem To Work Properly
The RVC system may not work
properly or display a clear image if:
.The RVC is turned off. See
“Turning the Rear Vision Camera
System On or Off”earlier in this
section.
.It is dark.
.The sun or the beam of
headlights is shining directly into
the camera lens.
.Ice, snow, mud, or anything else
builds up on the camera lens.
Clean the lens, rinse it with
water, and wipe it with a soft
cloth.
.The back of the vehicle is in an
accident, the position and
mounting angle of the camera
can change or the camera can
be affected. Be sure to have the
camera and its position and
mounting angle checked at your
dealer.
Page 237 of 372

Black plate (9,1)Chevrolet Orlando Owner Manual - 2013 - CRC - 6/5/12
Vehicle Care 10-9
vehicle warranty. Check with your
dealer or service provider on
whether the oil is approved to the
dexos1 specification.
Viscosity Grade
SAE 5W-30 is the best viscosity
grade for the vehicle. Do not use
other viscosity grade oils such as
SAE 10W-30, 10W-40, or 20W-50.
Cold Temperature Operation: In an
area of extreme cold, where the
temperature falls below−29°C
(−20°F), an SAE 0W-30 oil may be
used. An oil of this viscosity grade
will provide easier cold starting
for the engine at extremely low
temperatures. When selecting an oil
of the appropriate viscosity grade,
always select an oil of the correct
specification. See “Specification”
earlier in this section for more
information.Engine Oil Additives/Engine
Oil Flushes
Do not add anything to the oil. The
recommended oils with the dexos
specification and displaying the
dexos certification mark are all that
is needed for good performance and
engine protection.
Engine oil system flushes are not
recommended and could cause
engine damage not covered by the
vehicle warranty.
What to Do with Used Oil
Used engine oil contains certain
elements that can be unhealthy for
your skin and could even cause
cancer. Do not let used oil stay on
your skin for very long. Clean your
skin and nails with soap and water,
or a good hand cleaner. Wash or
properly dispose of clothing or rags
containing used engine oil. See the
manufacturer's warnings about the
use and disposal of oil products. Used oil can be a threat to the
environment. If you change your
own oil, be sure to drain all the oil
from the filter before disposal. Never
dispose of oil by putting it in the
trash or pouring it on the ground,
into sewers, or into streams or
bodies of water. Recycle it by taking
it to a place that collects used oil.
Engine Oil Life System
When to Change Engine Oil
This vehicle has a computer system
that indicates when to change the
engine oil and filter. This is based
on a combination of factors which
include engine revolutions, engine
temperature, and miles driven.
Based on driving conditions, the
mileage at which an oil change is
indicated can vary considerably. For
the oil life system to work properly,
the system must be reset every time
the oil is changed.
Page 238 of 372

Black plate (10,1)Chevrolet Orlando Owner Manual - 2013 - CRC - 6/5/12
10-10 Vehicle Care
When the system has calculated
that oil life has been diminished, it
indicates that an oil change is
necessary. A CHANGE ENGINE
OIL SOON message comes on. See
Engine Oil Messages on page 5‑26.
Change the oil as soon as possible
within the next 1 000 km (600 mi).
It is possible that, if driving under
the best conditions, the oil life
system might indicate that an oil
change is not necessary for up to a
year. The engine oil and filter must
be changed at least once a year
and, at this time, the system must
be reset. Your dealer has trained
service people who will perform this
work and reset the system. It is also
important to check the oil regularly
over the course of an oil drain
interval and keep it at the proper
level.
If the system is ever reset
accidentally, the oil must be
changed at 5 000 km (3,000 mi)
since the last oil change.
Remember to reset the oil life
system whenever the oil is changed.How to Reset the Engine Oil
Life System
Reset the system whenever the
engine oil is changed so that the
system can calculate the next
engine oil change. To reset the
system:
1. Turn the ignition to ON/RUN withthe engine off.
2. Press the DIC MENU button on the turn signal lever to enter the
Vehicle Information Menu. Use
the thumbwheel to scroll through
the menu items until you reach
REMAINING OIL LIFE.
3. Press the SET/CLR button to reset the oil life at 100%.
4. Turn the ignition to LOCK/OFF.
The system is reset when the
CHANGE ENGINE OIL SOON
message is off and the REMAINING
OIL LIFE 100% message is
displayed. If the CHANGE ENGINE OIL SOON
message comes back on when the
vehicle is started, the engine oil life
system has not been reset. Repeat
the procedure.
Automatic Transmission
Fluid
How to Check Automatic
Transmission Fluid
It is not necessary to check
the transmission fluid level.
A transmission fluid leak is the only
reason for fluid loss. If a leak
occurs, take the vehicle to your
dealer and have it repaired as soon
as possible.
There is a special procedure for
checking and changing the
transmission fluid. Because this
procedure is difficult, this should be
done at your dealer. Contact your
dealer for additional information or
the procedure can be found in the
service manual. To purchase a
Page 264 of 372

Black plate (36,1)Chevrolet Orlando Owner Manual - 2013 - CRC - 6/5/12
10-36 Vehicle Care
Circuit
Number Usage
1 OnStar/Hands‐Free Phone
2 DC/DC Converter
3 Body Control Module 5
4 Audio
5 Information Display, Face Plate
6 Front Power Outlet
7 Power Outlet
8 Body Control Module 3
9 Body Control Module 4
10 Body Control Module 8 Circuit
Number Usage
11 Air Conditioning Blower Motor
12 Not Used
13 Power Front Seat, Left Side
14 Dynamic Light Control
15 Airbag
16 Tailgate
17 Air Conditioning System
18 Trailer
19 Battery Sensor
20 Not Used
21 Instrument Cluster Circuit
Number Usage
22 Ignition/Electronic Key System
23 Body Control Module 1
24 Body Control Module 2
25 Steering Column Lock
26 Rear Power Outlet
Relays Usage K1 Trunk Open
K2 Logistic Mode
K3 Retained Accessory Power
Page 274 of 372

Black plate (46,1)Chevrolet Orlando Owner Manual - 2013 - CRC - 6/5/12
10-46 Vehicle Care
When a low tire pressure condition
is detected, the TPMS illuminates
the low tire pressure warning light
located on the instrument cluster.
If the warning light comes on, stop
as soon as possible and inflate the
tires to the recommended pressure
shown on the Tire and Loading
Information label. SeeVehicle Load
Limits on page 9‑9.
A message to check the pressure in
a specific tire displays in the Driver
Information Center (DIC) display.
The low tire pressure warning light
and the DIC warning message come
on at each ignition cycle until the
tires are inflated to the correct
inflation pressure. Using the DIC,
tire pressure levels can be viewed.
For additional information and details about the DIC operation and
displays see
Driver Information
Center (DIC) on page 5‑21.
The low tire pressure warning light
may come on in cool weather when
the vehicle is first started, and then
turn off as the vehicle is driven. This
could be an early indicator that the
air pressure is getting low and must
be inflated to the proper pressure.
A Tire and Loading Information label
shows the size of the original
equipment tires and the correct
inflation pressure for the tires when
they are cold. See Vehicle Load
Limits on page 9‑9, for an example
of the Tire and Loading Information
label and its location. Also see Tire
Pressure on page 10‑43.
The TPMS can warn about a low
tire pressure condition but it
does not replace normal tire
maintenance. See Tire Inspection
on page 10‑48, Tire Rotation on
page 10‑49 andTires on
page 10‑37. Notice:
Tire sealant materials are
not all the same. A non-approved
tire sealant could damage the
TPMS sensors. TPMS sensor
damage caused by using an
incorrect tire sealant is not
covered by the vehicle
warranty. Always use only the
GM-approved tire sealant
available through your dealer or
included in the vehicle.
Factory-installed Tire Inflator Kits
use a GM-approved liquid tire
sealant. Using non-approved tire
sealants could damage the TPMS
sensors. See Tire Sealant and
Compressor Kit on page 10‑58 for
information regarding the inflator kit
materials and instructions.
Page 275 of 372

Black plate (47,1)Chevrolet Orlando Owner Manual - 2013 - CRC - 6/5/12
Vehicle Care 10-47
TPMS Malfunction Light and
Message
The TPMS will not function properly
if one or more of the TPMS sensors
are missing or inoperable. When the
system detects a malfunction, the
low tire warning light flashes for
about one minute and then stays on
for the remainder of the ignition
cycle. A DIC warning message also
displays. The malfunction light and
DIC warning message come on at
each ignition cycle until the problem
is corrected. Some of the conditions
that can cause these to come
on are:
.One of the road tires has been
replaced with the spare tire. The
spare tire does not have a
TPMS sensor. The malfunction
light and DIC message should
go off after the road tire is
replaced and the sensor
matching process is performed
successfully. See "TPMS Sensor
Matching Process" later in this
section.
.The TPMS sensor matching
process was not done or not
completed successfully after
rotating the tires. The
malfunction light and the DIC
message should go off after
successfully completing the
sensor matching process. See
"TPMS Sensor Matching
Process" later in this section.
.One or more TPMS sensors are
missing or damaged. The DIC
message and the malfunction
light should go off when the
TPMS sensors are installed and
the sensor matching process is
performed successfully. See
your dealer for service.
.Replacement tires or wheels do
not match the original equipment
tires or wheels. Tires and wheels
other than those recommended
could prevent the TPMS from
functioning properly. SeeBuying
New Tires on page 10‑51.
.Operating electronic devices or
being near facilities using radio
wave frequencies similar to the
TPMS could cause the TPMS
sensors to malfunction.
If the TPMS is not functioning
properly, it cannot detect or signal a
low tire condition. See your dealer
for service if the TPMS malfunction
light and DIC message come on
and stay on.
TPMS Sensor Matching
Process
Each TPMS sensor has a unique
identification code. The identification
code needs to be matched to a new
tire/wheel position after rotating the
tires or replacing one or more of the
TPMS sensors. The TPMS sensor
matching process should also be
performed after replacing a spare
tire with a road tire containing the
TPMS sensor. The malfunction
light and the DIC message should
go off at the next ignition cycle.
Page 276 of 372

Black plate (48,1)Chevrolet Orlando Owner Manual - 2013 - CRC - 6/5/12
10-48 Vehicle Care
The sensors are matched to the tire/
wheel positions, using a TPMS
relearn tool, in the following order:
driver side front tire, passenger side
front tire, passenger side rear tire,
and driver side rear. See your
dealer for service or to purchase a
relearn tool.
There are two minutes to match the
first tire/wheel position, and
five minutes overall to match all four
tire/wheel positions. If it takes
longer, the matching process stops
and must be restarted.
The TPMS sensor matching
process is:
1. Set the parking brake.
2. Turn the ignition to ON/RUN withthe engine off.
3. Use the MENU button to select the Vehicle Information menu in
the Driver Information
Center (DIC).
4. Use the thumbwheel to scroll to the Tire Pressure Menu item
screen. 5. Press the SET/CLR button to
begin the sensor matching
process.
A message requesting
acceptance of the process
should display.
6. Press the SET/CLR button again to confirm the selection.
The horn sounds twice to signal
the receiver is in relearn mode
and the TIRE LEARNING
ACTIVE message displays on
the DIC screen.
7. Start with the driver side front tire.
8. Place the relearn tool against the tire sidewall, near the valve
stem. Then press the button to
activate the TPMS sensor.
A horn chirp confirms that the
sensor identification code has
been matched to this tire and
wheel position.
9. Proceed to the passenger side front tire, and repeat the
procedure in Step 8. 10. Proceed to the passenger side
rear tire, and repeat the
procedure in Step 8.
11. Proceed to the driver side rear tire, and repeat the procedure
in Step 8. The horn sounds two
times to indicate the sensor
identification code has been
matched to the driver side rear
tire, and the TPMS sensor
matching process is no longer
active. The TIRE LEARNING
ACTIVE message on the DIC
display screen goes off.
12. Turn the ignition to LOCK/OFF.
13. Set all four tires to the recommended air pressure
level as indicated on the Tire
and Loading Information label.
Tire Inspection
We recommend that the tires,
including the spare tire, if the
vehicle has one, be inspected
for signs of wear or damage at
least once a month.
Page 312 of 372

Black plate (84,1)Chevrolet Orlando Owner Manual - 2013 - CRC - 6/5/12
10-84 Vehicle Care
If the soil is not completely
removed, it may be necessary to
use a commercial upholstery
cleaner or spot lifter. Test a small
hidden area for colorfastness before
using a commercial upholstery
cleaner or spot lifter. If ring
formation occurs, clean the entire
fabric or carpet.
Following the cleaning process, a
paper towel can be used to blot
excess moisture.
Cleaning High Gloss Surfaces
and Vehicle Information and
Radio Displays
For vehicles with high gloss
surfaces or vehicle displays, use a
microfiber cloth to wipe surfaces.
Before wiping the surface with the
microfiber cloth, use a soft bristle
brush to remove dirt that could
scratch the surface. Then use the
microfiber cloth by gently rubbing to
clean. Never use window cleaners
or solvents. Periodically hand wash
the microfiber cloth separately,using mild soap. Do not use bleach
or fabric softener. Rinse thoroughly
and air dry before next use.
Notice:
Do not attach a device
with a suction cup to the display.
This may cause damage and
would not be covered by the
warranty.
Instrument Panel, Leather,
Vinyl, & Other Plastic Surfaces
Use a soft microfiber cloth
dampened with water to remove
dust and loose dirt. For a more
thorough cleaning, use a soft
microfiber cloth dampened with a
mild soap solution.
Notice: Soaking or saturating
leather, especially perforated
leather, as well as other interior
surfaces, may cause permanent
damage. Wipe excess moisture
from these surfaces after
cleaning and allow them to dry
naturally. Never use heat, steam,
spot lifters, or spot removers. Do
not use cleaners that contain
silicone or wax-based products. Cleaners containing these
solvents can permanently change
the appearance and feel of leather
or soft trim and are not
recommended.
Do not use cleaners that increase
gloss, especially on the instrument
panel. Reflected glare can decrease
visibility through the windshield
under certain conditions.
Notice:
Use of air fresheners may
cause permanent damage to
plastics and painted surfaces.
If an air freshener comes in
contact with any plastic or
painted surface in the vehicle,
blot immediately and clean with a
soft cloth dampened with a mild
soap solution. Damage caused by
air fresheners would not be
covered by the vehicle warranty.
Cargo Cover and
Convenience Net
Wash with warm water and mild
detergent. Do not use chlorine
bleach. Rinse with cold water, and
then dry completely.