2017 CHEVROLET ORLANDO warning
[x] Cancel search: warningPage 207 of 372
Black plate (27,1)Chevrolet Orlando Owner Manual - 2013 - CRC - 6/5/12
Driving and Operating 9-27
Parking Brake
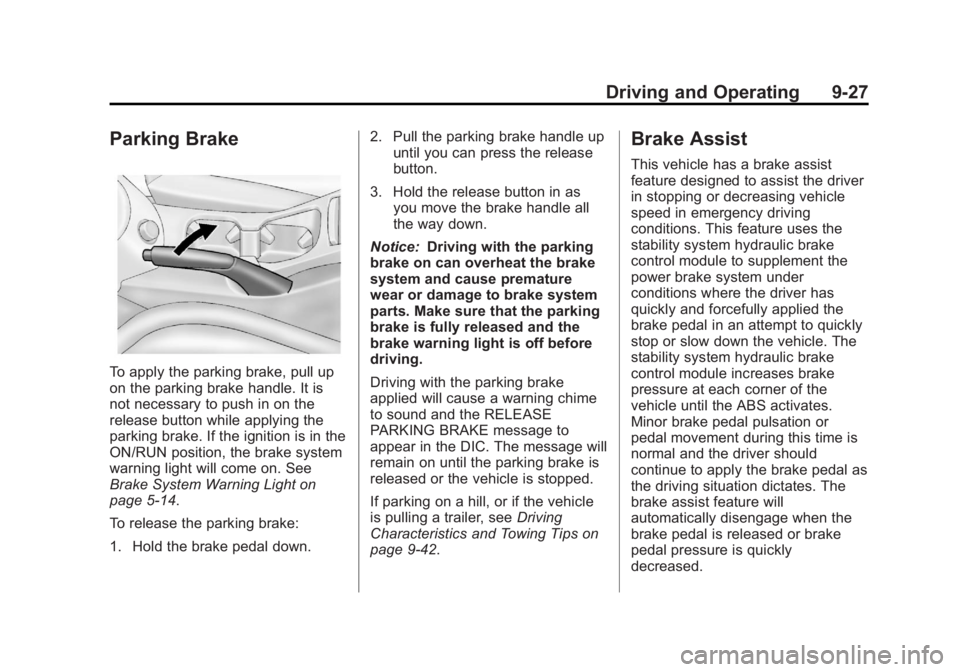
To apply the parking brake, pull up
on the parking brake handle. It is
not necessary to push in on the
release button while applying the
parking brake. If the ignition is in the
ON/RUN position, the brake system
warning light will come on. See
Brake System Warning Light on
page 5‑14.
To release the parking brake:
1. Hold the brake pedal down.2. Pull the parking brake handle up
until you can press the release
button.
3. Hold the release button in as you move the brake handle all
the way down.
Notice: Driving with the parking
brake on can overheat the brake
system and cause premature
wear or damage to brake system
parts. Make sure that the parking
brake is fully released and the
brake warning light is off before
driving.
Driving with the parking brake
applied will cause a warning chime
to sound and the RELEASE
PARKING BRAKE message to
appear in the DIC. The message will
remain on until the parking brake is
released or the vehicle is stopped.
If parking on a hill, or if the vehicle
is pulling a trailer, see Driving
Characteristics and Towing Tips on
page 9‑42.
Brake Assist
This vehicle has a brake assist
feature designed to assist the driver
in stopping or decreasing vehicle
speed in emergency driving
conditions. This feature uses the
stability system hydraulic brake
control module to supplement the
power brake system under
conditions where the driver has
quickly and forcefully applied the
brake pedal in an attempt to quickly
stop or slow down the vehicle. The
stability system hydraulic brake
control module increases brake
pressure at each corner of the
vehicle until the ABS activates.
Minor brake pedal pulsation or
pedal movement during this time is
normal and the driver should
continue to apply the brake pedal as
the driving situation dictates. The
brake assist feature will
automatically disengage when the
brake pedal is released or brake
pedal pressure is quickly
decreased.
Page 211 of 372
Black plate (31,1)Chevrolet Orlando Owner Manual - 2013 - CRC - 6/5/12
Driving and Operating 9-31
Cruise Control
For vehicles with cruise control, the
vehicle can maintain a speed of
about 40 km/h (25 mph) or more
without keeping your foot on the
accelerator. Cruise control does not
work at speeds below 40 km/h
(25 mph).
If the brakes are applied, the cruise
control shuts off.
The vehicle has a Traction Control
System (TCS) or StabiliTrak system
that begins to limit wheel spin while
using cruise control and the cruise
control will automatically disengage.
SeeTraction Control System (TCS)
on page 9‑28 orStabiliTrak
®System
on page 9‑29. When road conditions
allow you to safely use it again, the
cruise control can be turned on.
{WARNING
Cruise control can be dangerous
where you cannot drive safely at
a steady speed. So, do not use
the cruise control on winding
roads or in heavy traffic.
Cruise control can be dangerous
on slippery roads. On such roads,
fast changes in tire traction can
cause excessive wheel slip, and
you could lose control. Do not use
cruise control on slippery roads.
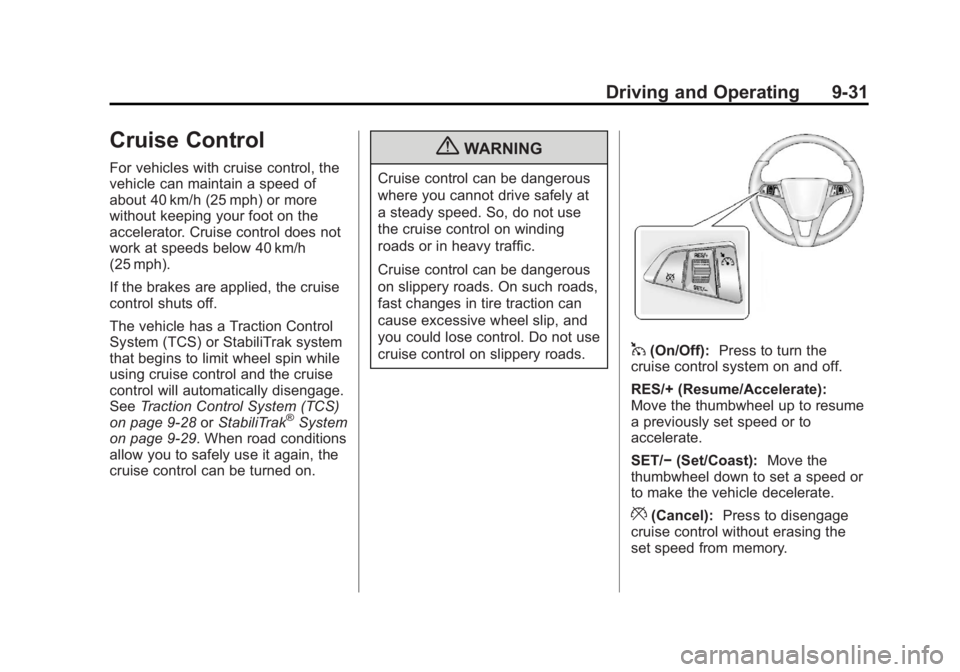
1(On/Off): Press to turn the
cruise control system on and off.
RES/+ (Resume/Accelerate):
Move the thumbwheel up to resume
a previously set speed or to
accelerate.
SET/− (Set/Coast): Move the
thumbwheel down to set a speed or
to make the vehicle decelerate.
*(Cancel): Press to disengage
cruise control without erasing the
set speed from memory.
Page 213 of 372

Black plate (33,1)Chevrolet Orlando Owner Manual - 2013 - CRC - 6/5/12
Driving and Operating 9-33
Ending Cruise Control
There are three ways to end cruise
control:
.To disengage cruise control,
step lightly on the brake pedal or
clutch for a manual transmission.
.Press*on the steering wheel.
.To turn off cruise control, press1on the steering wheel.
Erasing Speed Memory
The cruise control set speed is
erased from memory if
1is pressed
or if the ignition is turned off.
Object Detection
Systems
Ultrasonic Parking Assist
For vehicles with the Ultrasonic
Rear Parking Assist (URPA) system,
it assists the driver with parking and
avoiding objects while in
R (Reverse). URPA operates at
speeds less than 8 km/h (5 mph),
and the sensors on the rear bumper
detect objects up to 2.5 m (8 ft)
behind the vehicle, and at least
20 cm (8 in) off the ground.
{WARNING
The URPA system does not
detect children, pedestrians,
bicyclists, animals, or objects
below the bumper or that are too
close or too far from the vehicle.
It is not available at speeds
greater than 8 km/h (5 mph). To
prevent injury, death, or vehicle
(Continued)
WARNING (Continued)
damage, even with URPA, always
check the area around the vehicle
and check all mirrors before
backing.
How the System Works
URPA comes on automatically when
the shift lever is moved into
R (Reverse). A single tone sounds
to indicate the system is working.
URPA operates only at speeds less
than 8 km/h (5 mph).
An obstacle is indicated by audible
beeps. The interval between the
beeps becomes shorter as the
vehicle gets closer to the obstacle.
When the distance is less than
30 cm (12 in) the beeping is a
continuous tone for five seconds.
Page 215 of 372
Black plate (35,1)Chevrolet Orlando Owner Manual - 2013 - CRC - 6/5/12
Driving and Operating 9-35
Rear Vision
Camera (RVC)
The vehicle may have a Rear Vision
Camera (RVC) system. Read this
entire section before using it.
The RVC can assist the driver when
backing up by displaying a view of
the area behind the vehicle.
{WARNING
The RVC system does not display
children, pedestrians, bicyclists,
animals, or any other object
located outside the camera's field
of view, below the bumper,
or under the vehicle. Perceived
distances may be different from
actual distances. Do not back the
vehicle using only the RVC
screen, during longer, higher
speed backing maneuvers,
or where there could be cross
traffic. Failure to use proper care
before backing may result in(Continued)
WARNING (Continued)
injury, death, or vehicle damage.
Always check behind and around
the vehicle before backing.
An image appears on the radio
screen with the message Check
Surroundings for Safety when the
vehicle is shifted into R (Reverse).
The radio screen goes to the
previous screen after approximately
10 seconds once the vehicle is
shifted out of R (Reverse).
To cancel the delay, do one of the
following:
.Press a button on the radio.
.Shift into P (Park).
.Reach a vehicle speed of
8 km/h (5 mph). Turning the Rear Vision Camera
System On or Off
To turn the rear vision camera
system on or off:
1. Shift into P (Park).
2. Press the CONFIG button.
3. Select Display.
4. Select Rear Camera Options.
5. Select Camera. When a check
mark appears next to the
Camera option, then the RVC
system is on.
Symbols
The RVC system may have a
feature that lets the driver view
symbols on the radio screen while
using the RVC. The Ultrasonic Rear
Park Assist (URPA) system must
not be disabled to use the caution
symbols. The error message Rear
Parking Assist Symbols Unavailable
may display if URPA has been
disabled and the symbols have
been turned on. See Ultrasonic
Parking Assist on page 9‑33.
Page 220 of 372
Black plate (40,1)Chevrolet Orlando Owner Manual - 2013 - CRC - 6/5/12
9-40 Driving and Operating
Some gasolines that are
not reformulated for low
emissions can contain an
octane-enhancing additive called
methylcyclopentadienyl manganese
tricarbonyl (MMT); ask the attendant
where you buy gasoline whether the
fuel contains MMT. We recommend
against the use of such gasolines.
Fuels containing MMT can reduce
spark plug life and affect emission
control system performance. The
malfunction indicator lamp might
turn on. If this occurs, return to your
dealer for service.Filling the Tank
{WARNING
Fuel vapors and fuel fires burn
violently and can cause injury or
death.
.To help avoid injuries to you
and others, read and follow
all the instructions on the fuel
pump island.
.Turn off the engine when
refueling.
.Keep sparks, flames, and
smoking materials away
from fuel.
.Do not leave the fuel pump
unattended.
.Do not reenter the vehicle
while pumping fuel.
.Keep children away from the
fuel pump and never let
children pump fuel.(Continued)
WARNING (Continued)
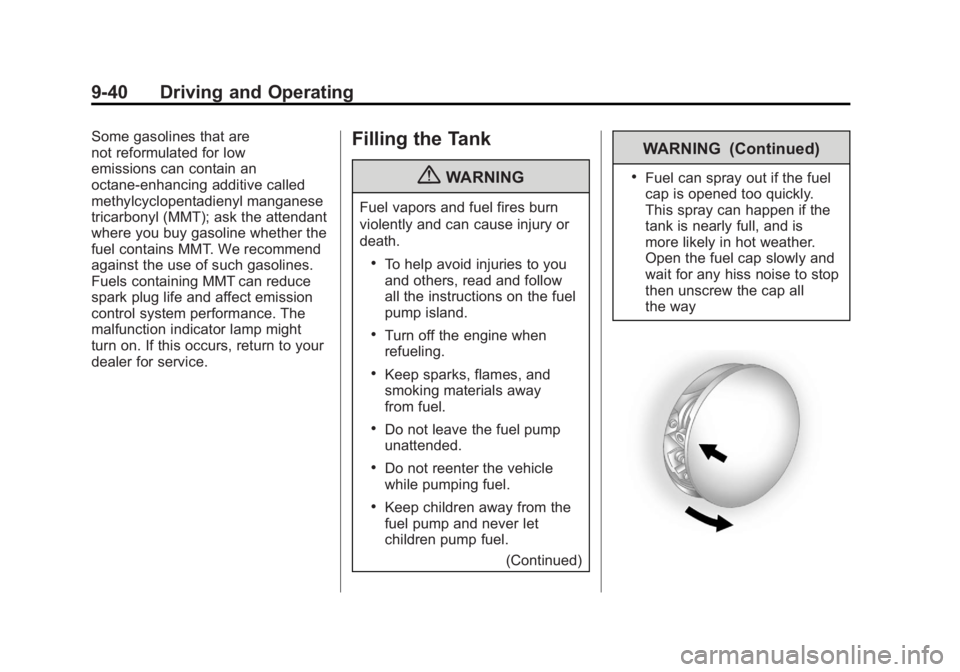
.Fuel can spray out if the fuel
cap is opened too quickly.
This spray can happen if the
tank is nearly full, and is
more likely in hot weather.
Open the fuel cap slowly and
wait for any hiss noise to stop
then unscrew the cap all
the way
Page 221 of 372
Black plate (41,1)Chevrolet Orlando Owner Manual - 2013 - CRC - 6/5/12
Driving and Operating 9-41
The tethered fuel cap is behind the
fuel door on the vehicle's passenger
side. Turn the fuel cap
counterclockwise to remove. While
refueling, hang the tethered fuel cap
from the disk on the end of the fuel
cap to the mating feature on the fuel
door hinge. Reinstall the cap by
turning it clockwise until it clicks.
Do not top off or overfill the tank.
Wait a few seconds before removing
the nozzle. Clean fuel from painted
surfaces as soon as possible. See
Exterior Care on page 10‑78.
{WARNING
If a fire starts while you are
refueling, do not remove the
nozzle. Shut off the flow of fuel by
shutting off the pump or by
notifying the station attendant.
Leave the area immediately.Notice:
If a new fuel cap is
needed, be sure to get the right
type of cap from your dealer. The
wrong type of fuel cap might not
fit properly, might cause the
malfunction indicator lamp to
light, and could damage the fuel
tank and emissions system. See
Malfunction Indicator Lamp on
page 5‑12.
Filling a Portable Fuel
Container
{WARNING
Filling a portable fuel container
while it is in the vehicle can cause
fuel vapors that can ignite either
by static electricity or other
means. You or others could be
badly burned and the vehicle
could be damaged. Always:
.Use approved fuel
containers.
(Continued)
WARNING (Continued)
.Remove container from
vehicle, trunk, or pickup bed
before filling.
.Place container on the
ground.
.Place the nozzle inside the fill
opening of the container
before dispensing fuel, and
keep it in contact with the fill
opening until filling is
complete.
.Do not smoke while
pumping fuel.
Page 222 of 372
Black plate (42,1)Chevrolet Orlando Owner Manual - 2013 - CRC - 6/5/12
9-42 Driving and Operating
Towing
General Towing
Information
Only use towing equipment that has
been designed for the vehicle.
Contact your dealer or trailering
dealer for assistance with preparing
the vehicle for towing a trailer. Read
the entire section before towing a
trailer.
For towing a disabled vehicle, see
Towing the Vehicle on page 10‑75.
For towing the vehicle behind
another vehicle such as a motor
home, seeRecreational Vehicle
Towing on page 10‑76.
Driving Characteristics
and Towing Tips
Driving with a Trailer
When towing a trailer:
.Become familiar with the state
and local laws that apply
specifically to trailer towing.
.Do not tow a trailer during the
first 800 km (500 mi), to prevent
damage to the engine, axle or
other parts.
.Then, during the first 800 km
(500 mi) trailer towing, do not
drive over 80 km/h (50 mph) and
do not make starts at full throttle.
.Vehicles with automatic
transmissions can tow in D
(Drive) but M (Manual Mode) is
recommended. See Manual
Mode on page 9‑23. Use a lower
gear if the transmission shifts
too often. For vehicles with a
manual transmission, it is better
not to use the highest gear.
{WARNING
When towing a trailer, exhaust
gases may collect at the rear of
the vehicle and enter if the
liftgate, trunk/hatch, or rear-most
window is open.
(Continued)
WARNING (Continued)
When towing a trailer:
.Do not drive with the liftgate,
trunk/hatch, or rear-most
window open.
.Fully open the air outlets on
or under the instrument
panel.
.Also adjust the Climate
Control system to a setting
that brings in only outside air.
See“Climate Control
Systems” in the Index.
For more information about
Carbon Monoxide, see Engine
Exhaust on page 9‑20.
Towing a trailer requires a certain
amount of experience. The
combination you are driving is
longer and not as responsive as the
vehicle itself. Get acquainted with
the handling and braking of the rig
before setting out for the open road.
Page 224 of 372
Black plate (44,1)Chevrolet Orlando Owner Manual - 2013 - CRC - 6/5/12
9-44 Driving and Operating
If the transmission is not shifted
down, the brakes might have to be
used so much that they would get
hot and no longer work well.
The vehicle can tow in D (Drive).
Use a lower gear if the transmission
shifts too often.
When towing at high altitude on
steep uphill grades, engine coolant
boils at a lower temperature than at
normal altitudes. If the engine is
turned off immediately after towing
at high altitude on steep uphill
grades, the vehicle could show
signs similar to engine overheating.
To avoid this, let the engine run
while parked, preferably on level
ground, with the transmission in
P (Park) for a few minutes before
turning the engine off. If the
overheat warning comes on, see
Engine Overheating on page 10‑17.Parking on Hills
{WARNING
Parking the vehicle on a hill with
the trailer attached can be
dangerous. If something goes
wrong, the rig could start to move.
People can be injured, and both
the vehicle and the trailer can be
damaged. When possible, always
park the rig on a flat surface.
If parking the rig on a hill:
1. Press the brake pedal, but do not shift into P (Park) yet. Turn
the wheels into the curb if facing
downhill or into traffic if facing
uphill.
2. Have someone place chocks under the trailer wheels.
3. When the wheel chocks are in place, release the brake pedal
until the chocks absorb the load. 4. Reapply the brake pedal. Then
apply the parking brake and shift
into P (Park) for vehicles with an
automatic transmission or into
gear for vehicles with a manual
transmission.
5. Release the brake pedal.
Leaving After Parking on a Hill
1. Apply and hold the brake pedal while you:
.Start the engine.
.Shift into a gear.
.Release the parking brake.
2. Let up on the brake pedal.
3. Drive slowly until the trailer is clear of the chocks.
4. Stop and have someone pick up and store the chocks.