Page 14 of 372

Black plate (8,1)Chevrolet Orlando Owner Manual - 2013 - CRC - 6/5/12
1-8 In Brief
To return the seatback to an upright
position:
1. Lift the lever fully withoutapplying pressure to the
seatback, and the seatback
returns to the upright position.
2. Push and pull on the seatback to make sure it is locked.
See Reclining Seatbacks on
page 3‑4.
Second Row Seats
The second row seats can be
tumbled to provide access to the
third row seat, and the seatbacks
can be reclined or folded forward.
See Second Row Seats on
page 3‑8.
Third Row Seats
The third row seats can be stowed
for more cargo space. See Third
Row Seats on page 3‑12.
Heated Seats
Automatic Climate Control System
Buttons Shown
If available, the buttons are on the
instrument panel, near the center.
To operate, the engine must be
running.
Press
LorMto heat the driver or
passenger seat.
See Heated Front Seats on
page 3‑6.
Head Restraint
Adjustment
Do not drive until the head restraints
for all occupants are installed and
adjusted properly.
To achieve a comfortable seating
position, change the seatback
recline angle as little as necessary
while keeping the seat and the head
restraint height in the proper
position.
See Head Restraints on page 3‑2
and Seat Adjustment on page 3‑3.
Page 20 of 372

Black plate (14,1)Chevrolet Orlando Owner Manual - 2013 - CRC - 6/5/12
1-14 In Brief
6. Driver and Passenger HeatedSeats (If Equipped)
7. Power
8. Recirculation
9. MODE (Air Delivery Mode)
10. AQS (Air Quality Sensor)
11. Air Conditioning
See Climate Control Systems on
page 8‑1 orAutomatic Climate
Control System on page 8‑3 (If
Equipped).
Transmission
Driver Shift Control (DSC)
Driver Shift Control (DSC) allows
you to shift an automatic
transmission similar to a manual
transmission. To use the DSC
feature:
1. Move the shift lever from D (Drive) to the left into the (+) or
(−) manual position. 2. Press the shift lever forward (+)
to upshift or rearward (−) to
downshift. An M and the current
gear will be displayed in the
Driver Information Center (DIC).
See Manual Mode on page 9‑23.
Up‐Shift Light
If the vehicle has a manual
transmission, it will have an up-shift
light that indicates when to shift to
the next higher gear for the best fuel
economy.
SeeManual Transmission on
page 9‑24.
Vehicle Features
Radio(s)
O
: Press to turn the system on
and off. Turn to increase or
decrease the volume.
BAND: Press to choose between
FM, AM, or SiriusXM®, if equipped.
MENU: Turn to select radio
stations. Press to select a menu.
g: Press to seek the previous
station or track.
l: Press to seek the next station
or track.
Buttons 1 to 6: Press to save and
select favorite stations.
INFO: Press to show available
information about the current station
or track.
For more information about these
and other radio features, see
Operation on page 7‑4.
Page 32 of 372

Black plate (4,1)Chevrolet Orlando Owner Manual - 2013 - CRC - 6/5/12
2-4 Keys, Doors, and Windows
7(Vehicle Locator/Panic
Alarm): Press and hold briefly to
initiate vehicle locator. The exterior
lamps flash and the horn chirps
three times.
Press and hold
7for at least
three seconds to sound the panic
alarm. The horn sounds and the
turn signals flash for 30 seconds,
or until
7is pressed again or the
key is placed in the ignition and
turned to ON/RUN.
/(Remote Vehicle Start): For
vehicles with this feature, press
Q
and then press and hold/to start
the engine from outside the vehicle
using the RKE transmitter. See
Remote Vehicle Start on page 2‑5
for additional information.
The buttons on the keys are
disabled when there is a key in the
ignition.
Programming Transmitters to
the Vehicle
Only RKE transmitters programmed
to this vehicle will work. If a
transmitter is lost or stolen, a
replacement can be purchased and
programmed through your dealer.
When the replacement transmitter is
programmed to this vehicle, all
remaining transmitters must also be
reprogrammed. Any lost or stolen
transmitters will no longer work
once the new transmitter is
programmed.
Battery Replacement
The battery is not rechargeable. To
replace the battery:
1. Extend the key blade and open the battery cover on the back of
the transmitter by prying with a
finger.
2. Remove the used battery by pushing on the battery and
sliding it toward the key blade.
Page 41 of 372
Black plate (13,1)Chevrolet Orlando Owner Manual - 2013 - CRC - 6/5/12
Keys, Doors, and Windows 2-13
Automatic Dimming
Rearview Mirror
The vehicle may have an automatic
dimming inside rearview mirror.
Automatic dimming reduces the
glare from the headlamps of the
vehicle behind you. The dimming
feature and indicator light come on
each time the vehicle is started.
Vehicles with OnStar have three
control buttons at the bottom of the
mirror. See your dealer for more
information about OnStar and how
to subscribe to it. SeeOnStar
Overview on page 14‑1.
Cleaning the Mirror
Do not spray glass cleaner directly
on the mirror. Use a soft towel
dampened with water.
Child-View Mirror
Push up and release, the mirror will
open automatically.
Push the mirror back up when not
in use.
Cleaning the Mirror
Do not spray glass cleaner directly
on the mirror. Use a soft towel
dampened with water.
Page 52 of 372

Black plate (6,1)Chevrolet Orlando Owner Manual - 2013 - CRC - 6/5/12
3-6 Seats and Restraints
Front Seat Armrest
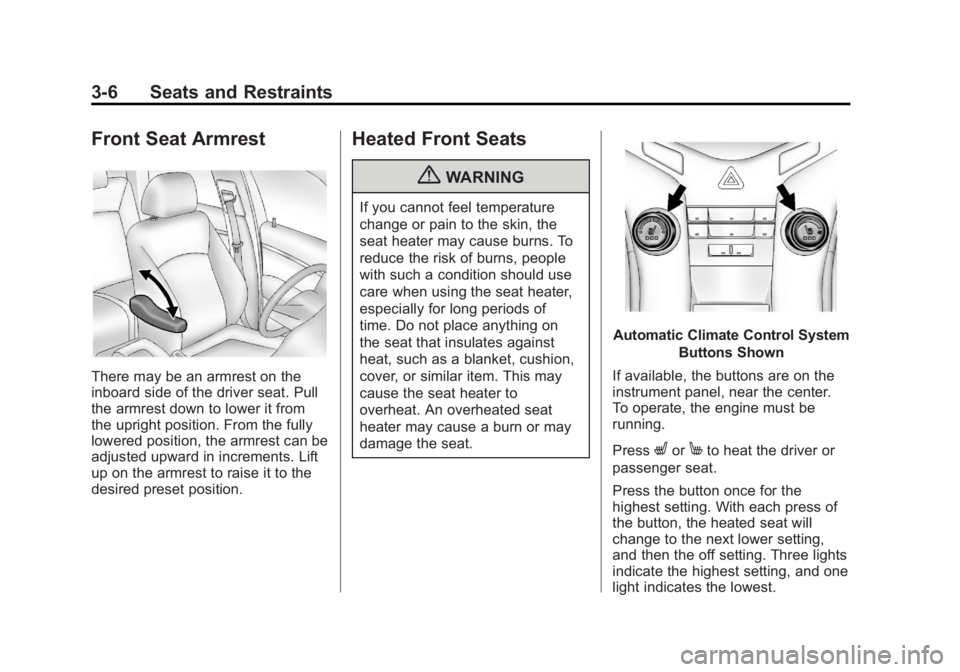
There may be an armrest on the
inboard side of the driver seat. Pull
the armrest down to lower it from
the upright position. From the fully
lowered position, the armrest can be
adjusted upward in increments. Lift
up on the armrest to raise it to the
desired preset position.
Heated Front Seats
{WARNING
If you cannot feel temperature
change or pain to the skin, the
seat heater may cause burns. To
reduce the risk of burns, people
with such a condition should use
care when using the seat heater,
especially for long periods of
time. Do not place anything on
the seat that insulates against
heat, such as a blanket, cushion,
cover, or similar item. This may
cause the seat heater to
overheat. An overheated seat
heater may cause a burn or may
damage the seat.
Automatic Climate Control SystemButtons Shown
If available, the buttons are on the
instrument panel, near the center.
To operate, the engine must be
running.
Press
LorMto heat the driver or
passenger seat.
Press the button once for the
highest setting. With each press of
the button, the heated seat will
change to the next lower setting,
and then the off setting. Three lights
indicate the highest setting, and one
light indicates the lowest.
Page 121 of 372

Black plate (21,1)Chevrolet Orlando Owner Manual - 2013 - CRC - 6/5/12
Instruments and Controls 5-21
Door Ajar Light
For base level clusters this light
comes on above the Driver
Information Center (DIC). For
uplevel clusters, this light comes on
in the Driver Information Center
(DIC) when a door is open or not
securely latched.
Before driving, check that all doors
are properly closed.
Information Displays
Driver Information
Center (DIC)
The DIC displays information about
your vehicle. It also displays
warning messages if a system
problem is detected. SeeVehicle
Messages on page 5‑24 for more
information. All messages appear in
the DIC display located in the center
of the instrument panel cluster.
DIC Operation and Displays
The DIC has different displays
which can be accessed by using the
DIC buttons on the turn signal lever
located on the left side of the
steering wheel. The DIC displays
trip, fuel, and warning messages if a
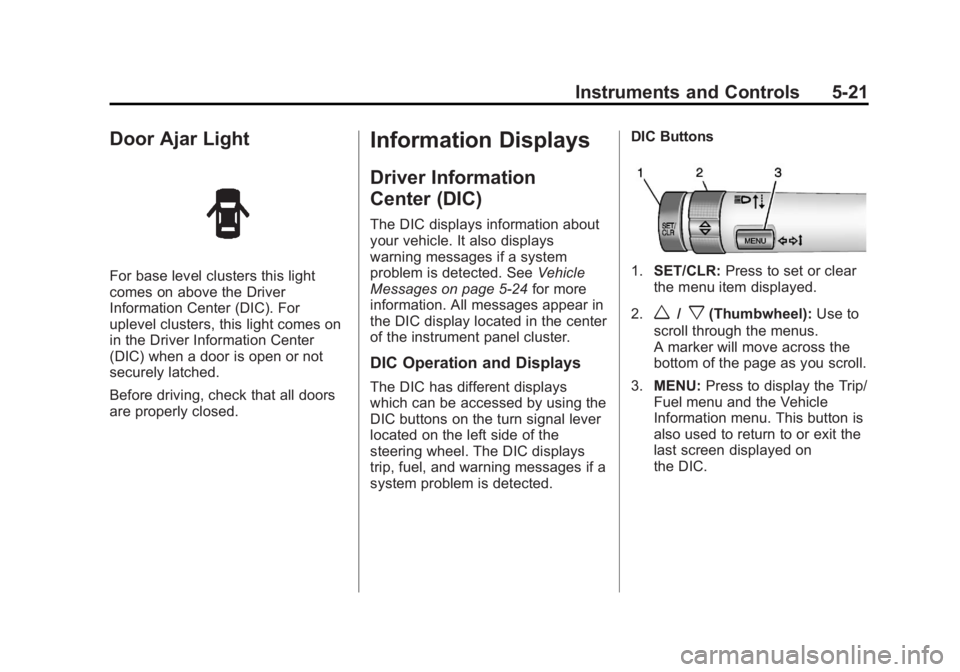
system problem is detected. DIC Buttons
1.
SET/CLR: Press to set or clear
the menu item displayed.
2.
w/x(Thumbwheel): Use to
scroll through the menus.
A marker will move across the
bottom of the page as you scroll.
3. MENU: Press to display the Trip/
Fuel menu and the Vehicle
Information menu. This button is
also used to return to or exit the
last screen displayed on
the DIC.
Page 145 of 372
Black plate (3,1)Chevrolet Orlando Owner Manual - 2013 - CRC - 6/5/12
Infotainment System 7-3
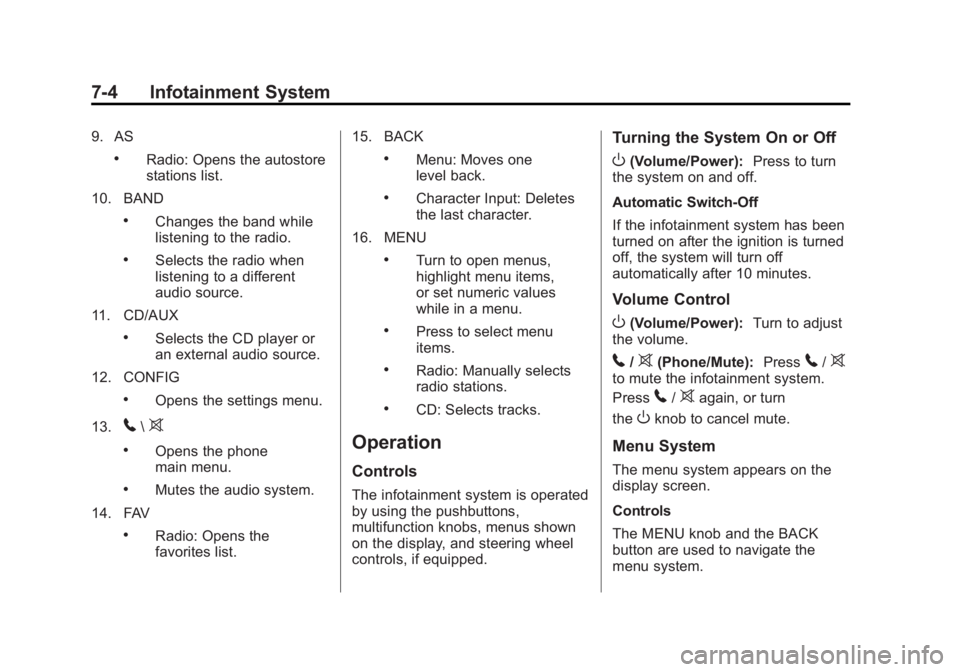
Overview
1.O
.Turns the system on or off
and adjusts the volume.
2. Buttons 1 to 6
.Radio: Saves and selects
favorite stations. 3.
g
.Radio: Seeks the previous
station.
.CD: Selects the previous
track or rewinds within a
track.4.
k
.CD: Pauses playback, and
stops playback.
5.
l
.Radio: Seeks the next
station.
.CD: Selects the next track
or fast forwards within a
track.
6. CLOCK
.Opens the clock menu.
7. INFO
.Radio: Shows available
information about the
current station.
.CD: Shows available
information about the
current track.
8. TONE
.Opens the tone menu.
Page 146 of 372

Black plate (4,1)Chevrolet Orlando Owner Manual - 2013 - CRC - 6/5/12
7-4 Infotainment System
9. AS
.Radio: Opens the autostore
stations list.
10. BAND
.Changes the band while
listening to the radio.
.Selects the radio when
listening to a different
audio source.
11. CD/AUX
.Selects the CD player or
an external audio source.
12. CONFIG
.Opens the settings menu.
13.
5\>
.Opens the phone
main menu.
.Mutes the audio system.
14. FAV
.Radio: Opens the
favorites list. 15. BACK
.Menu: Moves one
level back.
.Character Input: Deletes
the last character.
16. MENU
.Turn to open menus,
highlight menu items,
or set numeric values
while in a menu.
.Press to select menu
items.
.Radio: Manually selects
radio stations.
.CD: Selects tracks.
Operation
Controls
The infotainment system is operated
by using the pushbuttons,
multifunction knobs, menus shown
on the display, and steering wheel
controls, if equipped.
Turning the System On or Off
O(Volume/Power): Press to turn
the system on and off.
Automatic Switch-Off
If the infotainment system has been
turned on after the ignition is turned
off, the system will turn off
automatically after 10 minutes.
Volume Control
O(Volume/Power): Turn to adjust
the volume.
5/>(Phone/Mute): Press5/>to mute the infotainment system.
Press
5/>again, or turn
the
Oknob to cancel mute.
Menu System
The menu system appears on the
display screen.
Controls
The MENU knob and the BACK
button are used to navigate the
menu system.