2017 CHEVROLET MALIBU light
[x] Cancel search: lightPage 337 of 419
Chevrolet Malibu Owner Manual (GMNA-Localizing-U.S./Canada/Mexico-10122664) - 2017 - crc - 5/23/16
336 Vehicle Care
Temperature
The temperature grades are A
(the highest), B, and C,
representing the tire's resistance
to the generation of heat and its
ability to dissipate heat when
tested under controlled
conditions on a specified indoor
laboratory test wheel. Sustained
high temperature can cause the
material of the tire to degenerate
and reduce tire life, and
excessive temperature can lead
to sudden tire failure. The grade
Ccorrespondstoalevelof
performance which all
passenger car tires must meet
under the Federal Motor Safety
Standard No. 109. Grades B and
Arepresenthigherlevelsof
performance on the laboratory
test wheel than the minimum
required by law. Warning: The
temperature grade for this tire is
established for a tire that is
properly inflated and not
overloaded. Excessive speed,
underinflation, or excessive
loading, either separately or in
combination, can cause heat
buildup and possible tire failure.
Wheel Alignment and Tire
Balance
The tires and wheels were alignedand balanced at the factory toprovide the longest tire life and bestoverall performance. Adjustments towheel alignment and tire balancingare not necessary on a regularbasis. Consider an alignment checkif there is unusual tire wear or thevehicle is significantly pulling to oneside or the other. Some slight pull tothe left or right, depending on thecrown of the road and/or other roadsurface variations such as troughsor ruts, is normal. If the vehicle isvibrating when driving on a smoothroad, the tires and wheels may needto be rebalanced. See your dealerfor proper diagnosis.
Wheel Replacement
Replace any wheel that is bent,cracked, or badly rusted orcorroded. If wheel nuts keep comingloose, the wheel, wheel bolts, andwheel nuts should be replaced.If the wheel leaks air, replace it.Some aluminum wheels can berepaired. See your dealer if any ofthese conditions exist.
Yo u r d e a l e r w i l l k n o w t h e k i n d o fwheel that is needed.
Each new wheel should have thesame load-carrying capacity,diameter, width, offset, and bemounted the same way as the one itreplaces.
Replace wheels, wheel bolts, wheelnuts, or Tire Pressure MonitorSystem (TPMS) sensors with newGM original equipment parts.
{Warning
Using the wrong replacement
wheels, wheel bolts, or wheel
nuts can be dangerous. It could
(Continued)
Page 343 of 419
Chevrolet Malibu Owner Manual (GMNA-Localizing-U.S./Canada/Mexico-10122664) - 2017 - crc - 5/23/16
342 Vehicle Care
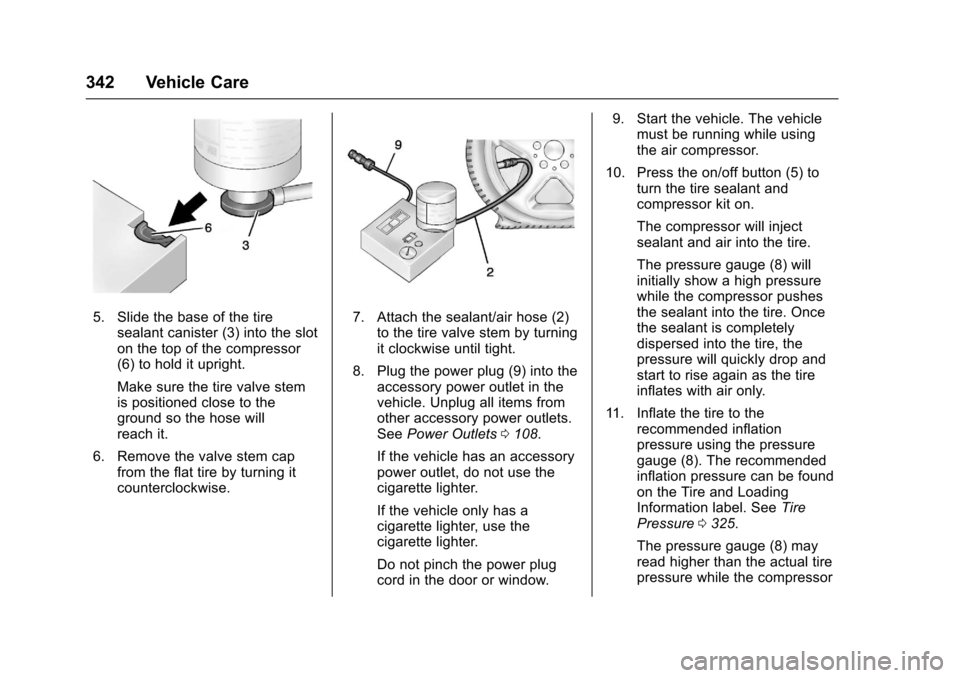
5. Slide the base of the tiresealant canister (3) into the sloton the top of the compressor(6) to hold it upright.
Make sure the tire valve stemis positioned close to theground so the hose willreach it.
6. Remove the valve stem capfrom the flat tire by turning itcounterclockwise.
7. Attach the sealant/air hose (2)to the tire valve stem by turningit clockwise until tight.
8. Plug the power plug (9) into theaccessory power outlet in thevehicle. Unplug all items fromother accessory power outlets.SeePower Outlets0108.
If the vehicle has an accessorypower outlet, do not use thecigarette lighter.
If the vehicle only has acigarette lighter, use thecigarette lighter.
Do not pinch the power plugcord in the door or window.
9. Start the vehicle. The vehiclemust be running while usingthe air compressor.
10. Press the on/off button (5) toturn the tire sealant andcompressor kit on.
The compressor will injectsealant and air into the tire.
The pressure gauge (8) willinitially show a high pressurewhile the compressor pushesthe sealant into the tire. Oncethe sealant is completelydispersed into the tire, thepressure will quickly drop andstart to rise again as the tireinflates with air only.
11 . I n f l a t e t h e t i r e t o t h erecommended inflationpressure using the pressuregauge (8). The recommendedinflation pressure can be foundon the Tire and LoadingInformation label. SeeTirePressure0325.
The pressure gauge (8) mayread higher than the actual tirepressure while the compressor
Page 346 of 419

Chevrolet Malibu Owner Manual (GMNA-Localizing-U.S./Canada/Mexico-10122664) - 2017 - crc - 5/23/16
Vehicle Care 345
1. Remove the compressor fromits storage location. SeeStoring the Tire Sealant andCompressor Kit0346.
2. Remove the air only hose (10)and the power plug (9) from thebottom of the compressor.
3. Place the compressor on theground near the flat tire.
Make sure the tire valve stemis positioned close to theground so the hose willreach it.
4. Remove the valve stem capfrom the flat tire by turning itcounterclockwise.
5. Attach the air only hose (10) tothe tire valve stem by turning itclockwise until tight.
6. Plug the power plug (9) into theaccessory power outlet in thevehicle. Unplug all items fromother accessory power outlets.SeePower Outlets0108.
If the vehicle has an accessorypower outlet, do not use thecigarette lighter.
If the vehicle only has acigarette lighter, use thecigarette lighter.
Do not pinch the power plugcord in the door or window.
7. Start the vehicle. The vehiclemust be running while usingthe air compressor.
8. Press the on/off button (5) toturn the tire sealant andcompressor kit on.
The compressor will inflate thetire with air only.
9. Inflate the tire to therecommended inflationpressure using the pressuregauge (8). The recommendedinflation pressure can be foundon the Tire and LoadingInformation label. SeeTirePressure0325.
The pressure gauge (8) mayread higher than the actual tirepressure while the compressoris on. Turn the compressor offto get an accurate pressure
reading. The compressor maybe turned on/off until thecorrect pressure is reached.
Caution
If the recommended pressure
cannot be reached after
approximately 25 minutes, the
vehicle should not be driven
farther. The tire is too severely
damaged and the tire sealant and
compressor kit cannot inflate the
tire. Remove the power plug from
the accessory power outlet and
unscrew the inflating hose from
the tire valve. SeeRoadside
Assistance Program0387.
10. Press the on/off button (5) toturn the tire sealant andcompressor kit off.
Be careful while handling thecompressor as it could bewarm after usage.
11 . U n p l u g t h e p o w e r p l u g ( 9 ) f r o mthe accessory power outlet inthe vehicle.
Page 355 of 419
Chevrolet Malibu Owner Manual (GMNA-Localizing-U.S./Canada/Mexico-10122664) - 2017 - crc - 5/23/16
354 Vehicle Care
involved in the jump startprocedure. Put an automatictransmission in P (Park) or amanual transmission in Neutralbefore setting the parkingbrake.
3. Set the parking brake firmly onboth vehicles. Put an automatictransmission in P (Park) or amanual transmission in Neutralbefore setting the parkingbrake.
Caution
If any accessories are left on or
plugged in during the jump
starting procedure, they could be
damaged. The repairs would not
be covered by the vehicle
warranty. Whenever possible, turn
off or unplug all accessories on
either vehicle when jump starting.
4. Turn the ignition to LOCK/OFFand switch off all lights andaccessories in both vehicles,except the hazard warningflashers if needed.
{Warning
An electric fan can start up even
when the engine is not running
and can injure you. Keep hands,
clothing, and tools away from any
underhood electric fan.
{Warning
Using a match near a battery can
cause battery gas to explode.
People have been hurt doing this,
and some have been blinded.
Use a flashlight if you need more
light.
Battery fluid contains acid that
can burn you. Do not get it on
you. If you accidentally get it in
your eyes or on your skin, flush
the place with water and get
medical help immediately.
{Warning
Fans or other moving engine
parts can injure you badly. Keep
your hands away from moving
parts once the engine is running.
6. Connect the red positive (+)cable to the positive (+) orremote positive (+) terminal ofthe discharged battery.
7. Connect the other end of thepositive (+) cable to thepositive (+) terminal of thegood battery. Use a remotepositive (+) terminal if thevehicle has one.
8. Connect one end of the blacknegative (✓)cabletothenegative (✓)terminalofthegood battery.
9. Connect the other end of thenegative (✓)cabletothenegative (–)groundterminalforthe discharged battery.
Page 356 of 419
Chevrolet Malibu Owner Manual (GMNA-Localizing-U.S./Canada/Mexico-10122664) - 2017 - crc - 5/23/16
Vehicle Care 355
10. Start the vehicle with the goodbattery and run the engine atidle speed for at leastfour minutes.
11 . Tr y t o s t a r t t h e v e h i c l e t h a t h a dthe dead battery. If it will notstart after a few tries, itprobably needs service.
For hybrid vehicles, the engine willonly start if needed after pressingON/RUN/START. The vehicle readylight will come on when thepropulsion system is on and ready.In cold temperatures, the engine willnot run with the hood open. Closethe hood.
Caution
If the jumper cables are
connected or removed in the
wrong order, electrical shorting
may occur and damage the
vehicle. The repairs would not be
covered by the vehicle warranty.
Always connect and remove the
jumper cables in the correct order,
(Continued)
Caution (Continued)
making sure that the cables do
not touch each other or other
metal.
Jumper Cable Removal
Reverse the sequence exactly whenremoving the jumper cables.
After starting the disabled vehicleand removing the jumper cables,allow it to idle for several minutes.
Towing the Vehicle
Caution
Incorrectly towing a disabled
vehicle may cause damage. The
damage would not be covered by
the vehicle warranty.
Do not lash or hook to
suspension components. Use the
proper straps around the tires to
secure the vehicle.
Have the vehicle towed on a wheellift tow truck. A flatbed car carriercould damage the vehicle. Thewheel lift tow truck must raise therear of the vehicle and wheel dolliesmust be used to lift the front wheelsoff the ground.
Consult your dealer or aprofessional towing service if thedisabled vehicle must be towed.
Page 359 of 419
Chevrolet Malibu Owner Manual (GMNA-Localizing-U.S./Canada/Mexico-10122664) - 2017 - crc - 5/23/16
358 Vehicle Care
Caution
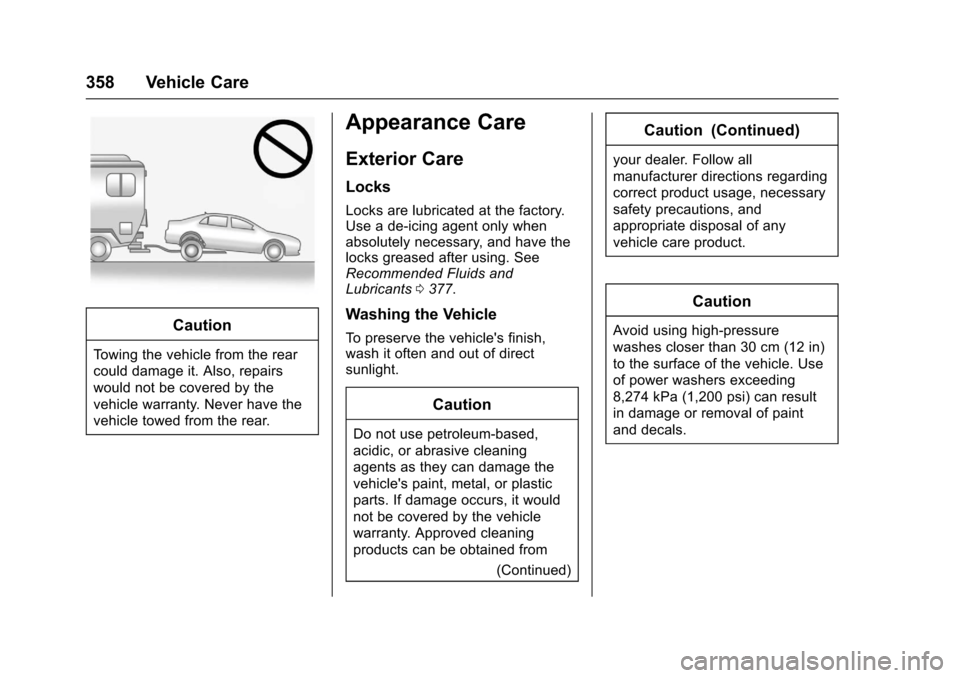
To w i n g t h e v e h i c l e f r o m t h e r e a r
could damage it. Also, repairs
would not be covered by the
vehicle warranty. Never have the
vehicle towed from the rear.
Appearance Care
Exterior Care
Locks
Locks are lubricated at the factory.Use a de-icing agent only whenabsolutely necessary, and have thelocks greased after using. SeeRecommended Fluids andLubricants0377.
Washing the Vehicle
To p r e s e r v e t h e v e h i c l e ' s f i n i s h ,wash it often and out of directsunlight.
Caution
Do not use petroleum-based,
acidic, or abrasive cleaning
agents as they can damage the
vehicle's paint, metal, or plastic
parts. If damage occurs, it would
not be covered by the vehicle
warranty. Approved cleaning
products can be obtained from
(Continued)
Caution (Continued)
your dealer. Follow all
manufacturer directions regarding
correct product usage, necessary
safety precautions, and
appropriate disposal of any
vehicle care product.
Caution
Avoid using high-pressure
washes closer than 30 cm (12 in)
to the surface of the vehicle. Use
of power washers exceeding
8,274 kPa (1,200 psi) can result
in damage or removal of paint
and decals.
Page 365 of 419
Chevrolet Malibu Owner Manual (GMNA-Localizing-U.S./Canada/Mexico-10122664) - 2017 - crc - 5/23/16
364 Vehicle Care
Caution
To p r e v e n t s c r a t c h i n g , n e v e r u s e
abrasive cleaners on automotive
glass. Abrasive cleaners or
aggressive cleaning may damage
the rear window defogger.
Cleaning the windshield with waterduring the first three to six monthsof ownership will reduce tendencyto fog.
Speaker Covers
Va c u u m a r o u n d a s p e a k e r c o v e rgently, so that the speaker will notbe damaged. Clean spots with waterand mild soap.
Coated Moldings
Coated moldings should be cleaned.
.When lightly soiled, wipe with asponge or soft, lint-free clothdampened with water.
.When heavily soiled, use warmsoapy water.
Fabric/Carpet/Suede
Start by vacuuming the surfaceusing a soft brush attachment. If arotating vacuum brush attachment isbeing used, only use it on the floorcarpet. Before cleaning, gentlyremove as much of the soil aspossible:
.Gently blot liquids with a papertowel. Continue blotting until nomore soil can be removed.
.For solid soils, remove as muchas possible prior to vacuuming.
To c l e a n :
1. Saturate a clean, lint-freecolorfast cloth with water.Microfiber cloth isrecommended to prevent linttransfer to the fabric or carpet.
2. Remove excess moisture bygently wringing until water doesnot drip from the cleaning cloth.
3. Start on the outside edge of thesoil and gently rub toward thecenter. Fold the cleaning cloth
to a clean area frequently toprevent forcing the soil in to thefabric.
4. Continue gently rubbing thesoiled area until there is nolonger any color transfer fromthe soil to the cleaning cloth.
5. If the soil is not completelyremoved, use a mild soapsolution followed only by plainwater.
If the soil is not completelyremoved, it may be necessary touse a commercial upholsterycleaner or spot lifter. Test a smallhidden area for colorfastness beforeusing a commercial upholsterycleaner or spot lifter. If ringformation occurs, clean the entirefabric or carpet.
After cleaning, use a paper towel toblot excess moisture.
Page 376 of 419
Chevrolet Malibu Owner Manual (GMNA-Localizing-U.S./Canada/Mexico-10122664) - 2017 - crc - 5/23/16
Service and Maintenance 375
.To a v o i d b r e a k - d o w n o r f a i l u r e t ostart the vehicle, maintain abattery with full cranking power.
.Trained dealer technicians havethe diagnostic equipment to testthe battery and ensure that theconnections and cables arecorrosion-free.
Belts
.Belts may need replacing if theysqueak or show signs ofcracking or splitting.
.Trained dealer technicians haveaccess to tools and equipmentto inspect the belts andrecommend adjustment orreplacement when necessary.
Brakes
Brakes stop the vehicle and arecrucial to safe driving.
.Signs of brake wear may includechirping, grinding, or squealingnoises, or difficulty stopping.
.Trained dealer technicians haveaccess to tools and equipmentto inspect the brakes andrecommend quality partsengineered for the vehicle.
Fluids
Proper fluid levels and approvedfluids protect the vehicle’ssystemsand components. SeeRecommended Fluids andLubricants0377for GM approvedfluids.
.Engine oil and windshieldwasher fluid levels should bechecked at every fuel fill.
.Instrument cluster lights maycome on to indicate that fluidsmay be low and need to befilled.
Hoses
Hoses transport fluids and shouldbe regularly inspected to ensurethat there are no cracks or leaks.With a multi-point inspection, yourdealer can inspect the hoses andadvise if replacement is needed.
Lamps
Properly working headlamps,taillamps, and brake lamps areimportant to see and be seen onthe road.
.Signs that the headlamps needattention include dimming, failureto light, cracking, or damage.The brake lamps need to bechecked periodically to ensurethat they light when braking.
.With a multi-point inspection,your dealer can check the lampsand note any concerns.
Shocks and Struts
Shocks and struts help aid in controlfor a smoother ride.
.Signs of wear may includesteering wheel vibration, bounce/sway while braking, longerstopping distance, or uneventire wear.
.As part of the multi-pointinspection, trained dealertechnicians can visually inspectthe shocks and struts for signs