2017 CHEVROLET IMPALA manual transmission
[x] Cancel search: manual transmissionPage 257 of 378
Chevrolet Impala Owner Manual (GMNA-Localizing-U.S./Canada-9921197) -
2017 - crc - 3/30/16
256 Vehicle Care
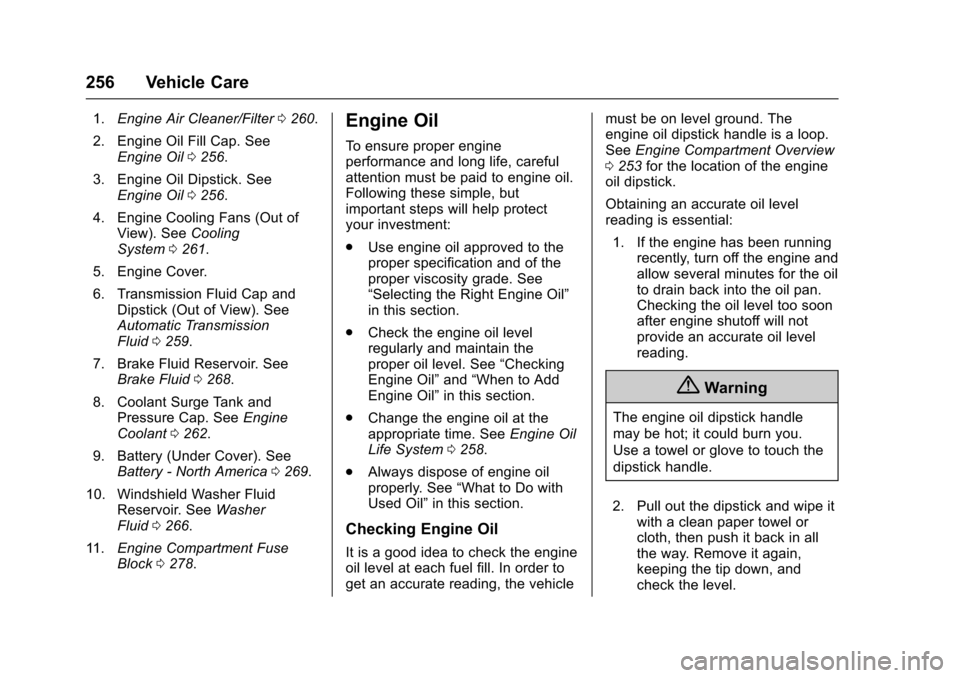
1.Engine Air Cleaner/Filter 0260.
2. Engine Oil Fill Cap. See Engine Oil 0256.
3. Engine Oil Dipstick. See Engine Oil 0256.
4. Engine Cooling Fans (Out of View). See Cooling
System 0261.
5. Engine Cover.
6. Transmission Fluid Cap and Dipstick (Out of View). See
Automatic Transmission
Fluid 0259.
7. Brake Fluid Reservoir. See Brake Fluid 0268.
8. Coolant Surge Tank and Pressure Cap. See Engine
Coolant 0262.
9. Battery (Under Cover). See Battery - North America 0269.
10. Windshield Washer Fluid Reservoir. See Washer
Fluid 0266.
11. Engine Compartment Fuse
Block 0278.Engine Oil
To ensure proper engine
performance and long life, careful
attention must be paid to engine oil.
Following these simple, but
important steps will help protect
your investment:
.
Use engine oil approved to the
proper specification and of the
proper viscosity grade. See
“Selecting the Right Engine Oil”
in this section.
. Check the engine oil level
regularly and maintain the
proper oil level. See “Checking
Engine Oil” and“When to Add
Engine Oil” in this section.
. Change the engine oil at the
appropriate time. See Engine Oil
Life System 0258.
. Always dispose of engine oil
properly. See “What to Do with
Used Oil” in this section.
Checking Engine Oil
It is a good idea to check the engine
oil level at each fuel fill. In order to
get an accurate reading, the vehicle must be on level ground. The
engine oil dipstick handle is a loop.
See
Engine Compartment Overview
0 253 for the location of the engine
oil dipstick.
Obtaining an accurate oil level
reading is essential:
1. If the engine has been running recently, turn off the engine and
allow several minutes for the oil
to drain back into the oil pan.
Checking the oil level too soon
after engine shutoff will not
provide an accurate oil level
reading.
{Warning
The engine oil dipstick handle
may be hot; it could burn you.
Use a towel or glove to touch the
dipstick handle.
2. Pull out the dipstick and wipe it with a clean paper towel or
cloth, then push it back in all
the way. Remove it again,
keeping the tip down, and
check the level.
Page 260 of 378

Chevrolet Impala Owner Manual (GMNA-Localizing-U.S./Canada-9921197) -
2017 - crc - 3/30/16
Vehicle Care 259
If the system is ever reset
accidentally, the oil must be
changed at 5 000 km (3,000 mi)
since the last oil change.
Remember to reset the oil life
system whenever the oil is changed.
How to Reset the Engine Oil
Life System
Reset the system whenever the
engine oil is changed so that the
system can calculate the next
engine oil change. To reset the
system:1. Using the DIC controls on the right side of the steering wheel,
display REMAINING OIL LIFE
on the DIC. See Driver
Information Center (DIC) 0128.
When remaining oil life is low,
the CHANGE ENGINE OIL
SOON message will appear on
the display. See Engine Oil
Messages 0133.
2. Press
Von the DIC controls
and hold down for a few
seconds to clear the CHANGE
ENGINE OIL SOON message
and reset the oil life at 100%. Be careful not to reset the oil
life display accidentally at any
time other than after the oil is
changed. It cannot be reset
accurately until the next oil
change.
The oil life system can also be reset
as follows: 1. Turn the ignition on with the engine off.
2. Fully press and release the accelerator pedal three times
within five seconds.
If the CHANGE ENGINE OIL
SOON message is not on, the
system is reset.
The system is reset when the
CHANGE ENGINE OIL SOON
message is off.
If the CHANGE ENGINE OIL SOON
message comes back on when the
vehicle is started, the engine oil life
system has not been reset. Repeat
the procedure.
Automatic Transmission
Fluid
How to Check Automatic
Transmission Fluid
It is not necessary to check the
transmission fluid level.
A transmission fluid leak is the only
reason for fluid loss. If a leak
occurs, take the vehicle to your
dealer service department and have
it repaired as soon as possible.
There is a special procedure for
checking and changing the
transmission fluid. Because this
procedure is difficult, you should
have this done at your dealer
service department. Contact your
dealer for additional information or
the procedure can be found in the
service manual. To purchase a
service manual, see Service
Publications Ordering
Information 0351.
Change the fluid at the intervals
listed in Maintenance Schedule
0 326, and be sure to use the fluid
listed in Recommended Fluids and
Lubricants 0335.
Page 271 of 378
Chevrolet Impala Owner Manual (GMNA-Localizing-U.S./Canada-9921197) -
2017 - crc - 3/30/16
270 Vehicle Care
Warning (Continued)
cancer and birth defects or other
reproductive harm. Batteries also
contain other chemicals known to
the State of California to cause
cancer.WASH HANDS AFTER
HANDLING.
See California Proposition
65 Warning 0250.
Vehicle Storage
{Warning
Batteries have acid that can burn
you and gas that can explode.
You can be badly hurt if you are
not careful. See Jump Starting -
North America 0311 for tips on
working around a battery without
getting hurt.
Infrequent Usage: Remove the
12-volt battery black, negative (−)
cable from the battery to keep the
battery from running down. Extended Storage: Remove the
12-volt battery black, negative (−)
cable from the battery or use a
battery trickle charger.
Remember to reconnect the battery
when ready to drive the vehicle.
Starter Switch Check
{Warning
When you are doing this
inspection, the vehicle could
move suddenly. If the vehicle
moves, you or others could be
injured.
1. Before starting this check, be sure there is enough room
around the vehicle.
2. Apply both the parking brake and the regular brake.
Do not use the accelerator
pedal, and be ready to turn off
the engine immediately if it
starts. 3. Try to start the engine in each
gear. The vehicle should start
only in P (Park) or N (Neutral).
If the vehicle starts in any other
position, contact your dealer for
service.
Automatic Transmission
Shift Lock Control
Function Check
{Warning
When you are doing this
inspection, the vehicle could
move suddenly. If the vehicle
moves, you or others could be
injured.
1. Before starting this check, be sure there is enough room
around the vehicle. It should be
parked on a level surface.
2. Apply the parking brake. Be ready to apply the regular
brake immediately if the vehicle
begins to move.
Page 272 of 378
Chevrolet Impala Owner Manual (GMNA-Localizing-U.S./Canada-9921197) -
2017 - crc - 3/30/16
Vehicle Care 271
3. With the engine off, turn theignition on, but do not start the
engine. Without applying the
regular brake, try to move the
shift lever out of P (Park) with
normal effort. If the shift lever
moves out of P (Park), contact
your dealer for service.
Ignition Transmission
Lock Check
If equipped with a key access
ignition, while parked and with the
parking brake set, try to turn the
ignition to LOCK/OFF in each shift
lever position.
.The ignition should turn to
LOCK/OFF only when the shift
lever is in P (Park).
. The ignition key should come
out only in LOCK/OFF.
Contact your dealer if service is
required.
Park Brake and P (Park)
Mechanism Check
{Warning
When you are doing this check,
the vehicle could begin to move.
You or others could be injured
and property could be damaged.
Make sure there is room in front
of the vehicle in case it begins to
roll. Be ready to apply the regular
brake at once should the vehicle
begin to move.
Park on a fairly steep hill, with the
vehicle facing downhill. Keeping
your foot on the regular brake, set
the parking brake.
. To check the parking brake's
holding ability: With the engine
running and the transmission in
N (Neutral), slowly remove foot
pressure from the regular brake
pedal. Do this until the vehicle is
held by the parking brake only. .
To check the P (Park)
mechanism's holding ability:
With the engine running, shift to
P (Park). Then release the
parking brake followed by the
regular brake.
Contact your dealer if service is
required.
Wiper Blade Replacement
Windshield wiper blades should be
inspected for wear or cracking.
It is a good idea to clean the wiper
blade assembly on a regular basis.
When worn, or when cleaning is
ineffective, replace the wiper blade.
For proper windshield wiper blade
length and type, see Maintenance
Replacement Parts 0336.
Page 281 of 378

Chevrolet Impala Owner Manual (GMNA-Localizing-U.S./Canada-9921197) -
2017 - crc - 3/30/16
280 Vehicle Care
The vehicle may not be equipped
with all of the fuses, relays, and
features shown.Fuses Usage
1 Transmission control module battery
2 Engine control module battery
3 A/C Clutch
4 –/Engine control
module battery
5 Engine control module/Ignition
6 Front wiper
7 Engine control module
8 Ignition coils –even
9 Ignition coils –odd
10 Engine control module 11 Non-walk PF
12 Starter
13 Transmission control module/Chassis
control module/
Ignition Fuses Usage
14 Cabin/Coolant pump
17 Body/Ignition 2
18 Battery disconnect unit/Ignition
19 Aeroshutter
20 Transmission auxiliary pump
21 Rear power window
22 Sunroof
23 Adaptive cruise control
24 Front power window
25 Retained accessory power
26 ABS pump
27 Electric parking brake
28 Rear defogger
29 Passive entry/Passive start
30 Canister vent solenoid
31 Left front heated seat
32 Body control module 6 Fuses Usage
33 Right front heated seat
34 ABS valve
35 Amplifier
37 Right high-beam headlamp
38 Left high-beam headlamp
41 Vacuum pump
42 Cooling fan k2
44 Starter 2
45 Cooling fan k1
46 Cooling fan
47 Non-walk PT
49 Right HID headlamp
50 Left HID headlamp
51 Horn/Dual horn
52 Display/Ignition
53 Body/Ignition
54 Instrument panel/ Ignition
Page 282 of 378

Chevrolet Impala Owner Manual (GMNA-Localizing-U.S./Canada-9921197) -
2017 - crc - 3/30/16
Vehicle Care 281
FusesUsage
55 Exterior rearview mirror
56 Front washer
60 Heated mirror
62 Obstacle detection
64 Rain sensor/Rear seat audio
66 Trunk release
67 Chassis control module
69 Battery voltage sensor
71 Memory seat
Relays Usage
1 A/C clutch
2 Starter
4 Front wiper speed
5 Front wiper control
6 Cabin/Coolant pump
7 Powertrain
8 Transmission auxiliary pump Relays
Usage
9 Cooling fan k2
10 Cooling fan k3
11 Starter
13 Cooling fan control k1
14 Low-beam HID headlamp
15 Run/Crank
17 Rear defogger
Instrument Panel Fuse
Block
The instrument panel fuse block is
in the instrument panel, on the
driver side of the vehicle.
To access the fuses on vehicles
equipped with a storage bin: 1. Push forward on the top edge of the bin to unlatch it.
2. Press in on the sides of the bin to release it from the
instrument panel.
3. Pivot the door downward, allowing it to hang from the
instrument panel.
4. To close the bin, swing it upward and push in until
closed.
Page 290 of 378
Chevrolet Impala Owner Manual (GMNA-Localizing-U.S./Canada-9921197) -
2017 - crc - 3/30/16
Vehicle Care 289
Tire Terminology and
Definitions
Air Pressure:The amount of
air inside the tire pressing
outward on each square inch of
the tire. Air pressure is
expressed in kPa (kilopascal)
or psi (pounds per square inch).
Accessory Weight
:The
combined weight of optional
accessories. Some examples of
optional accessories are
automatic transmission, power
windows, power seats, and air
conditioning.
Aspect Ratio
:The relationship
of a tire's height to its width.
Belt
:A rubber coated layer of
cords between the plies and the
tread. Cords may be made from
steel or other reinforcing
materials. Bead
:The tire bead contains
steel wires wrapped by steel
cords that hold the tire onto
the rim.
Bias Ply Tire
:A pneumatic tire
in which the plies are laid at
alternate angles less than
90 degrees to the centerline of
the tread.
Cold Tire Pressure
:The
amount of air pressure in a tire,
measured in kPa (kilopascal)
or psi (pounds per square inch)
before a tire has built up heat
from driving. See Tire
Pressure 0291.
Curb Weight
:The weight of a
motor vehicle with standard and
optional equipment including the
maximum capacity of fuel, oil,
and coolant, but without
passengers and cargo.
DOT Markings
:A code molded
into the sidewall of a tire
signifying that the tire is in
compliance with the U.S. Department of Transportation
(DOT) Motor Vehicle Safety
Standards. The DOT code
includes the Tire Identification
Number (TIN), an alphanumeric
designator which can also
identify the tire manufacturer,
production plant, brand, and
date of production.
GVWR
:Gross Vehicle Weight
Rating. See Vehicle Load
Limits 0199.
GAWR FRT
:Gross Axle Weight
Rating for the front axle. See
Vehicle Load Limits 0199.
GAWR RR
:Gross Axle Weight
Rating for the rear axle. See
Vehicle Load Limits 0199.
Intended Outboard Sidewall
:
The side of an asymmetrical tire
that must always face outward
when mounted on a vehicle.
Kilopascal (kPa)
:The metric
unit for air pressure.
Page 305 of 378
Chevrolet Impala Owner Manual (GMNA-Localizing-U.S./Canada-9921197) -
2017 - crc - 3/30/16
304 Vehicle Care
{Warning
Driving on a flat tire will cause
permanent damage to the tire.
Re-inflating a tire after it has been
driven on while severely
underinflated or flat may cause a
blowout and a serious crash.
Never attempt to re-inflate a tire
that has been driven on while
severely underinflated or flat.
Have your dealer or an authorized
tire service center repair or
replace the flat tire as soon as
possible.
{Warning
Lifting a vehicle and getting under
it to do maintenance or repairs is
dangerous without the
appropriate safety equipment and
training. If a jack is provided with
the vehicle, it is designed only for
changing a flat tire. If it is used for
anything else, you or others could(Continued)
Warning (Continued)
be badly injured or killed if the
vehicle slips off the jack. If a jack
is provided with the vehicle, only
use it for changing a flat tire.
If a tire goes flat, avoid further tire
and wheel damage by driving slowly
to a level place, well off the road,
if possible. Turn on the hazard
warning flashers. See Hazard
Warning Flashers 0151.
{Warning
Changing a tire can be
dangerous. The vehicle can slip
off the jack and roll over or fall
causing injury or death. Find a
level place to change the tire. To
help prevent the vehicle from
moving:
1. Set the parking brake firmly. (Continued)
Warning (Continued)
2. Put an automatictransmission in P (Park) or a
manual transmission in
1 (First) or R (Reverse).
3. Turn off the engine and do not restart while the vehicle
is raised.
4. Do not allow passengers to remain in the vehicle.
5. Place wheel blocks, if equipped, on both sides of
the tire at the opposite
corner of the tire being
changed.
When the vehicle has a flat tire (2),
use the following example as a
guide to assist in the placement of
the wheel blocks (1), if equipped.