2017 CHEVROLET EXPRESS CARGO VAN bulb
[x] Cancel search: bulbPage 129 of 346
Chevrolet Express Owner Manual (GMNA-Localizing-U.S./Canada/Mexico-9967827) - 2017 - crc - 5/2/16
128 Lighting
Hazard Warning Flashers
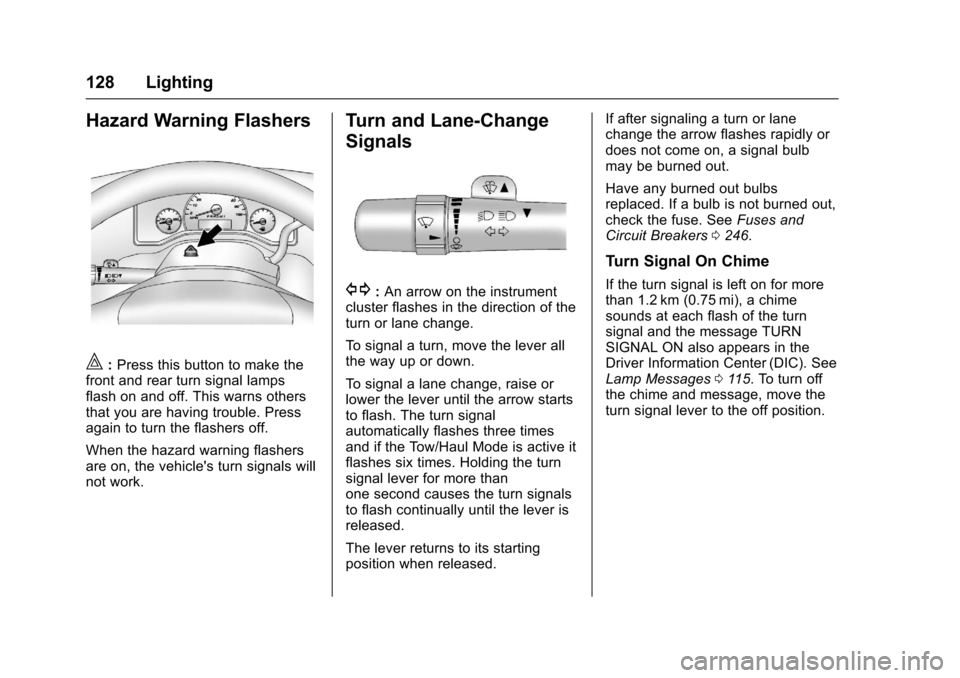
|:Press this button to make thefront and rear turn signal lampsflash on and off. This warns othersthat you are having trouble. Pressagain to turn the flashers off.
When the hazard warning flashersare on, the vehicle's turn signals willnot work.
Turn and Lane-Change
Signals
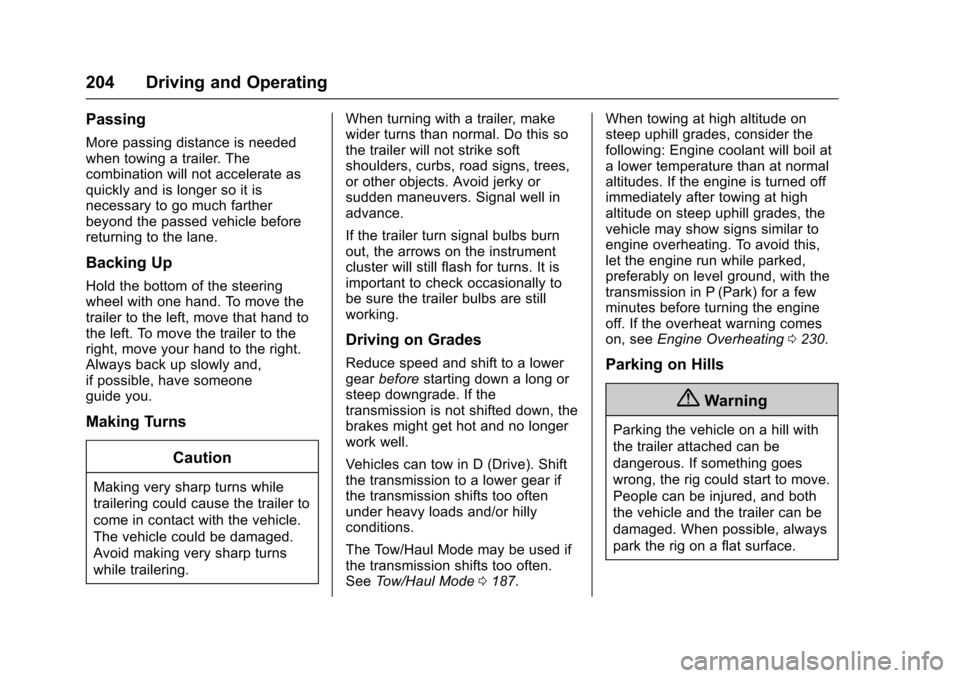
G:An arrow on the instrumentcluster flashes in the direction of theturn or lane change.
To s i g n a l a t u r n , m o v e t h e l e v e r a l lthe way up or down.
To s i g n a l a l a n e c h a n g e , r a i s e o rlower the lever until the arrow startsto flash. The turn signalautomatically flashes three timesand if the Tow/Haul Mode is active itflashes six times. Holding the turnsignal lever for more thanone second causes the turn signalsto flash continually until the lever isreleased.
The lever returns to its startingposition when released.
If after signaling a turn or lanechange the arrow flashes rapidly ordoes not come on, a signal bulbmay be burned out.
Have any burned out bulbsreplaced. If a bulb is not burned out,check the fuse. SeeFuses andCircuit Breakers0246.
Turn Signal On Chime
If the turn signal is left on for morethan 1.2 km (0.75 mi), a chimesounds at each flash of the turnsignal and the message TURNSIGNAL ON also appears in theDriver Information Center (DIC). SeeLamp Messages011 5.Toturnoffthe chime and message, move theturn signal lever to the off position.
Page 205 of 346
Chevrolet Express Owner Manual (GMNA-Localizing-U.S./Canada/Mexico-9967827) - 2017 - crc - 5/6/16
204 Driving and Operating
Passing
More passing distance is neededwhen towing a trailer. Thecombination will not accelerate asquickly and is longer so it isnecessary to go much fartherbeyond the passed vehicle beforereturning to the lane.
Backing Up
Hold the bottom of the steeringwheel with one hand. To move thetrailer to the left, move that hand tothe left. To move the trailer to theright, move your hand to the right.Always back up slowly and,if possible, have someoneguide you.
Making Turns
Caution
Making very sharp turns while
trailering could cause the trailer to
come in contact with the vehicle.
The vehicle could be damaged.
Avoid making very sharp turns
while trailering.
When turning with a trailer, makewider turns than normal. Do this sothe trailer will not strike softshoulders, curbs, road signs, trees,or other objects. Avoid jerky orsudden maneuvers. Signal well inadvance.
If the trailer turn signal bulbs burnout, the arrows on the instrumentcluster will still flash for turns. It isimportant to check occasionally tobe sure the trailer bulbs are stillworking.
Driving on Grades
Reduce speed and shift to a lowergearbeforestarting down a long orsteep downgrade. If thetransmission is not shifted down, thebrakes might get hot and no longerwork well.
Vehicles can tow in D (Drive). Shiftthe transmission to a lower gear ifthe transmission shifts too oftenunder heavy loads and/or hillyconditions.
The Tow/Haul Mode may be used ifthe transmission shifts too often.SeeTo w / H a u l M o d e0187.
When towing at high altitude onsteep uphill grades, consider thefollowing: Engine coolant will boil atalowertemperaturethanatnormalaltitudes. If the engine is turned offimmediately after towing at highaltitude on steep uphill grades, thevehicle may show signs similar toengine overheating. To avoid this,let the engine run while parked,preferably on level ground, with thetransmission in P (Park) for a fewminutes before turning the engineoff. If the overheat warning comeson, seeEngine Overheating0230.
Parking on Hills
{Warning
Parking the vehicle on a hill with
the trailer attached can be
dangerous. If something goes
wrong, the rig could start to move.
People can be injured, and both
the vehicle and the trailer can be
damaged. When possible, always
park the rig on a flat surface.
Page 215 of 346
Chevrolet Express Owner Manual (GMNA-Localizing-U.S./Canada/Mexico-9967827) - 2017 - crc - 5/2/16
214 Vehicle Care
Vehicle Care
General Information
General Information . . . . . . . . . . 215California Proposition65 Warning . . . . . . . . . . . . . . . . . 215California PerchlorateMaterials Requirements . . . . . 215Accessories andModifications . . . . . . . . . . . . . . . . 216
Vehicle Checks
Doing Your OwnService Work . . . . . . . . . . . . . . . 216Hood . . . . . . . . . . . . . . . . . . . . . . . . . 217Engine CompartmentOverview . . . . . . . . . . . . . . . . . . . . 218Engine Oil . . . . . . . . . . . . . . . . . . . . 219Engine Oil Life System . . . . . . . 221Automatic TransmissionFluid . . . . . . . . . . . . . . . . . . . . . . . . 222Engine Air Cleaner/Filter . . . . . . 225Cooling System . . . . . . . . . . . . . . 226Engine Coolant . . . . . . . . . . . . . . . 227Engine Overheating . . . . . . . . . . 230Engine Fan . . . . . . . . . . . . . . . . . . . 231Power Steering Fluid . . . . . . . . . 232Washer Fluid . . . . . . . . . . . . . . . . . 233Brakes . . . . . . . . . . . . . . . . . . . . . . . 233Brake Fluid . . . . . . . . . . . . . . . . . . . 234
Battery - North America . . . . . . 236Rear Axle . . . . . . . . . . . . . . . . . . . . 236Noise Control System . . . . . . . . 237Starter Switch Check . . . . . . . . . 238Automatic Transmission ShiftLock Control FunctionCheck . . . . . . . . . . . . . . . . . . . . . . . 238Ignition Transmission LockCheck . . . . . . . . . . . . . . . . . . . . . . . 239Park Brake and P (Park)Mechanism Check . . . . . . . . . . 239Wiper Blade Replacement . . . . 239
Headlamp Aiming
Headlamp Aiming . . . . . . . . . . . . 240
Bulb Replacement
Bulb Replacement . . . . . . . . . . . . 240Halogen Bulbs . . . . . . . . . . . . . . . . 240Headlamps . . . . . . . . . . . . . . . . . . . 241Front Turn Signal, Sidemarker,and Parking Lamps . . . . . . . . . 242Ta i l l a m p s . . . . . . . . . . . . . . . . . . . . . 2 4 3Center High-MountedStoplamp (CHMSL) . . . . . . . . . 244License Plate Lamp . . . . . . . . . . 244Replacement Bulbs . . . . . . . . . . . 245
Electrical System
Electrical System Overload . . . 245Fuses and Circuit Breakers . . . 246
Engine Compartment FuseBlock . . . . . . . . . . . . . . . . . . . . . . . . 246Floor Console Fuse Block . . . . 249
Wheels and Tires
Tires . . . . . . . . . . . . . . . . . . . . . . . . . . 252All-Season Tires . . . . . . . . . . . . . . 253Winter Tires . . . . . . . . . . . . . . . . . . 253All-Terrain Tires . . . . . . . . . . . . . . . 253Tire Sidewall Labeling . . . . . . . . 254Tire Designations . . . . . . . . . . . . . 256Tire Terminology andDefinitions . . . . . . . . . . . . . . . . . . 257Tire Pressure . . . . . . . . . . . . . . . . . 260Tire Pressure MonitorSystem . . . . . . . . . . . . . . . . . . . . . . 261Tire Pressure MonitorOperation . . . . . . . . . . . . . . . . . . . 262Tire Inspection . . . . . . . . . . . . . . . . 265Tire Rotation . . . . . . . . . . . . . . . . . 265Dual Tire Rotation . . . . . . . . . . . . 266When It Is Time for NewTires . . . . . . . . . . . . . . . . . . . . . . . . 267Buying New Tires . . . . . . . . . . . . . 268Different Size Tires andWheels . . . . . . . . . . . . . . . . . . . . . . 269Uniform Tire QualityGrading . . . . . . . . . . . . . . . . . . . . . 270Wheel Alignment and TireBalance . . . . . . . . . . . . . . . . . . . . . 271Wheel Replacement . . . . . . . . . . 271
Page 241 of 346
Chevrolet Express Owner Manual (GMNA-Localizing-U.S./Canada/Mexico-9967827) - 2017 - crc - 5/2/16
240 Vehicle Care
Caution (Continued)
the vehicle warranty. Do not allow
the wiper arm to touch the
windshield.
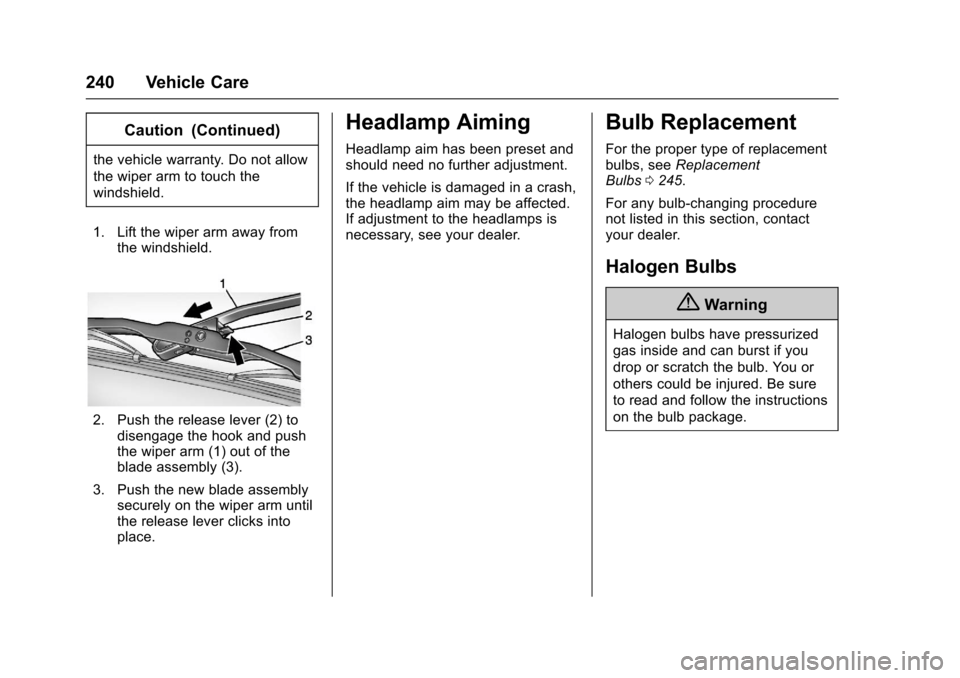
1. Lift the wiper arm away fromthe windshield.
2. Push the release lever (2) todisengage the hook and pushthe wiper arm (1) out of theblade assembly (3).
3. Push the new blade assemblysecurely on the wiper arm untilthe release lever clicks intoplace.
Headlamp Aiming
Headlamp aim has been preset andshould need no further adjustment.
If the vehicle is damaged in a crash,the headlamp aim may be affected.If adjustment to the headlamps isnecessary, see your dealer.
Bulb Replacement
For the proper type of replacementbulbs, seeReplacementBulbs0245.
For any bulb-changing procedurenot listed in this section, contactyour dealer.
Halogen Bulbs
{Warning
Halogen bulbs have pressurized
gas inside and can burst if you
drop or scratch the bulb. You or
others could be injured. Be sure
to read and follow the instructions
on the bulb package.
Page 242 of 346
Chevrolet Express Owner Manual (GMNA-Localizing-U.S./Canada/Mexico-9967827) - 2017 - crc - 5/2/16
Vehicle Care 241
Headlamps
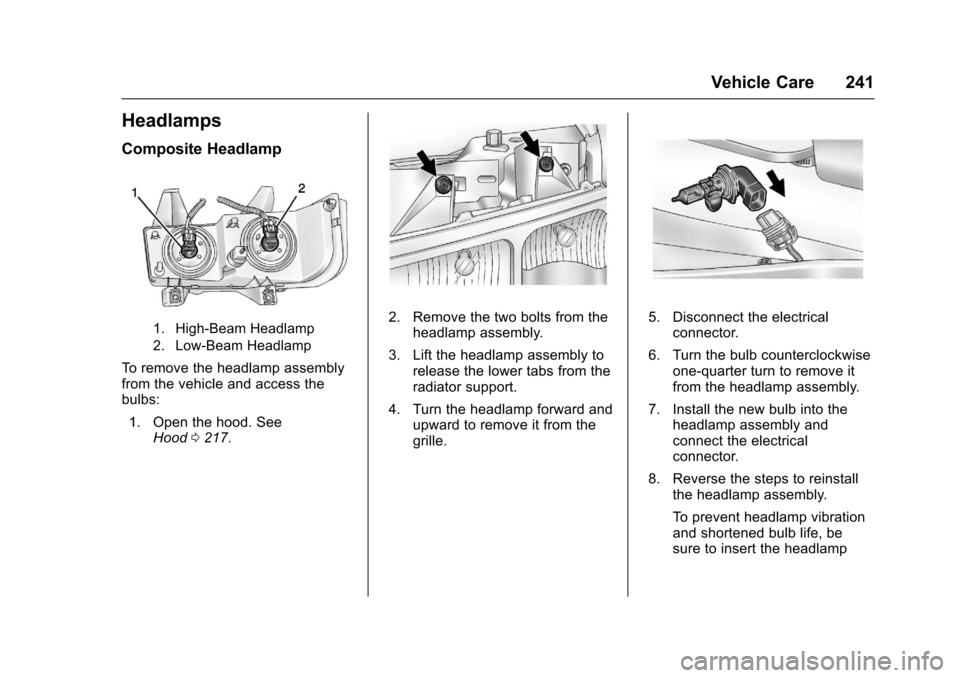
Composite Headlamp
1. High-Beam Headlamp
2. Low-Beam Headlamp
To r e m o v e t h e h e a d l a m p a s s e m b l yfrom the vehicle and access thebulbs:
1. Open the hood. SeeHood0217.
2. Remove the two bolts from theheadlamp assembly.
3. Lift the headlamp assembly torelease the lower tabs from theradiator support.
4. Turn the headlamp forward andupward to remove it from thegrille.
5. Disconnect the electricalconnector.
6. Turn the bulb counterclockwiseone-quarter turn to remove itfrom the headlamp assembly.
7. Install the new bulb into theheadlamp assembly andconnect the electricalconnector.
8. Reverse the steps to reinstallthe headlamp assembly.
To p r e v e n t h e a d l a m p v i b r a t i o nand shortened bulb life, besure to insert the headlamp
Page 243 of 346
Chevrolet Express Owner Manual (GMNA-Localizing-U.S./Canada/Mexico-9967827) - 2017 - crc - 5/2/16
242 Vehicle Care
assembly tabs in the slots atthe lower portion of thehousing.
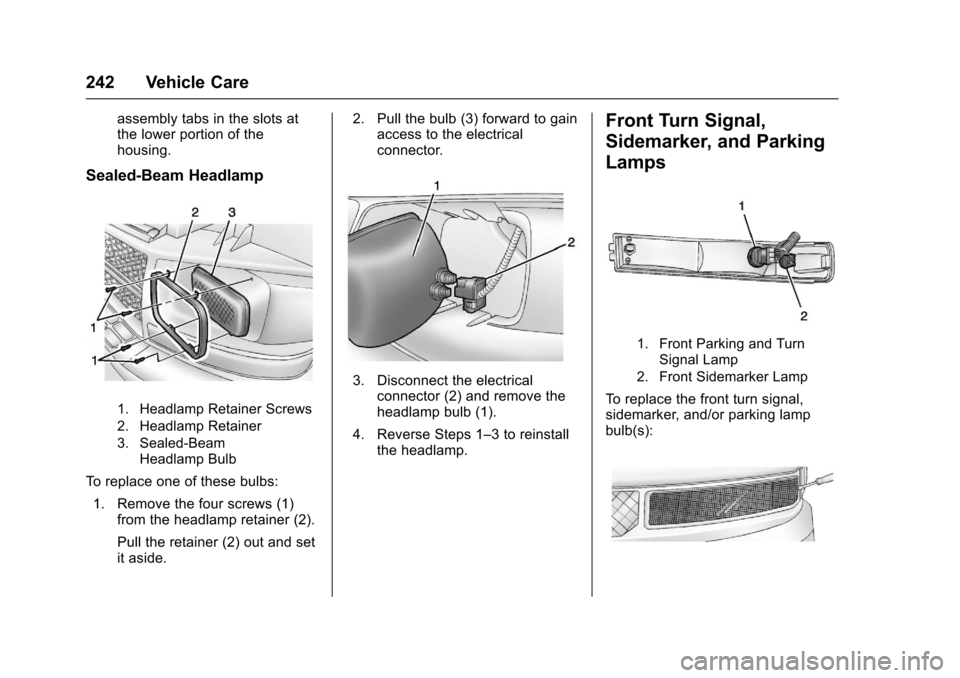
Sealed-Beam Headlamp
1. Headlamp Retainer Screws
2. Headlamp Retainer
3. Sealed-BeamHeadlamp Bulb
To r e p l a c e o n e o f t h e s e b u l b s :
1. Remove the four screws (1)from the headlamp retainer (2).
Pull the retainer (2) out and setit aside.
2. Pull the bulb (3) forward to gainaccess to the electricalconnector.
3. Disconnect the electricalconnector (2) and remove theheadlamp bulb (1).
4. Reverse Steps 1–3toreinstallthe headlamp.
Front Turn Signal,
Sidemarker, and Parking
Lamps
1. Front Parking and TurnSignal Lamp
2. Front Sidemarker Lamp
To r e p l a c e t h e f r o n t t u r n s i g n a l ,sidemarker, and/or parking lampbulb(s):
Page 244 of 346
Chevrolet Express Owner Manual (GMNA-Localizing-U.S./Canada/Mexico-9967827) - 2017 - crc - 5/2/16
Vehicle Care 243
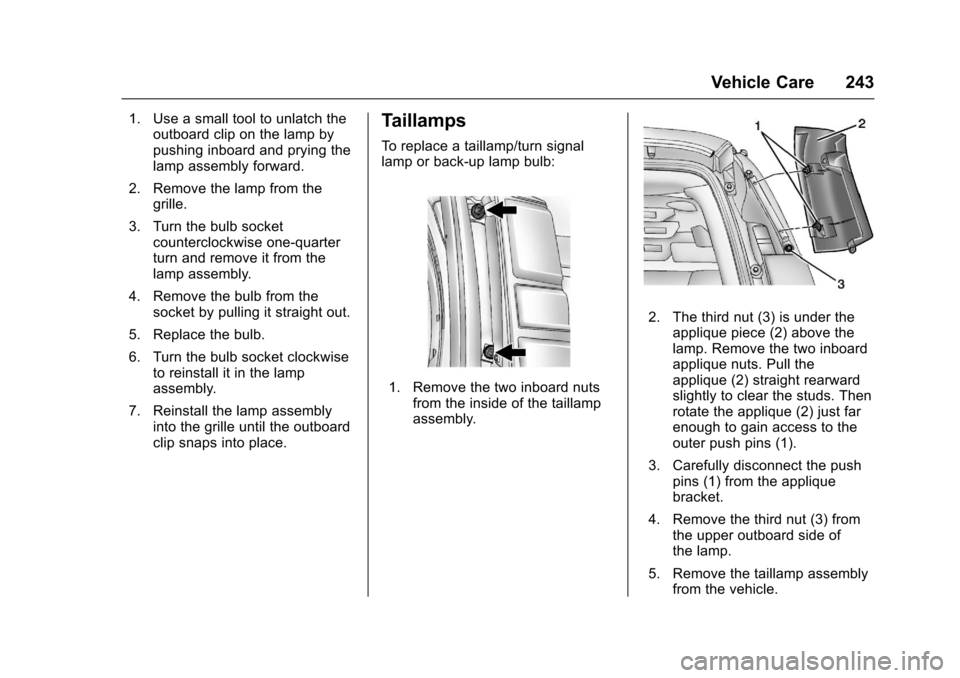
1. Use a small tool to unlatch theoutboard clip on the lamp bypushing inboard and prying thelamp assembly forward.
2. Remove the lamp from thegrille.
3. Turn the bulb socketcounterclockwise one-quarterturn and remove it from thelamp assembly.
4. Remove the bulb from thesocket by pulling it straight out.
5. Replace the bulb.
6. Turn the bulb socket clockwiseto reinstall it in the lampassembly.
7. Reinstall the lamp assemblyinto the grille until the outboardclip snaps into place.
Taillamps
To r e p l a c e a t a i l l a m p / t u r n s i g n a llamp or back-up lamp bulb:
1. Remove the two inboard nutsfrom the inside of the taillampassembly.
2. The third nut (3) is under theapplique piece (2) above thelamp. Remove the two inboardapplique nuts. Pull theapplique (2) straight rearwardslightly to clear the studs. Thenrotate the applique (2) just farenough to gain access to theouter push pins (1).
3. Carefully disconnect the pushpins (1) from the appliquebracket.
4. Remove the third nut (3) fromthe upper outboard side ofthe lamp.
5. Remove the taillamp assemblyfrom the vehicle.
Page 245 of 346
Chevrolet Express Owner Manual (GMNA-Localizing-U.S./Canada/Mexico-9967827) - 2017 - crc - 5/2/16
244 Vehicle Care
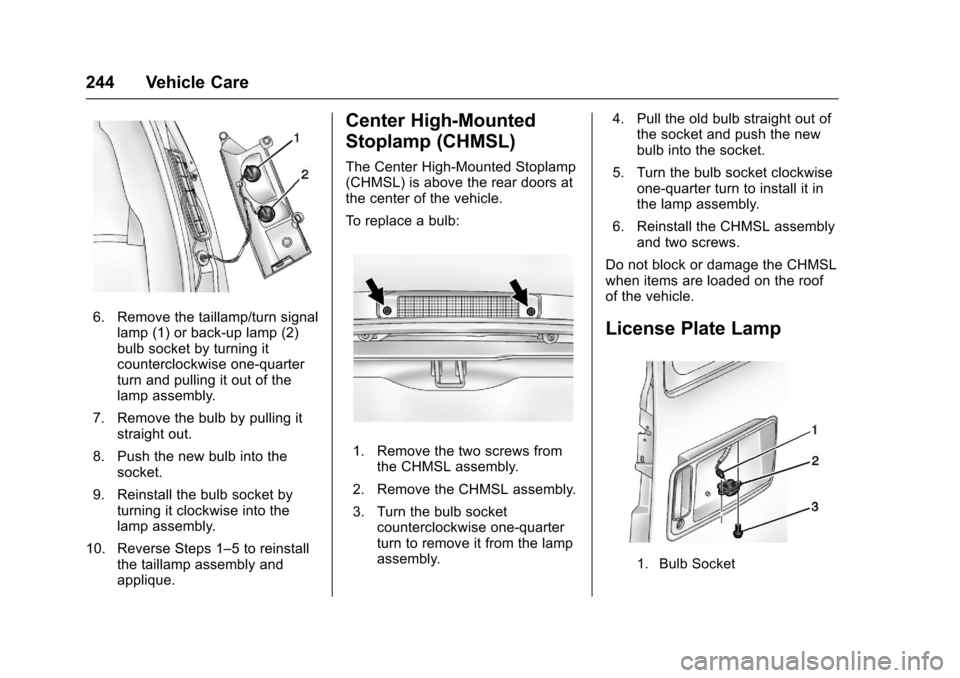
6. Remove the taillamp/turn signallamp (1) or back-up lamp (2)bulb socket by turning itcounterclockwise one-quarterturn and pulling it out of thelamp assembly.
7. Remove the bulb by pulling itstraight out.
8. Push the new bulb into thesocket.
9. Reinstall the bulb socket byturning it clockwise into thelamp assembly.
10. Reverse Steps 1–5toreinstallthe taillamp assembly andapplique.
Center High-Mounted
Stoplamp (CHMSL)
The Center High-Mounted Stoplamp(CHMSL) is above the rear doors atthe center of the vehicle.
To r e p l a c e a b u l b :
1. Remove the two screws fromthe CHMSL assembly.
2. Remove the CHMSL assembly.
3. Turn the bulb socketcounterclockwise one-quarterturn to remove it from the lampassembly.
4. Pull the old bulb straight out ofthe socket and push the newbulb into the socket.
5. Turn the bulb socket clockwiseone-quarter turn to install it inthe lamp assembly.
6. Reinstall the CHMSL assemblyand two screws.
Do not block or damage the CHMSLwhen items are loaded on the roofof the vehicle.
License Plate Lamp
1. Bulb Socket