2017 CHEVROLET EXPRESS CARGO VAN turn signal
[x] Cancel search: turn signalPage 197 of 346

Chevrolet Express Owner Manual (GMNA-Localizing-U.S./Canada/Mexico-9967827) - 2017 - crc - 5/6/16
196 Driving and Operating
This following shows the field ofview that the camera provides.
1. View displayed by thecamera
1. View displayed by thecamera
2. Corners of the rear bumper
Displayed images may be further orcloser than they appear. The areadisplayed is limited and objects thatare close to either corner of thebumper or under the bumper do notdisplay.
When the System Does Not
Seem To Work Properly
The RVC system might not workproperly or display a clear image if:
.It is dark.
.The sun or the beam ofheadlamps is shining directlyinto the camera lens.
.Ice, snow, mud, or anything elsebuilds up on the camera lens.Clean the lens, rinse it withwater, and wipe it with a softcloth.
.The back of the vehicle is in anaccident. The position andmounting angle of the cameracan change or the camera canbe affected. Be sure to have the
camera and its position andmounting angle checked at yourdealer.
The RVC system display in therearview mirror may turn off or notappear as expected due to one ofthe following conditions. If thisoccurs, the left indicator light on themirror will flash.
.Aslowflashmayindicatealossof video signal, or no videosignal present during the reversecycle.
.Afastflashmayindicatethatthedisplay has been on for themaximum allowable time duringareversecycle,orthedisplayhas reached an OverTe m p e r a t u r e l i m i t .
The fast flash conditions areused to protect the video devicefrom high temperatureconditions. Once conditionsreturn to normal, the device willreset and the indicator will stopflashing.
Page 205 of 346
Chevrolet Express Owner Manual (GMNA-Localizing-U.S./Canada/Mexico-9967827) - 2017 - crc - 5/6/16
204 Driving and Operating
Passing
More passing distance is neededwhen towing a trailer. Thecombination will not accelerate asquickly and is longer so it isnecessary to go much fartherbeyond the passed vehicle beforereturning to the lane.
Backing Up
Hold the bottom of the steeringwheel with one hand. To move thetrailer to the left, move that hand tothe left. To move the trailer to theright, move your hand to the right.Always back up slowly and,if possible, have someoneguide you.
Making Turns
Caution
Making very sharp turns while
trailering could cause the trailer to
come in contact with the vehicle.
The vehicle could be damaged.
Avoid making very sharp turns
while trailering.
When turning with a trailer, makewider turns than normal. Do this sothe trailer will not strike softshoulders, curbs, road signs, trees,or other objects. Avoid jerky orsudden maneuvers. Signal well inadvance.
If the trailer turn signal bulbs burnout, the arrows on the instrumentcluster will still flash for turns. It isimportant to check occasionally tobe sure the trailer bulbs are stillworking.
Driving on Grades
Reduce speed and shift to a lowergearbeforestarting down a long orsteep downgrade. If thetransmission is not shifted down, thebrakes might get hot and no longerwork well.
Vehicles can tow in D (Drive). Shiftthe transmission to a lower gear ifthe transmission shifts too oftenunder heavy loads and/or hillyconditions.
The Tow/Haul Mode may be used ifthe transmission shifts too often.SeeTo w / H a u l M o d e0187.
When towing at high altitude onsteep uphill grades, consider thefollowing: Engine coolant will boil atalowertemperaturethanatnormalaltitudes. If the engine is turned offimmediately after towing at highaltitude on steep uphill grades, thevehicle may show signs similar toengine overheating. To avoid this,let the engine run while parked,preferably on level ground, with thetransmission in P (Park) for a fewminutes before turning the engineoff. If the overheat warning comeson, seeEngine Overheating0230.
Parking on Hills
{Warning
Parking the vehicle on a hill with
the trailer attached can be
dangerous. If something goes
wrong, the rig could start to move.
People can be injured, and both
the vehicle and the trailer can be
damaged. When possible, always
park the rig on a flat surface.
Page 212 of 346
Chevrolet Express Owner Manual (GMNA-Localizing-U.S./Canada/Mexico-9967827) - 2017 - crc - 5/6/16
Driving and Operating 211
State and local regulations may alsorequire the trailer to have its ownbraking system if loaded above acertain threshold.
Be sure to read and follow theinstructions for the trailer brakes sothey are installed, adjusted, andmaintained properly.
Do not tap into the vehicle'shydraulic brake system.
Trailer Wiring Harness
The optional heavy-duty trailerwiring package includes a wiringharness, with a seven-pin connectorat the rear of the vehicle and afour-wire harness assembly underthe driver side of the instrumentpanel. The four-wire harnessassembly comes without aconnector.
If the vehicle does not have a trailerhitch, the seven-wire harnessassembly with connector is tapedtogether and located in a framepocket at the driver side rear leftcorner of the frame.
If the vehicle has a trailer hitch, theseven-wire harness assembly withconnector is attached to a bracketon the hitch platform. In both cases,the seven-wire harness has aconnector and includes a 30-ampfeed wire.
Use only a round, seven-wireconnector with flat blade terminalsmeeting SAE J2863 specificationsfor proper electrical connectivity.
The seven-wire harness connectorcontains the following trailer circuits:
.Light Green: Back-up Lamps(10A fuse)**
.White: Ground
.Dark Blue: Trailer Brake Signal
.Dark Green: Right Rear Stopand Turn Signal*
.Red/Black Stripe: Battery Feed(30A Fuse)
.Brown: Trailer Park LampSupply Voltage (15A fuse)**
.Ye l l o w : L e f t R e a r S t o p a n d Tu r nSignal *
The four-wire harness (withoutconnector) contains the followingcircuits:
.Black: Ground
.Red/White: Battery Feed
.Dark Blue: Trailer Brake Signal
.Light Blue: CHMSL/StoplampSupply Voltage
*Ifthevehicleisacutawaywithtrailer provisions, a 15 amp fuse willbe shared for both left/stop trailerturn and right/stop trailer turnsignals. However, the cutawaylighting connector will have a10 amp fuse for each signal.
** If the vehicle is a cutaway withtrailer provisions, a 15 amp fuse willbe shared for trailer park lamps andcutaway rear lighting connector parklamps. Also, a 10 amp fuse will beshared for trailer back-up lamps andcutaway rear lighting connectorback-up lamps.
Tow/Haul Mode
This button is on the instrumentpanel, to the right of the steeringwheel.
Page 215 of 346
Chevrolet Express Owner Manual (GMNA-Localizing-U.S./Canada/Mexico-9967827) - 2017 - crc - 5/2/16
214 Vehicle Care
Vehicle Care
General Information
General Information . . . . . . . . . . 215California Proposition65 Warning . . . . . . . . . . . . . . . . . 215California PerchlorateMaterials Requirements . . . . . 215Accessories andModifications . . . . . . . . . . . . . . . . 216
Vehicle Checks
Doing Your OwnService Work . . . . . . . . . . . . . . . 216Hood . . . . . . . . . . . . . . . . . . . . . . . . . 217Engine CompartmentOverview . . . . . . . . . . . . . . . . . . . . 218Engine Oil . . . . . . . . . . . . . . . . . . . . 219Engine Oil Life System . . . . . . . 221Automatic TransmissionFluid . . . . . . . . . . . . . . . . . . . . . . . . 222Engine Air Cleaner/Filter . . . . . . 225Cooling System . . . . . . . . . . . . . . 226Engine Coolant . . . . . . . . . . . . . . . 227Engine Overheating . . . . . . . . . . 230Engine Fan . . . . . . . . . . . . . . . . . . . 231Power Steering Fluid . . . . . . . . . 232Washer Fluid . . . . . . . . . . . . . . . . . 233Brakes . . . . . . . . . . . . . . . . . . . . . . . 233Brake Fluid . . . . . . . . . . . . . . . . . . . 234
Battery - North America . . . . . . 236Rear Axle . . . . . . . . . . . . . . . . . . . . 236Noise Control System . . . . . . . . 237Starter Switch Check . . . . . . . . . 238Automatic Transmission ShiftLock Control FunctionCheck . . . . . . . . . . . . . . . . . . . . . . . 238Ignition Transmission LockCheck . . . . . . . . . . . . . . . . . . . . . . . 239Park Brake and P (Park)Mechanism Check . . . . . . . . . . 239Wiper Blade Replacement . . . . 239
Headlamp Aiming
Headlamp Aiming . . . . . . . . . . . . 240
Bulb Replacement
Bulb Replacement . . . . . . . . . . . . 240Halogen Bulbs . . . . . . . . . . . . . . . . 240Headlamps . . . . . . . . . . . . . . . . . . . 241Front Turn Signal, Sidemarker,and Parking Lamps . . . . . . . . . 242Ta i l l a m p s . . . . . . . . . . . . . . . . . . . . . 2 4 3Center High-MountedStoplamp (CHMSL) . . . . . . . . . 244License Plate Lamp . . . . . . . . . . 244Replacement Bulbs . . . . . . . . . . . 245
Electrical System
Electrical System Overload . . . 245Fuses and Circuit Breakers . . . 246
Engine Compartment FuseBlock . . . . . . . . . . . . . . . . . . . . . . . . 246Floor Console Fuse Block . . . . 249
Wheels and Tires
Tires . . . . . . . . . . . . . . . . . . . . . . . . . . 252All-Season Tires . . . . . . . . . . . . . . 253Winter Tires . . . . . . . . . . . . . . . . . . 253All-Terrain Tires . . . . . . . . . . . . . . . 253Tire Sidewall Labeling . . . . . . . . 254Tire Designations . . . . . . . . . . . . . 256Tire Terminology andDefinitions . . . . . . . . . . . . . . . . . . 257Tire Pressure . . . . . . . . . . . . . . . . . 260Tire Pressure MonitorSystem . . . . . . . . . . . . . . . . . . . . . . 261Tire Pressure MonitorOperation . . . . . . . . . . . . . . . . . . . 262Tire Inspection . . . . . . . . . . . . . . . . 265Tire Rotation . . . . . . . . . . . . . . . . . 265Dual Tire Rotation . . . . . . . . . . . . 266When It Is Time for NewTires . . . . . . . . . . . . . . . . . . . . . . . . 267Buying New Tires . . . . . . . . . . . . . 268Different Size Tires andWheels . . . . . . . . . . . . . . . . . . . . . . 269Uniform Tire QualityGrading . . . . . . . . . . . . . . . . . . . . . 270Wheel Alignment and TireBalance . . . . . . . . . . . . . . . . . . . . . 271Wheel Replacement . . . . . . . . . . 271
Page 243 of 346
Chevrolet Express Owner Manual (GMNA-Localizing-U.S./Canada/Mexico-9967827) - 2017 - crc - 5/2/16
242 Vehicle Care
assembly tabs in the slots atthe lower portion of thehousing.
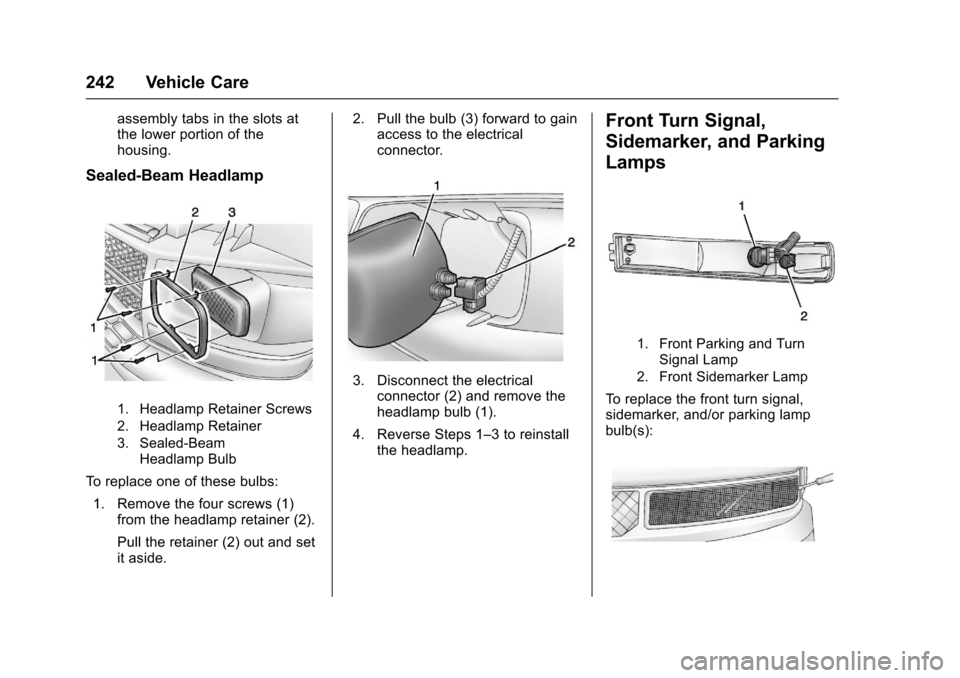
Sealed-Beam Headlamp
1. Headlamp Retainer Screws
2. Headlamp Retainer
3. Sealed-BeamHeadlamp Bulb
To r e p l a c e o n e o f t h e s e b u l b s :
1. Remove the four screws (1)from the headlamp retainer (2).
Pull the retainer (2) out and setit aside.
2. Pull the bulb (3) forward to gainaccess to the electricalconnector.
3. Disconnect the electricalconnector (2) and remove theheadlamp bulb (1).
4. Reverse Steps 1–3toreinstallthe headlamp.
Front Turn Signal,
Sidemarker, and Parking
Lamps
1. Front Parking and TurnSignal Lamp
2. Front Sidemarker Lamp
To r e p l a c e t h e f r o n t t u r n s i g n a l ,sidemarker, and/or parking lampbulb(s):
Page 245 of 346
Chevrolet Express Owner Manual (GMNA-Localizing-U.S./Canada/Mexico-9967827) - 2017 - crc - 5/2/16
244 Vehicle Care
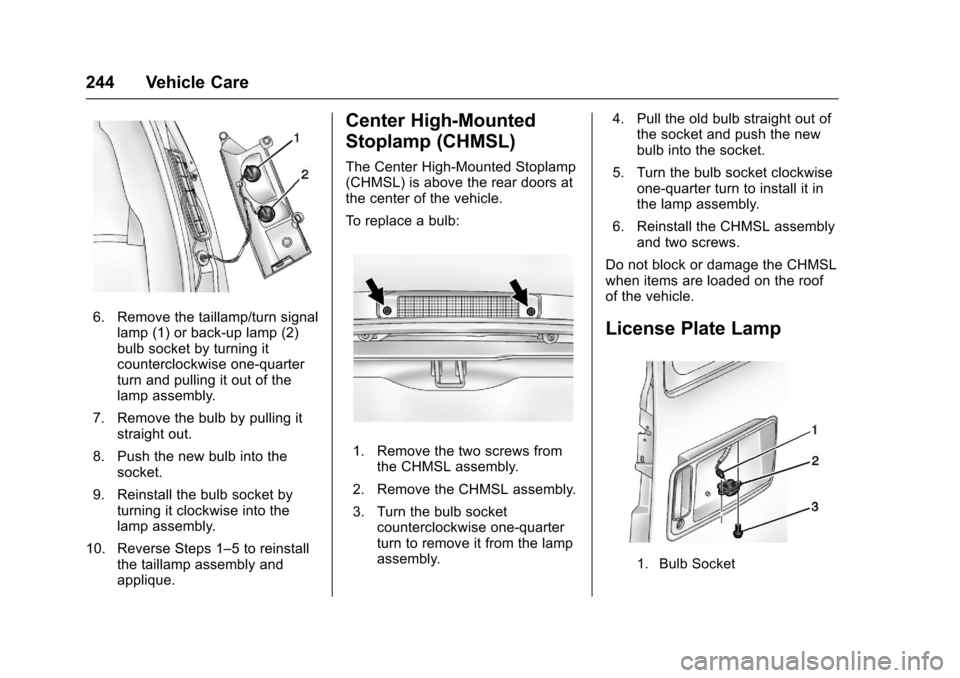
6. Remove the taillamp/turn signallamp (1) or back-up lamp (2)bulb socket by turning itcounterclockwise one-quarterturn and pulling it out of thelamp assembly.
7. Remove the bulb by pulling itstraight out.
8. Push the new bulb into thesocket.
9. Reinstall the bulb socket byturning it clockwise into thelamp assembly.
10. Reverse Steps 1–5toreinstallthe taillamp assembly andapplique.
Center High-Mounted
Stoplamp (CHMSL)
The Center High-Mounted Stoplamp(CHMSL) is above the rear doors atthe center of the vehicle.
To r e p l a c e a b u l b :
1. Remove the two screws fromthe CHMSL assembly.
2. Remove the CHMSL assembly.
3. Turn the bulb socketcounterclockwise one-quarterturn to remove it from the lampassembly.
4. Pull the old bulb straight out ofthe socket and push the newbulb into the socket.
5. Turn the bulb socket clockwiseone-quarter turn to install it inthe lamp assembly.
6. Reinstall the CHMSL assemblyand two screws.
Do not block or damage the CHMSLwhen items are loaded on the roofof the vehicle.
License Plate Lamp
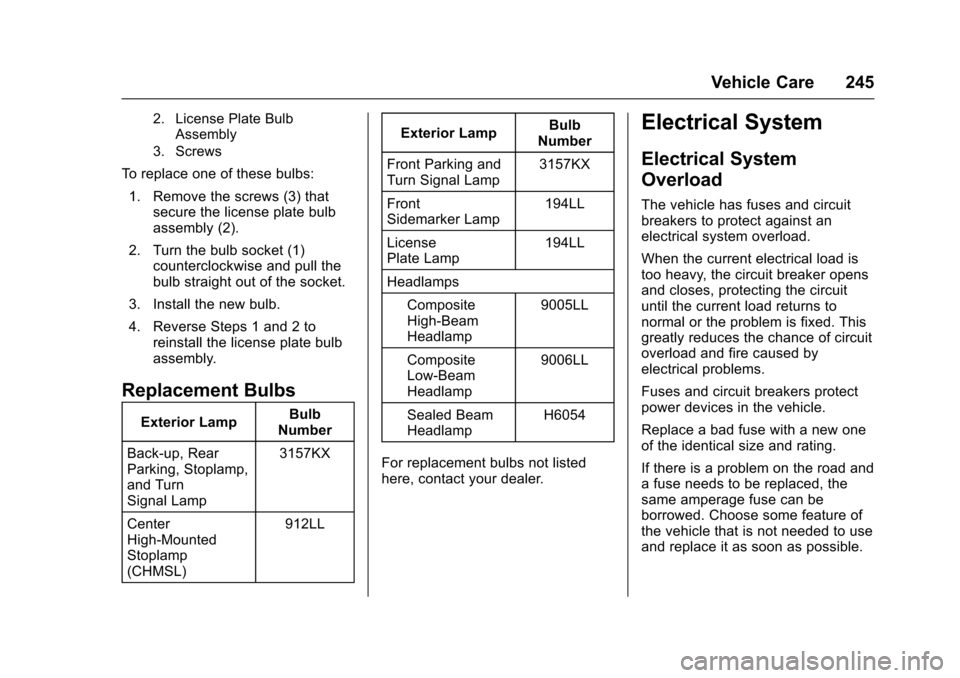
1. Bulb Socket
Page 246 of 346
Chevrolet Express Owner Manual (GMNA-Localizing-U.S./Canada/Mexico-9967827) - 2017 - crc - 5/2/16
Vehicle Care 245
2. License Plate BulbAssembly
3. Screws
To r e p l a c e o n e o f t h e s e b u l b s :
1. Remove the screws (3) thatsecure the license plate bulbassembly (2).
2. Turn the bulb socket (1)counterclockwise and pull thebulb straight out of the socket.
3. Install the new bulb.
4. Reverse Steps 1 and 2 toreinstall the license plate bulbassembly.
Replacement Bulbs
Exterior LampBulbNumber
Back-up, RearParking, Stoplamp,and TurnSignal Lamp
3157KX
CenterHigh-MountedStoplamp(CHMSL)
912LL
Exterior LampBulbNumber
Front Parking andTurn Signal Lamp3157KX
FrontSidemarker Lamp194LL
LicensePlate Lamp194LL
Headlamps
CompositeHigh-BeamHeadlamp
9005LL
CompositeLow-BeamHeadlamp
9006LL
Sealed BeamHeadlampH6054
For replacement bulbs not listedhere, contact your dealer.
Electrical System
Electrical System
Overload
The vehicle has fuses and circuitbreakers to protect against anelectrical system overload.
When the current electrical load istoo heavy, the circuit breaker opensand closes, protecting the circuituntil the current load returns tonormal or the problem is fixed. Thisgreatly reduces the chance of circuitoverload and fire caused byelectrical problems.
Fuses and circuit breakers protectpower devices in the vehicle.
Replace a bad fuse with a new oneof the identical size and rating.
If there is a problem on the road andafuseneedstobereplaced,thesame amperage fuse can beborrowed. Choose some feature ofthe vehicle that is not needed to useand replace it as soon as possible.
Page 265 of 346
Chevrolet Express Owner Manual (GMNA-Localizing-U.S./Canada/Mexico-9967827) - 2017 - crc - 5/2/16
264 Vehicle Care
the sensor matching process isperformed successfully. Seeyour dealer for service.
.Replacement tires or wheels donot match the original equipmenttires or wheels. Tires and wheelsother than those recommendedcould prevent the TPMS fromfunctioning properly. SeeBuyingNew Tires0268.
.Operating electronic devices orbeing near facilities using radiowave frequencies similar to theTPMS could cause the TPMSsensors to malfunction.
If the TPMS is not functioningproperly, it cannot detect or signal alow tire condition. See your dealerfor service if the TPMS malfunctionlight and DIC message come onand stay on.
TPMS Sensor Matching
Process
Each TPMS sensor has a uniqueidentification code. The identificationcode needs to be matched to a newtire/wheel position after rotating thevehicle’stiresorreplacingoneor
more of the TPMS sensors. Also,the TPMS sensor matching processshould be performed after replacingasparetirewitharoadtirecontaining the TPMS sensor. Themalfunction light and the DICmessage should go off at the nextignition cycle. The sensors arematched to the tire/wheel positions,using a TPMS relearn tool, in thefollowing order: driver side front tire,passenger side front tire, passengerside rear tire, and driver side rear.See your dealer for service or topurchase a relearn tool. A TPMSrelearn tool can also be purchased.See Tire Pressure Monitor SensorActivation Tool atwww.gmtoolsandequipment.com orcall 1-800-GM TOOLS(1-800-468-6657).
There are two minutes to match thefirst tire/wheel position, andfive minutes overall to match all fourtire/wheel positions. If it takeslonger, the matching process stopsand must be restarted.
The TPMS sensor matchingprocess is:
1. Set the parking brake.
2. Turn the ignition to ON/RUNwith the engine off.
3. Press the Remote Keyless
Entry (RKE) transmitter'sQ
andKbuttons at the same
time for approximatelyfive seconds. The horn soundstwice to signal the receiver is inrelearn mode and TIRELEARNING ACTIVE messagedisplays on the DIC screen.
If the vehicle does not haveRKE, press the DriverInformation Center (DIC)vehicle information button untilthe PRESSVTO RELEARNTIRE POSITIONS messagedisplays. The horn soundstwice to signal the receiver is inrelearn mode and TIRELEARNING ACTIVE messagedisplays on the DIC screen.
4. Start with the driver sidefront tire.