2017 CHEVROLET EXPRESS CARGO VAN buttons
[x] Cancel search: buttonsPage 149 of 346
Chevrolet Express Owner Manual (GMNA-Localizing-U.S./Canada/Mexico-9967827) - 2017 - crc - 5/2/16
148 Infotainment System
.FAT 3 2 .
Connecting a USB Storage
Device or iPod
The USB port can be used tocontrol an iPod or a USB storagedevice.
To c o n n e c t a U S B s t o r a g e d e v i c e ,connect the device to the USB porton the instrument panel.
To c o n n e c t a n i P o d , c o n n e c t o n eend of the USB cable that camewith the iPod to the iPod’sdockconnector and connect the otherend to the USB port on theinstrument panel. If the vehicle is onand the USB connection works,“OKto disconnect”and a GM logo mayappear on the iPod, and iPodappears on the radio display. TheiPod music appears on the radiodisplay and begins playing.
The iPod charges while it isconnected to the vehicle if thevehicle is in the ACC/ACCESSORYor ON/RUN position. When thevehicle is turned off, the iPod
automatically powers off and will notcharge or draw power from thevehicle's battery.
If you have an older iPod model thatis not supported, it can still be usedby connecting it to the auxiliaryinput jack using a standard 3.5 mm(1/8 in) stereo cable. See“Using theAuxiliary Input Jack”previously inthis section.
Using the Radio to Control a
USB Storage Device or iPod
The radio can control a USBstorage device or an iPod using theradio buttons and knobs, anddisplay song information on theradio display.
f:Turn to select files.
©SEEK :Press to go to the start ofthe track, if more than 10 secondshave played. Press and hold orpress multiple times to continuemoving backward through tracks.
¨SEEK :Press to go to the nexttrack. Press and hold or pressmultiple times to continue movingforward through tracks.
sREV :Press and hold to reverseplayback quickly. Sound is heard at
areducedvolume.ReleasesREV
to resume playing. The elapsed timeof the file displays.
\FWD :Press and hold toadvance playback quickly. Sound isheard at a reduced volume. Release\FWD to resume playing. Theelapsed time of the file displays.
4:Press to display additionalinformation about the selected track.
Using Softkeys to Control a
USB Storage Device or iPod
The five softkeys below the radiodisplay are used to control thefunctions listed below.
To u s e t h e s o f t k e y s :
1. Press the first or fifth softkeybelow the radio display todisplay the functions listedbelow, or press the softkeybelow the function if it iscurrently displayed.
2. Press the softkey below the tabwith the function on it to usethat function.
Page 153 of 346
Chevrolet Express Owner Manual (GMNA-Localizing-U.S./Canada/Mexico-9967827) - 2017 - crc - 5/2/16
152 Infotainment System
can be used while the key is in theON/RUN or ACC/ACCESSORYposition. The range of the Bluetoothsystem can be up to 9.1 m (30 ft).Not all phones support all functions,and not all phones work with thein-vehicle Bluetooth system. Seewww.gm.com/bluetooth for moreinformation on compatible phones inU.S. and Canada only.
Voice Recognition
The Bluetooth system uses voicerecognition to interpret voicecommands to dial phone numbersand name tags.
For additional information, say“Help”while you are in a voicerecognition menu.
Noise :Keep interior noise levels toaminimum.Thesystemmaynotrecognize voice commands if thereis too much background noise.
When to Speak :Ashorttonesounds after the system respondsindicating when it is waiting for avoice command. Wait until the toneand then speak.
How to Speak :Speak clearly in acalm and natural voice.
Audio System
When using the in-vehicle Bluetoothsystem, sound comes through thevehicle's front audio systemspeakers and overrides the audiosystem. Use the audio systemvolume knob, during a call, tochange the volume level. Theadjusted volume level remains inmemory for later calls. To preventmissed calls, a minimum volumelevel is used if the volume is turneddown too low.
Bluetooth Controls
Use the buttons on the steeringwheel to operate the in-vehicleBluetooth system. SeeSteeringWheel Controls088.
b/g:Press to answer incomingcalls, confirm system information,and start speech recognition.
c/x:Press to end a call, rejectacall,orcancelanoperation.
Pairing
ABluetooth-enabledcellphonemust be paired to the Bluetoothsystem and then connected to thevehicle before it can be used. Seethe cell phone manufacturer's userguide for Bluetooth functions beforepairing the cell phone. If a Bluetoothphone is not connected, calls will bemade using OnStar Hands-FreeCalling, if equipped. See OnStar,if equipped.
Pairing Information
.ABluetoothphonewithMP3capability cannot be paired tothe vehicle as a phone and anMP3 player at the same time.
.Up to five cell phones can bepaired to the Bluetooth system.
.The pairing process is disabledwhen the vehicle is moving.
.Pairing only needs to becompleted once, unless thepairing information on the cellphone changes or the cell phoneis deleted from the system.
Page 179 of 346
Chevrolet Express Owner Manual (GMNA-Localizing-U.S./Canada/Mexico-9967827) - 2017 - crc - 5/6/16
178 Driving and Operating
Operate the engine andtransmission gently to allow theoil to warm up and lubricate allmoving parts.
When the Low Fuel warninglamp is on and the FUELLEVEL LOW message isdisplayed in the DriverInformation Center (DIC), theComputer-Controlled CrankingSystem is disabled to preventpossible vehicle componentdamage. When this happens,hold the ignition switch in theSTART position to continueengine cranking.
Caution
Cranking the engine for long
periods of time, by returning the
ignition to the START position
immediately after cranking has
ended, can overheat and damage
the cranking motor, and drain the
battery. Wait at least 15 seconds
between each try, to let the
cranking motor cool down.
2. If the engine does not startafter 5-10 seconds, especiallyin very cold weather (below✓18 °C or 0 °F), it could beflooded with too muchgasoline. Try pushing theaccelerator pedal all the way tothe floor and holding it there asyou hold the key in START forup to 15 seconds. Wait at least15 seconds between each try,to allow the cranking motor tocool down. When the enginestarts, let go of the key andaccelerator. If the vehicle startsbriefly but then stops again, dothe same thing. This clears theextra gasoline from the engine.Do not race the engineimmediately after starting it.Operate the engine andtransmission gently until the oilwarms up and lubricates allmoving parts.
Fast Idle System
If equipped, this feature is availableonly with cruise control. The manualfast idle switch is operated using thecruise control buttons on the leftside of the steering wheel.
This system can be used toincrease engine idle speedwhenever the following conditionsare met:
.The parking brake is set.
.The brake pedal is not pressed.
.The vehicle must not be movingand the accelerator must not bepressed.
To c o n t r o l t h e f a s t i d l e :
.To e n a b l e t h e F a s t I d l e S y s t e m ,press and release the cruisecontrol on/off button and ensurethat the switch indicator lightis lit.
.Press and release the cruisecontrol SET- button. Enginespeed will be held atapproximately 1200 rpm.
Page 188 of 346
Chevrolet Express Owner Manual (GMNA-Localizing-U.S./Canada/Mexico-9967827) - 2017 - crc - 5/6/16
Driving and Operating 187
2. Press the +/✓buttons on theshift lever, to select the desiredrange of gears for currentdriving conditions.
When M (Manual Mode) is selectedanumberdisplaysintheDICnexttothe M indicating the current gear.
This number is the highest gear thatcan be used. However, the vehiclecan automatically shift to lowergears as it adjusts to drivingconditions. This means that allgears below that number areavailable. When 5 (Fifth) is selected,1(First) through 5(Fifth) gears areautomatically shifted by the vehicle,but 6 (Sixth) cannot be used untilthe +/✓button on the steeringcolumn lever is used to change tothe gear.
Grade Braking is not available whenRange Selection Mode is active.SeeTo w / H a u l M o d e0187.
While using Range Selection Mode,cruise control and the Tow/HaulMode can be used.
Caution
Spinning the tires or holding the
vehicle in one place on a hill
using only the accelerator pedal
may damage the transmission.
The repair will not be covered by
the vehicle warranty. If you are
stuck, do not spin the tires. When
stopping on a hill, use the brakes
to hold the vehicle in place.
Low Traction Mode
Low Traction Mode can assist invehicle acceleration when roadconditions are slippery. While thevehicle is at a stop, select thesecond gear range using RangeSelection Mode. This will limittorque to the wheels after it detectswheel slip, preventing the tires fromspinning.
Tow/Haul Mode
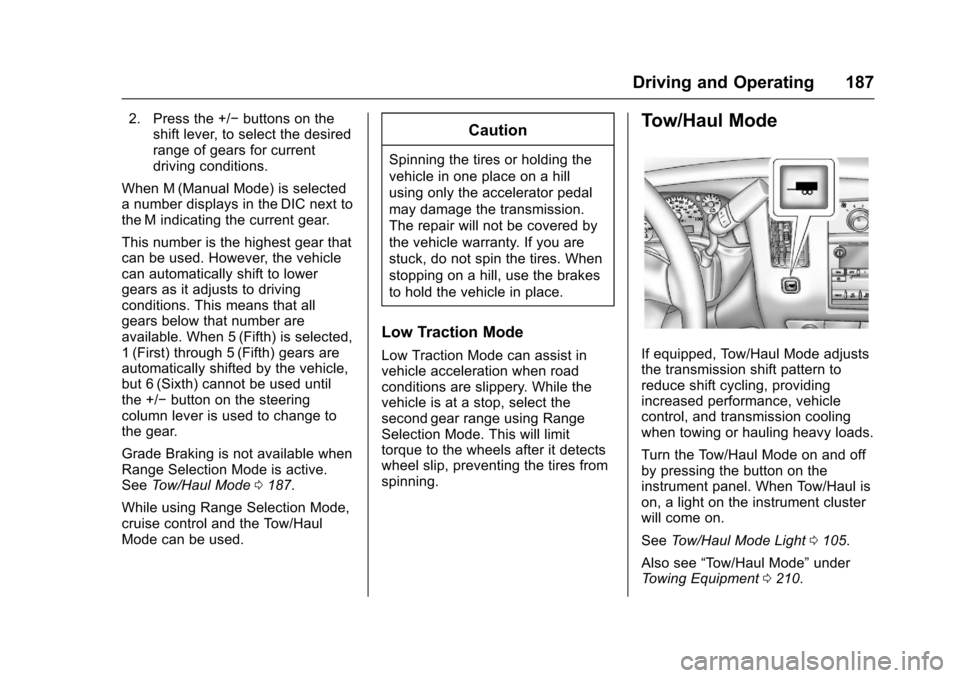
If equipped, Tow/Haul Mode adjuststhe transmission shift pattern toreduce shift cycling, providingincreased performance, vehiclecontrol, and transmission coolingwhen towing or hauling heavy loads.
Turn the Tow/Haul Mode on and offby pressing the button on theinstrument panel. When Tow/Haul ison, a light on the instrument clusterwill come on.
SeeTo w / H a u l M o d e L i g h t0105.
Also see“To w / H a u l M o d e”underTo w i n g E q u i p m e n t0210.
Page 263 of 346

Chevrolet Express Owner Manual (GMNA-Localizing-U.S./Canada/Mexico-9967827) - 2017 - crc - 5/2/16
262 Vehicle Care
lead to tire failure. Under-inflationalso reduces fuel efficiency and tiretread life, and may affect thevehicle's handling and stoppingability.
Please note that the TPMS is not asubstitute for proper tiremaintenance, and it is the driver'sresponsibility to maintain correct tirepressure, even if under-inflation hasnot reached the level to triggerillumination of the TPMS low tirepressure telltale.
Yo u r v e h i c l e h a s a l s o b e e nequipped with a TPMS malfunctionindicator to indicate when thesystem is not operating properly.The TPMS malfunction indicator iscombined with the low tire pressuretelltale. When the system detects amalfunction, the telltale will flash forapproximately one minute and thenremain continuously illuminated.This sequence will continue uponsubsequent vehicle start-ups aslong as the malfunction exists.
When the malfunction indicator isilluminated, the system may not beable to detect or signal low tire
pressure as intended. TPMSmalfunctions may occur for a varietyof reasons, including the installationof replacement or alternate tires orwheels on the vehicle that preventthe TPMS from functioning properly.Always check the TPMS malfunctiontelltale after replacing one or moretires or wheels on your vehicle toensure that the replacement oralternate tires and wheels allow theTPMS to continue to functionproperly.
SeeTire Pressure MonitorOperation0262.
SeeRadio FrequencyStatement0322.
Tire Pressure Monitor
Operation
This vehicle may have a TirePressure Monitor System (TPMS).The TPMS is designed to warn thedriver when a low tire pressurecondition exists. TPMS sensors aremounted onto each tire and wheelassembly, excluding the spare tireand wheel assembly. The TPMSsensors monitor the air pressure in
the tires and transmit the tirepressure readings to a receiverlocated in the vehicle.
When a low tire pressure conditionis detected, the TPMS illuminatesthe low tire pressure warning lightlocated on the instrument cluster.If the warning light comes on, stopas soon as possible and inflate thetires to the recommended pressureshown on the Tire and LoadingInformation label. SeeVehicle LoadLimits0171.
AmessagetocheckthepressureinaspecifictiredisplaysintheDriverInformation Center (DIC). The lowtire pressure warning light and theDIC warning message come on ateach ignition cycle until the tires areinflated to the correct inflationpressure. If the vehicle has DICbuttons, tire pressure levels can beviewed. For additional information
Page 265 of 346
Chevrolet Express Owner Manual (GMNA-Localizing-U.S./Canada/Mexico-9967827) - 2017 - crc - 5/2/16
264 Vehicle Care
the sensor matching process isperformed successfully. Seeyour dealer for service.
.Replacement tires or wheels donot match the original equipmenttires or wheels. Tires and wheelsother than those recommendedcould prevent the TPMS fromfunctioning properly. SeeBuyingNew Tires0268.
.Operating electronic devices orbeing near facilities using radiowave frequencies similar to theTPMS could cause the TPMSsensors to malfunction.
If the TPMS is not functioningproperly, it cannot detect or signal alow tire condition. See your dealerfor service if the TPMS malfunctionlight and DIC message come onand stay on.
TPMS Sensor Matching
Process
Each TPMS sensor has a uniqueidentification code. The identificationcode needs to be matched to a newtire/wheel position after rotating thevehicle’stiresorreplacingoneor
more of the TPMS sensors. Also,the TPMS sensor matching processshould be performed after replacingasparetirewitharoadtirecontaining the TPMS sensor. Themalfunction light and the DICmessage should go off at the nextignition cycle. The sensors arematched to the tire/wheel positions,using a TPMS relearn tool, in thefollowing order: driver side front tire,passenger side front tire, passengerside rear tire, and driver side rear.See your dealer for service or topurchase a relearn tool. A TPMSrelearn tool can also be purchased.See Tire Pressure Monitor SensorActivation Tool atwww.gmtoolsandequipment.com orcall 1-800-GM TOOLS(1-800-468-6657).
There are two minutes to match thefirst tire/wheel position, andfive minutes overall to match all fourtire/wheel positions. If it takeslonger, the matching process stopsand must be restarted.
The TPMS sensor matchingprocess is:
1. Set the parking brake.
2. Turn the ignition to ON/RUNwith the engine off.
3. Press the Remote Keyless
Entry (RKE) transmitter'sQ
andKbuttons at the same
time for approximatelyfive seconds. The horn soundstwice to signal the receiver is inrelearn mode and TIRELEARNING ACTIVE messagedisplays on the DIC screen.
If the vehicle does not haveRKE, press the DriverInformation Center (DIC)vehicle information button untilthe PRESSVTO RELEARNTIRE POSITIONS messagedisplays. The horn soundstwice to signal the receiver is inrelearn mode and TIRELEARNING ACTIVE messagedisplays on the DIC screen.
4. Start with the driver sidefront tire.
Page 327 of 346
Chevrolet Express Owner Manual (GMNA-Localizing-U.S./Canada/Mexico-9967827) - 2017 - crc - 5/2/16
326 OnStar
OnStar
OnStar Overview
OnStar Overview . . . . . . . . . . . . . 326
OnStar Services
Emergency . . . . . . . . . . . . . . . . . . . 327Security . . . . . . . . . . . . . . . . . . . . . . 327Navigation . . . . . . . . . . . . . . . . . . . . 328Connections . . . . . . . . . . . . . . . . . . 328Diagnostics . . . . . . . . . . . . . . . . . . . 330
OnStar Additional Information
OnStar AdditionalInformation . . . . . . . . . . . . . . . . . . 331
OnStar Overview
=Voice Command Button
QBlue OnStar Button
>Red Emergency Button
This vehicle may be equipped with acomprehensive, in-vehicle systemthat can connect to an OnStarAdvisor for Emergency, Security,Navigation, Connections, andDiagnostics Services. OnStarservices may require a paidsubscription and data plan. OnStarrequires the vehicle battery andelectrical system, cellular service,and GPS satellite signals to beavailable and operating. OnStar actsas a link to existing emergencyservice providers. OnStar maycollect information about you andyour vehicle, including locationinformation. See OnStar User
Te r m s , P r i v a c y S t a t e m e n t , a n dSoftware Terms for more detailsincluding system limitations atwww.onstar.com (U.S.) orwww.onstar.ca (Canada).
The OnStar system status light isnext to the OnStar buttons. If thestatus light is:
.Solid Green: System is ready.
.Flashing Green: On a call.
.Red: Indicates a problem.
.Off: System is active. PressQ
twice to speak with an OnStarAdvisor.
PressQor call 1-888-4ONSTAR
(1-888-466-7827) to speak to anAdvisor.
Press=to:
.Make a call, end a call,or answer an incoming call.
.Give OnStar Hands-Free Callingvoice commands.
.Give OnStar Turn-by-TurnNavigation voice commands.