2017 CHEVROLET EQUINOX clock
[x] Cancel search: clockPage 96 of 327
Chevrolet Equinox Owner Manual (GMNA-Localizing-U.S./Canada/Mexico-
9918169) - 2017 - CRC - 3/23/16
Instruments and Controls 95
Instruments and
Controls
Controls
Steering Wheel Adjustment . . . . 96
Steering Wheel Controls . . . . . . . 96
Horn . . . . . . . . . . . . . . . . . . . . . . . . . . . 96
Windshield Wiper/Washer . . . . . . 96
Rear Window Wiper/Washer . . . 98
Compass . . . . . . . . . . . . . . . . . . . . . . 98
Clock . . . . . . . . . . . . . . . . . . . . . . . . . . 99
Power Outlets . . . . . . . . . . . . . . . . 100
Warning Lights, Gauges, and
Indicators
Warning Lights, Gauges, andIndicators . . . . . . . . . . . . . . . . . . . 100
Instrument Cluster . . . . . . . . . . . . 101
Speedometer . . . . . . . . . . . . . . . . . 102
Odometer . . . . . . . . . . . . . . . . . . . . . 102
Tachometer . . . . . . . . . . . . . . . . . . . 102
Fuel Gauge . . . . . . . . . . . . . . . . . . . 102
Engine Coolant Temperature Gauge . . . . . . . . . . . . . . . . . . . . . . 103
Safety Belt Reminders . . . . . . . . 103
Airbag Readiness Light . . . . . . . 104
Passenger Airbag Status Indicator . . . . . . . . . . . . . . . . . . . . 104 Charging System Light . . . . . . . 105
Malfunction Indicator Lamp
(Check Engine Light) . . . . . . . . 106
Brake System Warning Light . . . . . . . . . . . . . . . . . . . . . . . . 108
Antilock Brake System (ABS) Warning Light . . . . . . . . . . . . . . . 108
Lane Departure Warning (LDW) Light . . . . . . . . . . . . . . . . . 109
Forward Collision Alert (FCA) Warning Light . . . . . . . . . . . . . . . 109
Vehicle Ahead Indicator . . . . . . 109
Traction Off Light . . . . . . . . . . . . . 109
StabiliTrak
®OFF Light . . . . . . . . 110
Traction Control System (TCS)/ StabiliTrak
®Light . . . . . . . . . . . . 110
Tire Pressure Light . . . . . . . . . . . 110
Engine Oil Pressure Light . . . . . 111
Fuel Economy Light . . . . . . . . . . . 111
Low Fuel Warning Light . . . . . . . 112
Security Light . . . . . . . . . . . . . . . . . 112
High-Beam On Light . . . . . . . . . . 112
Front Fog Lamp Light . . . . . . . . . 112
Lamps On Reminder . . . . . . . . . . 113
Cruise Control Light . . . . . . . . . . 113
Information Displays
Driver Information Center (DIC) . . . . . . . . . . . . . . . . 113
Vehicle Messages
Vehicle Messages . . . . . . . . . . . . 116
Battery Voltage and ChargingMessages . . . . . . . . . . . . . . . . . . . 117
Brake System Messages . . . . . 117
Compass Messages . . . . . . . . . . 117
Cruise Control Messages . . . . . 117
Door Ajar Messages . . . . . . . . . . 117
Engine Cooling System Messages . . . . . . . . . . . . . . . . . . . 118
Engine Oil Messages . . . . . . . . . 118
Engine Power Messages . . . . . 119
Fuel System Messages . . . . . . . 119
Key and Lock Messages . . . . . . 119
Object Detection System Messages . . . . . . . . . . . . . . . . . . . 119
Ride Control System Messages . . . . . . . . . . . . . . . . . . . 120
Airbag System Messages . . . . 121
Security Messages . . . . . . . . . . . 121
Service Vehicle Messages . . . . 122
Tire Messages . . . . . . . . . . . . . . . . 122
Transmission Messages . . . . . . 122
Vehicle Reminder Messages . . . . . . . . . . . . . . . . . . . 123
Vehicle Personalization
Vehicle Personalization . . . . . . . 123
Page 100 of 327
Chevrolet Equinox Owner Manual (GMNA-Localizing-U.S./Canada/Mexico-
9918169) - 2017 - CRC - 3/23/16
Instruments and Controls 99
Clock
The infotainment system controls
are used to access the time and
date settings through the menu
system. See“Using the System” in
the infotainment manual.
Setting the Clock Using the
Faceplate
To set the time and date:
1. Turn the infotainment system on.
2. Press the CONFIG button and select Time and Date, or press
the
Hbutton.
3. Select Set Time or Set Date.
4. Turn the MENU/SEL knob to adjust the highlighted value.
5. Press the MENU/SEL knob to select the next value. 6. To save the settings and return
to the Time and Date menu,
press
EBACK.
To set the 12/24 hour format: 1. Turn the infotainment system on.
2. Press the CONFIG button and select Time and Date, or press
the
Hbutton.
3. Highlight 12 hr/24 hr Format.
4. Press the MENU/SEL knob and select the 12 Hour or 24
Hour display format.
Setting the Clock Using the
Touchscreen
If Automatic Clock Update is
selected, Set Time and Set Date will
not be available. To set the time and date:
1. Touch CONFIG.
2. Touch Time and Date.
3. Touch Set Time or Set Date.
4. Touch + or −to decrease or
increase the Hours and
Minutes, or Year, Month,
and Day.
5. Touch Back to return to the previous screen.
12/24 HR Format : Touch 12 Hour
for standard time; touch 24 Hour for
military time.
Page 125 of 327
Chevrolet Equinox Owner Manual (GMNA-Localizing-U.S./Canada/Mexico-
9918169) - 2017 - CRC - 3/23/16
124 Instruments and Controls
.Radio Settings
. Phone Settings
. Navigation Settings
. Display Settings
. Vehicle Settings
Each menu is detailed in the
following information.
Languages
Select Language, then select from
the available language(s).
Time and Date
Manually set the time and date. See
Clock 099.
Radio Settings
Select and depending on the radio
the following may display:
.
Auto Volume
. Gracenote Options
. XM Channel Art
. Max Startup Volume
. Number of Favorites Pages
. RDS Options .
XM Categories
. Software Versions Menu
Auto Volume
This feature adjusts the volume to
minimize the effects of unwanted
background noise that can result
from changing road surfaces, driving
speeds, or open windows. This
feature works best at lower volume
settings where background noise is
typically louder than the sound
system volume.
Select Off, Low, Medium, or High.
Gracenote Options
Select and the following may
display:
. Normalization
Normalization
This feature improves voice
recognition and media groupings.
See “USB,” “Auxiliary Devices,” and
“Bluetooth Audio” in the infotainment
manual.
Select to enable or disable. XM Channel Art
This feature turns the XM Audio
page background on the XM
Channel display on and off.
Select to enable or disable.
Max Startup Volume
This feature sets the maximum
startup volume. If the vehicle is
started and the volume is greater
than this level, the volume is
adjusted to this level.
Select + or
−to increase or
decrease the volume.
Number of Favorite Pages
Select to set the number of favorites
to display.
Select the desired number.
RDS Options
Select and the following may
display:
. RDS
. Text Scroll Freeze
. RDS Text
Page 135 of 327
Chevrolet Equinox Owner Manual (GMNA-Localizing-U.S./Canada/Mexico-
9918169) - 2017 - CRC - 3/23/16
134 Lighting
Daytime Running
Lamps (DRL)
DRL can make it easier for others to
see the front of your vehicle during
the day.
The low-beam headlamps or
dedicated DRL, if equipped, come
on at a reduced brightness in
daylight when the following
conditions are met:
.The ignition is on.
. The exterior lamp control is
in AUTO.
. The transmission is not in
P (Park).
. The light sensor determines it is
daytime.
. The parking brake is released.
Fully functional DRL are required on
all vehicles first sold in Canada.
When the DRL are on, the taillamps,
sidemarker, instrument panel lights,
and other lamps will not be on. The
instrument cluster will be lit. When the exterior lamp control is
turned to
5, the low-beam
headlamps come on. The other
lamps that come on with the
headlamps will also come on.
To idle your vehicle with the DRL
off, move the shift lever to P (Park).
The DRL will stay off until the shift
lever is moved out of the P (Park)
position.
For vehicles first sold in the United
States or Mexico, the DRL can also
be turned off by turning the lamp
control counterclockwise. The DRL
will stay off until the next ignition
cycle.
The regular headlamp system
should be turned on when needed.
Automatic Headlamp
System
When it is dark enough outside, the
headlamps come on automatically.
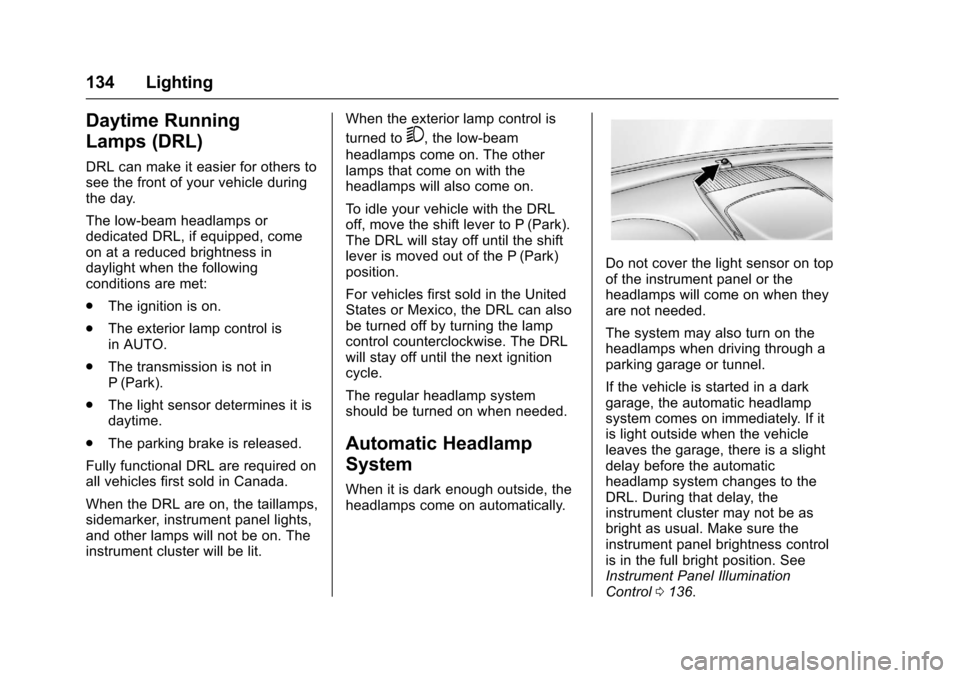
Do not cover the light sensor on top
of the instrument panel or the
headlamps will come on when they
are not needed.
The system may also turn on the
headlamps when driving through a
parking garage or tunnel.
If the vehicle is started in a dark
garage, the automatic headlamp
system comes on immediately. If it
is light outside when the vehicle
leaves the garage, there is a slight
delay before the automatic
headlamp system changes to the
DRL. During that delay, the
instrument cluster may not be as
bright as usual. Make sure the
instrument panel brightness control
is in the full bright position. See
Instrument Panel Illumination
Control 0136.
Page 137 of 327
Chevrolet Equinox Owner Manual (GMNA-Localizing-U.S./Canada/Mexico-
9918169) - 2017 - CRC - 3/23/16
136 Lighting
The parking lamps or low-beam
headlamps must be on to use the
fog lamps.
The fog lamps will go off whenever
the high-beam headlamps are
turned on. When the high-beam
headlamps are turned off, the fog
lamps will come on again.
Some localities have laws that
require the headlamps to be on
along with the fog lamps.Interior Lighting
Instrument Panel
Illumination Control
This control is located on the
instrument panel, to the left of the
steering column.
D:Turn clockwise or
counterclockwise to brighten or dim
the lights.
Dome Lamps
There are front and rear dome
lamps.
The dome lamp controls are located
in the overhead console. To change
the settings, press the following:
*: Turns the lamps off, even when
a door is open.
1: The lamps come on
automatically when a door is
opened.
+: Turns the dome lamps on.
The dome lamps can also be turned
on and off by pressing the buttons
next to the lamps.
Reading Lamps
The reading lamps are located on
the overhead console. These lamps
come on automatically when any
door is opened.
For manual operation, press the
button next to each lamp to turn it
on or off.
Page 141 of 327
Chevrolet Equinox Owner Manual (GMNA-Localizing-U.S./Canada/Mexico-
9918169) - 2017 - CRC - 3/23/16
140 Climate Controls
Climate Controls
Climate Control Systems
Climate Control Systems . . . . . 140
Automatic Climate ControlSystem . . . . . . . . . . . . . . . . . . . . . . 142
Air Vents
Air Vents . . . . . . . . . . . . . . . . . . . . . 145
Maintenance
Passenger Compartment AirFilter . . . . . . . . . . . . . . . . . . . . . . . . 145
Climate Control Systems
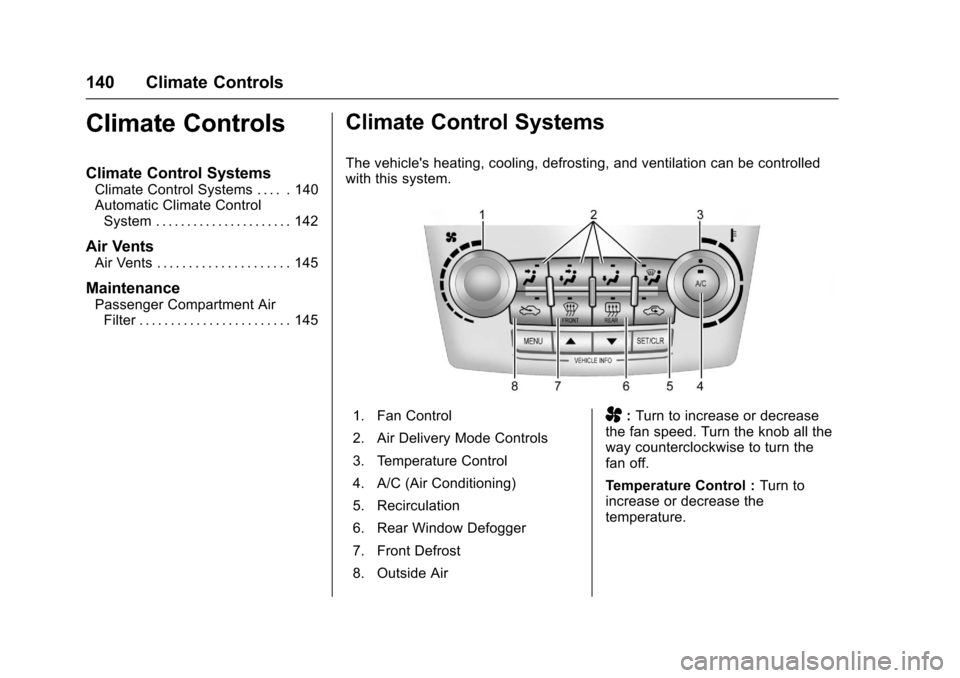
The vehicle's heating, cooling, defrosting, and ventilation can be controlled
with this system.
1. Fan Control
2. Air Delivery Mode Controls
3. Temperature Control
4. A/C (Air Conditioning)
5. Recirculation
6. Rear Window Defogger
7. Front Defrost
8. Outside AirA: Turn to increase or decrease
the fan speed. Turn the knob all the
way counterclockwise to turn the
fan off.
Temperature Control : Turn to
increase or decrease the
temperature.
Page 192 of 327
Chevrolet Equinox Owner Manual (GMNA-Localizing-U.S./Canada/Mexico-
9918169) - 2017 - CRC - 3/23/16
Driving and Operating 191
Caution
Do not use fuel containing
methanol. It can corrode metal
parts in the fuel system and also
damage plastic and rubber parts.
That damage would not be
covered under the vehicle
warranty.
Filling the Tank
{Warning
Fuel vapors and fuel fires burn
violently and can cause injury or
death.. To help avoid injuries to you
and others, read and follow
all the instructions on the
fuel pump island.
. Turn off the engine when
refueling.
. Keep sparks, flames, and
smoking materials away
from fuel.
(Continued)
Warning (Continued)
.Do not leave the fuel pump
unattended.
. Do not use a cell phone
while refueling.
. Do not re-enter the vehicle
while pumping fuel.
. Keep children away from
the fuel pump and never let
children pump fuel.
. Fuel can spray out if the fuel
cap is opened too quickly.
This spray can happen if the
tank is nearly full, and is
more likely in hot weather.
Open the fuel cap slowly
and wait for any hiss noise
to stop, then unscrew the
cap all the way.
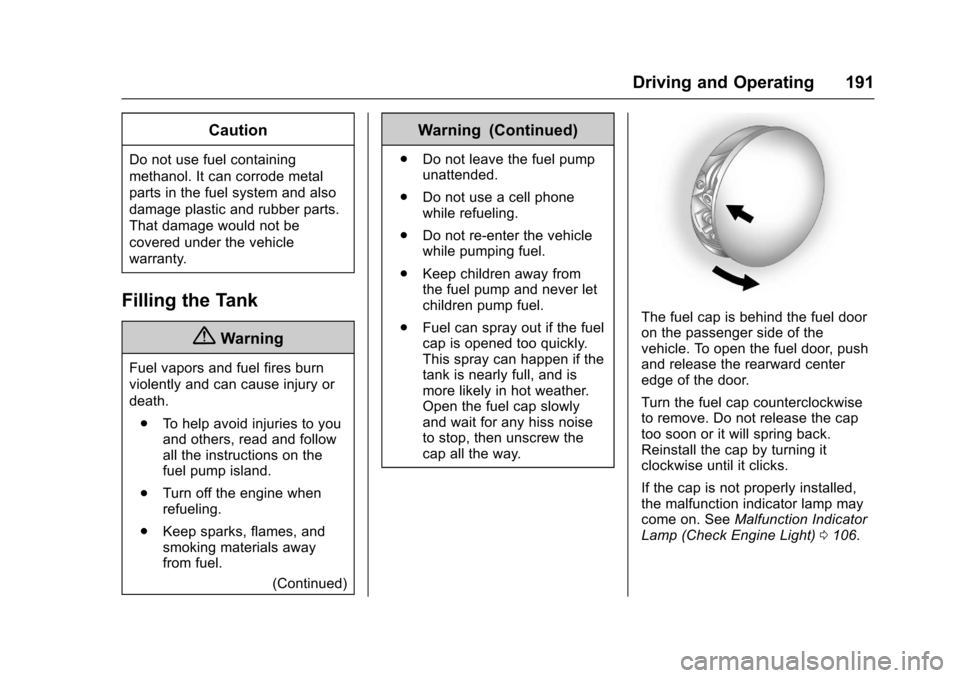
The fuel cap is behind the fuel door
on the passenger side of the
vehicle. To open the fuel door, push
and release the rearward center
edge of the door.
Turn the fuel cap counterclockwise
to remove. Do not release the cap
too soon or it will spring back.
Reinstall the cap by turning it
clockwise until it clicks.
If the cap is not properly installed,
the malfunction indicator lamp may
come on. See Malfunction Indicator
Lamp (Check Engine Light) 0106.
Page 217 of 327
Chevrolet Equinox Owner Manual (GMNA-Localizing-U.S./Canada/Mexico-
9918169) - 2017 - CRC - 3/23/16
216 Vehicle Care
Caution
In cold weather, water can freeze
and crack the engine, radiator,
heater core, and other parts. Use
the recommended coolant and
the proper coolant mixture.
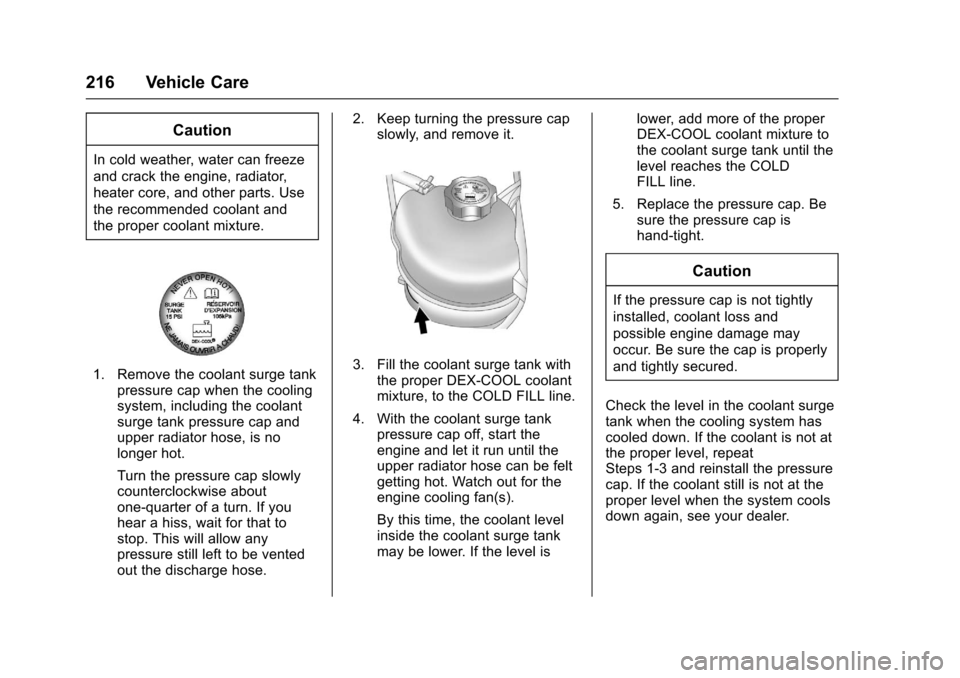
1. Remove the coolant surge tankpressure cap when the cooling
system, including the coolant
surge tank pressure cap and
upper radiator hose, is no
longer hot.
Turn the pressure cap slowly
counterclockwise about
one-quarter of a turn. If you
hear a hiss, wait for that to
stop. This will allow any
pressure still left to be vented
out the discharge hose. 2. Keep turning the pressure cap
slowly, and remove it.3. Fill the coolant surge tank withthe proper DEX-COOL coolant
mixture, to the COLD FILL line.
4. With the coolant surge tank pressure cap off, start the
engine and let it run until the
upper radiator hose can be felt
getting hot. Watch out for the
engine cooling fan(s).
By this time, the coolant level
inside the coolant surge tank
may be lower. If the level is lower, add more of the proper
DEX-COOL coolant mixture to
the coolant surge tank until the
level reaches the COLD
FILL line.
5. Replace the pressure cap. Be sure the pressure cap is
hand-tight.
Caution
If the pressure cap is not tightly
installed, coolant loss and
possible engine damage may
occur. Be sure the cap is properly
and tightly secured.
Check the level in the coolant surge
tank when the cooling system has
cooled down. If the coolant is not at
the proper level, repeat
Steps 1-3 and reinstall the pressure
cap. If the coolant still is not at the
proper level when the system cools
down again, see your dealer.