2017 CHEVROLET EQUINOX height
[x] Cancel search: heightPage 11 of 327
Chevrolet Equinox Owner Manual (GMNA-Localizing-U.S./Canada/Mexico-
9918169) - 2017 - CRC - 3/23/16
10 In Brief
Windows
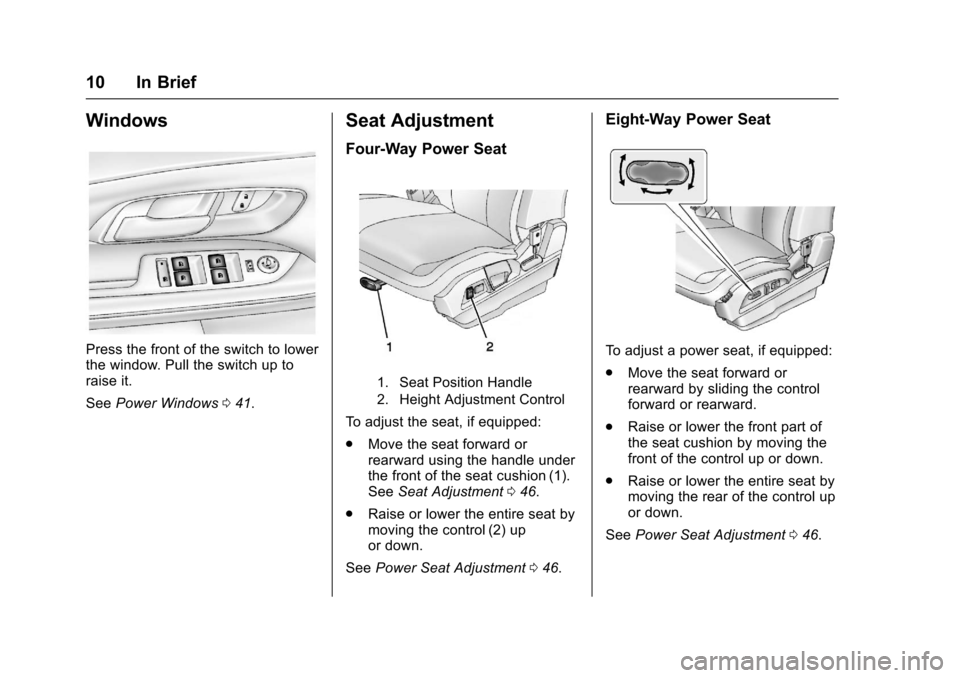
Press the front of the switch to lower
the window. Pull the switch up to
raise it.
SeePower Windows 041.
Seat Adjustment
Four-Way Power Seat
1. Seat Position Handle
2. Height Adjustment Control
To adjust the seat, if equipped:
.
Move the seat forward or
rearward using the handle under
the front of the seat cushion (1).
See Seat Adjustment 046.
. Raise or lower the entire seat by
moving the control (2) up
or down.
See Power Seat Adjustment 046.
Eight-Way Power Seat
To adjust a power seat, if equipped:
.
Move the seat forward or
rearward by sliding the control
forward or rearward.
. Raise or lower the front part of
the seat cushion by moving the
front of the control up or down.
. Raise or lower the entire seat by
moving the rear of the control up
or down.
See Power Seat Adjustment 046.
Page 13 of 327
Chevrolet Equinox Owner Manual (GMNA-Localizing-U.S./Canada/Mexico-
9918169) - 2017 - CRC - 3/23/16
12 In Brief
SeeReclining Seatbacks 048.
Memory Features
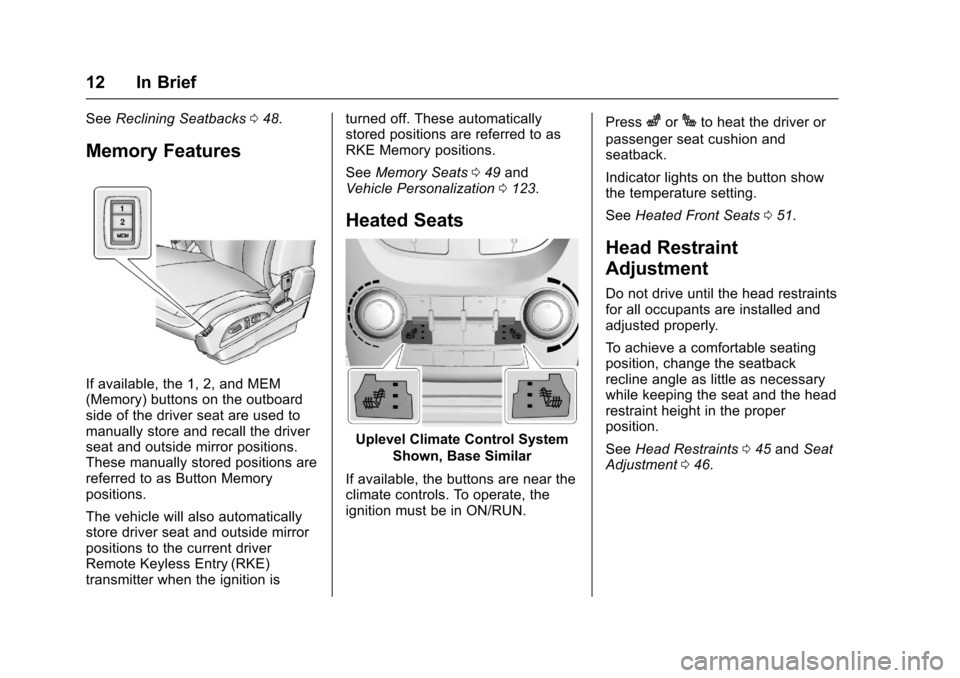
If available, the 1, 2, and MEM
(Memory) buttons on the outboard
side of the driver seat are used to
manually store and recall the driver
seat and outside mirror positions.
These manually stored positions are
referred to as Button Memory
positions.
The vehicle will also automatically
store driver seat and outside mirror
positions to the current driver
Remote Keyless Entry (RKE)
transmitter when the ignition is turned off. These automatically
stored positions are referred to as
RKE Memory positions.
See
Memory Seats 049 and
Vehicle Personalization 0123.
Heated Seats
Uplevel Climate Control System
Shown, Base Similar
If available, the buttons are near the
climate controls. To operate, the
ignition must be in ON/RUN. Press
zorJto heat the driver or
passenger seat cushion and
seatback.
Indicator lights on the button show
the temperature setting.
See Heated Front Seats 051.
Head Restraint
Adjustment
Do not drive until the head restraints
for all occupants are installed and
adjusted properly.
To achieve a comfortable seating
position, change the seatback
recline angle as little as necessary
while keeping the seat and the head
restraint height in the proper
position.
See Head Restraints 045 and Seat
Adjustment 046.
Page 35 of 327
Chevrolet Equinox Owner Manual (GMNA-Localizing-U.S./Canada/Mexico-
9918169) - 2017 - CRC - 3/23/16
34 Keys, Doors, and Windows
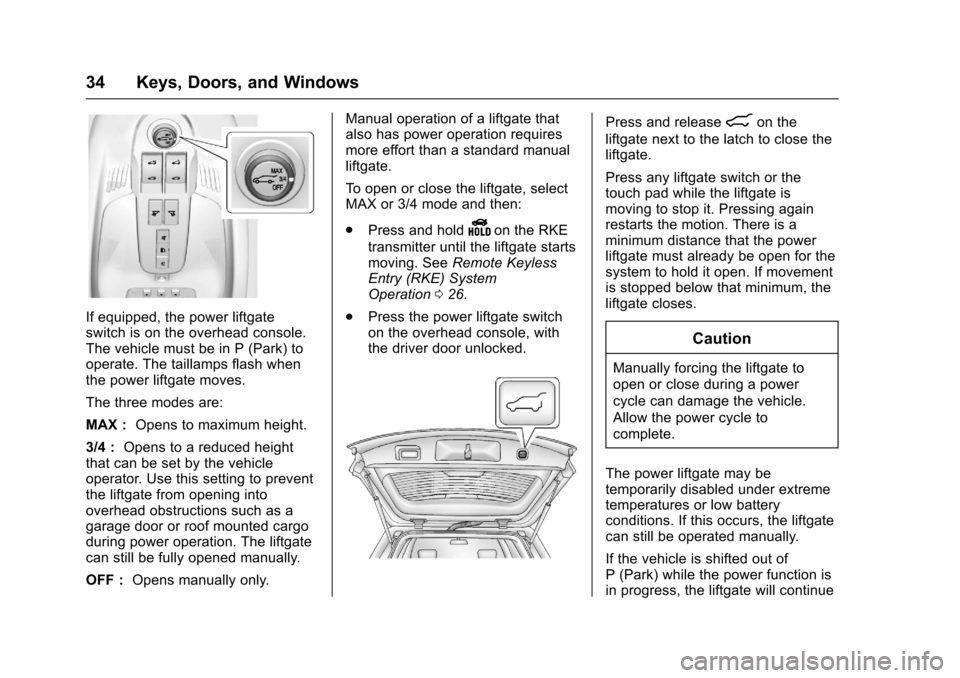
If equipped, the power liftgate
switch is on the overhead console.
The vehicle must be in P (Park) to
operate. The taillamps flash when
the power liftgate moves.
The three modes are:
MAX :Opens to maximum height.
3/4 : Opens to a reduced height
that can be set by the vehicle
operator. Use this setting to prevent
the liftgate from opening into
overhead obstructions such as a
garage door or roof mounted cargo
during power operation. The liftgate
can still be fully opened manually.
OFF : Opens manually only. Manual operation of a liftgate that
also has power operation requires
more effort than a standard manual
liftgate.
To open or close the liftgate, select
MAX or 3/4 mode and then:
.
Press and hold
Yon the RKE
transmitter until the liftgate starts
moving. See Remote Keyless
Entry (RKE) System
Operation 026.
. Press the power liftgate switch
on the overhead console, with
the driver door unlocked.
Press and release8on the
liftgate next to the latch to close the
liftgate.
Press any liftgate switch or the
touch pad while the liftgate is
moving to stop it. Pressing again
restarts the motion. There is a
minimum distance that the power
liftgate must already be open for the
system to hold it open. If movement
is stopped below that minimum, the
liftgate closes.
Caution
Manually forcing the liftgate to
open or close during a power
cycle can damage the vehicle.
Allow the power cycle to
complete.
The power liftgate may be
temporarily disabled under extreme
temperatures or low battery
conditions. If this occurs, the liftgate
can still be operated manually.
If the vehicle is shifted out of
P (Park) while the power function is
in progress, the liftgate will continue
Page 36 of 327
Chevrolet Equinox Owner Manual (GMNA-Localizing-U.S./Canada/Mexico-
9918169) - 2017 - CRC - 3/23/16
Keys, Doors, and Windows 35
to completion. If the vehicle is
accelerated before the liftgate has
completed moving, the liftgate may
stop or reverse direction. Check for
Driver Information Center (DIC)
messages and make sure the
liftgate is closed and latched before
driving.
Falling Liftgate Detection
The power liftgate will automatically
close if the support strut has lost
pressure. See your dealer for
service before using the power
liftgate.
Obstacle Detection Features
If the liftgate encounters an obstacle
during a power open or close cycle,
the liftgate will automatically reverse
direction and move a short distance
away from the obstacle. After
removing the obstruction, the power
liftgate operation can be used again.
If the liftgate encounters multiple
obstacles on the same power cycle,
the power function will deactivate.
After removing the obstructions,manually close the liftgate which will
allow normal power operation
functions to resume.
If the vehicle is locked while the
liftgate is closing, and an obstacle is
encountered that prevents the
liftgate from completely closing, the
horn will sound as an alert that the
liftgate did not close.
Pinch sensors are located on the
side edges of the liftgate. If an
object is caught between the liftgate
and the vehicle and presses against
this sensor, the liftgate will reverse
direction and stop at the first
position at which the liftgate can
hold open. The liftgate will remain
open until it is activated again or
closed manually.
Setting the 3/4 Mode
To change the position the liftgate
stops at when opening:
1. Select MAX or 3/4 mode and open the liftgate. 2. Stop the liftgate movement at
the desired height by pressing
any liftgate switch. Manually
adjust the liftgate position if
needed.
3. Press and hold
8on the
liftgate next to the latch until
the turn signals flash and a
beep sounds to indicate that
the new setting is recorded.
When power opened with the 3/4
mode selected, the liftgate stops at
the new set position.
If there is no audible and visual
feedback when setting the
intermediate stop position, the
liftgate height is being set below the
3/4 open height minimum
(approximately 1.5 m or 5 ft). The
liftgate cannot be set below that
minimum and the new setting will
not be recorded.
Page 46 of 327
Chevrolet Equinox Owner Manual (GMNA-Localizing-U.S./Canada/Mexico-
9918169) - 2017 - CRC - 3/23/16
Seats and Restraints 45
Head Restraints
Front Seats
The vehicle's front seats have head
restraints in the outboard seating
positions.
{Warning
With head restraints that are not
installed and adjusted properly,
there is a greater chance that
occupants will suffer a neck/
spinal injury in a crash. Do not
drive until the head restraints for
all occupants are installed and
adjusted properly.
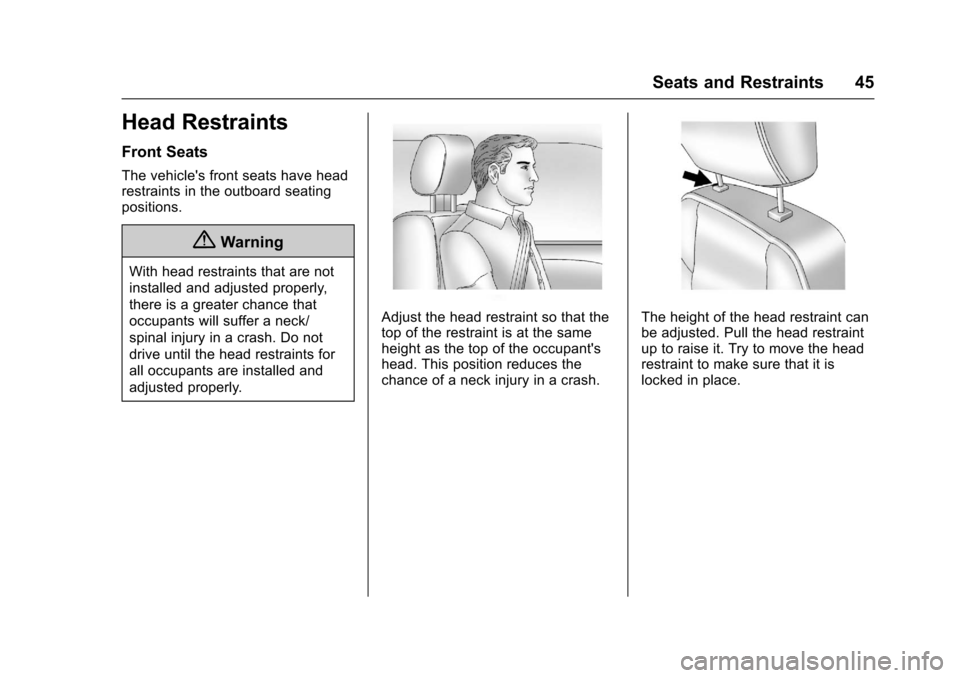
Adjust the head restraint so that the
top of the restraint is at the same
height as the top of the occupant's
head. This position reduces the
chance of a neck injury in a crash.The height of the head restraint can
be adjusted. Pull the head restraint
up to raise it. Try to move the head
restraint to make sure that it is
locked in place.
Page 47 of 327
Chevrolet Equinox Owner Manual (GMNA-Localizing-U.S./Canada/Mexico-
9918169) - 2017 - CRC - 3/23/16
46 Seats and Restraints
To lower the head restraint, press
the button, located on the top of the
seatback, and push the head
restraint down. Try to move the
head restraint after the button is
released to make sure that it is
locked in place.
The front seat outboard head
restraints are not removable.
Rear Seats
The vehicle's rear seat has head
restraints in the outboard seating
positions that cannot be adjusted.
Rear outboard head restraints are
not removable.
Front Seats
Seat Adjustment
{Warning
You can lose control of the
vehicle if you try to adjust a driver
seat while the vehicle is moving.
Adjust the driver seat only when
the vehicle is not moving.
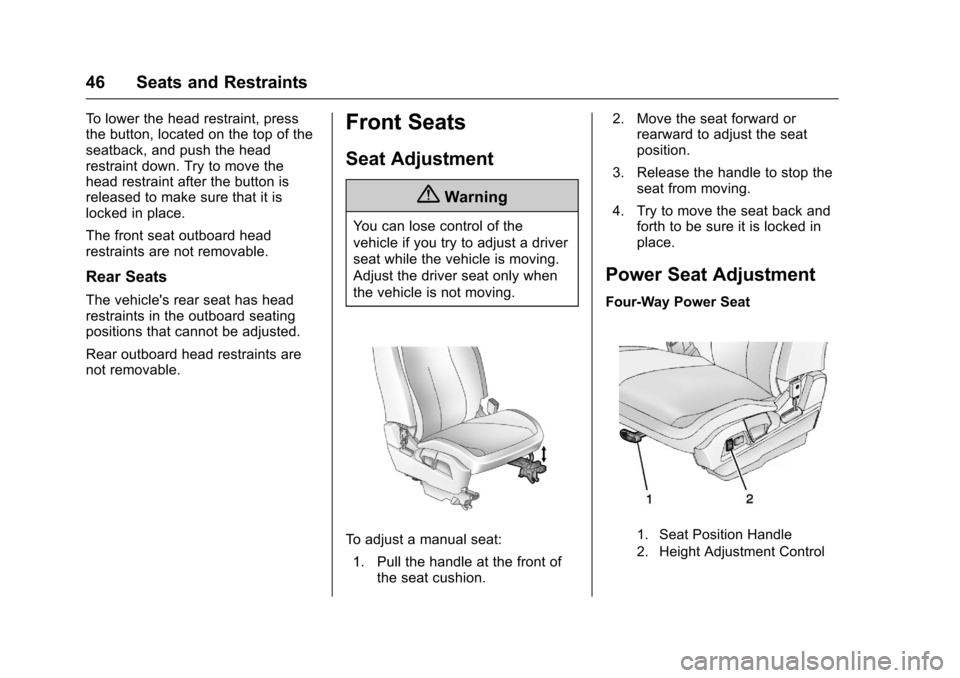
To adjust a manual seat:1. Pull the handle at the front of the seat cushion. 2. Move the seat forward or
rearward to adjust the seat
position.
3. Release the handle to stop the seat from moving.
4. Try to move the seat back and forth to be sure it is locked in
place.
Power Seat Adjustment
Four-Way Power Seat
1. Seat Position Handle
2. Height Adjustment Control
Page 57 of 327
Chevrolet Equinox Owner Manual (GMNA-Localizing-U.S./Canada/Mexico-
9918169) - 2017 - CRC - 3/23/16
56 Seats and Restraints
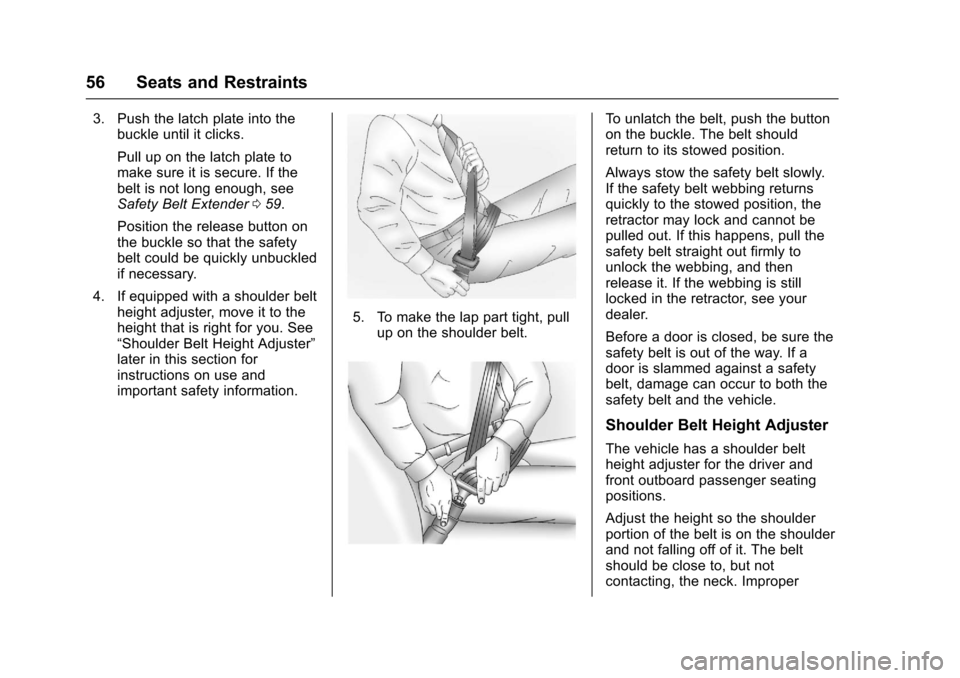
3. Push the latch plate into thebuckle until it clicks.
Pull up on the latch plate to
make sure it is secure. If the
belt is not long enough, see
Safety Belt Extender 059.
Position the release button on
the buckle so that the safety
belt could be quickly unbuckled
if necessary.
4. If equipped with a shoulder belt height adjuster, move it to the
height that is right for you. See
“Shoulder Belt Height Adjuster”
later in this section for
instructions on use and
important safety information.
5. To make the lap part tight, pullup on the shoulder belt.
To unlatch the belt, push the button
on the buckle. The belt should
return to its stowed position.
Always stow the safety belt slowly.
If the safety belt webbing returns
quickly to the stowed position, the
retractor may lock and cannot be
pulled out. If this happens, pull the
safety belt straight out firmly to
unlock the webbing, and then
release it. If the webbing is still
locked in the retractor, see your
dealer.
Before a door is closed, be sure the
safety belt is out of the way. If a
door is slammed against a safety
belt, damage can occur to both the
safety belt and the vehicle.
Shoulder Belt Height Adjuster
The vehicle has a shoulder belt
height adjuster for the driver and
front outboard passenger seating
positions.
Adjust the height so the shoulder
portion of the belt is on the shoulder
and not falling off of it. The belt
should be close to, but not
contacting, the neck. Improper
Page 58 of 327
Chevrolet Equinox Owner Manual (GMNA-Localizing-U.S./Canada/Mexico-
9918169) - 2017 - CRC - 3/23/16
Seats and Restraints 57
shoulder belt height adjustment
could reduce the effectiveness of
the safety belt in a crash. SeeHow
to Wear Safety Belts Properly 054.
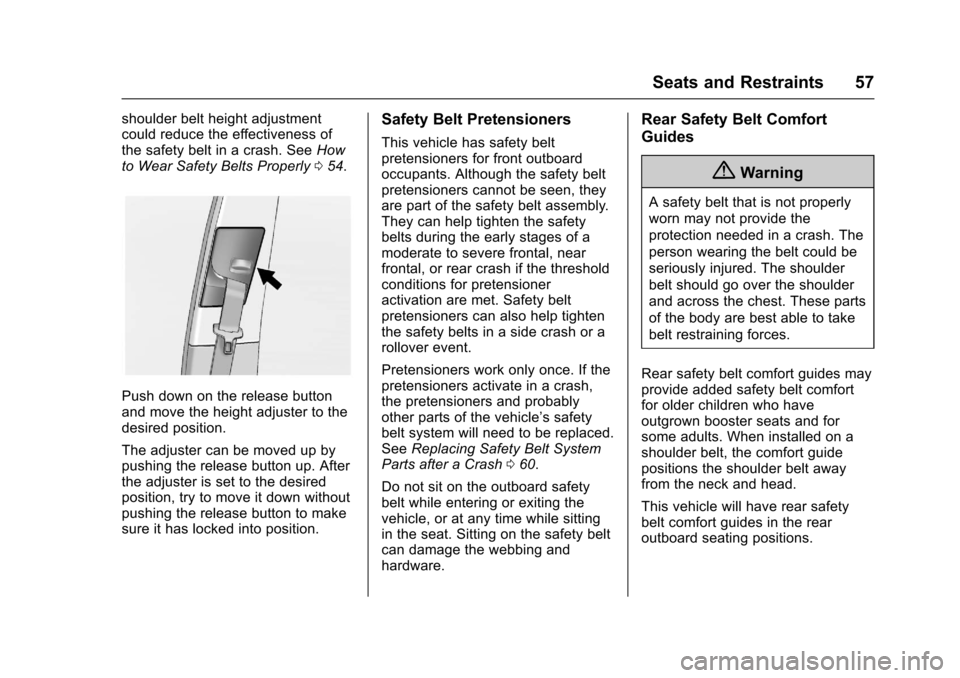
Push down on the release button
and move the height adjuster to the
desired position.
The adjuster can be moved up by
pushing the release button up. After
the adjuster is set to the desired
position, try to move it down without
pushing the release button to make
sure it has locked into position.
Safety Belt Pretensioners
This vehicle has safety belt
pretensioners for front outboard
occupants. Although the safety belt
pretensioners cannot be seen, they
are part of the safety belt assembly.
They can help tighten the safety
belts during the early stages of a
moderate to severe frontal, near
frontal, or rear crash if the threshold
conditions for pretensioner
activation are met. Safety belt
pretensioners can also help tighten
the safety belts in a side crash or a
rollover event.
Pretensioners work only once. If the
pretensioners activate in a crash,
the pretensioners and probably
other parts of the vehicle’s safety
belt system will need to be replaced.
See Replacing Safety Belt System
Parts after a Crash 060.
Do not sit on the outboard safety
belt while entering or exiting the
vehicle, or at any time while sitting
in the seat. Sitting on the safety belt
can damage the webbing and
hardware.
Rear Safety Belt Comfort
Guides
{Warning
A safety belt that is not properly
worn may not provide the
protection needed in a crash. The
person wearing the belt could be
seriously injured. The shoulder
belt should go over the shoulder
and across the chest. These parts
of the body are best able to take
belt restraining forces.
Rear safety belt comfort guides may
provide added safety belt comfort
for older children who have
outgrown booster seats and for
some adults. When installed on a
shoulder belt, the comfort guide
positions the shoulder belt away
from the neck and head.
This vehicle will have rear safety
belt comfort guides in the rear
outboard seating positions.