2017 CHEVROLET COLORADO length
[x] Cancel search: lengthPage 71 of 419

Chevrolet Colorado Owner Manual (GMNA-Localizing-U.S./Canada/Mexico-10122675) - 2017 - crc - 8/22/16
70 Seats and Restraints
Child Restraints
Older Children
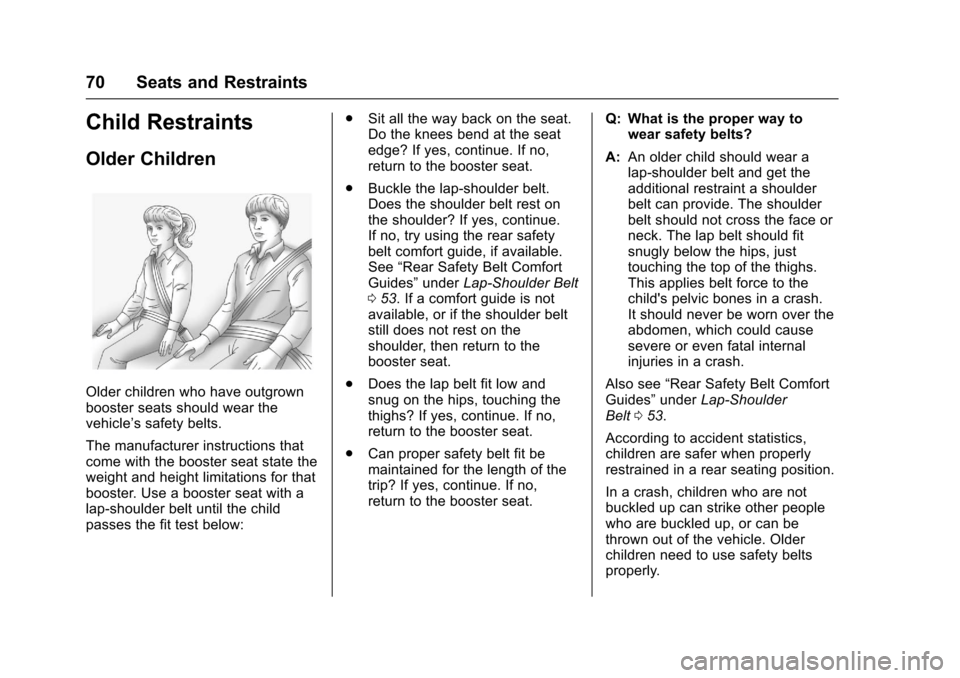
Older children who have outgrownbooster seats should wear thevehicle’ssafetybelts.
The manufacturer instructions thatcome with the booster seat state theweight and height limitations for thatbooster. Use a booster seat with alap-shoulder belt until the childpasses the fit test below:
.Sit all the way back on the seat.Do the knees bend at the seatedge? If yes, continue. If no,return to the booster seat.
.Buckle the lap-shoulder belt.Does the shoulder belt rest onthe shoulder? If yes, continue.If no, try using the rear safetybelt comfort guide, if available.See“Rear Safety Belt ComfortGuides”underLap-Shoulder Belt053.Ifacomfortguideisnotavailable, or if the shoulder beltstill does not rest on theshoulder, then return to thebooster seat.
.Does the lap belt fit low andsnug on the hips, touching thethighs? If yes, continue. If no,return to the booster seat.
.Can proper safety belt fit bemaintained for the length of thetrip? If yes, continue. If no,return to the booster seat.
Q: What is the proper way towear safety belts?
A:An older child should wear alap-shoulder belt and get theadditional restraint a shoulderbelt can provide. The shoulderbelt should not cross the face orneck. The lap belt should fitsnugly below the hips, justtouching the top of the thighs.This applies belt force to thechild's pelvic bones in a crash.It should never be worn over theabdomen, which could causesevere or even fatal internalinjuries in a crash.
Also see“Rear Safety Belt ComfortGuides”underLap-ShoulderBelt053.
According to accident statistics,children are safer when properlyrestrained in a rear seating position.
In a crash, children who are notbuckled up can strike other peoplewho are buckled up, or can bethrown out of the vehicle. Olderchildren need to use safety beltsproperly.
Page 85 of 419

Chevrolet Colorado Owner Manual (GMNA-Localizing-U.S./Canada/Mexico-10122675) - 2017 - crc - 8/22/16
84 Seats and Restraints
3.4. Adjust the top tether to itsfull length and attach thetop tether hook to theanchor. Make sure thatyou secure the top tetherto the top tether anchorand not to the seatbacklatch.
3.5. Push rearward on theseatback until it locks intoits upright position. Pushand pull on the seatbackto make sure it is securedproperly.
4. Attach and tighten the lowerattachments to the loweranchors. If the child restraintdoes not have lowerattachments or the desiredseating position does not havelower anchors, secure the childrestraint with the safety beltsand the top tether. Refer toyour child restraintmanufacturer instructions andSecuring Child Restraints (Withthe Safety Belt in the RearSeat)091orSecuring ChildRestraints (With the Safety Beltin the Front Seat)096.
5. Tighten the top tether.
6. Before placing a child in thechild restraint, make sure it issecurely held in place. Tocheck, grasp the child restraintat the LATCH path and attemptto move it side to side andback and forth. There shouldbe no more than 2.5 cm (1 in) ofmovement for properinstallation.
Extended Cab with Rear Seats
{Warning
Never secure a rear-facing or
forward-facing child restraint in
the left rear seating position in an
extended cab model. This seating
position is not suitable for child
restraint installation. The seat
cushion is too short to properly
support a rear-facing or
forward-facing child restraint.
Achildcouldbeseriouslyinjured
or killed in a sudden stop or
crash.
(Continued)
Warning (Continued)
Aboosterseatcanbeusedinthe
left or right rear seating position if
the base of the booster seat fits
on the seat cushion and does not
extend past the front edge. If it
does, it should be installed in the
right rear seating position using
the seat cushion extension. Only
install a booster seat in either rear
seating position if it can be
properly installed according to the
child restraint manufacturer’s
instructions.
Arear-facingorforward-facing
child restraint can be installed in
the right rear seating position
using the seat cushion extension
in an extended cab model. Never
install a rear-facing or
forward-facing child restraint in
the right rear seating position
without the seat cushion
extension.
Page 87 of 419

Chevrolet Colorado Owner Manual (GMNA-Localizing-U.S./Canada/Mexico-10122675) - 2017 - crc - 8/22/16
86 Seats and Restraints
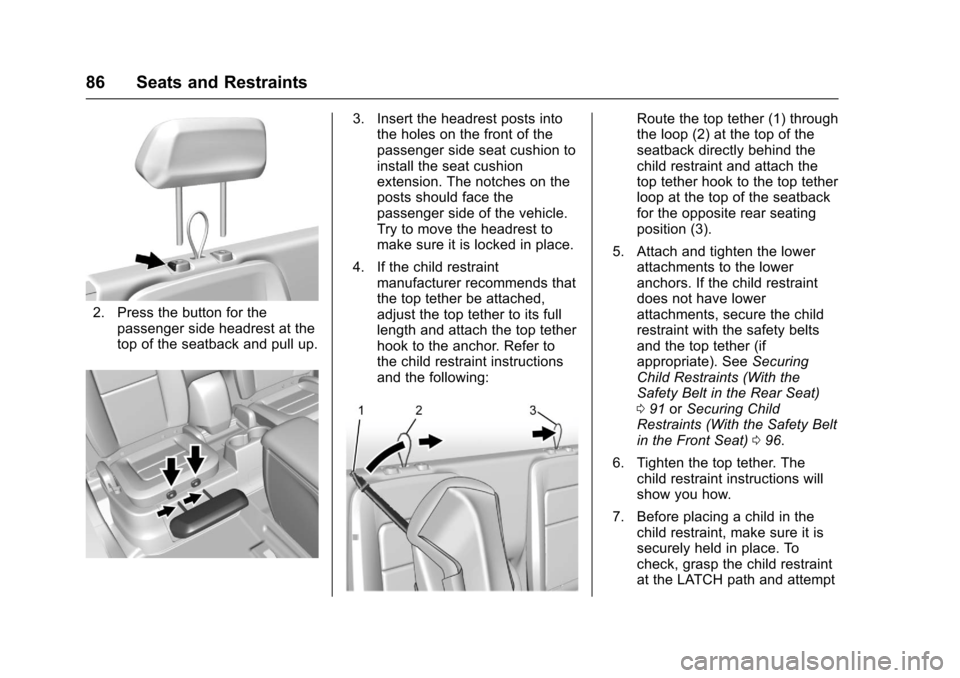
2. Press the button for thepassenger side headrest at thetop of the seatback and pull up.
3. Insert the headrest posts intothe holes on the front of thepassenger side seat cushion toinstall the seat cushionextension. The notches on theposts should face thepassenger side of the vehicle.Try to move the headrest tomake sure it is locked in place.
4. If the child restraintmanufacturer recommends thatthe top tether be attached,adjust the top tether to its fulllength and attach the top tetherhook to the anchor. Refer tothe child restraint instructionsand the following:
Route the top tether (1) throughthe loop (2) at the top of theseatback directly behind thechild restraint and attach thetop tether hook to the top tetherloop at the top of the seatbackfor the opposite rear seatingposition (3).
5. Attach and tighten the lowerattachments to the loweranchors. If the child restraintdoes not have lowerattachments, secure the childrestraint with the safety beltsand the top tether (ifappropriate). SeeSecuringChild Restraints (With theSafety Belt in the Rear Seat)091orSecuring ChildRestraints (With the Safety Beltin the Front Seat)096.
6. Tighten the top tether. Thechild restraint instructions willshow you how.
7. Before placing a child in thechild restraint, make sure it issecurely held in place. Tocheck, grasp the child restraintat the LATCH path and attempt
Page 94 of 419

Chevrolet Colorado Owner Manual (GMNA-Localizing-U.S./Canada/Mexico-10122675) - 2017 - crc - 8/22/16
Seats and Restraints 93
3. Insert the headrest posts intothe holes on the front of thepassenger side seat cushion toinstall the seat cushionextension. The notches on thepost should face the passengerside of the vehicle. Try to movethe headrest to make sure it islocked in place.
4. Put the child restraint onthe seat.
When installing a rear-facingchild restraint, move the frontseat all the way forward and tiltthe seatback forward toproperly install the childrestraint per the child restraintmanufacturer instructions. SeeSeat Adjustment046andReclining Seatbacks047.When a rear-facing childrestraint is installed properly,the front passenger seatcannot be used.
5. If the child restraintmanufacturer recommendsusing a top tether, adjust thetop tether to its full length andattach it to the top tether
anchor. Refer to theinstructions that came with thechild restraint and seeLowerAnchors and Tethers forChildren (LATCH System)077.
6. Pick up the latch plate, and runthe lap and shoulder portionsof the vehicle's safety beltthrough or around the restraint.The child restraint instructionswill show you how.
Tilt the latch plate to adjust thebelt if needed.
7. Push the latch plate into thebuckle until it clicks.
Position the release button onthe buckle, away from the childrestraint system, so that thesafety belt could be quicklyunbuckled if necessary.
Page 96 of 419

Chevrolet Colorado Owner Manual (GMNA-Localizing-U.S./Canada/Mexico-10122675) - 2017 - crc - 8/22/16
Seats and Restraints 95
Crew Cab
When using the lap-shoulder belt tosecure the child restraint in thisposition, follow the instructions thatcame with the child restraint and thefollowing instructions:
1. If the head restraint interfereswith the proper installation ofthe child restraint, the headrestraint may be removed. See“Head Restraint/HeadrestRemoval and Reinstallation”underLower Anchors andTe t h e r s f o r C h i l d r e n ( L AT C HSystem)077.
2. If the child restraintmanufacturer recommendsusing a top tether, adjust thetop tether to its full length andattach it to the top tetheranchor. Refer to theinstructions that came with thechild restraint and seeLowerAnchors and Tethers forChildren (LATCH System)077.
3. Put the child restraint onthe seat.
4. Pick up the latch plate, and runthe lap and shoulder portionsof the vehicle's safety beltthrough or around the restraint.The child restraint instructionswill show you how.
5. Push the latch plate into thebuckle until it clicks.
Position the release button onthe buckle, away from the childrestraint system, so that thesafety belt could be quicklyunbuckled if necessary.
6. Pull the shoulder belt all theway out of the retractor to setthe lock. When the retractorlock is set, the belt can betightened but not pulled out ofthe retractor.
Page 145 of 419

Chevrolet Colorado Owner Manual (GMNA-Localizing-U.S./Canada/Mexico-10122675) - 2017 - crc - 8/22/16
144 Instruments and Controls
Android Auto
This feature allows Android devicesto be connected to the infotainmentsystem through a USB port. See“Apple CarPlay and Android Auto”under“Phone”in the infotainmentmanual.
Select Off or On.
Manage Android Auto Devices
Select to manage Android devices.Android Auto must be on for thisfeature to be accessed. See“AppleCarPlay and Android Auto”under“Phone”in the infotainment manual.
Voice
Select and the following maydisplay:
.Confidence Threshold
.Prompt Length
.Audio Feedback Speed
.Display“What Can I Say?”Tips
Confidence Threshold
This feature allows the adjustmentof the sensitivity of the speechrecognition system.
Select Confirm More orConfirm Less.
Prompt Length
This feature adjusts the voiceprompt length.
Select Short or Long.
Audio Feedback Speed
This feature adjusts the audiofeedback speed.
Select Slow, Medium, or Fast.
Display“What Can I Say?”Tips
This feature gives voicecommand tips.
Select Off or On.
Display
Select and the following maydisplay:
.Mode
.Calibrate Touchscreen
.Turn Display Off
Mode
Select to change the displayscreen mode.
Select Auto, Day, or Night.
Calibrate Touchscreen
Select to calibrate the touchscreen,then follow the prompts.
Turn Display Off
Select to turn the display off. Touchanywhere on the display area or anyfaceplate button to turn thedisplay on.
Rear Camera
Select and the following maydisplay:
.Guidance Lines
Guidance Lines
Select to turn Off or On. SeeRearVision Camera (RVC)0261.
Return to Factory Settings
Select and the following maydisplay:
.Restore Vehicle Settings
.Clear All Private Data
.Restore Radio Settings
Page 187 of 419

Chevrolet Colorado Owner Manual (GMNA-Localizing-U.S./Canada/Mexico-10122675) - 2017 - crc - 8/22/16
186 Infotainment System
The access commands for playlists,artists, and genres are prohibitedafter the number of this type ofmedia exceeds 4,000.
The system will provide feedbackthe first time voice recognition isinitiated if it has become apparentthat any of these limits are reachedduring a device initializing process.
Voice Recognition for the
Phone
“Call
“Call
“Call
“Pair Phone”:Begins theBluetooth pairing process. Followinstructions on the radio display.
“Switch Phone”:Select a differentphone for outgoing calls.
“Vo i c e K e y p a d”:Begins a dialogto enter special numbers likeinternational numbers. The numberscan be entered in groups of digitswith each group of digits beingrepeated back by the system. If thegroup of digits is not correct, thecommand“Delete”will remove thelast group of digits and allow themto be re-entered. Once the entirenumber has been entered, thecommand“Call”will start dialing thenumber.
“Vo i c e M a i l”:Initiate a call to voicemail numbers.
Voice Recognition for OnStar
(If Equipped)
“OnStar”:Begin OnStar VoiceRecognition.
Bluetooth Speech Recognition
(If Equipped)
Voice Pass-Thru allows access tothe speech recognition commandson the cell phone. See your cellphone manufacturer’suserguidetosee if the cell phone supports thisfeature.
Activating this function will start theBluetooth Speech Recognition on aconnected phone.
The steering wheel controls areused to operate this function.
Press and holdgto activate.
Avoicesessionbeginssothatvoicecommands can be given to Siri®ormany other controls provided by thecell phone.
Press@to exit or pressito
close and return to the previousapplication prior to the start of VoicePass-Thru.
Page 238 of 419

Chevrolet Colorado Owner Manual (GMNA-Localizing-U.S./Canada/Mexico-10122675) - 2017 - crc - 8/22/16
Driving and Operating 237
Warning (Continued)
it overheat and cause a fire,property damage, electricshock, and injury.
.Do not operate the vehiclewith the heater cordpermanently attached to thevehicle. Possible heatercord and thermostatdamage could occur.
.While in use, do not let theheater cord touch vehicleparts or sharp edges. Neverclose the hood on theheater cord.
.Before starting the vehicle,unplug the cord, reattachthe cover to the plug, andsecurely fasten the cord.Keep the cord away fromany moving parts.
4. Before starting the engine, besure to unplug and store thecord as it was before to keep it
away from moving engineparts. If you do not, it could bedamaged.
The length of time the heater shouldremain plugged in depends onseveral factors. Ask a dealer in thearea where you will be parking thevehicle for the best advice on this.
Retained Accessory
Power (RAP)
The following vehicle accessoriescan be used for up to 10 minutesafter the engine is turned off:
.Audio System
.Power Windows
.OnStar System (if equipped)
These features work when the keyis in ON/RUN or ACC/ACCESSORY. Once the key isturned from ON/RUN to LOCK/OFF,the windows continue to work up to10 minutes or until any door isopened. The radio continues towork for up to 10 minutes or until thedriver door is opened.
Accessory Power Outlets (APOs)
The vehicle may have AccessoryPower Outlets (APOs) in severallocations. SeePower Outlets0107.
The APOs in the console or centerseat position are powered byRetained Accessory Power (RAP).They will continue to work for up to10 minutes after the key is turnedfrom ON/RUN to LOCK/OFF, or untilthe driver door is opened.
The APOs on the center stack comefrom the factory powered directlyfrom the vehicle battery, and supplyaccessory power at all times,regardless of ignition key position.
If electronic items are left pluggedinto these APOs for long periods oftime with the vehicle off, the vehiclebattery could be drained. Thevehicle may not start if the battery isallowed to drain for an extendedperiod of time.