2017 CHEVROLET COLORADO light
[x] Cancel search: lightPage 292 of 419

Chevrolet Colorado Owner Manual (GMNA-Localizing-U.S./Canada/Mexico-10122675) - 2017 - crc - 8/22/16
Vehicle Care 291
Do not remove the cap to check thefluid level or to top-off the fluid level.Remove the cap only whennecessary to add the proper fluiduntil the level reaches the MIN line.
Engine Air Cleaner/Filter
The engine air cleaner/filter is in theengine compartment on thepassenger side of the vehicle. SeeEngine CompartmentOverview0283.
When to Inspect the Engine Air
Cleaner/Filter
For intervals on changing andinspecting the engine air cleaner/filter, seeMaintenanceSchedule0366.
How to Inspect the Engine Air
Cleaner/Filter
Do not start the engine or have theengine running with the engine aircleaner/filter housing open. Beforeremoving the engine air cleaner/filter, make sure that the engine aircleaner/filter housing and nearbycomponents are free of dirt anddebris. Remove the engine air
cleaner/filter. Lightly tap and shakethe engine air cleaner/filter (awayfrom the vehicle), to release loosedust and dirt. Inspect the engine aircleaner/filter for damage, andreplace if damaged. Do not cleanthe engine air cleaner/filter orcomponents with water orcompressed air.
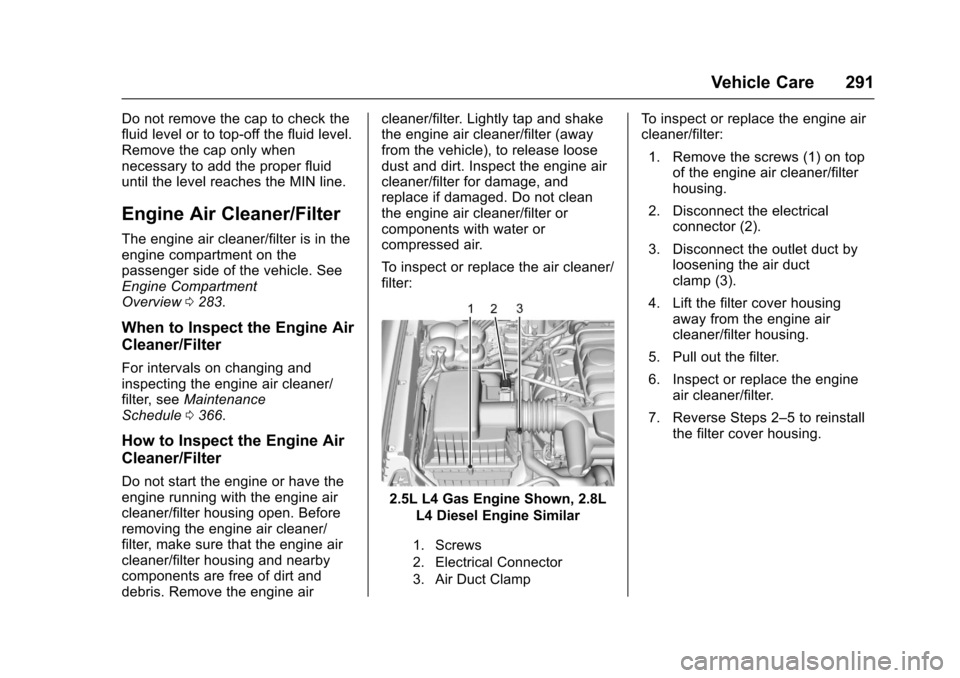
To i n s p e c t o r r e p l a c e t h e a i r c l e a n e r /filter:
2.5L L4 Gas Engine Shown, 2.8L
L4 Diesel Engine Similar
1. Screws
2. Electrical Connector
3. Air Duct Clamp
To i n s p e c t o r r e p l a c e t h e e n g i n e a i rcleaner/filter:
1. Remove the screws (1) on topof the engine air cleaner/filterhousing.
2. Disconnect the electricalconnector (2).
3. Disconnect the outlet duct byloosening the air ductclamp (3).
4. Lift the filter cover housingaway from the engine aircleaner/filter housing.
5. Pull out the filter.
6. Inspect or replace the engineair cleaner/filter.
7. Reverse Steps 2–5toreinstallthe filter cover housing.
Page 300 of 419

Chevrolet Colorado Owner Manual (GMNA-Localizing-U.S./Canada/Mexico-10122675) - 2017 - crc - 8/22/16
Vehicle Care 299
heard all the time the vehicle ismoving, except when applying thebrake pedal firmly.
{Warning
The brake wear warning sound
means that soon the brakes will
not work well. That could lead to
acrash.Whenthebrakewear
warning sound is heard, have the
vehicle serviced.
Caution
Continuing to drive with worn-out
brake pads could result in costly
brake repair.
Some driving conditions or climatescan cause a brake squeal when thebrakes are first applied or lightlyapplied. This does not meansomething is wrong with the brakes.
Properly torqued wheel nuts arenecessary to help prevent brakepulsation. When tires are rotated,inspect brake pads for wear andevenly tighten wheel nuts in theproper sequence to torquespecifications inCapacities andSpecifications0380.
Brake linings should always bereplaced as complete axle sets.
Brake Pedal Travel
See your dealer if the brake pedaldoes not return to normal height,or if there is a rapid increase inpedal travel. This could be a signthat brake service may be required.
Replacing Brake System Parts
Always replace brake system partswith new, approved replacementparts. If this is not done, the brakesmay not work properly. The brakingperformance expected can changein many other ways if the wrongreplacement brake parts areinstalled or parts are improperlyinstalled.
Brake Fluid
The brake/clutch master cylinderreservoir is filled with GM approvedDOT 3 brake fluid as indicated onthe reservoir cap. SeeEngineCompartment Overview0283forthe location of the reservoir.
Checking Brake Fluid
Place the vehicle in P (Park) orNeutral with the parking brakeapplied if equipped with a manualtransmission. On a level surface,the brake fluid level should bebetween the minimum andmaximum marks on the brake fluidreservoir.
Page 301 of 419

Chevrolet Colorado Owner Manual (GMNA-Localizing-U.S./Canada/Mexico-10122675) - 2017 - crc - 8/22/16
300 Vehicle Care
There are only two reasons why thebrake fluid level in the reservoir maygo down:
.Normal brake lining wear. Whennew linings are installed, thefluid level goes back up.
.Afluidleakinthebrake/clutchhydraulic system. Have thebrake/clutch hydraulic systemfixed. With a leak, the brakes willnot work well.
Always clean the brake fluidreservoir cap and the area aroundthe cap before removing it.
Do not top off the brake/clutch fluid.Adding fluid does not correct a leak.If fluid is added when the linings areworn, there will be too much fluidwhen new brake linings areinstalled. Add or remove fluid, asnecessary, only when work is doneon the brake/clutch hydraulicsystem.
{Warning
If too much brake fluid is added, it
can spill on the engine and burn,
if the engine is hot enough. You
or others could be burned, and
the vehicle could be damaged.
Add brake fluid only when work is
done on the brake/clutch
hydraulic system.
When the brake/clutch fluid falls to alow level, the brake warning lightcomes on. SeeBrake SystemWarning Light0120.
Brake fluid absorbs water over timewhich degrades the effectiveness ofthe brake fluid. Replace brake fluidat the specified intervals to preventincreased stopping distance. SeeMaintenance Schedule0366.
What to Add
Use only GM approved DOT 3brake fluid from a clean, sealedcontainer. SeeRecommendedFluids and Lubricants0375.
{Warning
The wrong or contaminated brake
fluid could result in damage to the
brake system. This could result in
the loss of braking leading to a
possible injury. Always use the
proper GM approved brake fluid.
Caution
If brake fluid is spilled on the
vehicle's painted surfaces, the
paint finish can be damaged.
Immediately wash off any painted
surface.
Battery - North America
For diesel engine vehicles, see“Battery”in the Duramax dieselsupplement.
The original equipment battery ismaintenance free. Do not removethe cap and do not add fluid.
Page 313 of 419

Chevrolet Colorado Owner Manual (GMNA-Localizing-U.S./Canada/Mexico-10122675) - 2017 - crc - 8/22/16
312 Vehicle Care
The vehicle may not be equippedwith all of the fuses, relays, andfeatures shown.
Fuses Usage
F1 Traction controlmodule power
F2 Engine controlmodule power
F3 A/C clutch
F4–
F5 Engine controlmodule/Integratedchassis controlmodule/Fuel pumppower module
F6 Wipers
F7 Cargo lamp/Bedlighting (ifequipped)
F8 Fuel injectors-even
F9 Fuel injectors - odd
F10 Engine controlmodule 1
Fuses Usage
F11 Miscellaneous 1/Ignition
F12 Starter
F13 Traction controlmodule
F14–
F15–
F16–
F17 Front axle actuator
F18–
F19 Aeroshutters
F20–
F21 Front blower
F22 Antilock brakesystem valves
F23–
F24 Trailer
F25 Transfer caseelectronic control
F26 Antilock brakesystem pump
Fuses Usage
F27 Trailer brakecontrol module
F28 Rear windowdefogger
F29–
F30 Driver heated seat
F31–
F32 Passengerheated seat
F33 Body controlmodule 3
F34 Fuel system controlmodule
F35 Integrated chassiscontrol module (ifequipped)
F36 Centerhigh-mountedstoplamp
F37 Right high-beamheadlamp
F38 Left high-beamheadlamp
Page 314 of 419

Chevrolet Colorado Owner Manual (GMNA-Localizing-U.S./Canada/Mexico-10122675) - 2017 - crc - 8/22/16
Vehicle Care 313
FusesUsage
F39–
F40–
F41–
F42–
F43 Cooling fan
F44 Vacuum pump
F45–
F46 Engine controlmodule 2
F47 Miscellaneous 2/Ignition
F48 Fog lamps (ifequipped)
F49–
F50 Trailer parkinglamps
F51 Horn
F52–
F53–
F54–
F55–
FusesUsage
F56 Washer pump
F57–
F58–
F59 Trailer wiring
F60 Mirrors defogger
F61–
F62 Canister ventsolenoid
F63–
F64 Trailerreverse lamp
F65 Left trailerstoplamp/Turnsignal lamps
F66 Right trailerstoplamp/Turnsignal lamps
F67 Electric powersteering
F68–
F69 Battery regulatedvoltage control
F70–
FusesUsage
F71–
F72–
F73–
F74 Generator
F75–
RelaysUsage
K1 A/C clutch
K2 Starter
K3–
K4 Wipers speed
K5 Wipers control
K6 Cargo lamp/Bedlighting (ifequipped)
K7 Powertrain
K8–
K9–
K10–
K11 Centerhigh-mountedstoplamp
Page 317 of 419

Chevrolet Colorado Owner Manual (GMNA-Localizing-U.S./Canada/Mexico-10122675) - 2017 - crc - 8/22/16
316 Vehicle Care
FusesUsage
F22–
F23 Data linkconnector/USB
F24 HVAC ignition
F25 Body control module 7
F26–
F27–
F28 Instrument panel/Sensing anddiagnostic module/Ignition
F29 Miscellaneous/Ignition
F30–
F31 Front camera
F32 Steering wheelcontrols backlighting
F33 Heated steering wheel
F34 Front ventilated seats
F35 Park/Reverse/Neutral/Drive/Low/Wirelesscharging module
F36 Discrete logic ignitionsensor
FusesUsage
F37–
F38–
F39 Auxiliary poweroutlet 2
F40 Auxiliary power outlet
F41 Auxiliary poweroutlet 1/Lighter
F42 Left power window
F43 Driver power seat
F44–
F45 Right power window
F46 Passenger power seat
RelaysUsage
K1 Retained accessorypower
K2 Run/Crank
Wheels and Tires
Tires
Every new GM vehicle has
high-quality tires made by a
leading tire manufacturer. See
the warranty manual for
information regarding the tire
warranty and where to get
service. For additional
information refer to the tire
manufacturer.
{Warning
.Poorly maintained and
improperly used tires are
dangerous.
.Overloading the tires can
cause overheating as a
result of too much
flexing. There could be a
blowout and a serious
crash. SeeVehicle Load
Limits0226.
(Continued)
Page 323 of 419

Chevrolet Colorado Owner Manual (GMNA-Localizing-U.S./Canada/Mexico-10122675) - 2017 - crc - 8/22/16
322 Vehicle Care
Department of Transportation
(DOT) Motor Vehicle Safety
Standards. The DOT code
includes the Tire Identification
Number (TIN), an alphanumeric
designator which can also
identify the tire manufacturer,
production plant, brand, and
date of production.
GVWR:Gross Vehicle Weight
Rating. SeeVehicle Load
Limits0226.
GAWR FRT:Gross Axle Weight
Rating for the front axle. See
Vehicle Load Limits0226.
GAWR RR:Gross Axle Weight
Rating for the rear axle. See
Vehicle Load Limits0226.
Intended Outboard Sidewall:
The side of an asymmetrical tire
that must always face outward
when mounted on a vehicle.
Kilopascal (kPa):The metric
unit for air pressure.
Light Truck (LT-Metric) Tire:A
tire used on light duty trucks and
some multipurpose passenger
vehicles.
Load Index:An assigned
number ranging from 1 to 279
that corresponds to the load
carrying capacity of a tire.
Maximum Inflation Pressure:
The maximum air pressure to
which a cold tire can be inflated.
The maximum air pressure is
molded onto the sidewall.
Maximum Load Rating:The
load rating for a tire at the
maximum permissible inflation
pressure for that tire.
Maximum Loaded Vehicle
Weight:The sum of curb
weight, accessory weight,
vehicle capacity weight, and
production options weight.
Normal Occupant Weight:The
number of occupants a vehicle
is designed to seat multiplied by
68 kg (150 lb). SeeVehicle Load
Limits0226.
Occupant Distribution:
Designated seating positions.
Outward Facing Sidewall:The
side of an asymmetrical tire that
has a particular side that faces
outward when mounted on a
vehicle. The side of the tire that
contains a whitewall, bears
white lettering, or bears
manufacturer, brand, and/or
model name molding that is
higher or deeper than the same
moldings on the other sidewall
of the tire.
Passenger (P-Metric) Tire:A
tire used on passenger cars and
some light duty trucks and
multipurpose vehicles.
Recommended Inflation
Pressure:Vehicle
manufacturer's recommended
Page 327 of 419

Chevrolet Colorado Owner Manual (GMNA-Localizing-U.S./Canada/Mexico-10122675) - 2017 - crc - 8/22/16
326 Vehicle Care
Tire Pressure Monitor
Operation
This vehicle may have a TirePressure Monitor System (TPMS).The TPMS is designed to warn thedriver when a low tire pressurecondition exists. TPMS sensors aremounted onto each tire and wheelassembly, excluding the spare tireand wheel assembly. The TPMSsensors monitor the air pressure inthe tires and transmit the tirepressure readings to a receiverlocated in the vehicle.
When a low tire pressure conditionis detected, the TPMS illuminatesthe low tire pressure warning lightlocated on the instrument cluster.If the warning light comes on, stopas soon as possible and inflate thetires to the recommended pressure
shown on the Tire and LoadingInformation label. SeeVehicle LoadLimits0226.
AmessagetocheckthepressureinaspecifictiredisplaysintheDriverInformation Center (DIC). The lowtire pressure warning light and theDIC warning message come on ateach ignition cycle until the tires areinflated to the correct inflationpressure. Using the DIC, tirepressure levels can be viewed. Foradditional information and detailsabout the DIC operation anddisplays, seeDriver InformationCenter (DIC) (Base Level)0126orDriver Information Center (DIC)(Uplevel)0129andTire Messages0137.
The low tire pressure warning lightmay come on in cool weather whenthe vehicle is first started, and thenturn off as the vehicle is driven. Thiscould be an early indicator that theair pressure is getting low andneeds to be inflated to the properpressure.
ATire and Loading Information labelshows the size of the originalequipment tires and the correctinflation pressure for the tires whenthey are cold. SeeVehicle LoadLimits0226,foranexampleoftheTire and Loading Information labeland its location. Also seeTirePressure0323.
The TPMS can warn about a lowtire pressure condition but it doesnot replace normal tiremaintenance. SeeTire Inspection0329,Tire Rotation0329,andTires0316.
Caution
Tire sealant materials are not all
the same. A non-approved tire
sealant could damage the TPMS
sensors. TPMS sensor damage
caused by using an incorrect tire
sealant is not covered by the
vehicle warranty. Always use only
the GM approved tire sealant
available through your dealer or
included in the vehicle.