2017 CHEVROLET CITY EXPRESS emergency
[x] Cancel search: emergencyPage 92 of 348
Chevrolet Express Owner Manual (GMNA-Localizing-U.S./Canada/Mexico-
9967827) - 2017 - crc - 9/26/16
Instruments and Controls 91
2. Find the vehicle's currentlocation and variance zone
number on the map.
Zones 1 through 15 are
available.
3. Press
Vto scroll through and
select the appropriate
variance zone.
4. Press
3until the vehicle
heading, for example, N for
North, is displayed in the DIC.
5. If calibration is necessary, calibrate the compass. See
“Compass Calibration
Procedure” following.
Compass Calibration
The compass can be manually
calibrated. Only calibrate the
compass in a magnetically clean
and safe location, such as an open
parking lot, where driving the
vehicle in circles is not a danger.
It is suggested to calibrate away
from tall buildings, utility wires,
manhole covers, or other industrial
structures, if possible. If CAL should ever appear in the
DIC display, the compass should be
calibrated.
If the DIC display does not show a
heading, for example, N for North,
or the heading does not change
after making turns, there may be a
strong magnetic field interfering with
the compass. Such interference
may be caused by a magnetic CB or
cell phone antenna mount, a
magnetic emergency light, magnetic
note pad holder, or any other
magnetic item. Turn off the vehicle,
move the magnetic item, then turn
on the vehicle and calibrate the
compass.
To calibrate the compass, use the
following procedure:
Compass Calibration Procedure
1. Before calibrating the compass, make sure the compass zone
is set to the variance zone in
which the vehicle is located.
See “Compass Variance (Zone)
Procedure” earlier in this
section. Do not operate any switches
such as window, climate
controls, seats, etc. during the
calibration procedure.
2. Press
Tuntil PRESSVTO
CALIBRATE COMPASS
displays.
3. Press
Vto start the compass
calibration.
4. The DIC will display CALIBRATING: DRIVE IN
CIRCLES. Drive the vehicle in
tight circles at less than 8 km/h
(5 mph) to complete the
calibration. The DIC will display
CALIBRATION COMPLETE for
a few seconds when the
calibration is complete. The
DIC display will then return to
PRESS
VTO CALIBRATE
COMPASS.
Page 156 of 348
Chevrolet Express Owner Manual (GMNA-Localizing-U.S./Canada/Mexico-
9967827) - 2017 - crc - 9/26/16
Infotainment System 155
To delete all name tags:1. Press and hold
b/gfor
two seconds.
2. Say “Delete all name tags.”
Listing Stored Numbers
The list command will list all stored
numbers and name tags.
Using the “List”Command
1. Press and hold
b/gfor
two seconds.
2. Say “Directory.”
3. Say “Hands-Free Calling.”
4. Say “List.”
Making a Call
Calls can be made using the
following commands.
Dial or Call : The dial or call
command can be used
interchangeably to dial a phone
number or a stored name tag.
Digit Dial : This command allows a
phone number to be dialed by
entering the digits one at a time. Re-dial :
This command is used to
dial the last number used on the cell
phone.
Using the “Dial”or“Call”
Command
1. Press and hold
b/gfor
two seconds.
2. Say “Dial”or“Call.”
3. Say the entire number without pausing, or say the name tag.
Once connected, the person called
will be heard through the audio
speakers.
Calling Emergency
1. Press and hold
b/gfor
two seconds. The system
responds “Ready,”followed by
a tone.
2. Say “Dial”or“Call.”
3. Say [emergency number].
4. Say “Dial”or“Call.”
Once connected, the person called
will be heard through the audio
speakers. Using the
“Digit Dial” Command
The digit dial command allows a
phone number to be dialed by
entering the digits one at a time.
After each digit is entered, the
system repeats back the digit it
heard followed by a tone.
If an unwanted number is
recognized by the system, say
“Clear” at any time to clear the last
number.
To hear all of the numbers
recognized by the system, say
“Verify” at any time.
1. Press and hold
b/gfor
two seconds.
2. Say “Digit Dial.”
3. Say each digit, one at a time, that you want to dial. After
each digit is entered, the
system repeats back the digit it
heard followed by a tone. After
the last digit has been entered,
say “Dial.”
Once connected, the person called
will be heard through the audio
speakers.
Page 167 of 348
Chevrolet Express Owner Manual (GMNA-Localizing-U.S./Canada/Mexico-
9967827) - 2017 - crc - 9/26/16
166 Driving and Operating
Drunk Driving
Death and injury associated with
drinking and driving is a global
tragedy.
{Warning
Drinking and then driving is very
dangerous. Your reflexes,
perceptions, attentiveness, and
judgment can be affected by even
a small amount of alcohol. You
can have a serious—or even
fatal —collision if you drive after
drinking.
Do not drink and drive or ride with
a driver who has been drinking.
Ride home in a cab; or if you are
with a group, designate a driver
who will not drink.
Control of a Vehicle
Braking, steering, and accelerating
are important factors in helping to
control a vehicle while driving.
Braking
Braking action involves perception
time and reaction time. Deciding to
push the brake pedal is perception
time. Actually doing it is
reaction time.
Average driver reaction time is
about three-quarters of a second. In
that time, a vehicle moving at
100 km/h (60 mph) travels 20 m
(66 ft), which could be a lot of
distance in an emergency.
Helpful braking tips to keep in mind
include:
. Keep enough distance between
you and the vehicle in front
of you.
. Avoid needless heavy braking.
. Keep pace with traffic.
If the engine ever stops while the
vehicle is being driven, brake
normally but do not pump the
brakes. Doing so could make the
pedal harder to push down. If the
engine stops, there will be some
power brake assist but it will be
used when the brake is applied. Once the power assist is used up, it
can take longer to stop and the
brake pedal will be harder to push.
Steering
Hydraulic Power Steering
Your vehicle has hydraulic power
steering. It may require
maintenance. See
Power Steering
Fluid 0232.
If power steering assist is lost
because the engine stops or
because of a system malfunction,
the vehicle can be steered but may
required increased effort. See your
dealer if there is a problem.
Caution
If the steering wheel is turned
until it reaches the end of its
travel, and is held in that position
for more than 15 seconds,
damage may occur to the power
steering system and there may be
loss of power steering assist.
Page 177 of 348
Chevrolet Express Owner Manual (GMNA-Localizing-U.S./Canada/Mexico-
9967827) - 2017 - crc - 9/26/16
176 Driving and Operating
This position locks the ignition and
transmission.
Do not turn the engine off when the
vehicle is moving. This will cause a
loss of power assist in the brake
and steering systems and disable
the airbags.
If the vehicle must be shut off in an
emergency:1. Brake using a firm and steady pressure. Do not pump the
brakes repeatedly. This may
deplete power assist, requiring
increased brake pedal force.
2. Shift the vehicle to N (Neutral). This can be done while the
vehicle is moving. After shifting
to N (Neutral), firmly apply the
brakes and steer the vehicle to
a safe location.
3. Come to a complete stop, shift to P (Park), and turn the
ignition to LOCK/OFF. On
vehicles with an automatic
transmission, the shift lever
must be in P (Park) to turn the
ignition switch to the LOCK/
OFF position. 4. Set the parking brake. See
Parking Brake 0189.
{Warning
Turning off the vehicle while
moving may cause loss of power
assist in the brake and steering
systems and disable the airbags.
While driving, only shut the
vehicle off in an emergency.
If the vehicle cannot be pulled over,
and must be shut off while driving,
turn the ignition to ACC/
ACCESSORY.
Caution
Using a tool to force the key to
turn in the ignition could cause
damage to the switch or break the
key. Use the correct key, make
sure it is all the way in, and turn it
only with your hand. If the key
cannot be turned by hand, see
your dealer. 1 (ACC/ACCESSORY) :
This is the
position in which you can operate
things like the radio and the
windshield wipers when the engine
is off.
2 (ON/RUN) : This position can be
used to operate the electrical
accessories and to display some
instrument cluster warning and
indicator lights. This position can
also be used for service and
diagnostics, and to verify the proper
operation of the malfunction
indicator lamp as may be required
for emission inspection purposes.
The switch stays in this position
when the engine is running.
If you leave the key in the ACC/
ACCESSORY or ON/RUN position
with the engine off, the battery could
be drained. You may not be able to
start the vehicle if the battery is
allowed to drain for an extended
period of time.
3 (START) : This is the position that
starts the engine. When the engine
starts, release the key. The ignition
switch returns to ON/RUN for
driving.
Page 267 of 348

Chevrolet Express Owner Manual (GMNA-Localizing-U.S./Canada/Mexico-
9967827) - 2017 - crc - 9/26/16
266 Vehicle Care
Use this rotation pattern when
rotating the tires.
If the vehicle has a compact
spare tire, do not include it in the
tire rotation.
Adjust the front and rear tires to
the recommended inflation
pressure on the Tire and
Loading Information label after
the tires have been rotated.
SeeTire Pressure 0260 and
Vehicle Load Limits 0171.
Reset the Tire Pressure Monitor
System. See Tire Pressure
Monitor Operation 0262. Check that all wheel nuts are
properly tightened. See
“Wheel
Nut Torque” underCapacities
and Specifications 0310.
{Warning
Rust or dirt on a wheel, or on the
parts to which it is fastened, can
make wheel nuts become loose
after time. The wheel could come
off and cause an accident. When
changing a wheel, remove any
rust or dirt from places where the
wheel attaches to the vehicle. In
an emergency, a cloth or a paper
towel can be used; however, use
a scraper or wire brush later to
remove all rust or dirt.
Lightly coat the center of the
wheel hub with wheel bearing
grease after a wheel change or
tire rotation to prevent corrosion
or rust build-up. Do not get
grease on the flat wheel
mounting surface or on the
wheel nuts or bolts.
Dual Tire Rotation
When the vehicle is new,
or whenever a wheel, wheel bolt,
or wheel nut is replaced, check the
wheel nut torque after
160, 1 600, and 10 000 km (100,
1,000, and 6,000 mi) of driving. For
proper wheel nut tightening
information, see “Removing the Flat
Tire and Installing the Spare Tire”
under Tire Changing 0274. Also
see “Wheel Nut Torque” under
Capacities and Specifications 0310.
The outer tire on a dual wheel setup
generally wears faster than the
inner tire. Tires last longer and wear
more evenly if they are rotated.
See Tire Inspection 0265 andTire
Rotation 0265. Also see
Maintenance Schedule 0298.
{Warning
If the vehicle is operated with a
tire that is underinflated, the tire
can overheat. An overheated tire
can lose air suddenly or catch
(Continued)
Page 280 of 348
Chevrolet Express Owner Manual (GMNA-Localizing-U.S./Canada/Mexico-
9967827) - 2017 - crc - 9/26/16
Vehicle Care 279
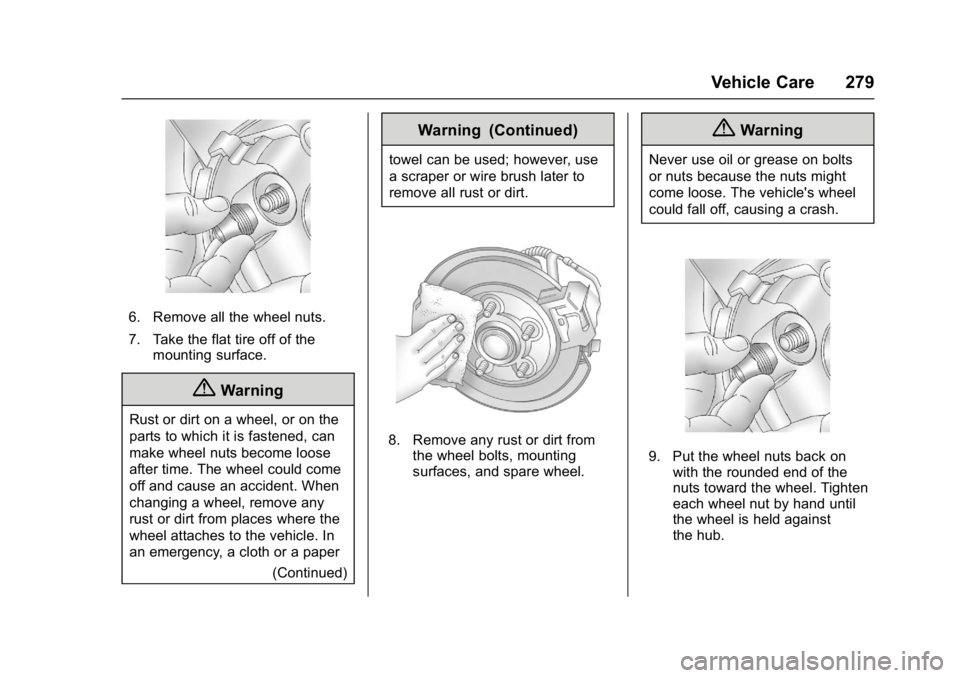
6. Remove all the wheel nuts.
7. Take the flat tire off of themounting surface.
{Warning
Rust or dirt on a wheel, or on the
parts to which it is fastened, can
make wheel nuts become loose
after time. The wheel could come
off and cause an accident. When
changing a wheel, remove any
rust or dirt from places where the
wheel attaches to the vehicle. In
an emergency, a cloth or a paper
(Continued)
Warning (Continued)
towel can be used; however, use
a scraper or wire brush later to
remove all rust or dirt.
8. Remove any rust or dirt fromthe wheel bolts, mounting
surfaces, and spare wheel.
{Warning
Never use oil or grease on bolts
or nuts because the nuts might
come loose. The vehicle's wheel
could fall off, causing a crash.
9. Put the wheel nuts back onwith the rounded end of the
nuts toward the wheel. Tighten
each wheel nut by hand until
the wheel is held against
the hub.
Page 319 of 348

Chevrolet Express Owner Manual (GMNA-Localizing-U.S./Canada/Mexico-
9967827) - 2017 - crc - 9/26/16
318 Customer Information
Services Provided
.Emergency Fuel Delivery:
Delivery of enough fuel for the
vehicle to get to the nearest
service station.
. Lock-Out Service: Service to
unlock the vehicle if you are
locked out. A remote unlock may
be available if you have OnStar.
For security reasons, the driver
must present identification
before this service is given.
. Emergency Tow from a Public
Road or Highway: Tow to the
nearest Chevrolet dealer for
warranty service, or if the vehicle
was in a crash and cannot be
driven. Assistance is not given
when the vehicle is stuck in the
sand, mud, or snow.
. Flat Tire Change: Service to
change a flat tire with the spare
tire. The spare tire, if equipped,
must be in good condition and
properly inflated. It is the owner's
responsibility for the repair or
replacement of the tire if it is not
covered by the warranty. .
Battery Jump Start: Service to
jump start a dead battery.
. Trip Interruption Benefits and
Assistance: If your trip is
interrupted due to a warranty
event, incidental expenses may
be reimbursed within the
Powertrain warranty period.
Items considered are reasonable
and customary hotel, meals,
rental car, or a vehicle being
delivered back to the customer,
up to 805 km (500 mi).
Services Not Included in
Roadside Assistance
. Impound towing caused by
violation of any laws.
. Legal fines.
. Mounting, dismounting,
or changing of snow tires,
chains, or other traction devices.
Service is not provided if a vehicle
is in an area that is not accessible
to the service vehicle or is not a
regularly traveled or maintained
public road, which includes ice and
winter roads. Off-road use is not
covered.
Services Specific to
Canadian-Purchased Vehicles
. Fuel Delivery: Reimbursement
is up to 7 liters. If available,
diesel fuel delivery may be
restricted. Propane and other
fuels are not provided through
this service.
. Lock-Out Service: Vehicle
registration is required.
. Trip Interruption Benefits and
Assistance: Must be over
150 km from where your trip was
started to qualify.
Pre-authorization, original
detailed receipts, and a copy of
the repair orders are required.
Once authorization has been
received, the Roadside
Assistance advisor will help to
make arrangements and explain
how to receive payment.
. Alternative Service: If
assistance cannot be provided
right away, the Roadside
Assistance advisor may give
permission to get local
emergency road service. You will
receive payment, up to $100,
Page 322 of 348
Chevrolet Express Owner Manual (GMNA-Localizing-U.S./Canada/Mexico-
9967827) - 2017 - crc - 9/26/16
Customer Information 321
Aftermarket collision parts are also
available. These are made by
companies other than GM and may
not have been tested for the vehicle.
As a result, these parts may fit
poorly, exhibit premature durability/
corrosion problems, and may not
perform properly in subsequent
collisions. Aftermarket parts are not
covered by the GM New Vehicle
Limited Warranty, and any vehicle
failure related to such parts is not
covered by that warranty.
Repair Facility
GM also recommends that you
choose a collision repair facility that
meets your needs before you ever
need collision repairs. Your dealer
may have a collision repair center
with GM-trained technicians and
state-of-the-art equipment, or be
able to recommend a collision repair
center that has GM-trained
technicians and comparable
equipment.
Insuring the Vehicle
Protect your investment in the GM
vehicle with comprehensive and
collision insurance coverage. There
are significant differences in the
quality of coverage afforded by
various insurance policy terms.
Many insurance policies provide
reduced protection to the GM
vehicle by limiting compensation for
damage repairs through the use of
aftermarket collision parts. Some
insurance companies will not
specify aftermarket collision parts.
When purchasing insurance, we
recommend that you ensure that the
vehicle will be repaired with GM
original equipment collision parts.
If such insurance coverage is not
available from your current
insurance carrier, consider switching
to another insurance carrier.
If the vehicle is leased, the leasing
company may require you to have
insurance that ensures repairs with
Genuine GM Original Equipment
Manufacturer (OEM) parts or
Genuine Manufacturer replacementparts. Read the lease carefully, as
you may be charged at the end of
the lease for poor quality repairs.
If a Crash Occurs
If there has been an injury, call
emergency services for help. Do not
leave the scene of a crash until all
matters have been taken care of.
Move the vehicle only if its position
puts you in danger, or you are
instructed to move it by a police
officer.
Give only the necessary information
to police and other parties involved
in the crash.
For emergency towing see
Roadside Assistance Program
0
317.
Gather the following information:
. Driver name, address, and
telephone number.
. Driver license number.
. Owner name, address, and
telephone number.
. Vehicle license plate number.