2017 BMW X3 ECU
[x] Cancel search: ECUPage 187 of 265

Load
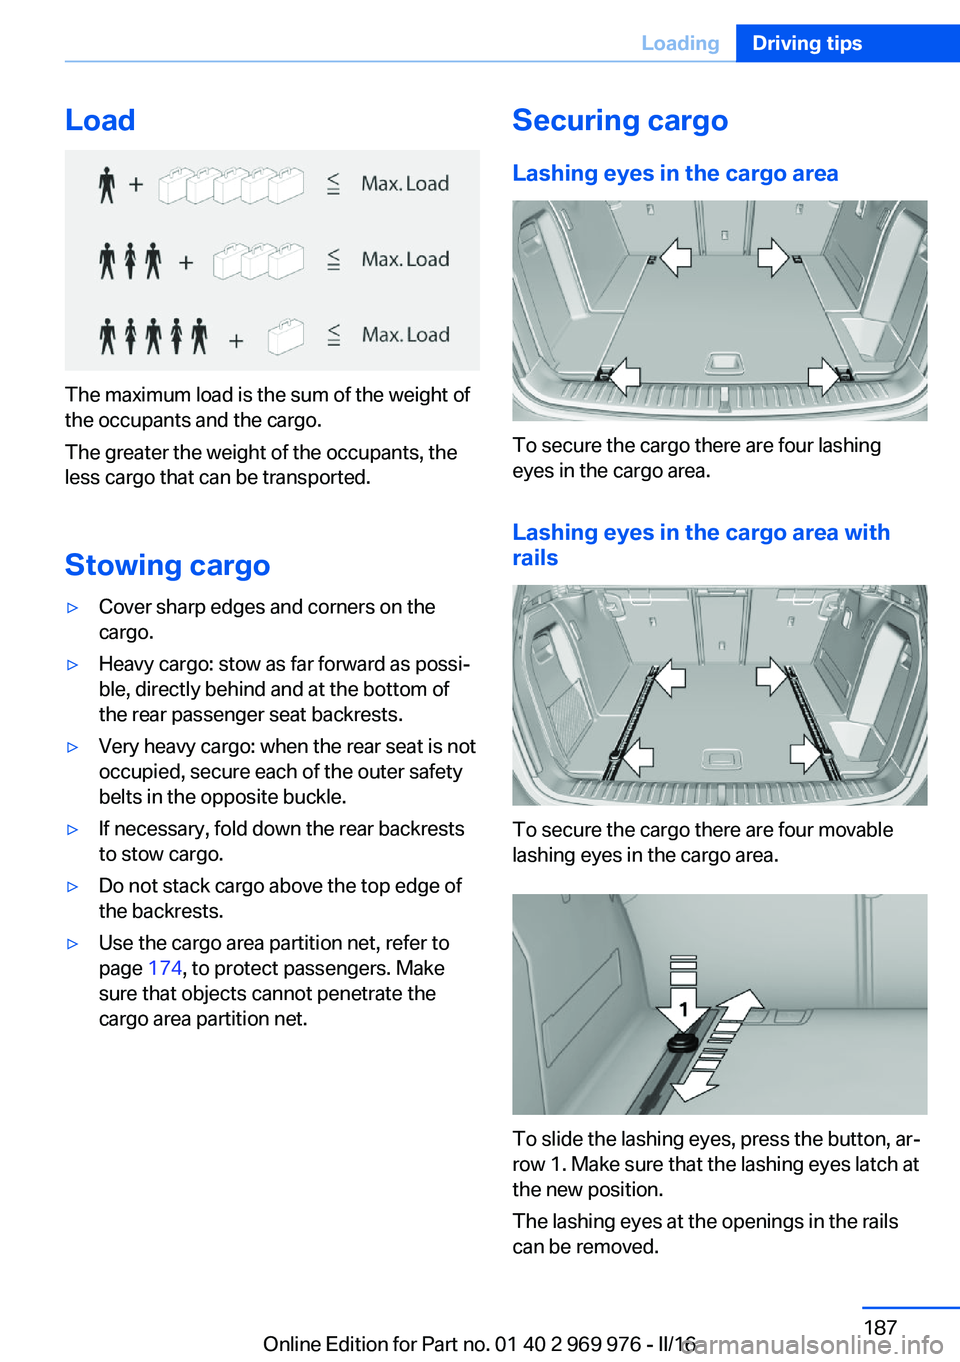
The maximum load is the sum of the weight of
the occupants and the cargo.
The greater the weight of the occupants, the
less cargo that can be transported.
Stowing cargo
▷Cover sharp edges and corners on the
cargo.▷Heavy cargo: stow as far forward as possi‐
ble, directly behind and at the bottom of
the rear passenger seat backrests.▷Very heavy cargo: when the rear seat is not
occupied, secure each of the outer safety
belts in the opposite buckle.▷If necessary, fold down the rear backrests
to stow cargo.▷Do not stack cargo above the top edge of
the backrests.▷Use the cargo area partition net, refer to
page 174, to protect passengers. Make
sure that objects cannot penetrate the
cargo area partition net.Securing cargo
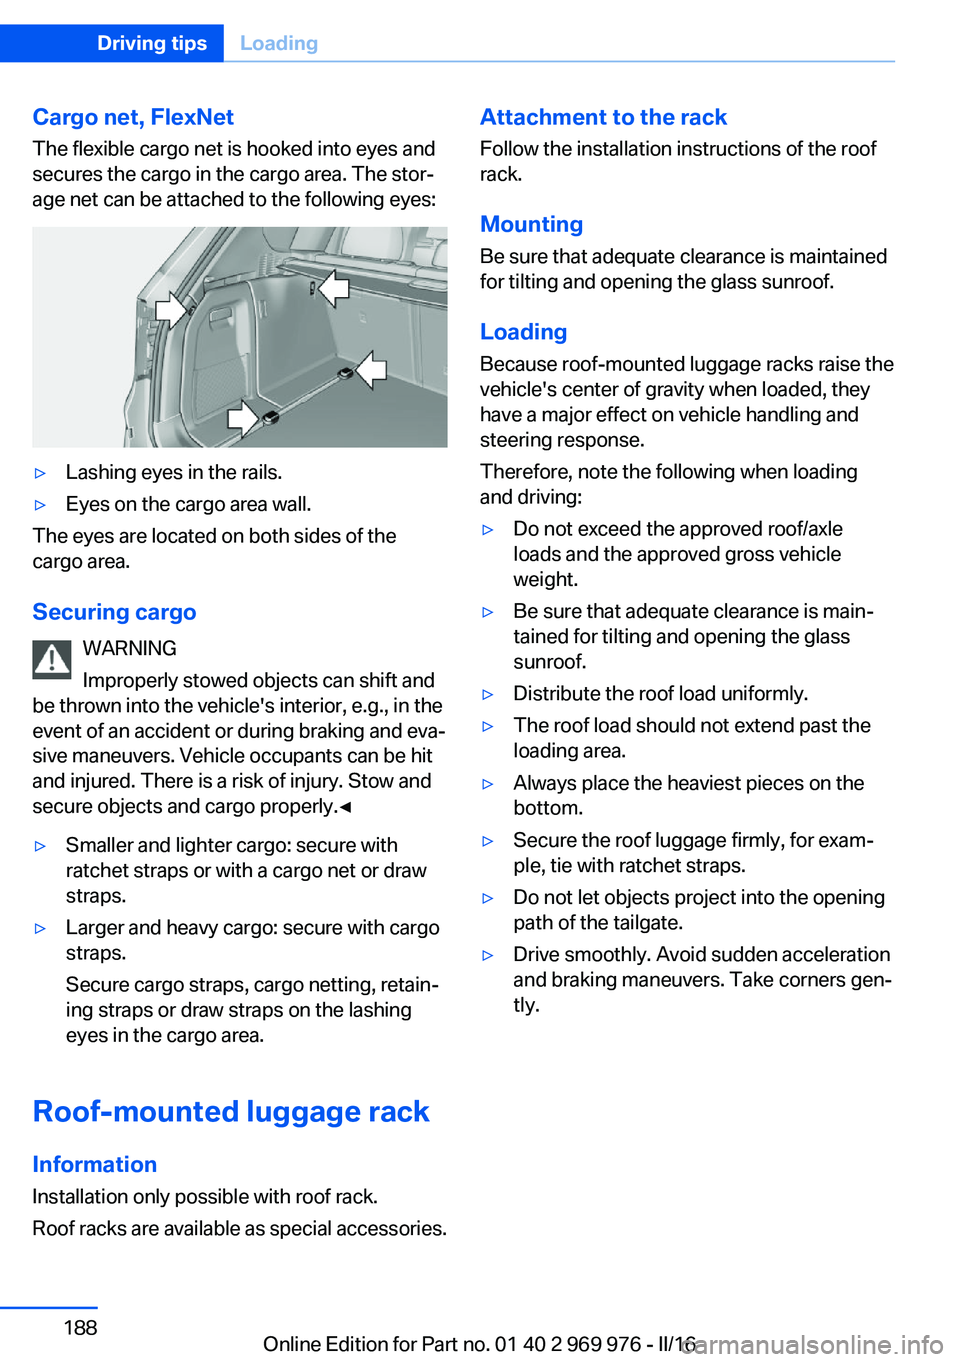
Lashing eyes in the cargo area
To secure the cargo there are four lashing
eyes in the cargo area.
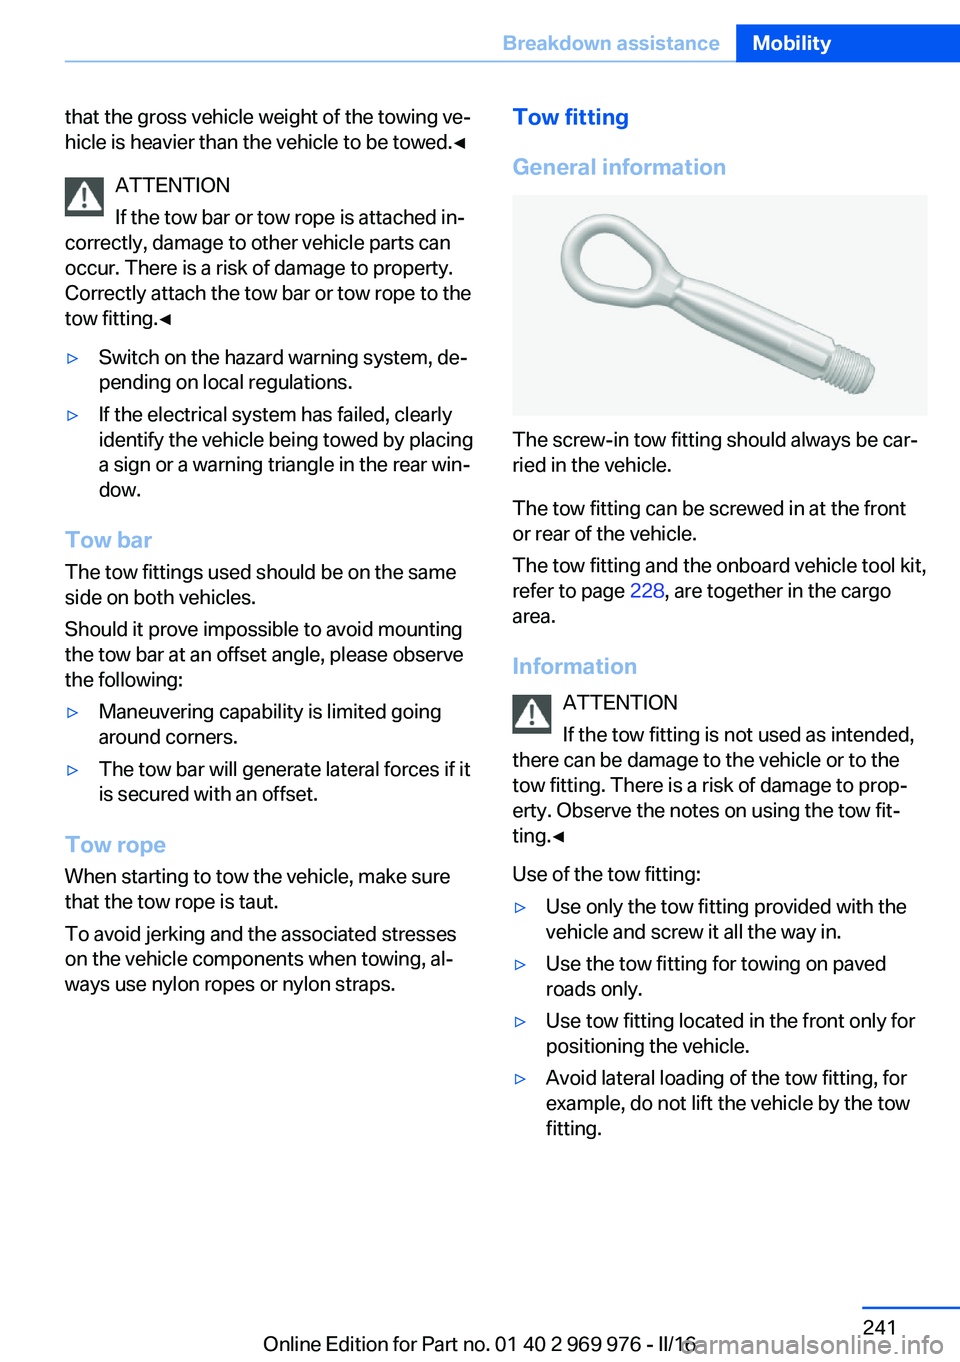
Lashing eyes in the cargo area with
rails
To secure the cargo there are four movable
lashing eyes in the cargo area.
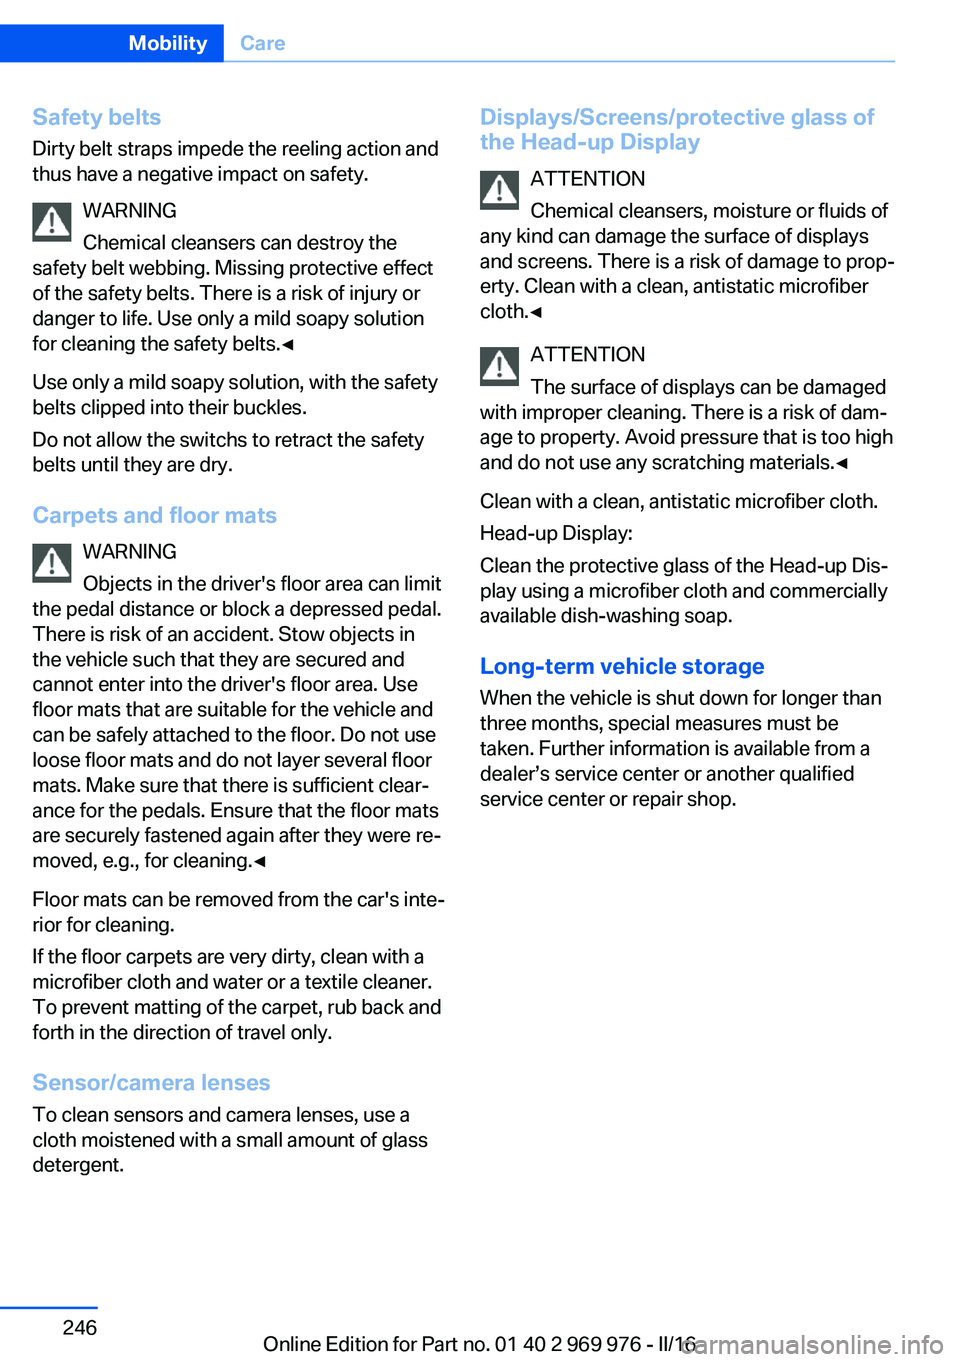
To slide the lashing eyes, press the button, ar‐
row 1. Make sure that the lashing eyes latch at
the new position.
The lashing eyes at the openings in the rails
can be removed.
Seite 187LoadingDriving tips187
Online Edition for Part no. 01 40 2 969 976 - II/16
Page 188 of 265

Cargo net, FlexNetThe flexible cargo net is hooked into eyes and
secures the cargo in the cargo area. The stor‐
age net can be attached to the following eyes:▷Lashing eyes in the rails.▷Eyes on the cargo area wall.
The eyes are located on both sides of the
cargo area.
Securing cargo WARNING
Improperly stowed objects can shift and
be thrown into the vehicle's interior, e.g., in the
event of an accident or during braking and eva‐
sive maneuvers. Vehicle occupants can be hit
and injured. There is a risk of injury. Stow and
secure objects and cargo properly.◀
▷Smaller and lighter cargo: secure with
ratchet straps or with a cargo net or draw
straps.▷Larger and heavy cargo: secure with cargo
straps.
Secure cargo straps, cargo netting, retain‐
ing straps or draw straps on the lashing
eyes in the cargo area.
Roof-mounted luggage rack
Information
Installation only possible with roof rack.
Roof racks are available as special accessories.
Attachment to the rack Follow the installation instructions of the roof
rack.
Mounting
Be sure that adequate clearance is maintained
for tilting and opening the glass sunroof.
LoadingBecause roof-mounted luggage racks raise thevehicle's center of gravity when loaded, they
have a major effect on vehicle handling and
steering response.
Therefore, note the following when loading
and driving:▷Do not exceed the approved roof/axle
loads and the approved gross vehicle
weight.▷Be sure that adequate clearance is main‐
tained for tilting and opening the glass
sunroof.▷Distribute the roof load uniformly.▷The roof load should not extend past the
loading area.▷Always place the heaviest pieces on the
bottom.▷Secure the roof luggage firmly, for exam‐
ple, tie with ratchet straps.▷Do not let objects project into the opening
path of the tailgate.▷Drive smoothly. Avoid sudden acceleration
and braking maneuvers. Take corners gen‐
tly.Seite 188Driving tipsLoading188
Online Edition for Part no. 01 40 2 969 976 - II/16
Page 212 of 265

shop. After rotating, check the tire pressure
and correct if needed.
Rotating the tires between the axes is not per‐
missible on vehicles with different tire sizes or
rim sizes on the front and rear axles.
Storage
Store wheels and tires in a cool, dry place with
as little exposure to light as possible.
Always protect tires against all contact with oil,
grease and fuels.
Do not exceed the maximum tire inflation pres‐
sure indicated on the side wall of the tire.
Run-flat tires
Label
RSC label on the tire sidewall.
The wheels consist of tires that are self-sup‐
porting, to a limited degree, and possibly spe‐
cial rims.
The support of the sidewall allows the tire to
remain drivable to a restricted degree in the
event of a tire inflation pressure loss.
Follow the instructions for continued driving
with a flat tire.
Changing run-flat tires
For your own safety, only use run-flat tires. No
spare tire is available in the case of a flat tire.
A dealer’s service center will be glad to answer
additional questions at any time.
Repairing a flat tire
Safety measures▷Park the vehicle as far away as possible
from passing traffic and on solid ground.▷Switch on the hazard warning system.▷Secure the vehicle against rolling away by
setting the parking brake.▷Turn the steering wheel until the front
wheels are in the straight-ahead position
and engage the steering wheel lock.▷Have all vehicle occupants get out of the
vehicle and ensure that they remain out‐
side the immediate area in a safe place,
such as behind a guardrail.▷If necessary, set up a warning triangle at an
appropriate distance.
Mobility System
The concept
With the Mobility System, minor tire damage
can be sealed temporarily to enable continued
travel. To accomplish this, sealant is pumped
into the tires, which seals the damage from the
inside.
The compressor can be used to check the tire
inflation pressure.
Information
▷Follow the instructions on using the Mobi‐
lity System found on the compressor and
sealant container.▷Use of the Mobility System may be ineffec‐
tive if the tire puncture measures approx.
1/8 in/4 mm or more.▷Contact a dealer’s service center or an‐
other qualified service center or repair
shop if the tire cannot be made drivable.▷If possible, do not remove foreign bodies
that have penetrated the tire.Seite 212MobilityWheels and tires212
Online Edition for Part no. 01 40 2 969 976 - II/16
Page 217 of 265

Engine compartmentVehicle features and optionsThis chapter describes all standard, country-
specific and optional features offered with the
series. It also describes features that are not
necessarily available in your car, e. g., due tothe selected options or country versions. This
also applies to safety-related functions and
systems. The respectively applicable country
provisions must be observed when using the
respective features and systems.
Important features in the engine compartment
1Washer fluid reservoir2Vehicle identification number3Jump-starting, negative battery terminal4Jump-starting, positive battery terminal5Coolant reservoir6Oil filler neckHood
Information WARNING
Improperly executed work in the engine
compartment can damage vehicle compo‐
nents and impair vehicle functions. There is a
risk of personal and property damage. Themanufacturer of your vehicle recommends
that, in the effort to avoid such risks, work in
the engine compartment be performed by a
dealer’s service center or another qualified
service center or repair shop.◀Seite 217Engine compartmentMobility217
Online Edition for Part no. 01 40 2 969 976 - II/16
Page 228 of 265

Replacing componentsVehicle features and optionsThis chapter describes all standard, country-
specific and optional features offered with the
series. It also describes features that are not
necessarily available in your car, e. g., due to
the selected options or country versions. This
also applies to safety-related functions and
systems. The respectively applicable country
provisions must be observed when using the
respective features and systems.
Onboard vehicle tool kit
The onboard vehicle tool kit is located behind
the left folding cover in the cargo area.
Wiper blade replacement Information ATTENTION
If the wiper arm falls onto the windshield
without the wiper blades installed, the wind‐ shield can be damaged. There is a risk of dam‐
age to property. Secure the wiper arm when
replacing the wiper blades and do not fold down the wipers without the wiper blades in‐
stalled.◀
Front: replacing the wiper blades1.To change the wiper blades, fold up, refer
to page 78, the wiper arms.2.Fold up the wipers.3.Position the wiper blade in a horizontal po‐
sition.4.Remove the wiper blade toward one side.5.Insert the new wiper blade in reverse order
of removal until it locks in place.6.Fold down the wipers.Seite 228MobilityReplacing components228
Online Edition for Part no. 01 40 2 969 976 - II/16
Page 236 of 265

Power failureAfter a power loss, some equipment needs to
be newly initialized or individual settings up‐
dated, for example:▷Seat and mirror memory: store the posi‐
tions again.▷Time: update.▷Date: update.▷Glass sunroof: initialize the system, refer to
page 52.
Disposing of old batteries
Have old batteries disposed of by a
dealer’s service center or another
qualified service center or repair shop
or take them to a collection point.
Maintain the battery in an upright position for
transport and storage. Secure the battery so
that it does not tip over during transport.
Fuses Information WARNING
Incorrect and repaired fuses can overload
electrical lines and components. There is risk
of fire. Never attempt to repair a blown fuse.
Do not replace a nonworking fuse with a sub‐
stitute of another color or amperage rating.◀
Plastic tweezers and information on the fuse
types and locations are stored in the fuse box
in the cargo area.
In the glove compartment
Swing the cover down, arrow.
In the cargo area
Open the cover on the right side trim, arrow,
and remove the sound insulation.
Information on the fuse types and locations is
found on a separate sheet.
Seite 236MobilityReplacing components236
Online Edition for Part no. 01 40 2 969 976 - II/16
Page 241 of 265

that the gross vehicle weight of the towing ve‐
hicle is heavier than the vehicle to be towed.◀
ATTENTION
If the tow bar or tow rope is attached in‐
correctly, damage to other vehicle parts can
occur. There is a risk of damage to property.
Correctly attach the tow bar or tow rope to the
tow fitting.◀▷Switch on the hazard warning system, de‐
pending on local regulations.▷If the electrical system has failed, clearly
identify the vehicle being towed by placing
a sign or a warning triangle in the rear win‐
dow.
Tow bar
The tow fittings used should be on the same
side on both vehicles.
Should it prove impossible to avoid mounting
the tow bar at an offset angle, please observe
the following:
▷Maneuvering capability is limited going
around corners.▷The tow bar will generate lateral forces if it
is secured with an offset.
Tow rope
When starting to tow the vehicle, make sure
that the tow rope is taut.
To avoid jerking and the associated stresses
on the vehicle components when towing, al‐
ways use nylon ropes or nylon straps.
Tow fitting
General information
The screw-in tow fitting should always be car‐
ried in the vehicle.
The tow fitting can be screwed in at the front
or rear of the vehicle.
The tow fitting and the onboard vehicle tool kit,
refer to page 228, are together in the cargo
area.
Information ATTENTION
If the tow fitting is not used as intended,
there can be damage to the vehicle or to the
tow fitting. There is a risk of damage to prop‐
erty. Observe the notes on using the tow fit‐
ting.◀
Use of the tow fitting:
▷Use only the tow fitting provided with the
vehicle and screw it all the way in.▷Use the tow fitting for towing on paved
roads only.▷Use tow fitting located in the front only for
positioning the vehicle.▷Avoid lateral loading of the tow fitting, for
example, do not lift the vehicle by the tow
fitting.Seite 241Breakdown assistanceMobility241
Online Edition for Part no. 01 40 2 969 976 - II/16
Page 246 of 265

Safety belts
Dirty belt straps impede the reeling action and
thus have a negative impact on safety.
WARNING
Chemical cleansers can destroy the
safety belt webbing. Missing protective effect
of the safety belts. There is a risk of injury or
danger to life. Use only a mild soapy solution
for cleaning the safety belts.◀
Use only a mild soapy solution, with the safety
belts clipped into their buckles.
Do not allow the switchs to retract the safety
belts until they are dry.
Carpets and floor mats WARNING
Objects in the driver's floor area can limit
the pedal distance or block a depressed pedal.
There is risk of an accident. Stow objects in
the vehicle such that they are secured and
cannot enter into the driver's floor area. Use
floor mats that are suitable for the vehicle and
can be safely attached to the floor. Do not use
loose floor mats and do not layer several floor
mats. Make sure that there is sufficient clear‐
ance for the pedals. Ensure that the floor mats
are securely fastened again after they were re‐
moved, e.g., for cleaning.◀
Floor mats can be removed from the car's inte‐
rior for cleaning.
If the floor carpets are very dirty, clean with a
microfiber cloth and water or a textile cleaner.
To prevent matting of the carpet, rub back and
forth in the direction of travel only.
Sensor/camera lenses
To clean sensors and camera lenses, use a
cloth moistened with a small amount of glass
detergent.Displays/Screens/protective glass of
the Head-up Display
ATTENTION
Chemical cleansers, moisture or fluids of
any kind can damage the surface of displays
and screens. There is a risk of damage to prop‐
erty. Clean with a clean, antistatic microfiber
cloth.◀
ATTENTION
The surface of displays can be damaged
with improper cleaning. There is a risk of dam‐
age to property. Avoid pressure that is too high
and do not use any scratching materials.◀
Clean with a clean, antistatic microfiber cloth.
Head-up Display:
Clean the protective glass of the Head-up Dis‐
play using a microfiber cloth and commercially
available dish-washing soap.
Long-term vehicle storage
When the vehicle is shut down for longer than
three months, special measures must be
taken. Further information is available from a
dealer’s service center or another qualified
service center or repair shop.Seite 246MobilityCare246
Online Edition for Part no. 01 40 2 969 976 - II/16