2017 BMW X3 tow
[x] Cancel search: towPage 225 of 265

Adding1.Let the engine cool.2.Turn the lid of the coolant reservoir slightly
counterclockwise to allow any excess
pressure to dissipate, then open it.3.If the coolant is low, slowly add coolant up
to the specified level; do not overfill.4.Turn the lid until there is an audible click.
The arrows on the coolant reservoir and
the lid must point towards one another.5.Have the cause of the coolant loss elimi‐
nated as soon as possible.
Disposal
Comply with the relevant environmen‐
tal protection regulations when dispos‐
ing of coolant and coolant additives.
Seite 225CoolantMobility225
Online Edition for Part no. 01 40 2 969 976 - II/16
Page 228 of 265

Replacing componentsVehicle features and optionsThis chapter describes all standard, country-
specific and optional features offered with the
series. It also describes features that are not
necessarily available in your car, e. g., due to
the selected options or country versions. This
also applies to safety-related functions and
systems. The respectively applicable country
provisions must be observed when using the
respective features and systems.
Onboard vehicle tool kit
The onboard vehicle tool kit is located behind
the left folding cover in the cargo area.
Wiper blade replacement Information ATTENTION
If the wiper arm falls onto the windshield
without the wiper blades installed, the wind‐ shield can be damaged. There is a risk of dam‐
age to property. Secure the wiper arm when
replacing the wiper blades and do not fold down the wipers without the wiper blades in‐
stalled.◀
Front: replacing the wiper blades1.To change the wiper blades, fold up, refer
to page 78, the wiper arms.2.Fold up the wipers.3.Position the wiper blade in a horizontal po‐
sition.4.Remove the wiper blade toward one side.5.Insert the new wiper blade in reverse order
of removal until it locks in place.6.Fold down the wipers.Seite 228MobilityReplacing components228
Online Edition for Part no. 01 40 2 969 976 - II/16
Page 232 of 265

In the case of a malfunction, contact a dealer’s
service center or another qualified service cen‐
ter or repair shop.
LED headlightsLight-emitting diodes (LEDs)
With LED headlights, all front lights and side
indicators are designed with LED technology.
If an LED fails, switch on the front fog lamps
and continue the trip with great care. Comply
with local regulations.
In the case of a malfunction, contact a dealer’s
service center or another qualified service cen‐
ter or repair shop.
Front fog lights
Follow general instructions, refer to page 229.
35-watt bulb, H8.1.Insert the screwdriver from the onboard
vehicle tool kit, with the flat side on the clip,
arrow 1.2.Turn the screwdriver by 90°, arrow 2.3.Remove the front fog lamp toward the
front.4.Detach the connector.5.Turn the bulb bracket and remove it.6.Remove the bulb and replace it.7.Proceed in reverse order to insert the front
fog lamp. Note the guide rails in doing so.
LED front fog lights
These front fog lights are made using LED
technology. In the case of a malfunction, con‐
tact a dealer’s service center or another quali‐
fied service center or repair shop.
Turn signal
Information
Follow general instructions, refer to page 229.
The turn signals are located next to each low
beam in the engine compartment.
21-watt bulb, PY 21W.
Seite 232MobilityReplacing components232
Online Edition for Part no. 01 40 2 969 976 - II/16
Page 240 of 265

corresponding engine or body ground of
the vehicle to be started.
Starting the engine
Never use spray fluids to start the engine.
1.Start the engine of the assisting vehicle
and let it run for several minutes at an in‐
creased idle speed.
If the vehicle to be started has a diesel en‐
gine: let the engine of the assisting vehicle
run for approx. 10 minutes.2.Start the engine of the vehicle that is to be
started in the usual way.
If the first starting attempt is not success‐
ful, wait a few minutes before making an‐
other attempt in order to allow the dis‐
charged battery to recharge.3.Let both engines run for several minutes.4.Disconnect the jumper cables in the re‐
verse order.
Check the battery and recharge if needed.
Tow-starting and towing Information WARNING
Due to system limits, individual functions
can malfunction during tow-starting/towing
with the Intelligent Safety systems activated,
e.g., approach control warning with light brak‐
ing function. There is risk of an accident.
Switch all Intelligent Safety systems off prior to
tow-starting/towing.◀
Steptronic transmission: transporting
the vehicle
Information
The vehicle is not permitted to be towed.
ATTENTION
The vehicle can be damaged when tow‐
ing the vehicle with a single lifted axle. There is
a risk of damage to property. The vehicle
should only be transported on a loading plat‐
form.◀
Tow truck
The vehicle should only be transported on a
loading platform.
ATTENTION
When lifting the vehicle by the tow fitting
or body and chassis parts; damage can occur
on vehicle parts. There is a risk of damage to
property. Lift vehicle using suitable means.◀
Use tow fitting located in the front only for po‐
sitioning the vehicle.
Pushing vehicle To maneuver vehicle from the danger area,
electronically unlock the transmission lock, re‐
fer to page 82, if needed.
Towing other vehicles
Information WARNING
If the approved gross vehicle weight of
the towing vehicle is lighter than the vehicle to
be towed, the tow fitting can tear off or it will
not be possible to control the vehicle's re‐
sponse. There is risk of an accident! Make sure
Seite 240MobilityBreakdown assistance240
Online Edition for Part no. 01 40 2 969 976 - II/16
Page 241 of 265

that the gross vehicle weight of the towing ve‐
hicle is heavier than the vehicle to be towed.◀
ATTENTION
If the tow bar or tow rope is attached in‐
correctly, damage to other vehicle parts can
occur. There is a risk of damage to property.
Correctly attach the tow bar or tow rope to the
tow fitting.◀▷Switch on the hazard warning system, de‐
pending on local regulations.▷If the electrical system has failed, clearly
identify the vehicle being towed by placing
a sign or a warning triangle in the rear win‐
dow.
Tow bar
The tow fittings used should be on the same
side on both vehicles.
Should it prove impossible to avoid mounting
the tow bar at an offset angle, please observe
the following:
▷Maneuvering capability is limited going
around corners.▷The tow bar will generate lateral forces if it
is secured with an offset.
Tow rope
When starting to tow the vehicle, make sure
that the tow rope is taut.
To avoid jerking and the associated stresses
on the vehicle components when towing, al‐
ways use nylon ropes or nylon straps.
Tow fitting
General information
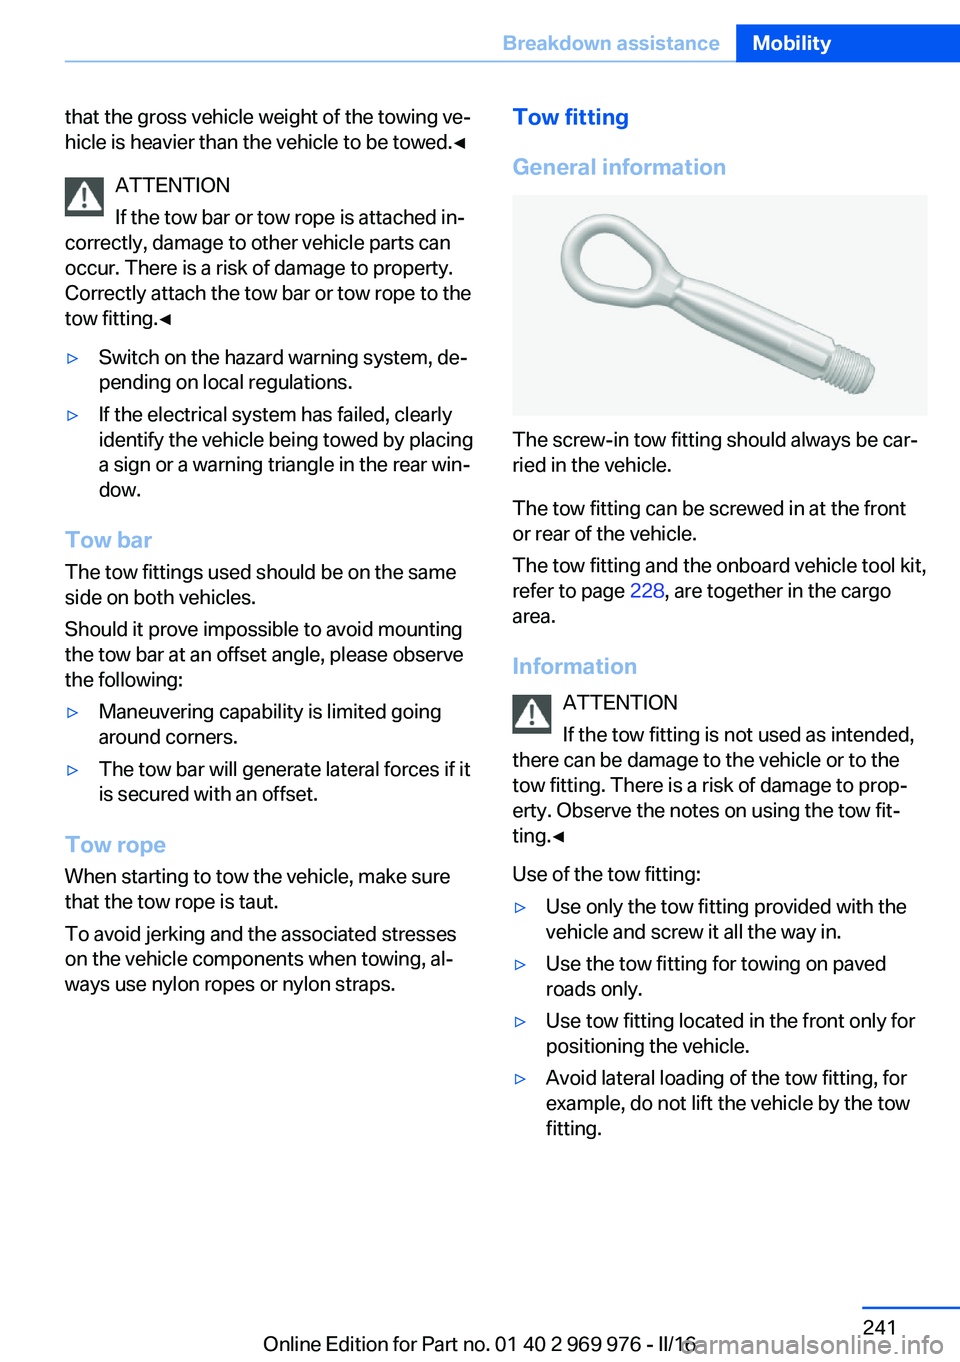
The screw-in tow fitting should always be car‐
ried in the vehicle.
The tow fitting can be screwed in at the front
or rear of the vehicle.
The tow fitting and the onboard vehicle tool kit,
refer to page 228, are together in the cargo
area.
Information ATTENTION
If the tow fitting is not used as intended,
there can be damage to the vehicle or to the
tow fitting. There is a risk of damage to prop‐
erty. Observe the notes on using the tow fit‐
ting.◀
Use of the tow fitting:
▷Use only the tow fitting provided with the
vehicle and screw it all the way in.▷Use the tow fitting for towing on paved
roads only.▷Use tow fitting located in the front only for
positioning the vehicle.▷Avoid lateral loading of the tow fitting, for
example, do not lift the vehicle by the tow
fitting.Seite 241Breakdown assistanceMobility241
Online Edition for Part no. 01 40 2 969 976 - II/16
Page 242 of 265

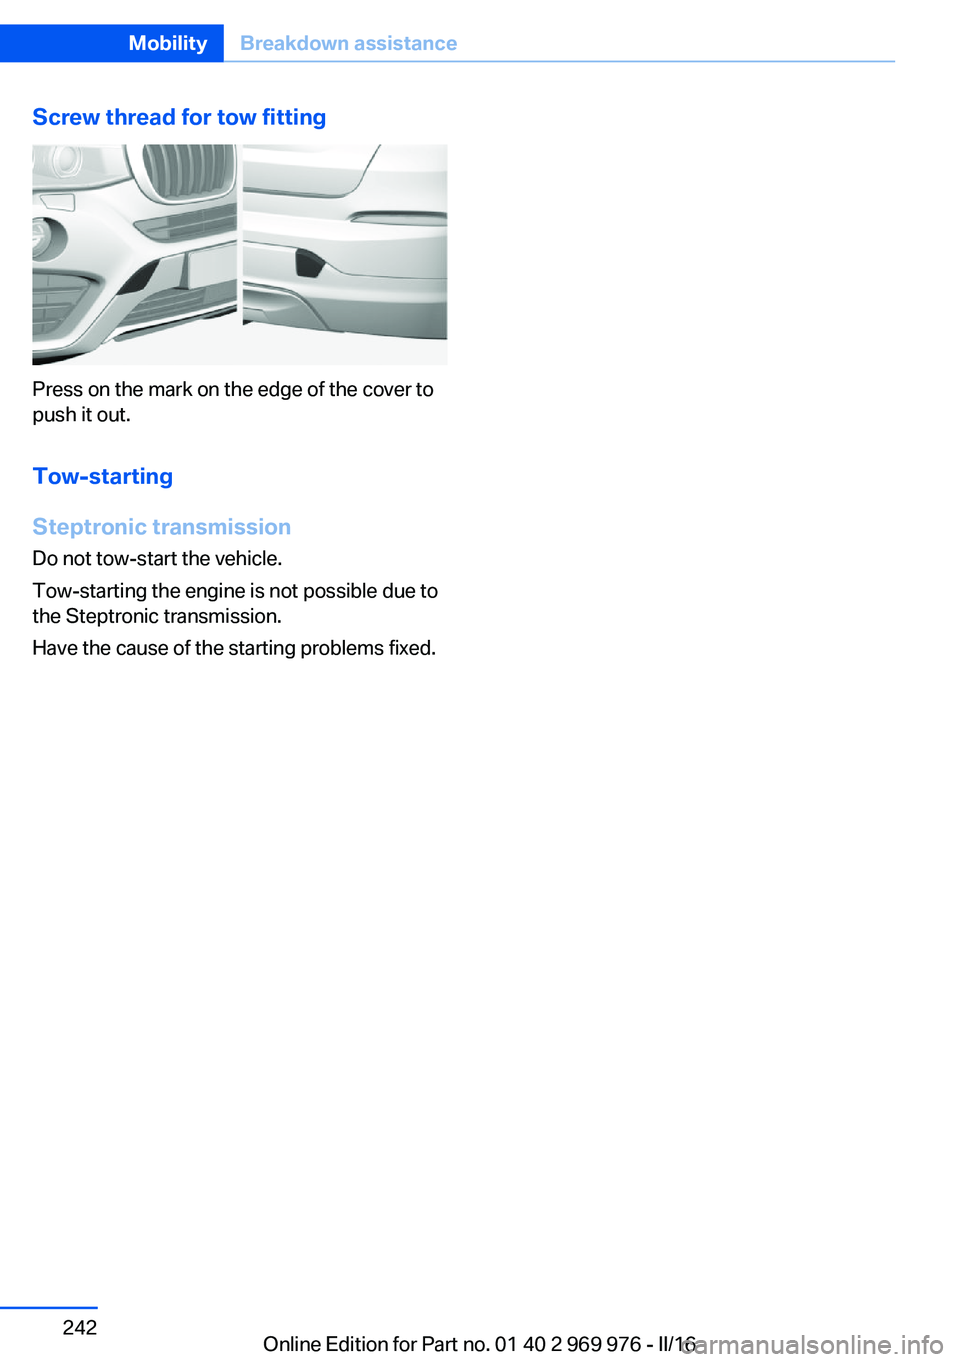
Screw thread for tow fitting
Press on the mark on the edge of the cover to
push it out.
Tow-starting
Steptronic transmission
Do not tow-start the vehicle.
Tow-starting the engine is not possible due to
the Steptronic transmission.
Have the cause of the starting problems fixed.
Seite 242MobilityBreakdown assistance242
Online Edition for Part no. 01 40 2 969 976 - II/16
Page 246 of 265

Safety belts
Dirty belt straps impede the reeling action and
thus have a negative impact on safety.
WARNING
Chemical cleansers can destroy the
safety belt webbing. Missing protective effect
of the safety belts. There is a risk of injury or
danger to life. Use only a mild soapy solution
for cleaning the safety belts.◀
Use only a mild soapy solution, with the safety
belts clipped into their buckles.
Do not allow the switchs to retract the safety
belts until they are dry.
Carpets and floor mats WARNING
Objects in the driver's floor area can limit
the pedal distance or block a depressed pedal.
There is risk of an accident. Stow objects in
the vehicle such that they are secured and
cannot enter into the driver's floor area. Use
floor mats that are suitable for the vehicle and
can be safely attached to the floor. Do not use
loose floor mats and do not layer several floor
mats. Make sure that there is sufficient clear‐
ance for the pedals. Ensure that the floor mats
are securely fastened again after they were re‐
moved, e.g., for cleaning.◀
Floor mats can be removed from the car's inte‐
rior for cleaning.
If the floor carpets are very dirty, clean with a
microfiber cloth and water or a textile cleaner.
To prevent matting of the carpet, rub back and
forth in the direction of travel only.
Sensor/camera lenses
To clean sensors and camera lenses, use a
cloth moistened with a small amount of glass
detergent.Displays/Screens/protective glass of
the Head-up Display
ATTENTION
Chemical cleansers, moisture or fluids of
any kind can damage the surface of displays
and screens. There is a risk of damage to prop‐
erty. Clean with a clean, antistatic microfiber
cloth.◀
ATTENTION
The surface of displays can be damaged
with improper cleaning. There is a risk of dam‐
age to property. Avoid pressure that is too high
and do not use any scratching materials.◀
Clean with a clean, antistatic microfiber cloth.
Head-up Display:
Clean the protective glass of the Head-up Dis‐
play using a microfiber cloth and commercially
available dish-washing soap.
Long-term vehicle storage
When the vehicle is shut down for longer than
three months, special measures must be
taken. Further information is available from a
dealer’s service center or another qualified
service center or repair shop.Seite 246MobilityCare246
Online Edition for Part no. 01 40 2 969 976 - II/16
Page 254 of 265

Everything from A to Z
IndexA ABS, Antilock Brake Sys‐ tem 129
ACC, Active Cruise Control with Stop&Go function 136
Acceleration Assistant, refer to Launch Control 82
Accessories and parts 8
Activated-charcoal filter 164
Active Blind Spot Detec‐ tion 126
Active Cruise Control with Stop&Go function,
ACC 136
Adaptive brake lights, see Brake force display 128
Adaptive Light Control 102
Additional information, iDrive 23
Additives, oil 222
Adjustments, seats/head re‐ straints 53
After washing vehicle 244
Airbags 105
Airbags, indicator/warning light 106
Air circulation, see Recircu‐ lated-air mode 160, 163
Air, dehumidifying, see Cool‐ ing function 160, 163
Air distribution, man‐ ual 161 , 164
Air flow, automatic climate control 161, 164
Air pressure, tires 205
Air vents, see Ventilation 165
Alarm system 47
Alarm, unintentional 48
All around the center con‐ sole 16 All around the roofliner 17
All around the steering wheel 14
All-season tires, see Winter tires 211
All-wheel-drive 131
Alternating-code hand-held transmitter 168
Alternative oil types 222
Ambient light 104
Antifreeze, washer fluid 78
Antilock Brake System, ABS 129
Anti-slip control, see DSC 129
App, BMW Driver’s Guide 6
Approved axle load 251
Armrest, see Center arm‐ rest 177
Arrival time 95
Ash tray 169
Assistance, Roadside Assis‐ tance 238
Assistance when driving off 135
Assist system, see Intelligent Safety 114
AUTO H button 73
AUTO H button, see Auto‐ matic Hold 73
AUTO intensity 163
Automatic car wash 243
Automatic climate con‐ trol 159
Automatic cruise control with Stop&Go function 136
Automatic Curb Monitor 61
Automatic deactivation, Front-seat passenger air‐
bags 107 Automatic headlamp con‐
trol 101
Automatic Hold 73
Automatic locking 46
Automatic recirculated-air control 163
Automatic tailgate 41
Automatic transmission, see Steptronic transmission 79
AUTO program, automatic cli‐ mate control 163
AUTO program, climate con‐ trol 160
AUTO program, intensity 163
Auto Start/Stop function 70
AUX-IN port, general informa‐ tion 171
Average fuel consumption 94
Average speed 94
Axle loads, weights 251
B Backrest curvature, see Lum‐ bar support 55
Backrest, width 56
Bad road trips 182
Band-aids, see First-aid kit 238
Battery replacement, vehicle battery 235
Battery replacement, vehicle remote control 35
Battery, vehicle 235
Being towed, see Tow-start‐ ing and towing 240
Belts, safety belts 56
Beverage holder, cup holder 177
Biodiesel 201
Blinds, sun protection 50 Seite 254ReferenceEverything from A to Z254
Online Edition for Part no. 01 40 2 969 976 - II/16